1
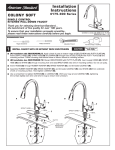
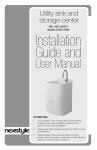
Utility sink,
faucet and cabinet
Installation Guide
and User Manual
Model: 80TH112WHI
ATTENTION
Your installation must comply with all local plumbing codes.
Have a qualified tradesman do or approve your plumbing installation.
Always wear safety goggles and gloves in order to avoid any personal injuries.
IMPORTANT
Carefully check the unit prior to installation to
ensure there is no damage. Do not dispose of any
packaging until you are satisfied with this product.
If you have any problems with this product or there
are missing or damaged parts, please call toll free
1-800-459-4409 (MONDAY–FRIDAY, 8:30 AM–5:00 PM EST).
DO NOT RETURN THE UNIT TO THE PLACE OF PURCHASE
BEFORE CALLING THE TOLL FREE NUMBER ABOVE.
BEFORE YOU START
1. Inspect your unit before proceeding. Check surface for any flaws or
damage. Once you unpack your unit check for dents, bends, bumps
or scuff marks. If any damage is noticed, do not install. Report
damage immediately.
2. Please read all the instructions carefully and keep for future
reference.
Your installation must comply with all local plumbing building codes.
Have a qualified tradesman do or approve your plumbing installation.
WARNING: Always wear safety goggles and gloves
in order to avoid any personal injuries.
CONTENTS
•
•
•
•
•
•
•
•
2
Utility sink x 1 pc
Cabinet x 1 pc
Strainer x 1 pc
Faucet assembly x 1 pc
Sprayer with hose x 1 pc
Door knobs x 2 pcs
Leveling legs x 4 pcs
Screws x 16 pcs
TOOLS REQUIRED
•
•
•
•
•
•
•
•
Phillips screwdriver
Adjustable wrench
Pliers
Pipe wrench
Plumbers putty / sealant
Hacksaw
Utility knife
Carpenters level
INSTALLATION INSTRUCTIONS
The user or a licensed plumber must install the faucet, strainer, drain
assembly, P-trap (not included), leveling legs, door handles and apply
sealant to secure the basin to the cabinet.
Before you Start
1. Remove all items from the packaging and check all parts are present.
2. Remove the protective foam wrapping from the acrylic basin
and the cabinet.
3. Place the basin on a soft protective surface.
Note: It is recommended that the faucet, sprayer and strainer
be assembled prior to placing the basin on the cabinet.
3
INSTALL leveling legs
1. Place cardboard or a towel on the floor and gently turn the unit on
it’s side to install the leveling legs.
2. On the bottom of the cabinet, you will see four locations for the legs.
3. Gently put each leg onto the right location. Using four screws per leg,
attach legs to the bottom of the cabinet.
4. Gently right the cabinet. CAUTION: Do not place side load on
the leveling legs when righting the cabinet as they
may break.
5. Using a carpenters level, turn the base of each leg until the cabinet
is completely level front to back and left to right.
Illustrations may vary from actual product
4
attach door handles
1. The cabinet ships with the door knobs attached to the inside
of the doors A. Remove the two short mounting screws with a
Phillips screwdriver to separate the door knobs from the doors.
2. Place the door knobs on the door fronts B and tighten short
mounting screws C.
ADJUST DOOR POSITION
If the doors need to be repositioned, the hinges can be adjusted
to ensure a precise fit with the cabinet.
D Lateral adjustment screw – adjusts the door left or right
E Horizontal adjustment screw – adjusts the door forward
or backward
F Vertical adjustment screw – adjusts the door up or down
5
Faucet and sprayer installation
Before installing faucet and sprayer, carefully unpack the faucet
and ensure no parts are missing (figure 1).
1
Faucet
Faucet shank
Faucet shank nut
Spray housing support
Nut
Sprayer and hose
Insert spray housing support through the pre-drilled hole on the sink
2
Spray housing
support
Nut
6
corner. Screw nut onto threads and hand tighten (figure 2).
Run spray hose down through the spray housing and up through the
centre faucet mounting hole. Connect spray hose to faucet and tighten
with a wrench (figure 3).
Install new faucet on sink with hot “H” to the left and cold “C” to the
right. From under the sink, thread mounting nuts onto faucet shanks
and tighten mounting nuts (figure 3).
3
Sprayer and hose
Faucet
Faucet
shank
Faucet
shank nut
The aerator is threaded on the outside to allow the attachment
of a hose, which is not included (figure 4).
4
7
STRAINER INSTALLATION
Apply a sealing ring of plumber’s putty to the underside
of strainer flange (figure 5).
5
Sealant
Insert the strainer body in the sink (figure 6).
6
Assemble the rubber gasket, friction washer and locknut onto the
strainer body from under the sink (figure 7).
7
Basket
Strainer body
Rubber gasket
Friction washer
Locknut
Hand tighten locknut. Do not over tighten locknut as it may split or
deform the body of the strainer.
8
BASIN INSTALLATION
Carefully place
a bead of sealant
all around the top
of the cabinet.
Ease the sink onto
the cabinet, and
ensure it is placed
evenly and centered
on the cabinet.
Wipe off any
excess sealant.
Use masking tape
to hold the basin
in place until the
sealant dries
(figure 8).
8
Sealant
PLACEMENT
Move the assembled unit to the final location. If required, level the unit
by adjusting the 4 leveling legs and ensure no rocking is exhibited.
SUPPLY LINE ASSEMBLY
The supply lines that attach the faucet to the household water system,
are not supplied with this unit. They need to be purchased separately.
Follow the supply line manufacturers instructions for proper installation.
CLEANING AND MAINTENANCE
To maintain the smooth, high gloss surface of your utility sink,
follow these tips:
• Use common household cleaners (non-abrasive) or a mild liquid dish
washing detergent. Rinse well and dry with a clean cloth.
• Do not allow your acrylic surface to come into contact with products
such as acetone (nail polish remover), nail polish, dry cleaning solution,
lacquer thinners, gasoline, pine oil, etc.
• Remove dust and dry dirt with a soft, damp cloth.
• Clean grease, oil, paint and ink stains with isopropyl (rubbing alcohol).
Immediately rinse with water after removal of stain.
• Avoid using razor blades or other sharp instruments that may
fall and scratch the surface.
9
REPLACEMENT PARTS
If you are missing or require replacement parts, please call customer
service at 1-800-459-4409 (Monday–Friday, 8:30 am–5:00 pm EST).
Identify the required part(s) and have the replacement part number
ready when you call.
10
Part Description
Part Number
Door knob
DOCP001
Hinge
DOCP002
Faucet shank nut
THsam001
Spray housing
support kit
THsam002
Sprayer
THsam003
Sprayer hose
THsam004
Faucet handle
THsam005
Faucet cartridge
THsam006
Threaded aerator
THsam007
Strainer assembly kit
LB9100
Strainer basket
LB9100
Your utility sink is warranted to the original purchaser to be free of
defects in material and workmanship for one (1) year from the date of
purchase. This warranty does not extend to commercial or institutional
use or installation.
Any failure of the unit that is not traceable to a defect in material or
workmanship is not covered by this warranty. These non-warrantable
items include, but are not limited to:
• Change in colour or finish due to chemical usage.
• The use of steel wool on surface.
• U
nit not properly installed in accordance
with manufacturers instructions.
• D
amage caused during shipping, handling or installation
(eg. dents, bumps, scratches).
• Care and maintenance guidelines not being followed.
• Any alterations to the unit.
• D
amage to the unit as a result of accidental impact, fire,
flood, freezing, normal wear.
• Bends and warpage caused by forced connections,
over-tightened fittings, inadequate support.
Quality Craft will not be held liable for any freight damage or damage
caused by leaks due to freight damage. Inspection prior to installation
is the responsibility of the installer, contractor or user. Quality Craft will
not be liable for failures or damage that could have been discovered
or avoided by proper inspection and testing. Quality Craft will not be
held liable for damages resulting from the improper fit or installation of
products not supplied by this company.
Quality Craft will not be held liable for loss of use of unit, inconvenience,
costs incurred for labour, materials, removal and installation of
replacement units or any other incidental or consequential damages.
Costs relating to obtaining access for repair or replacement are the
responsibility of the user. Under no circumstance shall Quality Craft or
any of its representatives be held liable for injury to any person
or damage to any property.
Quality Craft obligations shall be limited to the repair or replacement of a
unit (at our option) that may prove, by our sole examination, to be defective
under normal use and service during the warranty period. The company
may issue credit in the amount of the invoice value of the defective product
(or a percentage of it according to use) in lieu of repair or replacement.
Quality Craft warranty is non-transferable and shall be voided if the
unit is removed from its initial installation or if it is not installed following
the manufacturer’s specifications. This warranty shall not apply to
11
any product that has been subject to accident, alteration, misuse,
or abnormal chemical conditions. This warranty is made in lieu of all
other warranties expressed or implied. No other warranty, expressed
or implied, is assumed or will be assumed.
If a claimable defect occurs, please fill out a claim form through our
website at: www.qualitycraft.com or contact our customer service
department at 1-800-459-4409 (Monday–Friday, 8:30 am–5:00 pm EST).
Before you make your claim call, please make sure you have:
1. The model number of your product
2. Proof of sale
3. Details regarding the defect
4. Name and address of the owner and installer
Claims must be filled out in writing and returned within six (6) months
of appearance of defect. Failure to comply with this stipulation will
make the warranty null and void. We reserve the right to a thirty-day
(30) delay following receipt of claim in which to inspect the product.
We assume no responsibility for labor costs or removing/replacing a
previously installed product or transportation or return of a product.
Imported by
Laval, Quebec,
Canada H7S 2G7
www.qualitycraft.com
Made in China
12