1
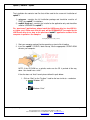
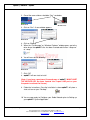
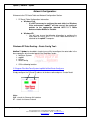
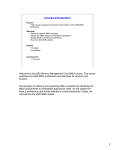
ZapMail v5.1 – Email to text Gateway
User Manual
Please contact us for further information
NeoTerra Systems Inc.
48 Centennial Road., Unit #7 Orangeville, Ontario L9W 3T4
+1 519 940 0088 / +1 519 940-8813
[email protected]
[email protected]
www.neoterra.ca
NeoTerra ™ and zapMail ™ are trademarks of NeoTerra Systems Inc.
MOTOROLA and the Stylized M Logo are registered in the US Patent & Trademark Office
All other product or service names are the property of their respective owners © Motorola Inc. 2009
zapMail by NeoTerra™ Systems
Table of Contents
SECTION 1 - Before You Start ......................................................................................4
Before you Start:..........................................................................................................5
Introduction:.................................................................................................................5
Before Installing the Software: .....................................................................................5
CAUTION!................................................................................................................5
NeoTerra™ Systems Contact information:...................................................................6
Installing zapMail™:......................................................................................................6
Minimum requirements:............................................................................................6
Additional requirements:...........................................................................................6
The MOTOTRBO™ Professional Digital Two-Way Radio System: ..............................9
Some value added inclusions within zapMail™: ........................................................9
SECTION 2 - Network Configuration..........................................................................10
Network Configuration: ..............................................................................................11
Windows XP Data Routing – Route Config Tool:....................................................11
Windows XP Data Routing – Normal IP Addresses: ...............................................12
Windows XP Data Routing – CAI IP Addresses: ....................................................12
Windows XP Data Routing – What is a Route Table? ............................................12
Windows XP Data Routing – Route Table Help:.....................................................13
Windows XP Data Routing – Simple Radio Setup: .................................................15
Windows XP Data Routing – Simple Radio Setup: .................................................15
SECTION 3 - Training Manual.....................................................................................16
System Set up: ..........................................................................................................17
The “Administration” TAB Setup:............................................................................18
The “Administration” TAB Setup (cont’d): ...............................................................19
The “TRBO Networks” TAB Setup:.........................................................................20
How to edit setup screen with tabular data: ............................................................21
The “Units” TAB Setup: ..........................................................................................22
The “Groups” TAB Setup:.......................................................................................23
The “Clients” TAB Setup: .......................................................................................24
The “Email 1” TAB Setup: ......................................................................................25
The “Email 2” TAB Setup: ......................................................................................26
The “Lone Worker” TAB Setup: ..............................................................................27
The “Variable” TAB Setup: .....................................................................................28
3rd Party Tab Setup: ...............................................................................................29
Save and EXIT: ......................................................................................................30
The “Server” Screen:..............................................................................................31
The “Messages” Screen: ........................................................................................32
The “EMail” Process Flow: .....................................................................................33
The “Variable” Process Flow: .................................................................................34
The “System” Screen: ............................................................................................35
The “Archive” Screen: ............................................................................................36
The “Variable” Screen: ...........................................................................................37
The “Lone Worker” Screen: ....................................................................................38
The “SNPP” Screen: ..............................................................................................39
The “TCP” Screen: .................................................................................................40
Filename: zapMail_Training_Manual.doc
Revised Date: 1/25/11
48 Centennial Road., Unit #7 Orangeville, Ontario. L9W 3T4
Tel: 1-519-940-0088 / Fax: 1-519-940-8813 – Email: [email protected]
www.neoterra.ca
Page 2 of 57
zapMail by NeoTerra™ Systems
The zapMail™ Client...................................................................................................41
zapMail™ Client Main Screen .................................................................................41
zapMail™ Client Message Detail Screen.................................................................42
zapMail™ Client New Message Screen...................................................................43
zapMail™ Client User Registration Screen..............................................................44
zapMail™ Alarms ....................................................................................................45
zapMail™ Client Setup Screen................................................................................46
Special Features..........................................................................................................47
zapMail™ Server ........................................................................................................47
zapMail™ Group “Reply to All” Setup ......................................................................47
zapMail™ Group “Reply to All” Diagram ..................................................................48
zapMail™ Client..........................................................................................................49
zapMail™ Call Alert Feature....................................................................................49
zapMail™ Call Alert Feature Setup..........................................................................50
Appendix A ..................................................................................................................51
How to set up email for use with zapMail™.................................................................51
Appendix B ..................................................................................................................53
Troubleshooting zapMail™ .........................................................................................53
Appendix C ..................................................................................................................54
Third-Party interface for zapMail ................................................................................54
Filename: zapMail_Training_Manual.doc
Revised Date: 1/25/11
48 Centennial Road., Unit #7 Orangeville, Ontario. L9W 3T4
Tel: 1-519-940-0088 / Fax: 1-519-940-8813 – Email: [email protected]
www.neoterra.ca
Page 3 of 57
zapMail by NeoTerra™ Systems
SECTION 1 - Before You Start
Filename: zapMail_Training_Manual.doc
Revised Date: 1/25/11
48 Centennial Road., Unit #7 Orangeville, Ontario. L9W 3T4
Tel: 1-519-940-0088 / Fax: 1-519-940-8813 – Email: [email protected]
www.neoterra.ca
Page 4 of 57
zapMail by NeoTerra™ Systems
Before you Start:
Introduction:
Thank you for purchasing zapMail™, an application designed by NeoTerra™ Systems for
the Motorola MOTOTRBO™ Professional Digital Two-Way Radio System, to permit the
user enhanced control capabilities. The application has been designed to accommodate
the safe tracking of fleet and similar fixed locations that use the MOTOTRBO product.
The application features a text to email gateway to allow text messages to be sent or
received via email over your Motorola MOTOTRBO radio system.
NeoTerra™ Systems has worked with the end users to streamline the application and
make it simple to install, easy to use and understand.
Before Installing the Software:
It is IMPORTANT to ensure that prior to configuring zapMail™; that your Computer route
table has been appropriately updated; so that the MOTOTRBO™ radio network can be
accessed.
Please refer to the “Network Configuration” portion of this guide.
The demonstration version of zapMail™ can be run as a stand alone, however, once
purchased will require a USB “Key” to work with and validate the licensing agreement.
This “Secure Key” will be supplied once the purchase has been approved.
CAUTION!
The purchased zapMail™ application is governed by a licence agreement that
INCLUDES a USB license dongle, that compounds the security of the application for
your exclusive use. This USB device is a Serialized Key that handshakes with your
zapMail™ application to validate its licensing parameters and contains information that
verifies these parameters which relates to the features purchased.
This USB “key” MUST be inserted into a usable USB port on the Computer and left in
place at all times, while the purchased application is in use.
Failure to do so or removal of the key at any time will result in the termination of the
zapMail™ application.
It is IMPERATIVE that the USB Secure Key be protected and secured at all times. In the
event of loss or damage a replacement key can ONLY be purchased from NeoTerra™
Systems.
Filename: zapMail_Training_Manual.doc
Revised Date: 1/25/11
48 Centennial Road., Unit #7 Orangeville, Ontario. L9W 3T4
Tel: 1-519-940-0088 / Fax: 1-519-940-8813 – Email: [email protected]
www.neoterra.ca
Page 5 of 57
zapMail by NeoTerra™ Systems
NeoTerra™
NeoTerra Systems Contact information:
NeoTerra™ Systems Inc:
48 Centennial Road
Unit #7
Orangeville, Ontario.
Canada.
L9W3T4
[email protected]
[email protected]
Business Number:
Facsimile Number:
+1-519-940-0088
+1-519-940-8813
(Please use the process within your Country to allow for direct dialling.)
For your convenience you may wish to try: http://www.countrycallingcodes.com/
For more information on NeoTerra™ Systems please visit: www.neoterra.ca
Installing zapMail™:
Minimum requirements:
A Microsoft Windows Platform - Windows Vista or Windows XP Home/Professional.
.
•
•
•
•
•
•
•
•
2 GHz Dual-Core 32-bit (x86) or 64-bit (x64) processor
For Windows XP 2 GB of system memory
For Windows Vista 3 GB of system memory (Need Vista 64 bit OS for the system
to see >3 GB of RAM in the system)
160 GB hard drive with at least 15 GB of available space (Minimum)
Dual monitor card (Recommended)
Audio Output
Local Area Network with IP Platform support
Internet access for remote support
Additional requirements:
Actual requirements and product functionality may vary based on your system
configuration.
Filename: zapMail_Training_Manual.doc
Revised Date: 1/25/11
48 Centennial Road., Unit #7 Orangeville, Ontario. L9W 3T4
Tel: 1-519-940-0088 / Fax: 1-519-940-8813 – Email: [email protected]
www.neoterra.ca
Page 6 of 57
zapMail by NeoTerra™ Systems
The installation disc contains two files that will be used for the successful installation of
zapMail™.
1) setup.exe – contains the full installation package and should be used for all
FIRST time zapMail™ installations.
2) zapMail Setup.msi – contains the installer for the application only and should be
used for UPGRADES to zapMail™
For “purchased” applications, please install the USB Secure Key in a free USB 2.0,
or higher, port. Please note that this port will be PERMANENTLY occupied by the
USB Secure Key for as long as the purchased zapMail™ application resides in the
computer in question. See sample:>
Security Key (May not be exactly as shown)
1. Start your computer and wait for the operating system to finish loading.
2. Insert the zapMail™ CD/DVD, label-side up, into the appropriate CD/DVD-ROM
drive on your computer.
NOTE: If the CD-ROM has a spindle, make sure the CD is pushed all the way
down. You should hear a “click”.
If the disc does not “Auto” launch please follow this path below:
1. Click on “Start” on the “Taskbar”. Look for the icon similar to – see below:
a.
Windows “XP”
b.
Filename: zapMail_Training_Manual.doc
Windows “Vista”
Revised Date: 1/25/11
48 Centennial Road., Unit #7 Orangeville, Ontario. L9W 3T4
Tel: 1-519-940-0088 / Fax: 1-519-940-8813 – Email: [email protected]
www.neoterra.ca
Page 7 of 57
zapMail by NeoTerra™ Systems
2. One of the menu choices should be “Run” see below:
Windows XP
Windows Vista
3. Click on “Run”. A new window appears.
Windows XP
Windows Vista
4. Click on “Browse”
5. When the “File Manager” or “Windows Explorer” window opens, go to the
drive where the zapMail™ disc has been inserted and click on “setup.exe”
or “setup”.
6. You will now see the following:
Windows XP
Windows Vista
7. Click “OK”
8. zapMail™ will now start to install.
(Note: If you have a purchased, licensed copy of zapMail™ MAKE SURE
THE SECURE KEY has been inserted into a spare USB port on your
Computer to activate the license.)
9. Follow the instructions. Once the installation is done zapMail™ will place a
short cut icon on your “Desktop”.
zapMail
10. You are now ready to Configure your Radio Network prior to Setting up
your zapMail™ System Application.
Filename: zapMail_Training_Manual.doc
Revised Date: 1/25/11
48 Centennial Road., Unit #7 Orangeville, Ontario. L9W 3T4
Tel: 1-519-940-0088 / Fax: 1-519-940-8813 – Email: [email protected]
www.neoterra.ca
Page 8 of 57
zapMail by NeoTerra™ Systems
The MOTOTRBO™ Professional Digital Two-Way Radio System:
Some interesting “points” to remember about the MOTOTRBO™ Professional
Digital Two-Way Radio
The Mobile radio has 5 terminal inputs and the Portable unit has 3 terminal
inputs for use in telemetry.
NeoTerra™ Systems has taken advantage of these terminals to accommodate various
tasks that are efficiently controlled by the zapMail™ application.
Some value added inclusions within zapMail™:
zapMail™ has some embedded assistance within the application:
1. Built-in archiving reporting tool.
2. Bundled drivers in Quick start, which includes Motorola drivers using
Ethernet over USB.
There is 1 Protocol that zapMail™ uses with MOTOTRBO™ devices:
1. ARS (Automatic Registration Service) – Advises of devices that come online and go off-line.
Filename: zapMail_Training_Manual.doc
Revised Date: 1/25/11
48 Centennial Road., Unit #7 Orangeville, Ontario. L9W 3T4
Tel: 1-519-940-0088 / Fax: 1-519-940-8813 – Email: [email protected]
www.neoterra.ca
Page 9 of 57
zapMail by NeoTerra™ Systems
SECTION 2 - Network Configuration
Filename: zapMail_Training_Manual.doc
Revised Date: 1/25/11
48 Centennial Road., Unit #7 Orangeville, Ontario. L9W 3T4
Tel: 1-519-940-0088 / Fax: 1-519-940-8813 – Email: [email protected]
www.neoterra.ca
Page 10 of 57
zapMail by NeoTerra™ Systems
Network Configuration:
Welcome to the PC Route Table and Network Configuration Section.
1. PC Route Table Configuration Information:
a. Windows Vista
i. It is NOT necessary to configure the route table in a Windows
Vista environment. zapMail™ will take care of the routing of
packets to the appropriate attached MOTOTRBO™ Radio
devices whether Mobile or Portable.
b. Windows XP:
i. You will have to use the following information to configure the
route table for EACH MOTOTRBO™ Base Radio device which is
attached to the zapMail™ computer.
Windows XP Data Routing – Route Config Tool:
NeoTerra™ Systems has bundled a simple to use utility to configure the route table in the
base computer, which can be found in the Start Menu under:
NeoTerra Systems
zapMail
Utilities
Route Config
OR the following location:
C:\Program Files\NeoTerra Systems\zapMail\utilities\Route Config.exe
Simply configure the CAI and IP address of the base radio and press ‘Create Route’
Note:
CAI - stands for Common Air Interface.
IP - stands for Internet Protocol
Filename: zapMail_Training_Manual.doc
Revised Date: 1/25/11
48 Centennial Road., Unit #7 Orangeville, Ontario. L9W 3T4
Tel: 1-519-940-0088 / Fax: 1-519-940-8813 – Email: [email protected]
www.neoterra.ca
Page 11 of 57
zapMail by NeoTerra™ Systems
Windows XP Data Routing – USB Driver:
USB Driver installed on any PC that needs to communicate with MOTOTRBO™
Radio.
Drivers are bundled in the zapMail™ distribution
Once connected, installed and configured correctly, MOTOTRBO™ Radio acts like
a network interface.
DO NOT INSTALL CPS ON EVERY MACHINE!
Windows XP Data Routing – Normal IP Addresses:
Radio leases its Accessory IP to the PC (not the other way around)
Accessory IP = Radio IP + 1
If more than 1 radio is connected to a PC make sure Radio IP’s are unique!
These IP’s automatically get added to the PCs route table
Windows XP Data Routing – CAI IP Addresses:
Each radio has dual identity – Normal IP and CAI IP
CAI Network is first byte of CAI IP and last 3 bytes are the Radio ID
CAI IP’s are NOT automatically added to the PCs route table and need to be
added manually
Windows XP Data Routing – What is a Route Table?
Controls which interface IP data is sent to.
Composed of
Netmask
Network Destination
Interface
Gateway
Metric
Default Gateway
Take target IP, apply Netmask, look for match in Network Destination and send
out that Interface
Gateway is ‘next hop’
Metric is tie breaker – lower number or ‘cost’ wins
If all else fails, send it out the Default Gateway
Filename: zapMail_Training_Manual.doc
Revised Date: 1/25/11
48 Centennial Road., Unit #7 Orangeville, Ontario. L9W 3T4
Tel: 1-519-940-0088 / Fax: 1-519-940-8813 – Email: [email protected]
www.neoterra.ca
Page 12 of 57
zapMail by NeoTerra™ Systems
Windows XP Data Routing – Route Table Help:
If you wish to obtain some HELP about the Data Routing Table, there are two ways you
can accomplish this:
Accessing the Command Prompt in Windows XP;
1. Click on “Start” on the “Taskbar”. Look for the icon similar to – see below:
Windows “XP”
2. One of the menu choices should be “Run” see below:
Windows XP
3. Click on “Run”. A new window appears.
Windows XP
4. In the BLANK area, to the right of the word “Open:” type “cmd” and hit
ENTER;
Windows XP
5. Click “OK”
6. A new window will launch:
Flashing “prompt” “_”
Filename: zapMail_Training_Manual.doc
Revised Date: 1/25/11
48 Centennial Road., Unit #7 Orangeville, Ontario. L9W 3T4
Tel: 1-519-940-0088 / Fax: 1-519-940-8813 – Email: [email protected]
www.neoterra.ca
Page 13 of 57
zapMail by NeoTerra™ Systems
7. At the flashing “prompt” “_” type in the
following information “route print” and then hit
ENTER, to see the Route Table displayed on
the Screen. See example below:
Drag the Scroll bar with your
mouse to see more data
8. To get HELP on the “route”
command you can type “route?” at
the flashing “prompt” and hit
ENTER. Please make sure there is
a “space” between the word “route”
and the “?” The various words or
“syntaxes” that can be used after the
word “route” will be displayed. If you
cannot see the entire information
use “expand” the “cmd” window
using your mouse or use the right
hand “scroll bar” to move the data
up and down the screen. See data
example below:
9. Once you have the
information you need to
type “EXIT” at the
flashing “prompt” and
the “cmd” window will
close after you hit
ENTER.
Filename: zapMail_Training_Manual.doc
Revised Date: 1/25/11
48 Centennial Road., Unit #7 Orangeville, Ontario. L9W 3T4
Tel: 1-519-940-0088 / Fax: 1-519-940-8813 – Email: [email protected]
www.neoterra.ca
Page 14 of 57
zapMail by NeoTerra™ Systems
Windows XP Data Routing – Simple Radio Setup:
Normal IP entry will automatically get populated in the PCs route table (PC1 shown
above):
Network
Destination
192.168.10.0
Netmask
255.255.255.0
Gateway
192.168.10.1
Interface
192.168.10.2
Metric
50
This entry only works for applications like the Customer Programming Software (CPS).
For use over the air as a generic UDP/IP data pipe additional route table entries need to
be manually added for the CAI IP address.
Windows XP Data Routing – Simple Radio Setup:
Using the information on “Page 12”, access the Command (cmd) Prompt window
From a Command Prompt window on Windows XP, the command to create a manual
route table entry for Radio CAI IP’s on PC1 would be:
C:\>route add 12.0.0.0 mask 255.0.0.0 192.168.10.1 metric 50 –p
And then for additional radios
C:\>route add 12.0.0.0 mask 255.0.0.0 192.168.20.1 metric 50 –p
C:\>route add 12.0.0.0 mask 255.0.0.0 192.168.30.1 metric 50 –p
C:\>route add 12.0.0.0 mask 255.0.0.0 192.168.40.1 metric 50 –p
Filename: zapMail_Training_Manual.doc
Revised Date: 1/25/11
48 Centennial Road., Unit #7 Orangeville, Ontario. L9W 3T4
Tel: 1-519-940-0088 / Fax: 1-519-940-8813 – Email: [email protected]
www.neoterra.ca
Page 15 of 57
zapMail by NeoTerra™ Systems
SECTION 3 - Training Manual
Filename: zapMail_Training_Manual.doc
Revised Date: 1/25/11
48 Centennial Road., Unit #7 Orangeville, Ontario. L9W 3T4
Tel: 1-519-940-0088 / Fax: 1-519-940-8813 – Email: [email protected]
www.neoterra.ca
Page 16 of 57
zapMail by NeoTerra™ Systems
System Set up:
Now that you have configured your radio network it’s time to set up the zapMail™
application.
On your computer “Desktop” locate the short cut zapMail™ icon:>
Double-click the icon to launch the zapMail™ application.
The following screen will open:
Main Menu Bar
Log in window
The following window will launch:
The default System Password is
LOWER case “pw”.
Click “OK”.
Place your mouse over the “Setup” icon
in the “Main menu” and click to open the
“Setup” window.
On successful completion, go through each
TAB in the SETUP window and configure the
required parameters.
The following tabs are available:
1.
2.
3.
4.
5.
Admin
TRBO Networks
Units
Groups
Clients
Filename: zapMail_Training_Manual.doc
6.
7.
8.
9.
10.
Email1
Email2
Lone Worker
Variable
3rd Party
Revised Date: 1/25/11
48 Centennial Road., Unit #7 Orangeville, Ontario. L9W 3T4
Tel: 1-519-940-0088 / Fax: 1-519-940-8813 – Email: [email protected]
www.neoterra.ca
Page 17 of 57
zapMail by NeoTerra™ Systems
The “Administration” TAB Setup:
Note: In order to edit any settings, the “Edit Values” checkbox must be checked!
1. General Options:
a. System Type – Choose Conventional or trunking (Capacity Plus). If trunking is
selected, an additional 4 voice radios become available for use under the “TRBO
Networks tab” and for display on the Main “Server” tab of the application.
b. Own ID - This is the ID of the base radio that will be connected to the computer
to route emails to/from the radio.
c. System Password - The system password to access this screen (default is
“pw”).
d. ARS Interval - This is the interval at which Automatic Registration will occur (in
multiples of 30 minutes).
e. Store Aging – This configures how long zapMail™ will try to send a given email
to a unit before giving up and deleting the message.
f.
Retry Cycle – This is how often zapMail™ checks to see if there is any mail
queued up.
g. Process – This will allow the user to choose between Email & Variable modes.
Most all installations are “Email” unless the customer is integrating zapMail with
the Starwood Guest/Response system, in which case, variable should be
chosen. For more information on the two modes, see pages 27, & 31-32.
Filename: zapMail_Training_Manual.doc
Revised Date: 1/25/11
48 Centennial Road., Unit #7 Orangeville, Ontario. L9W 3T4
Tel: 1-519-940-0088 / Fax: 1-519-940-8813 – Email: [email protected]
www.neoterra.ca
Page 18 of 57
zapMail by NeoTerra™ Systems
The “Administration” TAB Setup (cont’d):
h. Process – This determines how zapMail™ will respond to and send emails.
Below is a description of each mode.
Email Mode: In this mode, the administrator sets up several aliases or,
optionally, does not set up any email addresses at all for the domain forcing all
“unknown” emails to go into a catch-all account. Email addresses for each radio
are of the form [email protected], where x is the unit number (radio unit #) and y
is the unit or group number. Where y = 1, it refers to a unit number. Where y =
2, it refers to a group number. Where y = 4, it refers to a dispatch call.
Variable Mode: This mode is very similar to the “Email Mode” description above
except that there is another layer added that runs in parallel. The way this mode
works is that a message will come in against a fixed email domain. This address
is temporarily assigned an ID that will be used to contact the remote radio since
every message sent over the host system will have a different email address,
even if coming from the same dispatch center! The temporary ID assigned and
recorded in the Variable database is removed once the aging limit configured by
the administrator has elapsed or a user-definable CLEAR message is sent in
reply to a dispatch message from the portable/mobile.
i.
Receipts – Checking “to radio” enables “not read” receipts to be sent to the radio
for any message sent by the radio to an email/radio. Checking “to email” enables
“read” & “not read” receipts to be sent via email for any message sent to/from a
radio. “Not read” receipt messages will only be sent when the store aging
interval elapses for any given message.
j.
Call alert with message – This allows the radio to sound an audible alert
continuously on receiving a message until the user reads the message or until
the message expires through aging.
Filename: zapMail_Training_Manual.doc
Revised Date: 1/25/11
48 Centennial Road., Unit #7 Orangeville, Ontario. L9W 3T4
Tel: 1-519-940-0088 / Fax: 1-519-940-8813 – Email: [email protected]
www.neoterra.ca
Page 19 of 57
zapMail by NeoTerra™ Systems
The “TRBO Networks” TAB Setup:
There are two modes this screen displays. If the server is in conventional mode, the
screen displays as below.
2. Network Settings:
a. Server Interface - This is the address of the zapMail™ server.
b. Server Port – The port the server will listen on for clients to connect.
c. Network CAI - This is the CAI for the radio network
d. CAI Group – This is the CAI group
e. TMS Port - The port assignment for Text Message Service messages
f.
TLM Port - The port assignment for Telemetry messages
g. ARS Port - The port assignment for Automatic Reporting System messages
h. Voice Interface 1 to 4 – These options only appear when in “trunking” mode and
are for the voice side of a trunked capacity plus repeater system.
i.
Revert 1 to 16 – The radios that are part of the zapMail text messaging system
are put in here.
Filename: zapMail_Training_Manual.doc
Revised Date: 1/25/11
48 Centennial Road., Unit #7 Orangeville, Ontario. L9W 3T4
Tel: 1-519-940-0088 / Fax: 1-519-940-8813 – Email: [email protected]
www.neoterra.ca
Page 20 of 57
zapMail by NeoTerra™ Systems
How to edit setup screen with tabular data:
This page shows how to edit and save data on setup screens where tabular data exists.
The method of modification is the same in every screen with tabular data.
ADDING DATA:
Click the “ADD” Tab to add some data to the tab in question.
Enter the details
Click the ADD button again to save changes.
EDITING or DELETING:
Editing and deleting data is accomplished in very much the same was as adding it. To
start an edit or delete, click on “Edit/Delete” tab, then, by double-clicking on the row
header (area in the orange box). The data will then appear in the edit controls for
modification or deletion. To save any changes when editing, click the “EDIT” button
again. To delete the record permanently, click the “DELETE” button.
Area to Double-Click
Filename: zapMail_Training_Manual.doc
Revised Date: 1/25/11
48 Centennial Road., Unit #7 Orangeville, Ontario. L9W 3T4
Tel: 1-519-940-0088 / Fax: 1-519-940-8813 – Email: [email protected]
www.neoterra.ca
Page 21 of 57
zapMail by NeoTerra™ Systems
The “Units” TAB Setup:
This screen allows definition of any hand-held and mobile units the user has out in the
field.
UNITS Tab Settings:
Name – Enter a descriptive name for the unit.
Unit ID – Corresponds to the actual unit ID programmed into a subscriber radio.
Group – The partition group the unit belongs to (could be A, B, C, D), and
provides a way to section off visibility of whole groups of units
Filename: zapMail_Training_Manual.doc
Revised Date: 1/25/11
48 Centennial Road., Unit #7 Orangeville, Ontario. L9W 3T4
Tel: 1-519-940-0088 / Fax: 1-519-940-8813 – Email: [email protected]
www.neoterra.ca
Page 22 of 57
zapMail by NeoTerra™ Systems
The “Groups” TAB Setup:
This screen defines any groups that any given individual subscriber unit can belong to.
Groups Tab Settings:
Name – Enter a descriptive name for the group.
Group ID – Corresponds to the actual Group ID programmed into a subscriber
radio.
Dispatch ID – Entering a non-zero value here will define reply-to-all functionality.
See pg. 44 for more details.
Subject Text – In subject Mode, this field is used to enter text which will be
compared to the subject line of the incoming email.
Filename: zapMail_Training_Manual.doc
Revised Date: 1/25/11
48 Centennial Road., Unit #7 Orangeville, Ontario. L9W 3T4
Tel: 1-519-940-0088 / Fax: 1-519-940-8813 – Email: [email protected]
www.neoterra.ca
Page 23 of 57
zapMail by NeoTerra™ Systems
The “Clients” TAB Setup:
This tab defines client logins to allow connection to the zapMail™ server.
Clients Tab Settings:
Dispatch ID – Enter the dispatch ID (Client ID) for the client. These can also be
programmed into the radio as a “Dispatch Call” to allow a radio subscriber to
initiate a message to a given dispatcher.
Enter a descriptive name for the client.
Note: It is important to segregate between groupID’s, unitID’s, and client DispatchID’s
using different blocks of numbers as setup can get quite confusing otherwise. For
example, Group ID’s from 100-199, Unit ID’s from 1-99, Dispatch ID’s from 500-599, etc.
Filename: zapMail_Training_Manual.doc
Revised Date: 1/25/11
48 Centennial Road., Unit #7 Orangeville, Ontario. L9W 3T4
Tel: 1-519-940-0088 / Fax: 1-519-940-8813 – Email: [email protected]
www.neoterra.ca
Page 24 of 57
zapMail by NeoTerra™ Systems
The “Email 1” TAB Setup:
1. GENERAL:
The email address defined here is the one used when sending email from out of
zapMail™.
2. HEARTBEAT:
Controls in this area define whether or not the status of the base station radios
(connected to zapMail™) will send an email on whether they are online or offline.
3. Test Emails:
Emails that will be sent in test will be sent out this address.
4. POP and SMTP Set up:
Enter the appropriate POP and SMTP Server information to allow the successful
execution of the email alerts. Use the “Test” button to verify mail server connectivity. A
new addition is support for SSL and TLS secure socket connections for both incoming
and outgoing servers.
The “STORE and FORWARD” Function:
This functionality is an INBOX/OUTBOX feature that uses a “store and forward” function,
storing data when messages are sent from your Workstation (PC) to the Mobile unit prior
to sending it to it’s destination.
STEP 1: Using the POP and SMTP set up it goes through a 2 stage validation process
by checking the Radio’s ID in the “To” address, then the “From” address to verify
authorization from the list. If the Email is validated successfully the information goes into
the “Store and Forward” function and follows through by executing the TASK.
STEP 2: From the Mobile’s port to the zapMail™ workstation the incoming
data/information goes to an OUTBOX and uses the SMTP server to Execute the TASK.
Filename: zapMail_Training_Manual.doc
Revised Date: 1/25/11
48 Centennial Road., Unit #7 Orangeville, Ontario. L9W 3T4
Tel: 1-519-940-0088 / Fax: 1-519-940-8813 – Email: [email protected]
www.neoterra.ca
Page 25 of 57
zapMail by NeoTerra™ Systems
The “Email 2” TAB Setup:
Entries in this tab act like a spam filter. Any person that tries to email an individual unit,
group, or dispatcher from an address that is NOT in this list will unceremoniously get
discarded.
Email2 Tab Settings:
Unit ID – This is setup as a dispatch call in the radio and really should be called
an EmailID since this has nothing to do with a radio Unit ID.
Type in the Email address:
Example: “[email protected]”
Filename: zapMail_Training_Manual.doc
Revised Date: 1/25/11
48 Centennial Road., Unit #7 Orangeville, Ontario. L9W 3T4
Tel: 1-519-940-0088 / Fax: 1-519-940-8813 – Email: [email protected]
www.neoterra.ca
Page 26 of 57
zapMail by NeoTerra™ Systems
The “Lone Worker” TAB Setup:
This screen defines the lone worker interval and the various status messages that go
along with it.
Lone Worker Tab Settings:
Reset – The text to use to reset the contact interval timer for the unit in question.
This is sent when the radio acknowledges within the timeout period.
Contact Alert – This is the text used when the contact interval timer period
elapses without contact from any given unit.
Contact Restored – This is the text used when contact with the monitored unit is
restored.
Contact Interval – Defines the amount of time (in minutes) that a monitored unit
has to respond by without triggering the lone worker alarm.
Enable Emergency and Lone Worker – Checking this off will enable the
emergency and lone worker features of zapMail.
To – This is the email address to send lone worker and emergency messages to.
Filename: zapMail_Training_Manual.doc
Revised Date: 1/25/11
48 Centennial Road., Unit #7 Orangeville, Ontario. L9W 3T4
Tel: 1-519-940-0088 / Fax: 1-519-940-8813 – Email: [email protected]
www.neoterra.ca
Page 27 of 57
zapMail by NeoTerra™ Systems
The “Variable” TAB Setup:
1. Variable Setup:
Valid email FROM domain: Enter the domain that zapMail™ will use to separate valid
emails from invalid ones when messages go into the queue for sending to remote units.
MIN Dispatch call range: Defines the lower limit of randomly assigned email addresses
for those setups that utilize a variable email system.
MAX Dispatch call range: Defines the upper limit of randomly assigned email
addresses for those setups that utilize a variable email system.
2. Alias Clear Method:
This area defines how long a message will stay visible in the variable email list of
messages. A message can either timeout in x days settable by the user, be cleared by
sending a CLEAR message defined in the radio, or both of these methods can be used
for those types of systems where messages must be cleared away after being
acknowledged (for service-based systems eg: Trouble ticket system).
Note: See pg 31 for a flowchart on how elements of this screen work when zapMail™ is
setup in the variable email format.
Filename: zapMail_Training_Manual.doc
Revised Date: 1/25/11
48 Centennial Road., Unit #7 Orangeville, Ontario. L9W 3T4
Tel: 1-519-940-0088 / Fax: 1-519-940-8813 – Email: [email protected]
www.neoterra.ca
Page 28 of 57
zapMail by NeoTerra™ Systems
3rd Party Tab Setup:
This screen allows setup of SCADA or alarm system inputs via RS232, SNPP, or TCP/IP
protocols.
Mode
•
None – No 3rd party outputs/inputs are used.
•
RS232 – Enables RS232 (COM) port for use as an input from a SCADA or alarm
system.
•
SNPP – Enables Simple Network Paging Protocol (SNPP) for us with zapMail™.
•
TCP/IP – Enables TCP/IP mode for communication to external software vendors.
SNPP Port – This is the port that zapMail uses to listen for incoming data from
an SNPP data source.
TCP Port – This is the port that zapMail™ uses to send and receive data from a
3rd party application.
Note: The SNPP string that needs to be sent to zapMail™ has the following format
(without the quotes): “<STX>UnitID,Subject,Body<ETX>”, where <STX> is ASCII
character 2, and <ETX> is ASCII character 3.
Filename: zapMail_Training_Manual.doc
Revised Date: 1/25/11
48 Centennial Road., Unit #7 Orangeville, Ontario. L9W 3T4
Tel: 1-519-940-0088 / Fax: 1-519-940-8813 – Email: [email protected]
www.neoterra.ca
Page 29 of 57
zapMail by NeoTerra™ Systems
Save and EXIT:
On completion of the System Set up click on “Save and Exit” in the top left hand corner
of the “Setup” window to ensure all your data and changes that were recorded have
been secured and saved.
Filename: zapMail_Training_Manual.doc
Revised Date: 1/25/11
48 Centennial Road., Unit #7 Orangeville, Ontario. L9W 3T4
Tel: 1-519-940-0088 / Fax: 1-519-940-8813 – Email: [email protected]
www.neoterra.ca
Page 30 of 57
zapMail by NeoTerra™ Systems
The “Server” Screen:
This is the main area in zapMail™ for the display of the online or offline status of the base
station radios and also for the display of zapMail™ client connections to the server.
Filename: zapMail_Training_Manual.doc
Revised Date: 1/25/11
48 Centennial Road., Unit #7 Orangeville, Ontario. L9W 3T4
Tel: 1-519-940-0088 / Fax: 1-519-940-8813 – Email: [email protected]
www.neoterra.ca
Page 31 of 57
zapMail by NeoTerra™ Systems
The “Messages” Screen:
This is the main area in zapMail™ for the display of sent and received messages. There
are two different ways the inbox & outbox can behave, depending on the user setup of
the application for the “Process” setting (under the “Admin” tab in setup). The two main
modes are “Email” and “Variable”. Below is a description of the two modes.
Filename: zapMail_Training_Manual.doc
Revised Date: 1/25/11
48 Centennial Road., Unit #7 Orangeville, Ontario. L9W 3T4
Tel: 1-519-940-0088 / Fax: 1-519-940-8813 – Email: [email protected]
www.neoterra.ca
Page 32 of 57
zapMail by NeoTerra™ Systems
The “EMail” Process Flow:
There are two main ways that messages can be handled into/out of zapMail™. The
email process is outlined below. The email process functions as an email validation and
forwarding account, passing messages to and from radios via an email client.
Filename: zapMail_Training_Manual.doc
Revised Date: 1/25/11
48 Centennial Road., Unit #7 Orangeville, Ontario. L9W 3T4
Tel: 1-519-940-0088 / Fax: 1-519-940-8813 – Email: [email protected]
www.neoterra.ca
Page 33 of 57
zapMail by NeoTerra™ Systems
The “Variable” Process Flow:
The variable process functions as an email validation and forwarding account, passing
messages to and from radios via an email client. The only difference between this
process method and the “Email” process method is that there is another layer that
provides additional abstraction of any given email address so that it can function on the
in a system with a variable radio system assigned messaging address.
Filename: zapMail_Training_Manual.doc
Revised Date: 1/25/11
48 Centennial Road., Unit #7 Orangeville, Ontario. L9W 3T4
Tel: 1-519-940-0088 / Fax: 1-519-940-8813 – Email: [email protected]
www.neoterra.ca
Page 34 of 57
zapMail by NeoTerra™ Systems
The “System” Screen:
This screen shows system traffic, units & mobile status (whether they are on or offline).
There is also a status bar that shows (from left to right) the total incoming & outgoing
messages since starting zapMail™ (for the session), saved in & out message totals,
number of invalid messages deleted, zapMail™ clients connected, and number of
zapMail™ client messages queued.
A Radio Check can also be performed now on this screen (XCMP check).
Filename: zapMail_Training_Manual.doc
Revised Date: 1/25/11
48 Centennial Road., Unit #7 Orangeville, Ontario. L9W 3T4
Tel: 1-519-940-0088 / Fax: 1-519-940-8813 – Email: [email protected]
www.neoterra.ca
Page 35 of 57
zapMail by NeoTerra™ Systems
The “Archive” Screen:
This is the main area in zapMail™ showing the history for sent and received messages.
Simply click on “Open New” and then select the current archive file to display data for.
Filename: zapMail_Training_Manual.doc
Revised Date: 1/25/11
48 Centennial Road., Unit #7 Orangeville, Ontario. L9W 3T4
Tel: 1-519-940-0088 / Fax: 1-519-940-8813 – Email: [email protected]
www.neoterra.ca
Page 36 of 57
zapMail by NeoTerra™ Systems
The “Variable” Screen:
This is the tab that will show email history for any mail that goes out of zapMail™ when it
is configured to use the variable email process. This tab is only visible when zapMail™ is
configured to use the variable email process.
Filename: zapMail_Training_Manual.doc
Revised Date: 1/25/11
48 Centennial Road., Unit #7 Orangeville, Ontario. L9W 3T4
Tel: 1-519-940-0088 / Fax: 1-519-940-8813 – Email: [email protected]
www.neoterra.ca
Page 37 of 57
zapMail by NeoTerra™ Systems
The “Lone Worker” Screen:
This screen shows a list of monitored subscriber units. If the defined interval passes
(eg: 15 minutes), then zapMail will go into an alarm, sending an email that will show
email history for any mail that goes out of zapMail™ when it is configured to use the
variable email process. This tab is only visible when zapMail™ is configured to use the
variable email process.
Filename: zapMail_Training_Manual.doc
Revised Date: 1/25/11
48 Centennial Road., Unit #7 Orangeville, Ontario. L9W 3T4
Tel: 1-519-940-0088 / Fax: 1-519-940-8813 – Email: [email protected]
www.neoterra.ca
Page 38 of 57
zapMail by NeoTerra™ Systems
The “SNPP” Screen:
This screen shows any incoming data when the 3rd Party mode is set for SNPP.
Filename: zapMail_Training_Manual.doc
Revised Date: 1/25/11
48 Centennial Road., Unit #7 Orangeville, Ontario. L9W 3T4
Tel: 1-519-940-0088 / Fax: 1-519-940-8813 – Email: [email protected]
www.neoterra.ca
Page 39 of 57
zapMail by NeoTerra™ Systems
The “TCP” Screen:
This screen shows any incoming data when the 3rd Party mode is set for TCP/IP.
Filename: zapMail_Training_Manual.doc
Revised Date: 1/25/11
48 Centennial Road., Unit #7 Orangeville, Ontario. L9W 3T4
Tel: 1-519-940-0088 / Fax: 1-519-940-8813 – Email: [email protected]
www.neoterra.ca
Page 40 of 57
zapMail by NeoTerra™ Systems
The zapMail™
zapMail Client
zapMail™
zapMail Client Main Screen
The zapMail™ Client application is a text and instant messaging gateway for the
zapMail™ server application. It handles messaging to and from other zapMail™ clients,
mobile and portable groups, mobile and portable units or any combination thereof. The
client makes it easy for dispatchers to be in physically different locations or for those
handling several different zones all in the same room to communicate between their
peers even when they are busy talking on a radio.
The main window functions in a similar way to traditional email clients. Items in BOLD
are unread messages addressed to the client. Double-clicking a message or selecting
one and clicking the “View” button will open up the message text for the selected
message.
Filename: zapMail_Training_Manual.doc
Revised Date: 1/25/11
48 Centennial Road., Unit #7 Orangeville, Ontario. L9W 3T4
Tel: 1-519-940-0088 / Fax: 1-519-940-8813 – Email: [email protected]
www.neoterra.ca
Page 41 of 57
zapMail by NeoTerra™ Systems
zapMail™
zapMail Client Message Detail Screen
Clicking on New or Reply will call up the send new message form. If clicking “Reply”, the
recipient will be automatically supplied for you.
Filename: zapMail_Training_Manual.doc
Revised Date: 1/25/11
48 Centennial Road., Unit #7 Orangeville, Ontario. L9W 3T4
Tel: 1-519-940-0088 / Fax: 1-519-940-8813 – Email: [email protected]
www.neoterra.ca
Page 42 of 57
zapMail by NeoTerra™ Systems
zapMail™
zapMail Client New Message Screen
Clicking on New or Reply will call up the send new message form. If clicking “Reply”, the
recipient will be automatically added in the “To” list.
The screen below shows a test message with varied types of recipients (units, groups,
and to zapMail™ clients).
Filename: zapMail_Training_Manual.doc
Revised Date: 1/25/11
48 Centennial Road., Unit #7 Orangeville, Ontario. L9W 3T4
Tel: 1-519-940-0088 / Fax: 1-519-940-8813 – Email: [email protected]
www.neoterra.ca
Page 43 of 57
zapMail by NeoTerra™ Systems
zapMail™
zapMail Client User Registration Screen
This screen shows the mobile and portable units registered with the zapMail™ server
showing the name associated with the unitID, date/time of last update, status, and base
radio system last assigned.
Filename: zapMail_Training_Manual.doc
Revised Date: 1/25/11
48 Centennial Road., Unit #7 Orangeville, Ontario. L9W 3T4
Tel: 1-519-940-0088 / Fax: 1-519-940-8813 – Email: [email protected]
www.neoterra.ca
Page 44 of 57
zapMail by NeoTerra™ Systems
zapMail™
zapMail Alarms
When an emergency alarm or lone-worker alarm goes off, an alarm bell graphic and
sound will be generated on the client. To dismiss the sound, double-click on the alarm
bell graphic (which will also dismiss the graphic). To bring a radio into or out of lone
worker monitoring, simply double-click the first gray column in the row corresponding to
the unit you want to change the status on. In the lone-worker status, the operator will
have time to prevent an alarm from popping up on the client as there is a 1 minute prewarning where the radio will make noise every few seconds.
Filename: zapMail_Training_Manual.doc
Revised Date: 1/25/11
48 Centennial Road., Unit #7 Orangeville, Ontario. L9W 3T4
Tel: 1-519-940-0088 / Fax: 1-519-940-8813 – Email: [email protected]
www.neoterra.ca
Page 45 of 57
zapMail by NeoTerra™ Systems
zapMail™
zapMail Client Setup Screen
Setting up zapMail™ is very simple. There are only 4 fields to worry about. Password
(defaults to “pw”), Host Name which is the IP or machine name of the zapMail™ Server,
the port zapMail™ is configured to support for connecting clients, and the Dispatch ID of
the client (must correspond to a Dispatch ID under the Clients tab in zapMail™ Server
setup).
Filename: zapMail_Training_Manual.doc
Revised Date: 1/25/11
48 Centennial Road., Unit #7 Orangeville, Ontario. L9W 3T4
Tel: 1-519-940-0088 / Fax: 1-519-940-8813 – Email: [email protected]
www.neoterra.ca
Page 46 of 57
zapMail by NeoTerra™ Systems
Special Features
zapMail™ Server
zapMail™
zapMail Group “Reply to All” Setup
zapMail™ can be set up to allow a reply-to option to a dispatch call ID. This is handy
when someone wants to send a message that will be visible to all mobiles and portables
in a group. To make this option work, you need to define a Group ID and a valid
Dispatch ID to go with it. Then, make sure both the GroupID and Dispatch ID’s are
defined in the radios as well as with the zapMail™ server.
In the example below, when someone sends a message to the Dispatch ID (7325000),
zapMail™ will check the database of Groups to make sure a record exists for the passed
in Dispatch ID and if it does, grab the Group ID associated with it (7326000). Then, it
will put the message into the queue addressed FROM the Dispatch ID (7325000) TO the
Group ID (7326000).
Filename: zapMail_Training_Manual.doc
Revised Date: 1/25/11
48 Centennial Road., Unit #7 Orangeville, Ontario. L9W 3T4
Tel: 1-519-940-0088 / Fax: 1-519-940-8813 – Email: [email protected]
www.neoterra.ca
Page 47 of 57
zapMail by NeoTerra™ Systems
zapMail™
zapMail Group “Reply to All” Diagram
Filename: zapMail_Training_Manual.doc
Revised Date: 1/25/11
48 Centennial Road., Unit #7 Orangeville, Ontario. L9W 3T4
Tel: 1-519-940-0088 / Fax: 1-519-940-8813 – Email: [email protected]
www.neoterra.ca
Page 48 of 57
zapMail by NeoTerra™ Systems
zapMail™ Client
zapMail™
zapMail Call Alert Feature
There are also special messages that can be passed back and forth by users of the
system. The main one is #CALL ALERT which will cause the zapMail™ client screen to
pop up (if minimized) on the desktop and alert the operator via a chime sound that there
is a unit wishing to talk to them.
Filename: zapMail_Training_Manual.doc
Revised Date: 1/25/11
48 Centennial Road., Unit #7 Orangeville, Ontario. L9W 3T4
Tel: 1-519-940-0088 / Fax: 1-519-940-8813 – Email: [email protected]
www.neoterra.ca
Page 49 of 57
zapMail by NeoTerra™ Systems
zapMail™
zapMail Call Alert Feature Setup
To be able to use the call alert feature, you must first make sure that you have defined a
text message (with the exact spelling and spacing minus the double-quotes)
“#CALL ALERT”. The two illustrations below should help you get the proper settings
flashed into your radio.
Add text message
“#CALL ALERT” to pre-defined
messages list
Change or add an entry for
a button to use the
“#CALL ALERT” message.
Filename: zapMail_Training_Manual.doc
Revised Date: 1/25/11
48 Centennial Road., Unit #7 Orangeville, Ontario. L9W 3T4
Tel: 1-519-940-0088 / Fax: 1-519-940-8813 – Email: [email protected]
www.neoterra.ca
Page 50 of 57
zapMail by NeoTerra™ Systems
Appendix A
How to set up email for use with zapMail™
There are three ways you can create an email account for use with zapMail™. You can
either create a catch-all email account (limit of 1 per domain), forward any mail from a
catch-all email account to a new email account on an existing domain, or create aliases
to an existing domain email account.
If using aliases, then you will have to create a new email box on a domain (Eg. domain
is: xyz.com). Then, you create aliases attached to the new email box created so that any
mail addressed to the domain will not get dumped by the server. For example: the
customer wants you to use non catch-all account [email protected] as the email box for
zapMail™. You have portable unit ID’s 200 & 201 defined in your MOTO system. You
will need to define aliases [email protected], [email protected] and assign them to mailbox
[email protected] to be able to send mail to/from zapMail™.
Another option that is open to the customer is to create another email address and set
an existing/monitored catch-all account to forward all mail received to a new email
address on an existing domain. In this way, all mail destined for an already
defined/monitored catch-all account, will be echoed to the new one as well (Eg:
[email protected] forwarding turned on for email address [email protected] with local
copy enabled). When forwarding, it is important to make sure that you check off that
you want to retain a local copy in the catch-all account if it is monitored by the
customers IT department. Otherwise, any mail that winds up in [email protected] will
be forwarded off to [email protected] and then deleted thereafter!
To create a Catch-All account, follow the steps as outlined below (Note: You do not have
to choose netfirms as your domain hosting provider, it can be any domain host provider
with Catch-All support). The customer can choose to either use their existing domain or
create a new one for the applications use (it is up to them).
Note: It is important that the email address used in the Email1 tab in zapMail™ NOT be
using an email account shared by others as zapMail™ auto-deletes the mail as soon as it
grabs it down from the POP server (also defined in the Email1 tab)!
Filename: zapMail_Training_Manual.doc
Revised Date: 1/25/11
48 Centennial Road., Unit #7 Orangeville, Ontario. L9W 3T4
Tel: 1-519-940-0088 / Fax: 1-519-940-8813 – Email: [email protected]
www.neoterra.ca
Page 51 of 57
zapMail by NeoTerra™ Systems
The following steps are required when signing up for a domain hosting account (actual
steps may vary).
•
Choose a domain hosting company
Go to a hosting site of the customers’ choice Eg: www.godaddy.com and sign
up for a basic hosting account.
•
Pick a basic hosting plan
•
Choose a domain name
Choose a domain name to use for the email alias or catch-all to set up. The
hosting site should tell you whether or not the name search and/or registration
was successful or not.
•
Check-Out and Confirm Personal & Payment Details
Usually your hosting choices will be shown to you before you commit to the
domain purchase. Proceed to the checkout to give your particulars to the host of
choice, choose a password, and enter payment details.
•
Login to your new hosting account
The next step is to sign-in to the hosted domain that was just set up. Login with
the name and password you chose in prior steps to add an email address.
•
Create a new email address on your domain account
The hosting provider of choice must either provide support for email aliases or
catch-all accounts to be compatible with zapMail™. Create an email account to
be used by zapMail™.
•
Make the email account a “Catch-All” or assign aliases
One other thing to be aware of is that even though you are able to get in and
create an email address immediately after successful domain hosting sign-up, it
may take anywhere from 24-72 hours for the new email address to be recognized
as the new email server pointer (MX record) propagates across the internet DNS
servers.
Filename: zapMail_Training_Manual.doc
Revised Date: 1/25/11
48 Centennial Road., Unit #7 Orangeville, Ontario. L9W 3T4
Tel: 1-519-940-0088 / Fax: 1-519-940-8813 – Email: [email protected]
www.neoterra.ca
Page 52 of 57
zapMail by NeoTerra™ Systems
Appendix B
Troubleshooting zapMail™
There are a number of locations that you should be aware of that can help you to
troubleshoot zapMail™ when you are encountering difficulties.
The default application installation folder for zapMail™ is C:\Program Files\NeoTerra
Systems\zapMail Server. This default installation path from here on will be referred to as
%AppRoot%.
List of file and folder locations for zapMail™ Server:
%AppRoot%\Archive Contains MSAccess databases that are sectioned off monthly to
allow certain reports to run from the application.
%AppRoot%\Data
Contains the databases that make the application work. Among
the most important are the Units and the message store
database (units.mdb and store.mdb respectively). These
databases are copied over from %AppRoot% if the user deletes
the corresponding data file in this location due to corruption or
other cause.
%AppRoot%\Logs
Contains recycled (messages deleted from invalid email
addresses) message logs and TMS acknowledgement logs.
There are currently 6 different types of messages that can be
visible in the recycled message logs, from A-G. They are defined
as follows:
A
B
Email Process
Variable Process
%AppRoot%\Utilities
Invalid target type (not .1 or .2)
Incoming user not authorized (Invalid from address)
Invalid target type (Exists in email XLation table therefore follows
C
Email Process)
D
Invalid target type (Not exist in XLation table but domain good)
E
Error obtaining variable temp ID (Temp ID overflow)
F
Email not found in XLation table or invalid domain.
G
Prefix on incoming email non-numeric.
H
Unit or Group does not exist
Subject Text does not exist in groups table.
I
Contains the IP Converter and Route Config utilities
List of file and folder locations for zapMail™ Client:
%AppRoot%\Data
Contains the data files MESSAGES.MDB which stores any
messages sent to/from the zapMail™ client. This database is
copied over from %AppRoot% if the user deletes the
corresponding data file in this location due to corruption or other
cause.
%AppRoot%\Sounds Contains a sound file for use when the client receives a CALL
ALERT type call.
%AppRoot%\XML
This folder contains 3 XML files that define how the zapMail™
Client behaves.
Filename: zapMail_Training_Manual.doc
Revised Date: 1/25/11
48 Centennial Road., Unit #7 Orangeville, Ontario. L9W 3T4
Tel: 1-519-940-0088 / Fax: 1-519-940-8813 – Email: [email protected]
www.neoterra.ca
Page 53 of 57
zapMail by NeoTerra™ Systems
Appendix C
Third-Party interface for zapMail
zapMail now has a third-party protocol that can be used by other programs. All that
would be needed is for the customer to create a TCP/IP socket on the port specified in
the zapMail setup screen (3rd party tab) to parse out and send/receive message to/from
the zapMail Server application.
zapMail TCP Protocol V1.05
zapMail™ will operate as a server for a 3rd party to connect via a TCP/IP socket on
a user-designated port.
The 3rd party application will make a full time connection to zapMail.
Only one client connection at a time will be permitted by the server.
The 3rd party application will send a layer 7 keep alive message to zapMail every
1 second.
All messages will be wrapped in STX....ETX ascii codes
Delimiters within the messages will be ascii 31
All messages will have a KEYWORD as defined below to define the function to
be performed
All messages in the server to client direction will be queued and sent after a
PING from the client
The client and the server will timeout the TCP/IP connection if no layer 7 traffic is
received with 5 seconds. The client will initiate a reconnection proceedure upon
startup and after a layer 7 timeout or layer 3 disconnection.
Filename: zapMail_Training_Manual.doc
Revised Date: 1/25/11
48 Centennial Road., Unit #7 Orangeville, Ontario. L9W 3T4
Tel: 1-519-940-0088 / Fax: 1-519-940-8813 – Email: [email protected]
www.neoterra.ca
Page 54 of 57
zapMail by NeoTerra™ Systems
Message fields
messageID – unique ID for each message. Any reply to a message will include
the messageID
messageType – used to indicate a Private or Group message (P or G)
targetID – the Mototrbo ID of the target radio or group in the range of 1 16776415
message – the body of the alarm message. This is limited to 140 characters
including a CR/LF if a subject line is included.
Success – to indicate status of message cancellation request
Error code – server to client indication of an error – ID start at 100 and
increment by 1
Message structure
STXKEYWORD,Message dataETX
Filename: zapMail_Training_Manual.doc
Revised Date: 1/25/11
48 Centennial Road., Unit #7 Orangeville, Ontario. L9W 3T4
Tel: 1-519-940-0088 / Fax: 1-519-940-8813 – Email: [email protected]
www.neoterra.ca
Page 55 of 57
zapMail by NeoTerra™ Systems
Keywords
The examples below imply that the message is wrapped in STX/ETX codes
Word – PNG
Direction – client to server
Description – layer 7 keep alive message
Structure – PNG
Example – PNG
Possible responses – PNG – this will be sent back to the client to reset the layer
7 timeout timer.
Note – this message will be sent every 1 second by the client, and the PNG
reponse from the server shall be immediate. Either side of the connection should
disconnect after 5 seconds with no layer 7 traffic.
Word - MSG
Direction – client to server
Description - used to indicate a new message to be sent
Structure – MSG,messageType,targetID,messageID,message
Example – MSG,P,6,12345,Stamping Machine Alarm
Possible responses – STS
Note – if the radio is not ONLINE then the message will not be queued for
transmission. 3rd party application should escalate the message on receipt of
OFFLINE or EXPIRED STS message.
Word - STS
Direction – server to client
Description - use to indicate on/off line status of a radio
Structure – STS,targetID,messageID,Status
Example – STS,6,12345,ON or OFF or EXPIRED
Possible responses – none
Word - ACK
Direction – server to client
Description - used to indicate that the radio got the message
Structure – ACK,targetID,messageID
Example – ACK,6,12345
Possible responses – none
Filename: zapMail_Training_Manual.doc
Revised Date: 1/25/11
48 Centennial Road., Unit #7 Orangeville, Ontario. L9W 3T4
Tel: 1-519-940-0088 / Fax: 1-519-940-8813 – Email: [email protected]
www.neoterra.ca
Page 56 of 57
zapMail by NeoTerra™ Systems
Word – REP
Direction – server to client
Description - used to send the radio operators reply to a message
Structure – REP,targetID,messageID,Message
Example – REP,6,12345,Clear
Possible responses – none
Word - CNL
Direction – client to server
Description - used to cancel a message
Structure – CNL,messageType,targetID,messageID,message
Example – CNL,P,6,12345,Stamping Machine Alarm
Possible responses – CNA
Word - CNA
Direction – server to client
Description - used to ack or nack a CNL
Structure – CNA,messageType,targetID,messageID,success
Example – CNA,P,6,12345,ACK or NACK
Possible responses – None
Word - ERR
Direction – server to client
Description - used to report an error
Structure – ERR,error code
Example – ERR,100
Possible responses – None
Error codes
100 – Radio ID not valid
101 – Group ID not valid
102 – system error (zapMail or radio system not operating correctly)
Filename: zapMail_Training_Manual.doc
Revised Date: 1/25/11
48 Centennial Road., Unit #7 Orangeville, Ontario. L9W 3T4
Tel: 1-519-940-0088 / Fax: 1-519-940-8813 – Email: [email protected]
www.neoterra.ca
Page 57 of 57