1
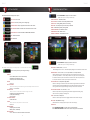
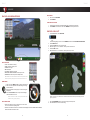
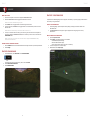
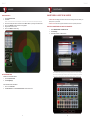
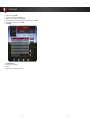
by TRUGOLF
USER MANUAL
E6GOLF
TRUGOLF
GETTING STARTED
CONDITIONS AND SETTINGS
Select CONDITIONS to specify the course conditions.
The E6GOLF Main Menu displays seven options:
NOTE: Select any button to change its default setting.
PLAY GOLF: Start a round
PRACTICE: Go to the practice green or driving range
CONTEST MODES: Set up Longest Drive and Closest to Pin contests
LOAD ROUND: Resume a Saved Round or Recover Round after a crash
CONFIGURATION: Contains OPTIONS, CONDITIONS, SETTINGS
INFO: Product Information
TERRAIN PENALTY - Enabled, disabled
PIN POSITIONS - 6 Postitions for each Easy, Medium or Hard
TIME OF DAY - Morning, Midday, Afternoon or Evening
WEATHER - Clear, Partly Cloudy, Overcast, Rainy or Random
WIND - No Wind, Breezy, Windy or Strong Wind
GREEN HARDNESS - Soft, Moderate or Hard
GREEN SPEED - Slow, Medium or Fast
FAIRWAY HARDNESS - Soft, Moderate or Hard
EXIT: Exit E6Golf
Select SETTINGS to specify play options for the round.
NOTE: Select any button to change its default setting.
IMPORTANT: Before playing a round (Play Golf), it is recommended to first check
Click or touch any button to cycle through its settings:
CAMERA
• Classic Mode (camera does not follow the ball)
• Ball Mode (camera follows the ball)
• TV Mode (camera shows different views)
SOUND
• On or Off
AUTO CONTINUE
NOTE: This is the length of time before the game automatically continues after a shot.
• Off, 3, 5, 7 or 10 seconds
TRACER STYLE
NOTE: A tracer is a colored line that shows the flight of the ball.
• Solid (tracers stay permanently visible)
• Comet (tracers fade away)
• Off (no tracers)
TOP VIEW TRACERS
• Solid or No Tracer
FLYBYS
NOTE: These are aerial previews of each new hole.
• On or Off
MEASUREMENT
• Imperial (yards, feet, inches)
• Metric (meters, centimeters)
SESSION TIMER
• Use +/- buttons to set hours and minutes for the session
5
MULLIGANS - Unlimited, None, 1, 2, 5 or 10
NOTE: Mulligans are “do-overs” – rehit without penalty. Mulligans are not allowed in “official” rounds.
GIMMIE RANGE - Putt Out, 2 feet, 4, 6, 8, 10, Player Enters #, or Computer Enters #
NOTE: Gimmie Range is the distance within which you automatically hole out with a oneputt. With “Player Enters #”, once the Player’s ball is on the green, s/he can manually enter
the estimated number of putts s/he would need to finish the hole; with “Computer Enters #”,
the computer selects the number of putts required to finish the hole.
PUTTING ARROW - Off, Play Break or Align Break
NOTE: The Putting Arrow shows the break and elevation changes between the ball and the
hole. RED indicates downhill, GREEN indicates uphill. Play Break aligns the Player to the
hole, regardless of break; Align Break aligns the Player in the direction of the break.
PUTTING ARROW FADE - Off, 3 seconds, 5, 7 or 10
NOTE: This specifies how long the Putting Arrow will be displayed before fading away.
Select Off to always display the Putting Arrow.
GRID - Off, On Green, or Always On
NOTE: The Grid overlays the terrain to highlight undulations and elevation changes.
BALL SIZE - Small, Medium or Large
NOTE: Ball Size is for display purposes only and does not affect play.
ELEVATION
Select COURSE ELEVATION to play the course at its actual elevation.
Select SELECT ELEVATION and then move the slider to change the course elevation.
6
E6GOLF
TRUGOLF
4
STARTING A NEW ROUND
1
2
STARTING A NEW ROUND
Select HOLES to choose any combination of holes to play from the chosen course.
From the opening screen, select PLAY GOLF.
Select PLAYERS.
NOTE: This is automatically selected when the screen first appears.
A. Select to Enter a PLAYER NAME.
B. Select the desired TEE.
NOTE: The tee boxes are: Championship, Pro, Amateur, Junior and Ladies.
C. Select BOOST if you want to adjust the average club distance for Player 1. Move the red
arrow slider to the right to increase or to the left to decrease the power boost. Select the
Checkmark button to save the change, the X button to cancel, or the green button to reset.
D. Select HANDICAP to enter your handicap and factor it into the scoring for the round.
IMPORTANT: DO NOT enter a handicap if you don’t want to factor it into the scoring!
A. HOLES CURRENTLY SELECTED - A red box indicates which hole(s) will be played and in which order.
B. HOLES AVAILABLE - Will add hole to next available spot in Holes Currently Selected window.
C. ALL 18 - Override Holes Currently Selected and play all 18 holes in the correct order.
D. FRONT 9 - Override Holes Currently Selected and play ONLY the front 9 from the chosen course.
E. BACK 9 - Override Holes Currently Selected and play ONLY the back 9 from the chosen course.
F. REMOVE - Removes the last hole from Holes Currently Selected window.
G. CLEAR - Clears ALL Holes Currently Selected.
5
Select MODES to choose the mode of play for the round.
6
Select START to begin the round.
NOTE: Stroke is the standard mode of play. Scroll through the list to select a different MODE.
A description is displayed of the currently selected MODE.
E. Select HANDED to switch between right and left-handed.
F. Select the –/+ buttons to change the number of golfers to play in the round.
3
Select COURSES to display a list of all available golf courses.
Scroll through the list to highlight
the course you want to play.
NOTE: Select Scorecard to see
the course’s official scorecard.
7
8
E6GOLF
TRUGOLF
PLAYING A ROUND
ON SCREEN INTERFACE
E6 MENU contains the following:
ROUND MENU: Make changes to the Round settings
•Mulligan: If available, undo the last shot.
•Replay: Show a replay of the last shot.
•Score Card: Display the score card for the current round.
•Fly By: Show a fly by of the current hole.
•Next Hole: Advance ALL players to the next hole; all players receive a set score
based on the mode of play.
•Grid: On or Off
•Spot Pin: Close-up view of pin location
•More: More Round Settings
»»In-round Practice: Enter Practice Mode while in-round
»»Mode of Play Rules: Displays rules for current Mode
»»Save Round: Save the current Round
»»Exit Current Round: Exit Round
»»Back: Return to the E6 Menu
PLAYER MENU: Make changes to the Player Settings
INFORMATION BOX
1. Course Name
2. Hole Number
3. Par
4. Distance from the ball to the pin
5. Player Name
6. Scoring
7. Shot Number
8. Difference in Elevation between the ball and the pin
9. Next Player to Hit
QUICK BUTTONS - To access these features, touch/click the indicated area
•Drop: Drop the ball.
•Pick Up: Advance the current player to the next hole and receive a set score
based on the mode of play.
•Concede: Concede the hole.
NOTE: This option is only available in certain modes of play, such as Match Play.
•Boost: Boost your hitting power.
•Skip Options:
»»Skip Player Once: Skip the current Player one time.
»»Skip Player Till End of Hole: Allow all other Players to finish the hole before the current
Player hits again.
»»Skip Player Till End of Order: Allow all other Players to hit before the current Player.
»»Skip Team Once: Same as Skip Player Once (above) in a Team mode of play.
»»Skip Team Till End of Hole: See above.
»»Back: Return to the E6 Menu.
•More: More Player Menu settings.
»»Add: Add a new Player to the group.
»»Remove: Remove a Player from the group.
»»Replace: Change one of the Players (Name and/or Settings).
»»Back: Return to the E6 Menu.
OPTIONS MENU: Make other changes
•Camera Mode:
»»Classic
»»Ball
»»TV Mode
•Sound: On or Off
•Auto Continue: The length of time before the game automatically continues after
a shot (3,5,7 or 10 seconds)
•Main view Tracers: Solid, Comet, or Off
•Top view Tracers: Solid or No Tracer
•Auto Fly by: These are aerial previews of each new hole. Select On or Off
•Measurement: Imperial or Metric
1. View Scorecard
2. Drop Down Player List
3. Spot Pin
9
10
E6GOLF
TRUGOLF
PLAYING A ROUND
SWING ANALYSIS: POST SHOT
SWING ANALYSIS: POST SHOT
SETTINGS MENU: Make changes to Settings
After a shot, a variety of options are displayed:
•Gimmies: Select the number of gimmies.
•Putt Arrow: Select Off, Play Break, Align Break
•Putt Arrow Fade: This is the length of time the Putt Arrow is on screen (3,5,7, or 10 seconds)
•Grid: Select On Green, Always On, Always Off
•Ball Size: Select Small, Medium, or Large
•Elevation: Select Course Elevation to play the course at its actual elevation or Select Elevation
and move the slider.
CONDITIONS MENU: Make changes to the Conditions
•Green Speeds: Select Slow, Medium, or Fast
•Greens Hardness: Select Soft, Moderate, or Hard
•Fairways Hardness: Select Soft, Moderate, or Hard
•Terrain Penalty: Enable or Disable
Note: The Terrain Penalty feature allows you to turn the affects of taller grass on your ball ON or OFF
•Weather: Select Clear, Partly Cloudy, Overcast, Rainy, or Random
•Wind: Select No, Breezy, Windy, Strong Wind
NOTE: Wind Speed and Wind Direction can both be specified in more detail in Practice.
•Time of Day: Change the time of day. This will dramatically change the lighting on the course.
CLOSE BUTTON: Press Close to take you back to the round.
AIMING YOUR SHOT
You are automatically aimed at either the center of the fairway or the pin, whichever is appropriate. To adjust the
direction you are aimed:
1. Click or touch the terrain either on the course or in the Top View window to display the red and white striped Aim Marker.
2. Drag the Aim Marker to where you want to aim.
3. Select the CHECKMARK button.
4. To cancel the alignment choice, select CANCEL (X).
•CONTINUE: Accept the shot and continue.
NOTE: By default, if the ball is in play, CONTINUE is automatically selected after five
seconds. To change this setting go to Options Menu (see OPTIONS MENU page 8).
•MULLIGAN: If available, select to rehit without penalty.
•PENALTY REHIT: If available, select to rehit with a penalty.
NOTE: This is available only after the ball is hit out of play. The errant shot counts for one
stroke and there is a one-stroke penalty.
•PICKUP: Advance to the next hole and receive a set score dependent on the mode of play.
•DROP: If available, drop the ball in the best allowable location.
NOTE: This is available only after the ball is hit out of play and only if there is an acceptable
drop location. The errant shot counts for one stroke and there is a one-stroke penalty.
Toogles view between
tees & green
•REPLAYS:
»» TV: Show a replay of the shot from several different views.
»» Ball Cam: Show a replay following the ball flight.
»» Forward: Show a replay from the golfer’s perspective.
»» Reverse: Show a replay from where the ball came to rest.
NOTE: To reset the aim toward the pin or center of the fairway, display the Aim Marker and
then select the Flag button.
11
12
E6GOLF
TRUGOLF
PRACTICE
SHOT REPLAY
PRACTICE: ON SCREEN INTERFACE
1. Click or touch the E6 MENU.
2. Select REPLAY.
CLEAR SHOT STATISTICS
1. Click the arrow at the bottom of the Shot Statistics box to open the drop-down menu.
2. Select RESET to clear all shots –OR– select REMOVE to clear only the last shot.
PRACTICE: CHIP & PUTT
1. From the Main Menu, select PRACTICE.
2.
3.
4.
5.
6.
–OR–
From the Driving Range, click or touch the E6 MENU, and then select CHOOSE PRACTICE AREA.
Select CHIP & PUTT.
Select the FLAG button in the top right corner.
Move the Flag icon to – or click/touch – where you want the hole to be.
Select the BALL button.
Move the Ball icon to – or click/touch – where you want to putt from.
SHOT STATISTICS
•
•
•
•
•
•
•
TOTAL: Total distance of shot(s)
CARRY: Distance of shot(s) in air
LAUNCH: Shot angle
MPH: Ball speed
TO TARGET: Distance from target
DEVIATION ANGLE/DISTANCE: Consistency of shots
DISPERSION: Tracks the spread of multiple shots.
IMPORTANT: The Shot Statistics Box also has a drop-down menu
which is opened by clicking the arrow at the bottom of the box. >>
WIND GAUGE
1. Click or touch the WIND GAUGE to adjust the wind settings.
2. Click or touch the perimeter of the Wind Gauge to change
the wind direction.
3. Drag the attachment on the right up or down to change the
wind speed.
4. Select the Checkmark button to accept the new settings;
select the X button to cancel.
NOTE: The wind can ONLY be adjusted in PRACTICE,
and NOT during regular golf play.
SHOT PROFILE VIEW
• Select a color button to have your shot(s) leave a tracer of that
color. This is useful for comparing shots.
• Select the arrow buttons to increase or decrease the area displayed in the TOP VIEW & SHOT PROFILE;
select the double arrow button to reset.
13
NOTE: The distance and difference in elevation between the ball and the pin are displayed in the
upper right corner.
7. Click the CHECKMARK button to accept the settings and start practice.
8. Click the X button to return to the last setting.
14
E6GOLF
TRUGOLF
PRACTICE
READ CHIP OR PUTT
PRACTICE: THE SCORING ZONE
1. Click or touch anywhere on the terrain to display the AIM MARKER & GRID.
2. Move the AIM MARKER & GRID to highlight the undulations of the terrain.
NOTE: Red indicates a downhill break, green uphill.
1.
2.
Click the BALL button to toggle between an elevated and ground level view.
In the elevated view, click FLAG button to toggle between a view from behind the pin and a view from
behind the ball.
NOTE: While in the elevated view you can move the slider to zoom in or out.
3.
To set up in a direction other than at the pin, you must be at ground level. Click or touch anywhere on
the terrain to display the AIM MARKER & GRID, move it to where you want to face, and then select the
CHECKMARK button.
NOTE: To reset view to face the pin, click or touch the terrain (to display the AIM MARKER & GRID)
and then click the FLAG button.
CHANGE THE BALL AND/OR PIN POSITION
1.
2.
Click the ARROW at the bottom of the Shot Statistics box in the upper left corner to open the drop-down menu.
Select Change.
A special feature of E6 Driving Range is the Scoring Zone, which allows you to practice getting consistent distance
and accuracy for any particular shot.
DISPLAY THE SCORING ZONE
1. On the Driving Range, open the drop-down menu by clicking or touching the arrow at the bottom of the
Shot Statistics box.
2. Select Scoring Zone. The Scoring Zone target is displayed on the driving range and in the Top
View window.
MOVE OR RESIZE THE SCORING ZONE
1. Open the drop-down menu.
2. Select Change. The following options are now available:
•Increase Width: Expand the target.
•Decrease Width: Shrink the target.
•Center Target: Move the target to the center of the fairway.
3. To move the Target, click or touch and drag it.
4. When finished, select Accept Target.
PRACTICE: DRIVING RANGE
1. From the Main Menu, select PRACTICE and then DRIVING RANGE.
–OR–
From the Practice Green (Chip & Putt area), click or touch the E6 Cube.
2. Select CHOOSE PRACTICE AREA.
3. Select DRIVING RANGE.
15
16
E6GOLF
TRUGOLF
PRACTICE
CONTEST MODES
VIEW SHOT RESULTS
LONGEST DRIVE & CLOSEST TO PIN CONTESTS
1. Open the drop-down menu.
2. Select View.
NOTE: The shadowed area shows the Dispersion of shots taken; the crosshairs show the Dispersion midpoint.
3. The Shot box displays the number of shots taken. Select Next or Prev to cycle through the individual shots.
4. Click or touch Remove to delete whichever shot is highlighted.
5. Drag the slider to zoom in and out.
6. Click or touch Return to resume hitting.
• LONGEST DRIVE: Challenge your friends to see who can hit the longest drive in the fairway on a
specific par four or par five hole.
• CLOSEST TO PIN: See who can get the ball closest to the hole on a specific par three hole.
TO SET UP A LONGEST DRIVE OR CLOSEST TO PIN CONTEST:
1. Select LONGEST DRIVE or CLOSEST TO PIN.
2. Select New/Copy.
3. Select NEW CONTEST or CREATE COPY
Note: CREATE COPY will bring up a list of existing contests. Select which contest you
want to copy and it will copy the course and all of the current settings of that particular
contest. You can make changes to the settings at this time (hole #, conditions, etc.)
EXIT THE SCORING ZONE
RETURN TO THE DRIVING RANGE
1. Open the drop-down menu.
2. Select Driving Range.
EXIT OR SWITCH PRACTICE AREAS:
1. Click or touch the E6 Cube.
2. Select Exit Practice to exit or Choose Practice Area to switch Practice Areas.
17
18
E6GOLF
TRUGOLF
CONTEST MODES
4.
5.
6.
7.
8.
9.
Select a Course, and then NEXT.
Specify the Course Conditions, and then NEXT.
Select the Hole, Tee, and Pin Position, and then NEXT.
Specify the Number of Attempts (which each player will get in the contest), and then NEXT.
Enter a Name for the contest, and then select NEXT.
Select START.
10. Select NEW PLAYER.
11. Enter a Name for the first player.
12. Hit away!
13. Repeat steps 9-11 for all the players in the contest.
19
20
™
D R I V I N G
R E A L I T Y
60 NORTH 1400 WEST
CENTERVILLE, UT 84014
CUSTOMER SUPPORT
801.677.1123
877.711.6691
SALES
801.298.1997
866.711.4653
WWW.TRUGOLF.COM