1
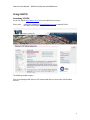
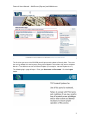
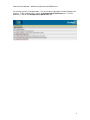
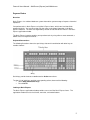
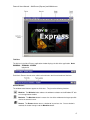
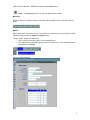
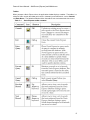
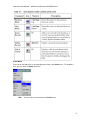
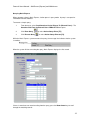
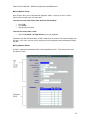
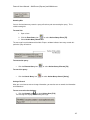
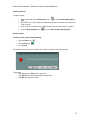
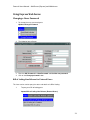
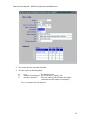
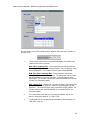
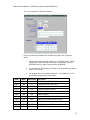
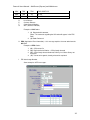
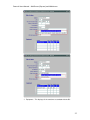
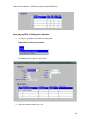
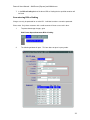
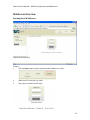
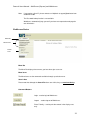
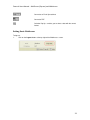
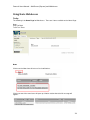
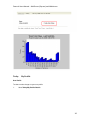
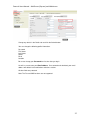
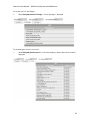
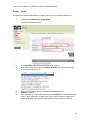
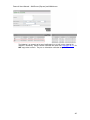
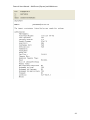
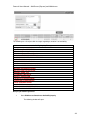
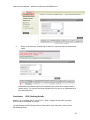
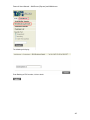
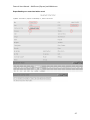
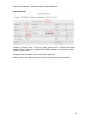
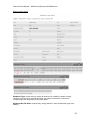
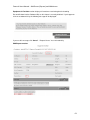
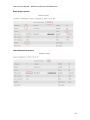
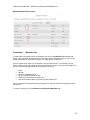
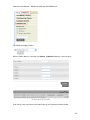
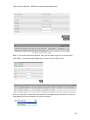
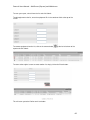
TERMINAL SYSTEMS INC.
EXTERNAL USER MANUAL
External Users Manual – WebForms (Express) and WebAccess
Contents
Using SSLVPN ...................................................................................................................... 1
Launching SSLVPN ....................................................................................................... 1
Express Overview ................................................................................................................ 4
Starting Navis Express ................................................................................................. 4
Express Basics ............................................................................................................. 5
Using Forms .............................................................................................................. 11
Code Values............................................................................................................... 18
Exiting Navis Express ................................................................................................. 20
Using Express Web Forms ................................................................................................. 21
Changing a Users Password .......................................................................................... 21
Bill of Lading Line Release for External Users ........................................................... 21
Querying on Bills of Lading in a Container ................................................................ 28
Guaranteeing Bills of Lading ..................................................................................... 29
WebAccess Overview ........................................................................................................ 31
Starting Navis WebAccess ......................................................................................... 31
WebAccess Basics ..................................................................................................... 32
Exiting Navis WebAccess........................................................................................... 33
Using Navis WebAccess .................................................................................................... 34
Today .................................................................................................................... 34
Today My Profile .................................................................................................. 36
Today Notify ......................................................................................................... 39
Container Availability Inquiry............................................................................... 42
Containers EDO/Booking Details ......................................................................... 45
Containers Container Details ............................................................................... 56
Containers Maintain List ...................................................................................... 63
ii
External Users Manual – WebForms (Express) and WebAccess
Using SSLVPN
Launching SSLVPN
On the TSI website http://www.tsi.bc.ca click on the Web Services Log in.
Please note:
Contact our Helpdesk at [email protected] or 604-267-5330
to request a User Log In and password.
The following window will open.
Click on the Deltaport Web Services OR Vanterm Web Services item under SSLVPN Web
Services.
1
External Users Manual – WebForms (Express) and WebAccess
The first time you access the SSLVPN you will get a warning about a Security Alert. To access
the service without this warning every time, please follow the instructions that were e-mailed on
th
March 14 for different versions of Internet Explorer (For example: Internet Explorer 6 or 7).
The following log in page will open. Enter your Username and Password. Click the Logon
button.
2
External Users Manual – WebForms (Express) and WebAccess
This will take you to a list of Applications. This will include all applications for both Deltaport and
Vanterm. To log into Web Forms, click on the Deltaport Navis WehForms item. To access
WebAccess, click on the Deltaport Navis WebAccess item.
3
External Users Manual – WebForms (Express) and WebAccess
Express Overview
Starting Navis Express
To start the Web Forms (Navis Express) application:
1. Enter your user ID in the Username field
and press Tab or click in the next field.
2. Enter your password in the Password
field and press Tab.
3. Click Connect or press Enter. Do NOT
change the information in the Database
field.
The Navis Express application window appears.
4
External Users Manual – WebForms (Express) and WebAccess
Express Basics
Overview
Navis Express is a relational database system that enables you to manage all aspects of terminal
operations.
You perform tasks in Navis Express using Navis Express forms, which consist of data fields
grouped in blocks. You use these forms to view, enter, and change information in the Navis
Express database. The forms are organized by function and task under the menus in the Navis
Express application window.
The Navis Express interface enables you to perform tasks by using either a menu command, a
toolbar icon, or a keyboard shortcut.
Keyboard Conventions
The following illustration shows the special keys that work in combination with other keys to
provide shortcuts.
Quick keys provide shortcuts to toolbar tools or Action menu items.
To view a list of quick keys and their corresponding actions, do one of the following:
• Select Help>Show Quick Keys.
• Press Ctrl+F1
Looking at Navis Express
The Navis Express application window provides access to all the Navis Express forms. The
application window consists of a title bar, menu bar, and control buttons.
5
External Users Manual – WebForms (Express) and WebAccess
Title Bars
The title bar in the Navis Express application window displays the title of the application: Navis
EXPRESS – TERMINAL SYSTEM.
Each Navis Express form also has a title bar that displays the title and number of the form.
Control Buttons
The window control buttons appear on all title bars. They have the following functions:
Minimize. The Minimize button reduces the window to a button on the Windows NT task
or in the application window.
Maximize. The Maximize button increases the size of the window to the largest possible
size for the terminal screen.
Restore. The Restore button returns a window to its previous size. Once a window is
restored, this button changes into the Maximize button.
6
External Users Manual – WebForms (Express) and WebAccess
Close. The Close button closes or quits the open form or window.
Menu Bar
Below the title bar is the Navis Express menu bar, which provides access to all Navis Express
forms.
Menus
Menus group forms by function or task. For example, all forms that you use for import or export
operations appear under the Import and Export menus.
To open a form, do one of the following:
• Click any form menu item to open its corresponding form.
• Press Alt and the underlined letter of the menu item you want. In the following example
you would press Alt+I+G.
The selected form displays:
7
External Users Manual – WebForms (Express) and WebAccess
Toolbar
When you open a Navis Express form, the application window displays a toolbar. The toolbar is a
column of icons or tools that allow you to access commonly-used commands, such as Commit
and Enter Query. The following table describes the toolbar icons and commands they access.
8
External Users Manual – WebForms (Express) and WebAccess
Action Menu
Each icon on the toolbar has a corresponding menu item in the Action menu. To complete a
task, you can select an Action menu item.
Note
You can also print and exit from the Action menu.
9
External Users Manual – WebForms (Express) and WebAccess
Quick Keys
Quick keys provide shortcuts to toolbar tools or Action menu items.
To view a list of quick keys (shortcuts):
•
Select Help>Show Quick Keys.
OR
•
Press Ctrl+F1.
The Keys window appears.
Click OK or press Enter to exit.
Message Line
The message line appears at the bottom of the Navis Express application window and displays
Navis Express system messages and error messages. For example, the message line can tell
you which key to press to execute or cancel a query, how many records you will retrieve with a
query, what kinds of data are required in a particular field, and so on.
Status Line
The status line appears below the message line and displays specific information about the
current form. For example, the status line displays information about the record you are viewing.
10
External Users Manual – WebForms (Express) and WebAccess
Using Forms
Opening a Form
You can access any form through the menu bar. For example, to open the Container Carrier
Release to (External Users) – YRD011FTSI form using the menu:
•
Select Import>Guarantee import Demurrage.
The following form will open.
11
External Users Manual – WebForms (Express) and WebAccess
Querying Navis Express
When you open a form in Navis Express, it often opens in query mode. A query is a request for
information from the database.
To execute a simple query:
1.
From the menu, select Yard>Container Carrier Release To (External Users). The
Container Web Form for External Users YRD011FTSI form opens.
2.
Click Enter Query
3.
Click Execute Query
or select Action>Query>Enter [F7].
or select Action>Query>Execute [F8].
While the Navis Express system executes the query, the message line indicates that the system
is working:
When the system finishes executing the query, Navis Express displays the first record.
If there is more than one record resulting from the query, press the Down Arrow key to scroll
through the matching records.
12
External Users Manual – WebForms (Express) and WebAccess
Moving Between Fields
Navis Express forms consist of data fields grouped in blocks. A field is an area in a Navis
Express form into which you can enter data.
To move the cursor from field to field, do one of the following:
•
•
•
Press Tab.
Press Enter.
Click directly in the field.
To move the cursor within a field:
•
Use the Left Arrow and Right Arrow keys on your keyboard.
Sometimes, the data contained within a field is longer than the number of characters displayed on
the form. In this case, you can use the arrow keys on the keyboard to move horizontally through
the data.
Moving Between Blocks
A block is a group of related fields within a form, identified by a title. There may be more than
one block in a form.
13
External Users Manual – WebForms (Express) and WebAccess
To move the cursor from block to block, do one of the following:
•
•
Click Next Block.
Press Ctrl+Page Down.
To move the cursor back to the first field of a previous block, do one of the following:
•
•
Click Previous Block.
Press Ctrl+Page Up.
If you try to move the cursor to the next block while in the last block, Navis Express displays a
warning:
•
Click OK or press Enter to remove the message.
If you try to move the cursor to a previous block while in the first block, a similar warning appears.
14
External Users Manual – WebForms (Express) and WebAccess
Moving Between Records
A record is a group of related data. A record corresponds to a row of data in a database table.
For example, each trucking company has its own record. When you submit a query, you ask
Navis Express to show you one or more records that are already in the database.
In the section Querying Navis Express the simple query retrieves multiple records from the
database; however, only one record displays. The status line displays the message:
Record: 1/?
The 1 means that you are looking at the first record in a set of records. The ? means that there
are more records underneath the first record.
To view the second record, do one of the following:
•
Click the Next Record icon on the toolbar.
•
Press Down Arrow on the keyboard.
The status line now displays the message:
The 2 means that you are looking at the second record in a set of records. The ? means that
there are more records underneath the second record.
To view the first or previous record, do one of the following:
•
•
Click the Previous Record icon on the toolbar.
Press Up Arrow on the keyboard.
The status line now displays the message:
If you scroll through the set to the last record, the status line displays a message similar to the
following:
th
This message means that you are at the 78 record in a set of 78 records. If you scroll back to
the first record, the status line displays:
15
External Users Manual – WebForms (Express) and WebAccess
Counting Hits
You can find out how many records a query will retrieve prior to executing the query. This is
called counting hits.
To count hits:
1. Open a form.
or select Action>Query>Enter [F7].
2. Click the Enter Query icon
3. Select Action>Query>Count Hits.
The message line at the bottom of the Navis Express window indicates how many records this
particular query will retrieve.
To execute the query:
•
Click the Execute Query icon
or select Action>Query>Execute [F8].
To cancel the query:
•
Click the Cancel Query icon
or select Action>Query>Cancel [Ctrl+q].
Saving a Record
After you use a form to enter or change information, you need to save or commit the information
to the database.
To save a record to the database:
• Click the Commit icon
or select Action>Save [F10].
The message line displays the following message:
16
External Users Manual – WebForms (Express) and WebAccess
Viewing a Record
To view a record:
or select Action>Query>Enter
1. Open a form and click the Enter Query icon
[F7].
2. Place the cursor in the field for the information you want to retrieve, for example, the
ID for a vessel.
3. Enter a value in the field or press F9 and select from the list of values if available.
4. Click the Execute Query icon
or select Action>Query>Execute [F8].
Closing a Form
To close a form, do one of the following:
•
Click the Close icon
•
•
Click the Exit icon
Press Ctrl+q.
.
.
If you did not save your last transaction, Navis Express displays a warning message.
To proceed:
• Click Yes or press Enter to save your work
• Click Cancel to resume working with the open form.
• Click No to quit without saving.
17
External Users Manual – WebForms (Express) and WebAccess
Code Values
Equipment Codes
DESCRIPTION
EQSZ_ID
EQTP_ID
EQHT_ID
20' Bin Container 4’0”
20' Bin Container 4'3”
20' Bulk Container 8’0”
20' Bulk Container 8’6”
20’ Bulk Container 9’0”
20’ Bulk Container 9’6”
20' Dry Container 8'0”
20' Dry Container 8’6”
20' Dry Container 9'0”
20' Dry Container 9'6”
20' Flat Rack Container 8'0”
20' Flat Rack Container 8’6”
20' Flat Rack Container 9'0”
20' Flat Rack Container 9'6”
20' Hard Top Container 8'0”
20' Hard Top Container 8’6”
20' Hard Top Container 9'0”
20' Hard Top Container 9'6”
20' Insulated Reefer Container 8'0”
20' Insulated Reefer Container 8’6”
20' Open Side Container 8'0”
20' Open Side Container 8’6”
20' Open Side Container 9'0”
20' Open Side Container 9'6”
20' Open Top Container 8'0”
20' Open Top Container 8’6”
20' Open Top Container 9'0”
20' Open Top Container 9'6”
20' Platform Container 2’0”
20' Reefer Container 8'0”
20' Reefer Container 8’6”
20' Reefer Container 9'0”
20' Reefer Container 9'6”
20' Tank Container 8'0”
20' Tank Container 8’6”
20' Vent Container 8’6”
20’ Vent Container 9’6”
40' Bin Container 4'3”
40' Bulk Container 8'0”
40' Bulk Container 8'6”
20
20
20
20
20
20
20
20
20
20
20
20
20
20
20
20
20
20
20
20
20
20
20
20
20
20
20
20
20
20
20
20
20
20
20
20
20
40
40
40
BN
BN
BU
BU
BU
BU
DR
DR
DR
DR
FR
FR
FR
FR
HT
HT
HT
HT
IN
IN
OS
OS
OS
OS
OT
OT
OT
OT
PL
RF
RF
RF
RF
TK
TK
VE
VE
BN
BU
BU
40
43
80
86
90
96
80
86
90
96
80
86
90
96
80
86
90
96
80
86
80
86
90
96
80
86
90
96
20
80
86
90
96
80
86
86
96
43
80
86
18
External Users Manual – WebForms (Express) and WebAccess
DESCRIPTION
EQSZ_ID
EQTP_ID
EQHT_ID
40' Bulk Container 9'0”
40' Bulk Container 9'6”
40' Dry Container 8'0”
40' Dry Container 8'6”
40' Dry Container 9'0”
40' Dry Container 9'6”
40' Flat Rack Container 8'0”
40' Flat Rack Container 8'6”
40' Flat Rack Container 9'0”
40' Flat Rack Container 9'6”
40' Hard Top Container 8'0”
40' Hard Top Container 8'6”
40' Hard Top Container 9'0”
40' Hard Top Container 9'6”
40' Insulated Reefer Container 8'6”
40' Insulated Reefer Container 9'6”
40' Open Side Container 8'0”
40' Open Side Container 8'6”
40' Open Side Container 9'0”
40' Open Side Container 9'6”
40' Open Top Container 8'0”
40' Open Top Container 8'6”
40' Open Top Container 9'0”
40' Open Top Container 9'6”
40' Platform Container 2’0”
40' Reefer Container 8'0”
40' Reefer Container 8'6”
40' Reefer Container 9'0”
40' Reefer Container 9'6”
40' Tank 8'6”
40' Tank 9'6”
40' Vent Container 8'6”
40' Vent Container 9'0”
40' Vent Container 9'6”
45' Dry Container 9'0”
45' Dry Container 9'6”
45' Flat Rack Container 9'6”
45' Hard Top Container 9'6”
45' Open Side Container 9'6”
45' Open Top Container 9'6”
45' Platform Container 2’0”
45' Reefer Container 9'6”
45' Vent Container 9'6”
48' Dry Container 9'6”
40
40
40
40
40
40
40
40
40
40
40
40
40
40
40
40
40
40
40
40
40
40
40
40
40
40
40
40
40
40
40
40
40
40
45
45
45
45
45
45
45
45
45
48
BU
BU
DR
DR
DR
DR
FR
FR
FR
FR
HT
HT
HT
HT
IN
IN
OS
OS
OS
OS
OT
OT
OT
OT
PL
RF
RF
RF
RF
TK
TK
VE
VE
VE
DR
DR
FR
HT
OS
OT
PL
RF
VE
DR
90
96
80
86
90
96
80
86
90
96
80
86
90
96
86
96
80
86
90
96
80
86
90
96
20
80
86
90
96
86
96
86
90
96
90
96
96
96
96
96
20
96
96
96
19
External Users Manual – WebForms (Express) and WebAccess
DESCRIPTION
EQSZ_ID
EQTP_ID
EQHT_ID
53' Dry Container 9'6”
Genpac
53
40
DR
GP
96
96
Container Categories
E
I
M
R
S
T
Export
Import
Empty Storage
Restow
Stay on Board
Tranship
Container Statuses
E
F
L
Empty
Full
Less than Container
Exiting Navis Express
To quit the Web Forms application:
•
Click Action>Exit (Ctrl+Q).
OR
•
Click Close
.
20
External Users Manual – WebForms (Express) and WebAccess
Using Express Web Forms
Changing a Users Password
1. To change the users password, go to
Options>Change Password
2. The following form will open.
3. Enter the Old Password, the New Password and Confirm new password.
4. Click on the Change password button.
Bill of Lading Line Release for External Users
This form can be used to query the status and details of a Bill of Lading.
1.
To query on a Bill of Lading go to
Import>Bills of Lading Line Release (External Users)
21
External Users Manual – WebForms (Express) and WebAccess
The following form will open.
2.
Press F7, enter the B/L number in the Number field, press F8.
22
External Users Manual – WebForms (Express) and WebAccess
3. The system will return the details of the B/L.
4. This form shows the following details:
A.
B.
C.
Line
– The Steamship Line
Inbound Vessel/Voyage – The Vessel Name / Voyage / Call
Delivery Instructions
– These can either be rail or off dock instructions.
(See below for a description and examples.)
This is an example of a Rail container:
23
External Users Manual – WebForms (Express) and WebAccess
Rail instructions consist of three blocks which together define the way a container is
to move on rail.
1.
The first block in the Delivery Instruction field defines the customs and
steamship line release statuses.
MLB - Mini Landbridge Rail – These containers are moving under the
Steamship Line’s bond to their final destination. The Line Release status
will be RELEASED. The Customs Release status will be INBOND.
DLB - Duty Paid Landbridge Rail – These containers are custom
clearing in Vancouver prior to departure. The Steamship Line has made
the rail arrangements for these containers. The Line Release will be
RELEASED. The Customs Release will show RELEASED once Canada
Customs has cleared the goods.
REG - Regular Rail – Regular rail is customs clearing in Vancouver prior
rd
to departure. Here a 3 party has made the rail arrangements for the
containers. The Line release will either show HELD or RELEASED. The
Customs Release will show RELEASED once Canada Customs has
cleared the goods.
2.
The second block in the Delivery Instruction field defines the rail line
which is moving the container, i.e. CNR / CPR.
3.
The third block in the rail concatenated field defines the destination, i.e.
TOR / MTL / CAL etc.
24
External Users Manual – WebForms (Express) and WebAccess
This is an example of an Off Dock container:
Like the rail delivery instructions, the Off Dock instructions consist of three
blocks.
1. The first block shows that the container is an Off Dock (ODK). When a
container has ODK instructions it will have a Line Release status of
RELEASED and a Customs Release Status of INBOND.
2. If a container has ODK delivery instructions, the second block will always
show as TRK (truck).
3. The third block is for the off dock warehouse. The following is a list of
the off docks and their abbreviated codes:
Code
Mode
Destination
ODK
TRK
ALS
ALLCAN LOGISTICS SERVICES
ODK
TRK
CFI
CONSOLIDATED FASTFRATE
ODK
TRK
DMC
DAMCO
ODK
TRK
FSD
FRASER SURREY DOCKS
ODK
TRK
HARB
HARBOUR LINK
ODK
TRK
ISA
ISAAC FREIGHT
ODK
TRK
LEI
LOCHERS EVERS INTERNATIONAL
ODK
TRK
MDS
MAERSK DISTRIBUTION SERVICES
ODK
TRK
PHY
PACIFIC HIGHWAY
ODK
TRK
RTC
RYDER CRSA LOGISTICS
ODK
TRK
SCH
SCHENKER
Description
25
External Users Manual – WebForms (Express) and WebAccess
ODK
TRK
TDK
TDK LOGISTICS
ODK
TRK
VIF
CP VIF
ODK
TRK
VIT
CN VIT
D.
E.
F.
G.
Line Release
Customs Release
Cargo Control Number
GIS - (General Indicator)
Examples of GIS Codes:
1. (2) Rejected with comment
(Note: The comment regarding the GIS code will appear in the ERC
field)
2. (4) Goods Released
H. ERC (Application Error Information) – this message explains the error code from the
GIS field.
Examples of ERC Codes:
1. (01) CCN not on file
2. (03) Duplicate Arrival Notice – CCN already released
3. (07) CCN already released/referred, Delivery Inst./Status Query not
accepted
4. (15) Cannot arrive goods; already released & acquitted.
I.
EDI Interchange Number
Some examples of EDI messages:
26
External Users Manual – WebForms (Express) and WebAccess
J. Equipment – This displays all the containers associated with the B/L
27
External Users Manual – WebForms (Express) and WebAccess
Querying on Bills of Lading in a Container
5. To query on a container and its Bills of Lading, go to
Import>Bills of Lading In A Container
The following form will open in query mode.
6. Enter the container number, press F8.
28
External Users Manual – WebForms (Express) and WebAccess
7. In the Bills of Lading block of the form all Bills of Lading for the specified container will
be listed.
Guaranteeing Bills of Lading
Charges can only be protected for an entire B/L. Individual containers cannot be protected.
Please note: Only those customers with a credit account will have access to this form.
1.
To protect demurrage charges, go to
Web Forms>Import>Guarantee Bills of Lading.
2.
The following window will open. This form does not open in query mode.
29
External Users Manual – WebForms (Express) and WebAccess
3.
Enter the B/L, press the Tab key and the details associated with the B/L will autopopulate. The Customer and Guarantor fields will default with the user’s details.
4.
A PO Number can also be entered if required.
Note: If a guarantee already existed for the B/L, then you would get the below
warning.
5.
Save changes. (F10 or
)
Removing Storage Protection
Please contact Customer Solutions to request a storage protection removal.
30
External Users Manual – WebForms (Express) and WebAccess
WebAccess Overview
Starting Navis WebAccess
To log in:
1.
Click the Login button at the top right of the Navis WebAccess screen.
2.
Under User ID, enter your user name.
3.
Enter your password and click Log In.
31
External Users Manual – WebForms (Express) and WebAccess
Note:
If you require a User ID, please contact our Helpdesk at [email protected]
or 604-267-5300
The Password lookup function is not available.
WebAccess automatically logs you out if you have not requested a web page for
over 20 minutes.
WebAccess Basics
Menu Bar
Menu Items
Search
Area
Menu Bar
The Menu Bar displays those menus you have been give access to.
Menu Items
The Menu Items are the commands available through a particular menu.
Search Area
Please note that although the Search For items are visible, they are non-functioning.
Command Buttons
Login - used to log into WebAccess.
Logout - used to log out of WebAccess
Pinter Friendly – used to print the content in the display area
only.
32
External Users Manual – WebForms (Express) and WebAccess
Convert to an Excel Spreadsheet
Convert to PDF.
Calendar Pop Up – enables you to select a date with the correct
format.
Exiting Navis WebAccess
To log out:
1.
Click on the Logout button at the top right of the WebAccess screen.
33
External Users Manual – WebForms (Express) and WebAccess
Using Navis WebAccess
Today
The following is the Home Page for WebAccess. There are 3 items available on the Home Page:
News
Ships On Berth
Truck Turn Times
News
Clicking on the News item will return a list of notifications.
Clicking on one of the news items will open up a Notice section where the full message will
appear.
34
External Users Manual – WebForms (Express) and WebAccess
Ships On Berth
Clicking on the Ships On Berth item will return a list of ships which are currently at the terminal’s
berth.
Please note at this time although the vessels are underlined indicating the user can drill down
further on these items, the vessel schedule is not currently functioning properly. If a user clicks
on one of the vessels the following notification will be displayed.
If you see this message, click ‘Cancel’. ‘Request Access’ has no functionality.
Truck Turn Times
Clicking on Truck Turn Times will return a graph showing the turn times of trucks in the terminal
for the last 1440 minutes. (24 hours)
35
External Users Manual – WebForms (Express) and WebAccess
Today
My Profile
User Profile
To view or make changes to your user profile:
1.
Go to Today>My Profile>Details.
36
External Users Manual – WebForms (Express) and WebAccess
Change any details in the Details tab and click the Submit button.
You can change the following profile information:
Password
First Name
Last Name
Phone
Email
Location
Be sure to change your Password the first time after you log in.
As well, be sure to enter your Email address. Once entered and submitted, your email
address will default in the notifications and alerts sections.
All other fields are protected.
Note: The Fax and SMS functions are not supported.
37
External Users Manual – WebForms (Express) and WebAccess
To see the users list of privileges:
1.
Go to Today>My Profile>Privileges. A list of privileges is displayed.
To see what types of access a user has:
1.
Go to Today>My Profile>Access. A list of the company’s whose data can be viewed is
displayed.
38
External Users Manual – WebForms (Express) and WebAccess
Today
Notify
A customer can request notification be sent directly to them via email through WebAccess.
1.
To do this go to WebAccess>Today>Notify
The following window will open.
2.
3.
In the Container field enter the required container number.
Next, from the drop down menu in the Notify Me When field, select the event you
wish to receive notification on
4.
5.
6.
Enter the email address where you would like the notification sent.
Submit the request.
Once submitted, the request will show under the pending queue at the bottom of the
screen. When notification has been successfully sent, the request will move to the
right hand recent list giving you the date and time the message was extracted.
39
External Users Manual – WebForms (Express) and WebAccess
The following is an example of the email notification the user will receive showing the
container’s availability. Please note the notification will come from [email protected]. Do
NOT reply to these emails. They are an information notification only.
40
External Users Manual – WebForms (Express) and WebAccess
41
External Users Manual – WebForms (Express) and WebAccess
Container
1.
Availability Inquiry
To query on a container’s availability in WebAccess, go to
Web Access>Containers>Availability Inquiry
The following window will open.
2.
3.
4.
5.
Enter the container number in the Equipment IDs field. This can be a multitude of
containers.
Enter a trucking company if required. The system will default to ANY, however you
can select a company from the List of Values. Click on the drop down arrow and
highlight the trucking company.
Select the Pickup Date. (Clicking on the Calendar icon will open a calendar.)
Click the Submit button.
The following window will open. The red X denotes the container is NOT available
for pick up.
42
External Users Manual – WebForms (Express) and WebAccess
6.
Note:
7.
Click on the EQUIP ID. The container’s impediments are returned.
Any item in WebAccess that is presented with an underline can be clicked on to drill
down to more information.
If the container is available, a green check mark denotes the container is ready for
pick up.
43
External Users Manual – WebForms (Express) and WebAccess
The following are a list of possible messages regarding a container’s unavailability:
Availability Inquiry Messages
Storage charges owed = $nnnn.nn
Last free day was DDMMMYY
Bill of Lading held by line operator
Bill of Lading not released by customs
CANADA CUSTOMS INSPECTION
CUSTOMS DOCKSIDE / TAILGATE EXAM
DAMAGE HOLD
EXPORT DEMURRAGE HOLD
HOLD
MISSING HAZARDOUS DECLARATION
MISSING HAZARDOUS PERMIT
Not in the Yard! On the Vessel
QUEEN'S BOND / E44
STEAMSHIP LINE HOLD
SURVEY / INSPECTION
TAILGATE CHARGES OWING
TRANSPORT CANADA HOLD
VACIS CHARGES OWING
VACIS EXAM
WOOD PACKING DESTUFF HOLD
WOOD PACKING PAPERWORK HOLD
Querying on Demurrage Owed
1.
Go to WebAccess>Containers>Availability Inquiry
The following window will open.
44
External Users Manual – WebForms (Express) and WebAccess
2.
Query on the container. If demurrage is owed, the system will show the total amount
owing.
Unfortunately once demurrage has been protected, the system will no longer show the
amount owing. The container will show available for pick up unless an impediment other
than demurrage exists.
Containers
EDO/Booking Details
Bookings are associated with an Export Vessel. EDO’s (Empty Delivery Order) are empty
releases not associated with any vessel.
To view Booking and EDO (Empty Delivery Order) details, open Containers menu & select
EDO/Booking Details.
45
External Users Manual – WebForms (Express) and WebAccess
The following will display
Enter Booking or EDO number, click on submit
46
External Users Manual – WebForms (Express) and WebAccess
Export Bookings are associated with a vessel
47
External Users Manual – WebForms (Express) and WebAccess
Nbr = Booking Number, Outbound Ship = Export Vessel, Voyage = Voyage Number, POD = Port
of Discharge, Status = F (Full) or E (Empty)
Equipment Types section displays number of containers for a booking, number of empty
containers that have been released (delivered), the number of containers received, the
size/type/height, the commodity and any reefer details.
Equipment Out For Order section displays empty containers released (delivered) against the
booking.
Equipment In For Order section displays full containers received against the booking.
From the booking you can drill down on the Outbound Ship to view the vessel schedule
If the Booking number exists for multiple vessels, the following will display.
In this example, the booking exists for 2 vessels:
• CCHI 82 1 (CSCL CHIWAN)
• XZHJ 66 1 (XIN ZHAN JIANG)
Select the booking corresponding with the required vessel.
48
External Users Manual – WebForms (Express) and WebAccess
The booking details will be displayed:
49
External Users Manual – WebForms (Express) and WebAccess
IMO Export Booking example:
50
External Users Manual – WebForms (Express) and WebAccess
REEFER Export Booking example:
51
External Users Manual – WebForms (Express) and WebAccess
Export Booking with Special Stow instructions example:
Note: Do not attempt to drill-down into the Outboun Ship as this feature is currently disabled. If
you happen to click on a Vessel, the following message will be displayed:
52
External Users Manual – WebForms (Express) and WebAccess
If you see this message, click ‘Cancel’. ‘Request Access’ has no functionality.
These are the special stow values in use:
53
External Users Manual – WebForms (Express) and WebAccess
EDO (Equipment Delivery Orders) are not associated with a vessel
Equipment Delivery Orders are used to reposition containers from the terminal to other facilities
via the truck gate. Example: Off Hires, For Sale, Repair, etc.
There is no vessel or port of discharge information on the Equipment Delivery Order
54
External Users Manual – WebForms (Express) and WebAccess
EDO example:
MTY delivered displays 4
Empty containers delivered against this Equipment Delivery Order
55
External Users Manual – WebForms (Express) and WebAccess
Containers
Container Details
This form will show you limited container details at the current moment.
Open Containers menu & select Container Details
The following will display
Enter container number & click on Submit
56
External Users Manual – WebForms (Express) and WebAccess
Container Details will be displayed
57
External Users Manual – WebForms (Express) and WebAccess
Import Containers
Category = I (Import), Status = F (Full) or E (Empty), Outbound Carrier = TRUCK or Rail Carrier,
Current Position = Dock Location or Stow Position
Damage & Hazardous details will also be displayed if applicable
Empty Containers
Category = M (Storage), Status = E (Empty), Inbound Carrier = Truck ID or Railcar, Booking/EDO
= Booking number (if applicable), Current Position = Dock Location
Damage & Hazardous details will also be displayed if applicable
58
External Users Manual – WebForms (Express) and WebAccess
Export Containers
Category = E (Export), Status = F (Full) or E (Empty), Inbound Carrier = TRUCK or Rail Carrier,
Outbound Carrier = Export Vessel, Booking/EDO= Booking Number, Current Position = Dock
Location or Stow Position
Damage & Hazardous details will also be displayed if applicable
Booking numbers are underlined which will allow you to drill down to view limited details.
59
External Users Manual – WebForms (Express) and WebAccess
Booking details display
Equipment Types section displays number of containers for a booking, number of empty
containers that have been released (delivered), the number of containers received, the
size/type/height, the commodity and any reefer details.
Equipment Out For Order section displays empty containers released (delivered) against the
booking
60
External Users Manual – WebForms (Express) and WebAccess
Equipment In For Order section displays full containers received against the booking
Do not drill-down into the Outbound Ship as this feature is currently disabled. If you happen to
click on an outbound ship, the following message will be displayed:
If you see this message, click ‘Cancel’. ‘Request Access’ has no functionality.
IMO Export container
61
External Users Manual – WebForms (Express) and WebAccess
Reefer Export container
Inbound Export Rail container
62
External Users Manual – WebForms (Express) and WebAccess
Outbound Import Rail container
Containers
Maintain List
To view details for multiple pieces of equipment, you can use the Maintain List command to
create lists of containers that do not necessarily share specific equipment criteria, such as high
priority equipment you need to track closely. All query details are real-time.
You can create one or more lists of containers that you want to track. For example, you may
want to create a list of ‘Hot’ containers that you need to track closely. Once you have made a list,
you can view the following data for all the containers on the list:
•
•
•
•
•
•
Status
Position
Inbound / Outbound Carrier
Arrival / Departure Date and Time
Whether an event notice has been sent
Real-time container details (by clicking on the container ID)
You can maintain an unlimited number of container lists and one container can appear on more
than one list.
To create a container list go to WebAccess>Containers>Maintain List.
63
External Users Manual – WebForms (Express) and WebAccess
The following window will open.
With the ‘Define New List’ selected, click Submit. A Maintain List entry screen will open.
Enter the list name in the New List field then enter up to 5 equipment numbers below.
64
External Users Manual – WebForms (Express) and WebAccess
Note: If you need to add more equipment, when you click Submit you will see 5 more fields.
Click Submit. Scroll down to the bottom of the screen to see the report results.
Once a List has been created, when you are back at the beginning of the Maintain List form, the
drop down box will now include the List you have created.
65
External Users Manual – WebForms (Express) and WebAccess
To rerun your report, select it from the list and click Submit.
To add equipment to the list, enter the equipment IDs in the container fields at the top of the
screen.
To remove equipment from the list, click on the remove button
report and click Submit.
at the far left column of the
To return to the original screen to create another list simply click on the Reset button.
This will return you to the Define new List window.
66
External Users Manual – WebForms (Express) and WebAccess
67