1
s
DESIGO™ PX
PXM10 operator unit
User's guide Version 2.3
CM110397en
31.08.2004
Siemens Building Technologies
Building Automation
2/34
Siemens Building Technologies
Building Automation
PXM10 operator unit
CM110397en
31.08.2004
Contents
1
About this manual ................................................ 5
1.1
Target readers ..................................................... 5
1.2
Content ................................................................ 5
1.3
1.3.1
1.3.2
1.3.3
Printing conventions............................................. 6
Text in display panel ............................................ 6
Labeling of the push-dial and buttons .................. 6
Notes.................................................................... 6
2
Display and control elements ............................... 7
2.1
Layout .................................................................. 7
2.2
2.2.1
2.2.2
2.2.3
2.2.4
Push-dial and buttons .......................................... 8
Push-dial .............................................................. 8
Esc button ............................................................ 8
Info button ............................................................ 9
Alarm button with alarm LED ............................... 9
2.3
2.3.1
2.3.2
2.3.3
Display panel ..................................................... 10
Menu line ........................................................... 11
Working area...................................................... 11
Symbols ............................................................. 13
3
Commissioning the PXM10................................ 14
3.1
Settings on the device........................................ 15
4
Reading and editing values................................ 17
4.1
Example: Setting a setpoint ............................... 17
5
Alarms and events ............................................. 19
5.1
Pop-up windows................................................. 19
5.2
Displaying the alarm list ..................................... 20
5.3
Acknowledging alarms ....................................... 21
3/34
Siemens Building Technologies
Building Automation
PXM10 operator unit
Contents
CM110397en
31.08.2004
5.4
Resetting extended alarms ................................ 22
6
Scheduler........................................................... 23
6.1
6.1.1
6.1.2
Day profile.......................................................... 23
Editing an existing profile ................................... 24
Adding a new entry ............................................ 25
6.2
6.2.1
6.2.2
Special periods .................................................. 26
Others ................................................................ 28
Adding a new entry ............................................ 29
7
Index .................................................................. 31
4/34
Siemens Building Technologies
Building Automation
PXM10 operator unit
Contents
CM110397en
31.08.2004
1
About this manual
1.1
Target readers
This user's guide is written for the users of the plant and for
service engineers. It is assumed that the users of the manual
will have the necessary understanding of the system and
plant.
1.2
Content
The descriptions in this manual cover the commissioning,
basic configuration and use of the PXM10 operator unit.
As there may be significant differences between one plant
and another, and between one object and another, it follows
that it is not possible to provide a description which is
generally applicable to every individual case. The question of
exactly which objects are integrated with which values in a
plant, is determined in the engineering phase according to
the individual needs of the plant operator.
Important
The descriptions in this manual are intended as examples
only, and are designed to clarify the basic operating
principles of the PXM10 operator unit.
5/34
Siemens Building Technologies
Siemens Building Automation
PXM10 operator unit
CM110397en
31.08.2004
1.3
Printing conventions
1.3.1
Text in display panel
Bold text is used to denote the exact text which appears in
the display, e.g. Main menu or Settings.
1.3.2
Labeling of the push-dial and buttons
The main operator control element, the "push-dial", is not
named on the housing.
The "Acknowledge" function ("OK") is integrated into the
push-dial.
The "Info" and "Esc" buttons are labeled accordingly on the
housing.
The "Alarm" button is not named on the housing, but can be
identified by the alarm symbol.
Examples:
Press the Info button or, more briefly Confirm with OK.
1.3.3
STOP
Note
Notes
Caution
The symbol shown here acts as a warning in cases where an
action may result in permanent loss of data.
Important
This indicates an important statement which requires your
special attention.
A "Note" qualifies an immediately preceding statement or
statements.
6/34
Siemens Building Technologies
Building Automation
PXM10 operator unit
CM110397en
31.08.2004
2
Display and control
elements
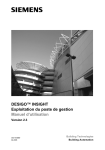
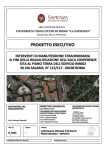
2.1
Layout
2
3
9230Z01
1
INFO
OK
ESC
PXM10
4
5
Figure 2-1 Housing
Key:
1.
2.
3.
4.
5.
Info button
Display panel
Push-dial
Alarm button with alarm LED
Esc button
7/34
Siemens Building Technologies
Siemens Building Automation
PXM10 operator unit
CM110397en
31.08.2004
2.2
Push-dial and buttons
2.2.1
Push-dial
Figure 2-2 Push-dial
The push-dial is the main operator control element.
Rotary action
By rotating the dial, you can move from top to bottom of the
text field and set or modify setpoints.
Push action
By pushing the dial, you can navigate to the next level down,
and acknowledge a selected option or input; this function is
equivalent to selecting "OK".
2.2.2
Esc button
Figure 2-3 Esc button
Pressing the "Esc" button lets you abandon a process you
have already started (e.g. editing a value), navigate to the
next higher level or close a pop-up window.
8/34
Siemens Building Technologies
Building Automation
PXM10 operator unit
CM110397en
31.08.2004
2.2.3
Info button
Figure 2-4 Info button
You can use the Info button to display a pop-up window
containing all the available information about the selected
line. You can close the pop-up window by pressing the Info
button (or Esc button) again.
2.2.4
Alarm button with alarm LED
Figure 2-5 Alarm button with alarm LED
The alarm LED lights up or flashes when an alarm or event is
tripped in the system. The alarm button takes you straight to
the alarm list.
Alarm LED
response
Alarm
LED
Symbols
Flashing
Pending alarm, unacknowledged
(pop-up window and alarm list)
Steady
light
Incoming event (pop-up window only)
Pending alarm, acknowledged, and
extended alarm, acknowledged but
not reset (alarm list)
Off
Note
Event
No active alarms
Alarms are operated by use of the push-dial (see Section 5).
9/34
Siemens Building Technologies
Siemens Building Automation
PXM10 operator unit
CM110397en
31.08.2004
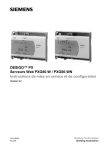
2.3
Display panel
Figure 2-6 Opening screen
The PXM10 has a five-line display. It can be used to view all
the visible elements of a plant with values or other
information. Figure 2-7 shows the layout of the display. The
areas of the display and the symbols used are described in
the next section.
The push-dial and buttons used for navigation and editing
are adjacent to the display panel, set into the housing itself.
These buttons are described in Section 2.2.
Menu line
Working area, with four
lines of text, one of
which is highlighted.
Figure 2-7 Layout of display with one line of text highlighted
10/34
Siemens Building Technologies
Building Automation
PXM10 operator unit
CM110397en
31.08.2004
2.3.1
Menu line
Figure 2-8 Menu line
The line at the top of the display shows you the menu in which
you are currently located. The menu line is underlined,
separating it from the rest of the display with a horizontal line.
Exception
Under Scheduler > Special period you will see the entry
Others which, as a submenu, is also underlined:
Figure 2-9 Submenu
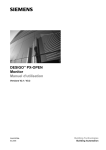
2.3.2
Working area
Figure 2-10 Working area
Below the menu line is the working area, which consists of a
maximum of four alphanumeric lines of text.
Note
Graphs are only displayed in the Scheduler menu.
If there are more lines than can be displayed at once, this is
indicated by the scroll arrows.
11/34
Siemens Building Technologies
Siemens Building Automation
PXM10 operator unit
CM110397en
31.08.2004
Highlighted line
A line highlighted in inverse video (light print on dark
background) indicates an option associated with one or more
hierarchically subordinate lines; you can display these with
the push-dial.
Figure 2-11 Text lines, one of which is highlighted
Outlined text
If a line of text is outlined, this indicates that you are at the
lowest level, and you can only read, but not edit the value on
this line. Use the Esc button to navigate back to the next
higher level.
Figure 2-12 Outlined text at the lowest level
Pop-up
A "pop-up" is a dialog box used to display an alarm or an
event. The alarm button provides direct access to the list of
pending alarms.
Figure 2-13 Pop-up display for an alarm
Figure 2-14 Pop-up display for an event
12/34
Siemens Building Technologies
Building Automation
PXM10 operator unit
CM110397en
31.08.2004
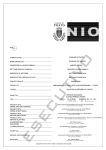
Graphs
Time schedules are displayed in graph form .
Figure 2-15 Time schedule graph
2.3.3
Symbols
The following is a list of all the symbols used in the display,
and their meanings. The same symbol may represent
different entries, or have a different meaning, depending on
the context.
Symbol
Description
Favorite objects These are defined at the engineering stage
.
Pop-up window:
Alarm or event
Alarm list:
Uncleared alarm, neither acknowledged
nor reset
Uncleared but acknowledged alarm
Alarm cleared but not acknowledged
Alarm cleared, acknowledged but not
reset
Info window
Info symbol
Override
Manually overwritten (forced) value
Cursor
Only used in Scheduler graphs.
Wildcards
Only used in Scheduler > Special period.
Description in Section 6.2.
13/34
Siemens Building Technologies
Siemens Building Automation
PXM10 operator unit
CM110397en
31.08.2004
3
Commissioning
the PXM10
The PXM10 is used for local operation of a compact or
modular DESIGO PX automation station. No user login is
required. The PXM10 allows you to work at the "Basic" and
"Standard" operating levels.
All the objects from these operating levels are mapped in the
device.
Note
"Favorite" objects are defined at the engineering stage and
mapped separately.
Step
1
or
2
Action
Mount the PXM10 on the housing of the modular
automation station.
Connect the PXM10 to the compact or modular
automation station with a PXA-C1 cable.
After a few seconds, the display will light up and
the opening screen will appear. The PXM10 is now
ready for operation:
Figure 3-1 Opening screen
Notes
3
Either open the plant data with OK
or
Press the alarm button to go directly to the alarm
list.
The PXM10 and PXM20 can be used in parallel for operation
and monitoring of a PXC…-U automation station by
mounting the PXM10 directly on the automation station and
connecting the PXM20 to the MMI/tool socket with a PXA-C1
cable.
14/34
Siemens Building Technologies
Building Automation
PXM10 operator unit
CM110397en
31.08.2004
If the PXM10 connection is interrupted briefly, it may take up
to 15 seconds for the polling cycle to resume. The display
can be re-enabled by operating any of the operator controls.
Logout
STOP
There is no need to log out.
Caution
Wait 30 seconds before reconnecting.
3.1
Settings on the device
Figure 3-2 Display showing plant data
Step
1
Procedure
Press OK to open the Settings menu.
Figure 3-3 Individual entries
2
Set individual values by rotating the dial and
acknowledge the settings with OK. You can also
use OK to move from one input field to the next
within a value.
15/34
Siemens Building Technologies
Siemens Building Automation
PXM10 operator unit
CM110397en
31.08.2004
Step
3
Procedure
When the last value has been acknowledged, the
plant data screen is displayed automatically.
Contrast
Time
Date
Event pop-up
View
100 = High; 0 = Low
Default = 50
Digital display, format: hh.mm
Digital display, format: dd.mm.yy
Active/inactive
Favorites / Both
Both lets you display both the Favorite
objects and all the objects in the
"Standard user" view.
16/34
Siemens Building Technologies
Building Automation
PXM10 operator unit
CM110397en
31.08.2004
4
Reading and editing
values
4.1
Example: Setting a setpoint
The screenshots below illustrate which values you can edit
and which you can only read:
Figure 4-1 Highlighted values can be edited
Step
1
2
3
Figure 4-2 Outlined values are read-only
Procedure
Navigate to the required setpoint (the relevant line
is highlighted)
Select setpoint with OK.
A dialog box opens, in which you can set the value.
Figure 4-3 Setting a manual setpoint, with one input
field only
Figure 4-4 Setting the time, with two input fields
17/34
Siemens Building Technologies
Siemens Building Automation
PXM10 operator unit
CM110397en
31.08.2004
4
Note
5
Rotate the dial to set the required value in the input
field. Acknowledge with OK.
If a value is made up of two or more input fields, the
input focus will then switch to the next field.
Confirm with OK or press Esc to cancel. Press the
Esc button to return automatically to the Setpoints
screen (Figure 4-2).
18/34
Siemens Building Technologies
Building Automation
PXM10 operator unit
CM110397en
31.08.2004
5
Difference
between alarm
and event
Alarms and events
The LED display in the alarm button lights up in response to
incoming alarms and events, and, in the case of alarms,
starts flashing.
Events do not require acknowledgement, nor do they appear
in the alarm list.
5.1
Pop-up windows
If an alarm or event occurs while the PXM10 is in operation,
you will be notified accordingly in a pop-up window (Figure
5-1). If the PXM10 is only switched on after the occurrence of
the alarm or event, there will be no pop-up window. These
alarms do, however, appear in the alarm list.
Activating event
pop-up windows
If you want to be notified of events in a pop-up window, you
can activate this option under Settings > Event popup.
Figure 5-1 Settings screen
Figure 5-2 Activate event pop-up window
A pop-up window contains the main information about the
event or alarm concerned:
Figure 5-3 Pop-up window with event
Figure 5-4 Pop-up window with
unacknowledged alarm
19/34
Siemens Building Technologies
Siemens Building Automation
PXM10 operator unit
CM110397en
31.08.2004
The display shows a time stamp, the object name, the
notification text and the alarm priority. In the case of alarm
messages, you can display the Alarm list directly (see
Section 5.2).
Deleting a popup window
Press Esc to delete a pop-up window without affecting the
alarm.
5.2
Displaying the alarm list
Figure 5-5 The Alarms menu (alarm list)
The alarm LED lights up and flashes.
Step
1
Procedure
or
by selecting the Alarms option.
Display the alarm list either by use of the alarm
button.
Figure 5-6 Plant data screen
2
The alarm list opens. Unacknowledged alarms
and alarms that have been acknowledged but not
yet reset are displayed here.
Each line contains the object name and the alarm
symbol. All the associated information can be
displayed by use of the Info button.
20/34
Siemens Building Technologies
Building Automation
PXM10 operator unit
CM110397en
31.08.2004
Notes
Note that for each object, only the current alarm, i.e. the last
alarm received, is displayed.
Acknowledged alarms and reset alarms are removed from
the PXM10 display.
Exception
Acknowledged extended alarms (which require a reset)
continue to be displayed in the alarm list until they are reset.
5.3
Step
1
Acknowledging alarms
Procedure
Highlight the required alarm in the alarm list (Figure 5-3).
The "bell" symbol shows the status of the alarm (see the
symbol in Section 2.3.3:
2
Acknowledge the next alarm.
Figure 5-7 Prompt for acknowledgement
Use the push-dial to select No or Yes and
acknowledge with OK.
The alarm LED will stop flashing and switch off. The
bell symbol is marked with a tick, representing
"acknowledged".
With extended alarms, which require a reset once
the fault has been cleared, the alarm LED stays on
(see Section 5.4).
3
or
Note
Acknowledge the next alarm
Press Esc to close the alarm list.
Basic alarms disappear when the fault has been cleared:
they do not require acknowledgement.
21/34
Siemens Building Technologies
Siemens Building Automation
PXM10 operator unit
CM110397en
31.08.2004
5.4
Resetting extended alarms
Extended alarms additionally require a reset. Delete the
associated pop-up window by pressing Esc.
STOP
Caution
The alarm can only be reset after the fault has been cleared.
Step
1
2
3
4
5
6
Procedure
Navigate to the Alarms option (Figure 5-4)
Confirm with OK. The alarm list opens (Figure 5-3)
Highlight the required alarm and confirm with OK.
Clear the fault
Open the alarm list again
Select the required alarm and confirm with OK.
Figure 5-8 Resetting an alarm
7
8
9
Use the push-dial to select No or Yes
Confirm with OK to reset the alarm.
The alarm disappears from the alarm list.
22/34
Siemens Building Technologies
Building Automation
PXM10 operator unit
CM110397en
31.08.2004
6
Scheduler
The Scheduler consists of a "Day profile" option (for 7-day
programs) and a "Special period" option for exceptions.
• In the "Day profile" you can define switching operations to
be repeated week after week.
• In the "Special period" menu, you define individual days
which deviate from those defined in the day profile.
Note
The names and locations of these time schedules are
defined on a plant-specific basis. The following illustrations
are examples only.
6.1
Day profile
In the Day profile you can define separate switching periods
for each day of the week, which are then repeated week after
week..
Figure 6-1
23/34
Siemens Building Technologies
Siemens Building Automation
PXM10 operator unit
CM110397en
31.08.2004
6.1.1
Step
1
Editing an existing profile
Procedure
Highlight the Day Profile option and click OK to
open it
Figure 6-2
2
In the Day profile menu, highlight the required day
and click OK to open it.
Figure 6-3
A screen appears with a graph representing the day
profile.
Figure 6-4 Day profile
24/34
Siemens Building Technologies
Building Automation
PXM10 operator unit
CM110397en
31.08.2004
Step
3
Procedure
Click OK to open the input window
Figure 6-5 Input fields for the day profile
4
Rotate the dial to set the required time and switch
status. Move to the next input field by pressing OK
in each case.
5
Finally, confirm the inputs with OK.
6.1.2
Step
1
Adding a new entry
Procedure
Highlight the Day Profile option and click OK to
open it
Figure 6-6
2
Highlight the required day and open it with OK.
Figure 6-7
25/34
Siemens Building Technologies
Siemens Building Automation
PXM10 operator unit
CM110397en
31.08.2004
A screen appears with a graph representing the day
profile.
Figure 6-8
3
Rotate the push-dial until the cursor marks New
entry, and then define the new switching operation.
Figure 6-9
6.2
Special periods
The Special period option is used to define individual days
which deviate from those defined in the "Day profile".
Step
1
Procedure
Highlight the Special period option and open it with
OK.
Figure 6-10 Special period
26/34
Siemens Building Technologies
Building Automation
PXM10 operator unit
CM110397en
31.08.2004
2
A window opens, containing the following options:
• New entry
Define a new special period
• Others
Edit an existing special period
Figure 6-11 Special period screen
3
or
Continue as described in Section 6.2.1 Others
as in Section 6.2.1, Adding a new entry
27/34
Siemens Building Technologies
Siemens Building Automation
PXM10 operator unit
CM110397en
31.08.2004
6.2.1
Others
Step
1
Procedure
Open the required entry and confirm with OK.
Figure6-12 Existing entry under Others
2
Edit the individual values as required and confirm
with OK.
Figure 6-13 Individual entries
STOP
Caution
The date type and priority should be modified only
by a fully trained person.
28/34
Siemens Building Technologies
Building Automation
PXM10 operator unit
CM110397en
31.08.2004
6.2.2
Step
1
Adding a new entry
Procedure
In the Special period field highlight the New entry
option and confirm with OK..
Figure 6-14
2
The New entry screen will appear.
Figure 6-15
3
The profiles are defined individually at the
engineering stage.
Note
STOP
Open the individual entries.
Rotate the push-dial to set the required values.
Move to the next input field by pressing OK in each
case.
Caution
The date type and priority should be defined only by
a fully trained person.
4
Wildcards
Confirm inputs with OK and use the Esc button to
back out again.
You can use wildcards when entering the date type, week &
day, and the date. Each wildcard represents any value in the
day, month or year. To enter wildcards, rotate the push-dial
anticlockwise until the wildcard "stars" appear. Wildcards
29/34
Siemens Building Technologies
Siemens Building Automation
PXM10 operator unit
CM110397en
31.08.2004
appear in the display panel in the form of the symbol shown
to the left.
Example:
A new special period is to be defined, which is to take effect
st
on New Year's Day, i.e. on 1 January of every year. The
calendar year values change annually. You should therefore
enter the date as follows:
01.01. ***
30/34
Siemens Building Technologies
Building Automation
PXM10 operator unit
CM110397en
31.08.2004
7
Index
Adjusting setpoints.............................................................. 17
Alarm button..........................................................................9
Alarm LED.............................................................................9
Alarm list
Displaying ................................................................. 20
Alarm pop-up ...................................................................... 19
Alarms
Acknowledge ............................................................ 21
Reset ........................................................................ 22
Alarms................................................................................. 19
Buttons
Esc.............................................................................. 8
Printing convention ..................................................... 6
Commissioning ................................................................... 14
Contrast .............................................................................. 16
Day profile........................................................................... 23
Edit............................................................................ 24
New entry.................................................................. 25
Display ................................................................................ 10
Graphs ...................................................................... 13
Pop-up ...................................................................... 12
Working area ............................................................ 11
Display panel ...................................................................... 10
Esc button ......................................................................... 6, 8
Event
Enable pop-up .......................................................... 16
Popup ....................................................................... 19
Events................................................................................. 19
Graphs ................................................................................ 13
Housing.................................................................................7
Info button .............................................................................9
Interruption.......................................................................... 15
Keys
Esc.............................................................................. 8
LED.......................................................................................9
Logout ................................................................................. 15
Menu line ............................................................................. 11
31/34
Siemens Building Technologies
Siemens Building Automation
PXM10 operator unit
CM110397en
31.08.2004
Operator controls
Printing convention ..................................................... 6
Parallel operation ................................................................ 14
Pop-up ................................................................................ 12
Delete ....................................................................... 20
Pop-up window ................................................................... 19
Printing conventions..............................................................6
Redaing and editing values.................................................17
Schedule
Special period ........................................................... 26
Scheduler............................................................................23
Setting the date................................................................... 16
Setting the object view ........................................................ 16
Setting the time ................................................................... 16
Settings ............................................................................... 15
Special period ..................................................................... 26
New entry.................................................................. 29
Others ....................................................................... 28
Symbol
Alarm ........................................................................ 13
Favorite objects ........................................................ 13
Forced value ............................................................. 13
Info window............................................................... 13
Pop-up window ......................................................... 13
Wildcard.................................................................... 13
Wildcards ............................................................................ 29
32/34
Siemens Building Technologies
Building Automation
PXM10 operator unit
CM110397en
31.08.2004
33/34
Siemens Building Technologies
Siemens Building Automation
PXM10 operator unit
CM110397en
31.08.2004
Siemens Building Technologies Ltd.
Building Automation
Gubelstrasse 22
CH-6301 Zug, SWITZERLAND
Tel. +41 41-724 24 24
Fax +41 41-724 35 22
www.sbt.siemens.com
© 2004 Siemens Building Technologies Ltd.
Subject to alteration
34/34
Siemens Building Technologies
Building Automation
PXM10 operator unit
CM110397en
31.08.2004