Transcript
ENGLISH
®
SALTDETECT - OPERATING INSTRUCTIONS
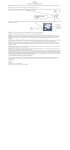
Unit components
- Sensor (B)
- Wire +- 2 metres (K)
- Power supply unit (Q)
Installing and setting the appliance
The total distance to be detected is at least 11 cm (+- 4 inches) up to 120 cm (+- 47 inches).
Hang the power supply unit on the wall by using a screw (M) or by using double-sided adhesive “Velcro” tape (N), as close to a power point as possible (D).
Make an opening of 2.2 cm in diameter in the salt tank cover (A) of the water softener, as centrally as possible so that the sensor faces the salt (E) in as straight
a line as possible.
Place the sensor in the salt tank cover (B), with the detector eye (I) facing down onto the salt.
Now screw the sensor onto the cover using the fastening bolts (L).
Then put the exchangeable plug (C) into the power point (D).
Caution! Make sure the sensor faces only the salt (E).
Proceed to section 1 or 2.
1) If the salt tank is empty
First set the switch (P) to the highest position = number 2 at the highest position.
Fill up the salt tank (E) up to the minimum level specified by the fitter = 1/3 of the total salt tank height.
Proceed to section 3.
2) If the salt tank is about half full or full (where you cannot set the level because there is too much salt in the tank).
First set the switch (P) to the highest position = number 2 at the highest position.
Then take a handful of salt and put it on the floor.
Now measure the desired level using a distance meter.
Proceed to section 3.
3) Continuation of sections 1 and 2
Take a pointed object, such as a pen, and set the desired level by pressing the setting button (F) on the power supply unit for up to 2 seconds in order to
calibrate it.
When you hear one tone from the buzzer (G) and the green indicator (H2) lights up at the top of the power supply unit (Q), this means that the appliance is
calibrated at the desired detection level.
The buzzer (G) and green indicator (H2) should only give one signal during calibration. If several signals are given, this means that the detection level (J) has
not been calibrated.
You can test this by raising the sensor 1.5 cm (0.5 inch) = above the calibrated level.
If the red indicator flashes (H1) and the buzzer (G) can be heard, the calibration has been completed.
If this is not the case, try again until you see one single green indicator signal and you hear one single buzz.
If the red indicator (H1) flashes and the buzzer (G) goes off, this means that the lowest set level has been reached and salt has to be added.
If the red indicator lights up permanently and the buzzer does not work, this means that the sensor has to look too far = more than 120 cm (+- 47 inches).
If the green indicator lights up permanently and the buzzer does not work, this means that the system is working properly.
4) Setting the buzzer
You can set the buzzer as follows. (You can choose between buzzer high, buzzer low or buzzer off)
Buzzer high: Set the switch (P) to the highest position = number 2 at the highest position.
Buzzer low: Set the switch (P) to the middle position = number 1 at the middle position.
Buzzer off: Set the switch (P) to the lowest position = number 0 at the lowest position.
The lights will always keep working!
-If after setting or some time afterwards the appliance gives a continuous buzz = the red indicator (H1) flashes and/or the buzzer (G) goes off, this means that
the lowest level under the set minimum limit has been reached, and that salt has to be added.
---------You do not need to fill up the salt tank completely if you do not wish, or if you do not have enough salt.
If you have run out of salt, you may remove the exchangeable plug (C) from the power point (D) until you have stocked up on salt again.
The detection level memory will remain calibrated and will not disappear.
When you buy a different type of water softener, you need to reset the level by pressing the setting button (F) for up to 2 seconds at the desired detection level.
Caution!
- NEVER drop the appliance!
- If the detector eye (I) = side facing the salt, has become dirty for some reason, clean it with a soft dry cloth.
- If you need to fill up the salt tank, place the salt tank cover (A) very carefully upside down on the floor with the detector eye facing upwards so as not to
damage (scratch) the sensor (B).
- Never let salt touch the sensor, since this may cause scratches.
- After you have added salt, always smooth the salt surface evenly.
---------Caution! The detector eye (I) must never come into contact with salt or water!
---------If you have any questions or problems, call your fitter.
Drawing: at the end.