1
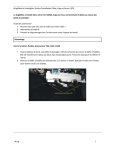
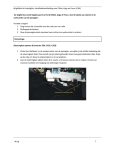
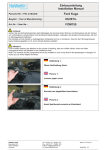
dLightBox for AutoLights: Installation Manual for Cmax, Kuga and Focus II (EN)
To build in a dLightBox into your Ford Cmax, Kuga and Focus you have to connect 6 cables in the
footwell area of the passenger:
Before you begin:
1 Make sure you have the radio code
2 Disconnect the battery
3 Push the passenger seat to back to create workspace
Disassembly
Open the fuse box (to access connector C96, C102 and C103)
1
2
dling
Under the dash in the passenger footwell, remove the fabric cover the fuse box cover. This is
kept in place by two yellow plastic clips. Squeeze the clip to release and remove.
Disconnect the 2 black screws in front and the cabinet will tip forward to access the fuse box.
1
dLightBox for AutoLights: Installation Manual for Cmax, Kuga and Focus II (EN)
Accessing connector C111
Connector C111 is located behind the
plastic panel on the base of the A-pillar in
the footwell on the passenger side.
Everything is fastened with clips and can be
removed without tools, simply by pulling
gently :
1
2
3
Remove the horizontal trim underneath
the glove box (Pulling to the chair). Only
for Kuga and Cmax, not Focus.
Open the glove box and remove the trim
strip between the glove box and door
(pulling to the chair)
Remove the plastic panel at the base
of the A-pillar between the glove box
and the floor (pulling to the steering
wheel).
Mounting dLightBox
Depending on the model year of your Ford, there are 2 different versions of fuse boxes. The differences
relate only to the location of the fuses. The connectors C96, C102 and C103 are at the same locations.
Connect the following 4 cables from the dLightBox through Scotchlok connectors with cables from
connectors C96, C102 or C103 as described below (By disconnecting connectors C96 and C102, you can
easily see the pin numbers at the bottom):
1
2
dling
Connector C96: Green / White wire to pin 7
Connector C102: Black wire on pin 19
→
→
White cable of dLightBox
Black cable of dLightBox
2
dLightBox for AutoLights: Installation Manual for Cmax, Kuga and Focus II (EN)
3
4
Connector C102: Green / Red wire at pin 30
Connector C103: Green / Red wire at pin 5
→
→
Red cable of dLightBox
Green cable of dLightBox
The last 2 cables must be connected as follows:
5
On the C111 connector, select the
Green / Yellow wire on pin 19 (pin 19
is the first on the middle row ).
You need to cut the wire at 5 cm from
the connector.
Connect both sides of the cut wire with shrink tubes with the following cables from the
dLightBox:
a Green / Yellow wire to the top
→
Brown cable of dLightBox
b Green / Yellow wire down
→
Blue cable of dLightBox
The dLightBox is connected, you can check operation.
Assembly
Reassemble all panels, by running the disassembly procedure in reverse order.
Remember:
● Enter the radio code again
● If you have power windows, calibrate the automatic opening and closing of the windows. (Check
the manual of your car to get the procedure).
dling
3