1
User manual
Mode
d’emploi
Time and date
of call*
Maestro 6042
New call not yet
consulted*
Position in Call Log*
*Subject to subscription from Proximus
3.1 Setting the clock
4.3 Redial
When the menu shows "TIME/DATE":
l
l
l
10000612 Rev.1 (EN)
l
l
Connect one end of the spiral cord to the handset and the
other into the slot on the left side of the telephone.
Plug the line cord into the slot at the back of the set (behind
the display) and plug the telephone jack into the wall
socket.
Connect one end of the power cable into the socket
provided on the back of the set (behind the display).
display. You have 10 seconds to initiate the call, either by
.
l
To adjust the setting, press p to scroll through the digits.
l
To move on to the next parameter (hour/minute/day/month),
press q.
4.4 Using hands-free mode
l
Press
Tips on using hands-free mode
again to save.
lifting up the handset, or by pressing
Line cord connector
Power supply connector
3/07/14 13:58
Proximus thanks you for choosing the Maestro 6042, a
Avoid talking at the same time as your correspondent.
When the menu shows "SELECT CONTRAST":
l
Avoid using hands-free mode in noisy environments: the
Press
Press
public analogue network, and is approved in compliance with
European regulations, as attested by the CE mark.
Check that the following are all in the box:
Handset
Spiral cord
Phone line cord
Caution:
l Only use the 9V DC power supply provided with the
telephone.
Orientation
3.3 Selecting the call parameter
M3
Memory label
Power cable
1.2 Cleaning
l
Press
l
Use the p or q keys to select the flash time.
l
Call Log*
Correct / Erase
input
Display
Program key
Quit menu / Flash (access
to operator services*)
l
Secrecy (mute)
Adjust hands-free
/ handset volume
Incoming call LED
/ Hands-free
Redial
Press
u
l
Volume amplifier
Direct-access
memories(M1, M2 & M3)
3. SETTINGS
To go into settings mode:
Open menu /
Confirm input
.
A LED lights up above the
Press
key .
Similarly, at any point in a hands-free conversation, you can
.
Press
l
Enter the number (up to 32 digits).
l
Press
l
Enter the associated name (up to 12 characters) using the
keypad.
4.5 Adjusting the volume
silent
The display shows: "SET
OR
Use the p or q keys to scroll through the menu functions.
If the ringer is silent, the red LED
incoming calls.
(hands-free mode).
again
Note: You can go back a step or quit the menu at any time by
pressing
.
Setting the display language (French, English, German and
Dutch)
When the menu shows "CID LANGUAGE":
l
Press
Dial the number of your correspondent (for stored numbers,
see §5.2 "Calling a Phonebook number").
l
Select the language using the p or q
l
Press
To talk without picking up the handset (i.e. in hands-free
mode):
At any time during a call, you can raise or lower the volume
by pressing
as many times as required (4 levels).
.
red LED above the key lights up.
active), you can
three times.
Dial the number of your correspondent (for stored numbers,
see §5.2 "Calling a Phonebook number").
.
The call is initiated automatically.
At the end of the call, replace the handset or press
again.
to save the name.
keys can be used to
To erase / change a memory:
l
Press
.
Scroll through with the p or qkeys (or press the selected
memory directly:
,
,
or 0 to 9), Now you
have two options :
l
Press
The telephone will remember the last volume level.
l
Enter the new name.
Special function: "earpiece amplifier" (on the handset)
l
Press
This function is intended mainly for people with hearing
difficulties. It raises each volume level in the handset by 6
decibels.
During a call (only when using the handset), press
key lights up in red.
- the
Each volume level is increased by 6 decibels. If it still isn't
At the end of the call, press
again.
Press
once.
as required (8 levels).
l
l
- Press
Enter the new number directly (using the keypad).
as many times
function, press
. When you put the handset down after the
call, the function is automatically turned off.
u
twice.
l
raise or lower the volume by pressing
When your correspondent answers, speak directly without
picking up the handset.
Pick up the handset or press
- Press
Press
l
l
once.
l
loud enough, press
keys.
- Press
Erase a memory and replace it with a new one:
Dial the number of your correspondent (for stored numbers,
see §5.2 "Calling a Phonebook number").
l
again to save.
At the end of the call, replace the handset.
Note: At any time during the call, you can switch to handsfree mode by pressing
. When the red LED lights
up, you can replace the handset.
l
once.
The
,
,
and
enter special characters.
l
Setting the handset volume:
If you are talking in hands-free mode(
Dialling the number before picking up the handset:
.
lights up to signal
Setting the hands-free speaker volume:
l
u The
- Press
To insert a pause when storing a number, press
.
The ringer volume slider is on the right-hand side of the
telephone. Move the cursor to the desired setting: silent, low
or high.
Pick up the handset.
".
again to save the number.
Note: At any time during this procedure, you can erase the
previous digit or letter by pressing .
high
low
again to save.
l
Press
to confirm the memory location.
Example: for "PAUL":
l
4.1 Answering a call
l
Select the chosen memory location (pad keys 0 to 9 for
indirect memories or keys
,
,
for direct
memories).
l
turns off).
.
Pick up the handset or press
display shows “I0-I9”.
To insert a space, press
4. MAIN FUNCTIONS
l
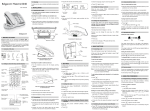
See chapter 1.3 At-a-glance guide to the keys and display.
Open Phonebook /Dial
from Call Log*
l
Setting the ringer volume:
To talk via the handset:
M2
menu / Open
u
.
u The
turn off hands-free mode by picking up the handset (the LED
Spiral cord
M1
pqBrowse
Press
Press
Note: You can use the p or q keys to scroll through all the
memory locations.
Turning hands-free mode on/off
l
4.2 Making a call
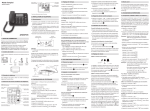
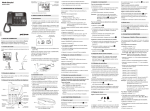
1.3 At-a-glance guide to the keys and display
when you finish saying something.
You can switch to hands-free mode at any time.
At the end of the call, replace the handset or press
(hands-free mode).
Line cord
Power cable
To clean your set, use an antistatic cloth lightly moistened
with water.
To store a number in memory:
When the menu shows "FLASH TIME":
This appliance is equipped with a switching power supply; it
therefore has very low electricity consumption.
Base
again to save.
Default flash time for Belgium is 120 ms.
AC/DC power adapter model: K06S090010G
Manufacturer: Dongguan Guanjin Electronics Technology Co., Ltd
AC: 100-240V - 50/60 Hz -300mA
Output: 9V DC 100 mA
1.1 Contents of the box
You can store up to 13 names and numbers in memory
(3 direct-access memories + 10 indirect memories). An
adhesive label (supplied in the box) can be used to record
the names corresponding to memory keys
,
and
. It is designed to be affixed under the handset to the
left of key 4.
the hands-free function from switching to receive mode
Use the p or q keys to select the contrast level on the
display (4 levels).
telephone specially adapted for people with hearing difficulties
The Maestro 6042 is designed for connection to the Belgian
microphone can pick up ambient noise and this will prevent
.
5.1 Programming / Changing / Erasing a memory
l
Contrast
Flash time (timed loop break):
or impaired vision.
Stay fairly close to the telephone so that the person you
l
It is not necessary to modify the following parameter
which is preset to work on the Belgian network:
1. BEFORE STARTING
-13110042-Maestro 6042 Black-Cover.indd 1
.
are speaking to can hear you clearly.
The display can be positioned manually (raised or lowered as
preferred).
Plug the other end into an electricity socket.
: the last number called appears on the
Press
3.2 Setting the display contrast
2.1 Connections
Press
l
l
2. INSTALLATION
5. USING THE PHONEBOOK
again (without deactivating the
.
to save.
Change a memory or erase it without replacing it:
l
Press
l
Correct the number using the
key, or erase each digit
one by one, again using the key, to delete the number
completely.
l
Press
l
Correct the name using the
to delete the name.
l
Press
key) until you obtain the right volume. To turn off the
.
.
key, or erase all of the letters
again to save.
5.2 Calling a Phonebook number
4.6 Secrecy mode
To put your correspondent on hold while you talk to someone
next to you, press the
.
key, which then lights up in red.
To exit secrecy mode, press
again.
Direct-access memories (M1, M2, M3):
l
Pick up the handset or press
.
l
Press the direct-access memory key
.
u The
call is initiated automatically.
,
or
Indirect memories (I0 to I9):
6.2 Compatibility with Proximus voicemail
service* (PHONEMAIL)
l
Pick up the handset or press
.
l
Press
l
Use the p or q keys to scroll through the Phonebook to
find the name you want.
to open the Phonebook.
l
or
l
Press the corresponding memory location (0 to 9).
l
Then press
to initiate the call.
Press
u The
l
is shown on the display.
l
Contact Proximus for more information.
6.3 Other network service functions*
In conversation, R key allows access to other Proximus
services (2nd call, toggle between 2 correspondents, 3-way
conference).
5.3 Saving the last dialled number
l
When a new voicemail message is received, the icon
.
Contact Proximus for more information.
display shows "PICKUP PHONE".
Press
followed by the memory location key (0 to 9
or the direct access keys
,
or
).
l
Press
once to save the number.
l
Enter the correspondent’s name, using the keypad.
l
Save by pressing
7. TROUBLESHOOTING
Problem
.
6. NETWORK SERVICE FUNCTIONS*
(subject to subscription)
6.1 Identifying callers
The Maestro 6042 enables you to use the caller name/
number identification service* to identify callers before
answering, or if a call comes in while you are already on the
line with somebody else.
The last 75 incoming calls (whether you answered them or
not) are listed in the Call Log.
You have
difficulty
reading the
display
Cause
Solution
Adjust the contrast (see
§3.3 "Setting the display
The contrast is too contrast").
weak
Tip: the "contrast setting"
function is the 3rd item in
the menu
The display is at
the wrong angle
Move the display by hand
into the optimal position.
The display
The power supply Check the power
and hands-free
is not connected connections (see §2.1
feature are not
properly
"Connections").
working
Call Log
The display shows: "X NEW CALL(S)" for missed calls that
you haven’t consulted, or "X CALL(S)" for missed calls you
have consulted and calls you have answered.
The telephone
Check the line cord
jack is not properly connections (see §2.1
"Connections").
There is no dial plugged in
If the caller number matches a number in the Phonebook, the
name associated with the number is displayed*.
tone
The display also shows the time and date of the call and the
is shown the first time
order in which calls are received.
you consult a missed call.
Consulting the Call Log:
l
Use the p or q keys to scroll through the Call Log.
u
The display shows the message "START/END" at the
beginning and end of the list.
Deleting a number from the Call Log:
To delete the displayed number, press
.
Deleting all the numbers in the Call Log:
You can delete all the numbers from the Call Log list while
consulting it, or when the display shows the number of (new)
calls. To do so:
l
Press and hold down the
"ERASE ALL?".
l
Press
key until the display shows:
to confirm.
Saving a number from the Call Log in the Phonebook:
l
To save the displayed number, press
.
Calling someone back from the Call Log:
l
While consulting the Call Log, you can call the displayed
numbers by pressing
:
u
"PICKUP PHONE" appears.
l
To dial out, off-hook the handset or press
.
l
If the phone is connected behind a private switch (PABX)
and a prefix is required to dial out, press the selected digit
on keypad (to delete , press #).
l
To dial out, off-hook the handset or press
.
l
If "CAN’T BE DIALED" appears, the number cannot be
called back because it was not disclosed by the fixed
telephone network.
The telephone
doesn’t ring
The earpiece
volume is too low
Increase the volume
setting (see §4.5"
Adjusting the volume").
The ringer is off
Adjust the ringer volume
(see §4.5 "Adjusting the
volume").
The line cord is
disconnected
Check the line cord
connections (see §2.1
"Connections").
Secrecy mode
Your
Turn off secrecy mode
(Mute) is active:
correspondent
(Mute) by pressing
.
the
key LED is
can't hear you
The LED turns off.
on
8. GUARANTEE TERMS
9. SAFETY
The Equipment you have bought has been carefully selected
by Proximus and is covered by a two-year warranty on spare
parts and labor in the event of any material or manufacturing
defect, unless otherwise specified. The warranty shall be
valid from the date on which the equipment is collected or
delivered.
In the event of danger, the mains adapter acts as 230V power
isolating device.
If you have any problems with the equipment, you should
take it to Proximus Center or to one of our authorized agents,
in its entirety and in its original packaging, or in packaging
providing the same degree of protection, together with the
original receipt.
If the mains adapter fails, it must be replaced by an identical
model.
Your equipment will be repaired or replaced free of charge,
on presentation of the receipt, in the event of any material or
manufacturing defect.
10. ENVIRONMENT
Proximus alone shall determine what repairs and/or
replacements are necessary. The warranty on the repaired
or replaced equipment shall end on the date on which the
original warranty on the purchased equipment expires, but
shall not be less than 3 months.
The warranty shall not cover:
- damage of any kind that does not predate the sale;
- any damage, faults or defects attributable to the Customer
or to causes unrelated to the Equipment: lightning, power
surges, humidity, accidental damage, improper use or poor
maintenance, failure to comply with the instructions in the
user manual, and force majeure;
- the repair or replacement of movable parts (cords, wires,
plugs, aerials,etc.), consumables (cells, batteries, paper,
ink, etc.) needing regular replacement and the supply of
cleaning products.
The warranty shall not apply:
- to any changes or repairs to the Equipment undertaken
by the Customer himself/herself or through the services of
persons not designated by Proximus;
- if the Customer removes or tampers with the manufacturer’
s serial numbers and/or brand names on the Equipment;
Proximus shall not be liable for any indirect or immaterial loss
sustained by the Customer as a result of the malfunctioning
of the terminal Equipment, such as any loss of production,
revenue or contracts.
It should therefore, as a precaution, be installed close to the
appliance and be easily accessible. To disconnect the device
from the primary power source, the mains adapter must be
removed from the 230 V AC / 50 Hz socket.
!Do not use your telephone to notify a gas leak when
standing in the vicinity of the leak.
The equipment that you bought has required the
extraction and use of natural resources for its
production. It may contain hazardous substances
for the health and the environment.
In order to avoid the dissemination of those substances in
our environment and to diminish the pressure on the natural
resources, we encourage you to use the appropriate takeback systems. Those systems will reuse or recycle most of
the materials of your end life equipment in a sound way.
The crossed-bin symbol invites you to use those systems.
If you need more information on the collection, reuse and
recycling systems, please contact your local or regional waste
administration.
You can also contact us for more information on the
environmental performances of our products.
! The General Terms and Conditions for the Sale of
Equipment can be obtained on request from any Proximus
service available to the public or at www.proximus.be
R.P. Ariane Marchant,
Proximus PLC under Belgian Public Law,
Bd du Roi Albert II 27,
B-1030 Bruxelles