1
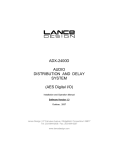
The Industry Leader in Ice Control Engineering
CONTENTS
I.
II.
III.
IV.
V.
VI.
VII.
VIII.
IX.
X.
XI.
XII.
XIII.
Safety Instructions……………………………………...
General Owner’s Instructions…………………………..
Warranty, Warranty Claim, & Return Policy…………...
Maintenance Recommendations………………………..
De-Icer Installation Instructions, Specs, & Sizing...……
Replacement Parts & Assembly Diagram…………...….
C-10 Instructions…………………………….………….
C-20 Instructions………………………………………..
Universal Dock Mount Instructions…………………….
Horizontal Float Instructions……………………………
Troubleshooting Tips…………………………………...
Customer Repair Form………………………………….
Warranty Registration Information……………………..
Kasco Marine, Inc.
800 Deere Rd.
Prescott, WI 54021
Phone (715) 262-4488 * Fax (715) 262-4487
www.De-Icer.com * [email protected]
2
3
4-5
6
7-9
10
11-12
13-14
15-16
17-19
20
21
22
Made in the USA
Rev. 8/2/07
2
We at Kasco Marine, Inc. would like to both thank and congratulate you on your purchase of
the De-Icer. We appreciate you choosing Kasco and for your purchase. Kasco is the industry
leader of De-Icing equipment and technology. Your decision to purchase Kasco’s De-Icer will
not disappoint you. We thank you for choosing Kasco for your De-Icing needs and want you
to be completely satisfied with your purchase.
IMPORTANT SAFETY & HANDLING INSTRUCTIONS
Please read and follow these extremely important safety and handling instructions for your
Kasco equipment. Following these instructions will help ensure your safety and the quality
performance of your equipment.
•
•
•
•
•
•
•
•
•
Under NO circumstances should anyone enter the water with the electrical equipment
plugged in and/or in operation. All Kasco De-Icers are ETL approved to UL and CSA standards for safety in water. However, it is NEVER recommended to enter the water with the
equipment in operation.
Caution should be used when dealing with any electrical and/or moving equipment. Always keep people and objects clear of the propeller when operating.
NEVER run the unit out of water. It will damage the seals and create a dangerous situation
for the operator.
Extreme caution should be used around open water, especially cold water, which poses a
hazard in and of itself.
Always disconnect the electrical power before servicing or removing your De-Icer.
NEVER lift or drag the De-Icer by the power cord. This could damage the power cord and
make your De-Icer unsafe to operate. If you need to pull the unit, use the mooring ropes.
Kasco Marine recommends that precautions be taken around open water de-icing areas to
ensure the safety of the public, i.e., “Thin Ice” and/or “Open Water” signs, appropriate
lighting, fencing, or other safety measures required in your area.
The De-Icer is supplied with an internal grounding conductor and a grounding-type attachment plug. To reduce the risk of electrical shock, be certain that the De-Icer is plugged into
a GFI protected circuit.
Please Note: Under certain conditions, no de-icer can prevent damage from ice movement
caused by wind or current, or from extremely cold weather causing ice to form all the way
to the bottom and in some cases where bottom water temperature is the same as the ice. Effective de-icing can also be retarded when used in extremely shallow conditions.
3
GENERAL OWNER’S INSTRUCTIONS
INSPECT THE SHIPMENT
Immediately inspect your Kasco De-Icer shipment for any visible damages. Also cross reference the
parts supplied with the Parts Included sheet to check for shortages. Shortages should be reported immediately to your Kasco Marine distributor or representative and damages reported to your carrier and
Kasco Marine.
CAUTION
WARNING: Under NO circumstances should anyone enter the water with the unit in operation.
Always operate the unit in the water and keep people and objects clear of the propeller. Do not lift or
pull the unit by the electrical cord. Always use extreme caution around electrical equipment and water situations.
ASSEMBLY & INSTALLATION
Please see the proper Assembly and Installation Instructions enclosed in this manual. Each is specific
for your model and size of De-Icer and De-Icer accessory.
WARRANTY
Kasco De-Icers are the result of over 40 years of design and engineering. Kasco products are built to
withstand the toughest conditions. Kasco Marine backs each De-Icer with a 2 Year Warranty. This
warranty covers any and all manufacturers defects within 2 years from the date of purchase (See Warranty, Warranty Claim, & Return Policy on pages 4 & 5). Please register your De-Icer online at:
www.de-icer.com/solutions_warranty_registration.htm .
USE AND OPERATION
Kasco De-Icers are designed and engineered for continuous duty in the harshest environments, such as
in marinas or other commercial applications, or on-demand use, as may be needed.
Your Kasco Marine De-Icer is ready for immediate use (after installation). The motor is of an oilfilled design with ball bearings submerged in oil and equipment with a thermal overload protection
with an automatic reset. No further lubrication is necessary. It is extremely important that the installer make sure sufficient and proper voltage is available to the unit’s motor. The zinc anode located
below the propeller must be in good condition in order to prevent corrosion damage to the unit. The
zinc anode must be inspected periodically and replaced if it shows significant deterioration. Make
sure to keep the motor housing clean from hard water deposits and/or algae. (See Maintenance
Recommendations on page 6.)
The De-Icer is also completely assembled, you do not need bolts, screws, nails, or brackets, unless an
optional mounting device was purchased. All you have to do is suspend it in as little as two (2) feet of
water from piers, docks, or boats and plug it into a 15 amp outlet.
Kasco De-Icers are lightweight, energy efficient, and easy to install and operate. We strive to produce
products that exceed customer expectations. We hope you enjoy your Kasco De-Icer.
Please Note: Under certain conditions, no de-icer can prevent damage from ice movement caused by
wind or current, or from extremely cold weather causing ice to form all the way to the bottom and in
some cases where bottom water temperature is the same as the ice. Effective de-icing can also be retarded when used in extremely shallow conditions.
4
WARRANTY, WARRANTY CLAIM, & RETURN POLICY
2 Year Limited Warranty: Kasco® Marine, Inc. warrants this De-Icer to be free from defects in material or
workmanship (except for the ropes, power cord, ropes, and propeller) under normal use and service. The
Kasco Marine, Inc. obligation under this warranty is limited to replacing or repairing free of charge any
defective part within two (2) years from the date of shipment. Customer shall pay shipping charges for
returning the unit to Kasco or an Authorized Repair Center.
THIS WARRANTY IS IN LIEU OF ANY OTHER WARRANTIES, EXPRESSED OR IMPLIED,
AND ANY OTHER OBLIGATION OR LIABILITY WHATEVER ON THE PART OF KASCO
MARINE, INC. AND IN NO EVENT SHALL KASCO MARINE, INC. BE LIABLE FOR ANY
SPECIAL OR CONSEQUENTIAL DAMAGES.
Warranty is void if:
•
The De-Icer is not maintained properly according to the Maintenance Recommendations supplied in this
Owners Manual.
•
The De-Icer is returned for repair without the power cord or if the unit or power cord are altered in any
way from original shipment. Cuts in the power cord are not covered under warranty.
•
The De-Icer is damaged by unauthorized tampering.
•
The Sacrificial Zinc Anode around the propeller shaft shows significant deterioration. (The Anode must be
inspected periodically and replaced if necessary.)
Note: There are certain conditions under which no circulator can prevent ice damage such as ice that moves
due to wind or current, extremely cold weather where ice forms all the way to the bottom and in some cases
where the bottom water temperature is the same as ice (very shallow water). Effective operation can be somewhat reduced when flow is restricted by too little bottom clearance.
Warranty Claim Procedure:
Check the ten-digit serial number printed either on the black cover of the motor or on the blue nameplate and
determine the year of manufacture according to the serial number scheme below:
Sample Serial #
6001 D 2 1725
•
The first two digits represent the reverse of the last two digits of the year of manufacture.
Example: 60 = 2006 model year.
•
The third and fourth digits represent the week of the year. (Ex. “01” for 1st week in Jan.)
•
The fifth digit represent the model. (Ex. “D” for 2400D)
•
The sixth digit represents the horsepower of the unit in fourths: 2 = 2/4 = 1/2HP, 3 = 3/4HP, 4 = 1HP.
•
The remaining four digits are sequential.
The best method for establishing warranty period is registering your De-Icer online at the below address and/or
the original receipt. If the customer has registered the De-Icer online at:
www.de-icer.com/solutions_warranty_registration.htm ,
Kasco Marine will have a record of the purchase and will be able to determine whether or not the unit still caries warranty coverage.
5
Once the warranty coverage has been established, the unit may be sent to any Kasco Authorized Repair Center
for evaluation and repair. Please call Kasco Marine at 715-262-4488 prior to shipping to receive a Return
Authorization Number and/or Repair Form, then ship to:
Kasco Marine, Inc.
800 Deere Rd.
Prescott, WI 54021
Attn: Repairs
Or call Kasco Marine at 715-262-4488 to locate your nearest Authorized Repair Center. You can also email
Kasco at [email protected] .
Note: Only complete motor assemblies will be accepted for warranty repair. The power cord and all other
components must be returned with the motor as originally assembled. Any missing parts will be replaced at
the customer’s expense and, if determined to have caused the failure, could void the entire warranty. Some
parts are essential for structural support during shipping and others, such as the power cord, are essential to
properly diagnose potential causes of failure. It is not necessary to return the control box or float with the motor assembly, unless specifically asked to by a Kasco representative.
Please include the Repair Form received from Kasco Marine or your local distributor with the shipment. If no
Repair Form is available, include your name and physical address for return delivery of the repaired unit and a
daytime phone number and/or e-mail address for correspondence regarding the warranty claim.
Any expedited shipping method for the return of the unit is at the customer’s expense. Kasco Marine will return units repaired under warranty at our expense via ground freight within the continental United States.
Other Repairs:
Most failed equipment can be repaired at substantially lower costs than replacement with new. Please ship according to the instructions in the previous section. Again, it is best to call ahead for a Return Authorization
Number and/or Repair Form so we know the repair is coming.
Kasco Marine offers free estimates on repairs at the request of the customer. The request for estimate should
be included in the letter that accompanies the returned unit and must include a daytime phone number and/or
e-mail address. Estimate options are as follows:
•
•
We will contact the customer with a total after the unit has been evaluated, but before the work is performed.
We will repair the unit only if repair costs are under a stated dollar amount. Example: “Please repair if total is under $150.00 before shipping charges.”
All estimates that are rejected for repair will be destroyed unless otherwise directed by the customer. If the
customer would like the unit returned, the unit will be restored as closely as possible to the condition in which
it was received and shipped at the customer’s expense for shipping and handling charges.
Billing:
All non-warranty repairs will be returned to the customer and billed C.O.D. unless otherwise directed. Kasco
Marine also accepts Visa and MasterCard credit card payments. Kasco Marine will call for credit card information upon completion of the repair at the customer’s request.
All other warranty and repair inquiries should be directed to Kasco Marine, Inc. at 715-262-4488 or
[email protected] .
6
MAINTENANCE RECOMMENDATIONS
** Under No Circumstances should anyone enter the water while a De-Icer is operating. **
** Please keep the original box for maintenance shipping. **
The following maintenance procedures can be utilized to ensure many years of quality performance from your
Kasco De-Icer and reduce the need for more costly repair work.
•
PROPER INSTALLATION: Proper installation of Kasco equipment will include a power source with
ground fault interruption. Ground fault interrupters are a safety feature that can also alert you to electrical
leaks in the equipment. It is extremely important to test the GFI upon installation, each reinstallation, and
monthly thereafter to ensure proper operation. If you have repeat, consistent trips on your ground fault, the
equipment should be disconnected and removed from the water. The power cord should be inspected for
damage and you should call Kasco Marine at 715-262-4488 for further instructions or email Kasco at [email protected].
•
OBSERVATION: Operating equipment should be observed on a regular basis (daily, if possible) for any
reduction or variation in performance. If a change in performance is observed, the equipment should be disconnected from power and inspected for any material that may have clogged the system or wrapped around
the shaft of the motor, especially plastic bags and fishing line. Even though Kasco De-Icers are the most
clog-resistant on the market, it is impossible to protect against all items that can clog equipment and still
maintain a flow of water. These materials can be very damaging to the equipment under continued operation
and must be removed as soon as possible. ALWAYS UNPLUG THE UNIT BEFORE ATTEMPTING TO
REMOVE CLOGS.
•
SUMMER STORAGE: You Kasco De-Icer can be used during non-freezing times of the year to improve
water circulation and prevent stagnant water areas and poor water quality. If you do decide to store the unit
during non-freezing times it is not necessary to store Kasco motors upside down. All internal seals are fully
lubricated while stored in an upright position.
•
CLEANING: De-Icers should be removed from the water at least once per season to clean the exterior of
the system, especially the stainless steel motor housing (can). The motor housing is the surface that dissipates heat into the water and any algae, calcium, etc. build-up will become an insulator that blocks heat
transfer. In most cases a power washer will be sufficient if the unit and algae are still wet.
•
SEAL AND OIL REPLACEMENT: This is a sealed motor assembly and seals will wear out over time
(similar to break pads on a car). Replacement of the seals and a change of oil after three years may
add longevity to the operation of the motor, saving you the cost of more expensive repairs. In where the DeIcer runs most or all of the year, it is a good idea to replace seals more regularly than you would need to in
situations where the unit is removed from the water for several months.
•
ZINC ANODE: A Sacrificial Zinc Anode is supplied on the shaft of all De-Icers for protection of the
equipment from corrosion and electrolysis. It is extremely important that the zinc anode be updated
(replaced) if reduced to half the original size or if white in color. Corrosion from electrolysis is more commonly associated with saltwater or brackish water, but as a matter of precaution, it is important to periodically check the zinc anode in all installations (at least every two to three months; monthly in saltwater).
Seal replacement and all other repair services should be performed by Kasco Marine or a Kasco trained Authorized Repair Center. Any alterations or changes made to Kasco units by an unauthorized source will void the
warranty. This includes tampering with the unit, power cord, and/or control box. Please contact Kasco Marine,
Inc. at 715-262-4488 for your nearest Authorized Repair Center.
DE-ICER INSTALLATION INSTRUCTIONS
7
De-Icing is often referred to as more of an art form than an exact science because each situation is different
and unique. Kasco offers three basic ways for De-Icer installation, Vertical or Rope Suspension, Universal
Dock Mount Installation, or Angled or Horizontal Float Installation. Different De-Icing objectives may require different mounting/installation options.
STEP ONE
How and where to locate your De-Icer depends on your De-Icing objectives. If ice expansion pressure is your
concern, you may find it easier to have an open-water buffer between your dock or structure and the expanding
ice pack.
If ice lifting or a combination of lifting/expansion is your concern, you may wish to keep your dock, structure,
or boat area completely ice free. Both of these concerns or objectives are very different and may require very
different installations.
STEP TWO
Once you have determined your De-Icing objective, the next thing to do is determine the best location(s) for
installation. Remember, a De-Icer draws warmer, denser water from the bottom (39OF or 4OC is approximately water’s densest point) and circulates it upward to the surface. Around docks and boats water is usually
fairly shallow, so look for somewhat deep water to install your De-Icer. Up to a point, the deeper the water,
the warmer the water; however, if your De-Icer is installed too deep, the rising warmer water will not effectively spread at the surface, thereby reducing the De-Icing effect.
8
Although conditions change from one climate to another, a good guide is 4-6 feet deep for vertical installation, and slightly shallower in angled operation, but at least 1 foot off the bottom. Operating your De-Icer too
close to the bottom may increase the possibility of debris being picked up, causing the propeller to clog. In
colder climates, warmer water is a more important factor than surface circulation, so you may wish to install
your De-Icer deeper than the above guide lines. De-Icers generally will work in shallower water, but are less
effective and due to the constraints of your installation, you may have to settle for a shallower installation. It
is recommended that you experiment with more than one possible location for the best installation results.
STEP THREE
When you have determined both your De-Icing objectives and best installation points, it is time to analyze
what external constraints your De-Icing location (structures, i.e., dock, boat, etc.) may have that could affect
the flow of warmer water at the surface. Any obstruction at the surface of the water may slow or stop the flow
of warmer water. A natural current, such as in a river, will tend to force your De-Icing efforts downstream.
Once you have determined your external constraints, you can choose your installation point(s). Some useful
tricks you may wish to consider are:
•
•
•
•
•
De-Ice from the upstream side and let the current help, rather than hinder.
Boats are designed to allow water to flow from the bow to the stern with the least resistance. It is generally
easier to De-Ice a boat by installing the De-Icer at or near the bow, angled to push the De-Icing flow of water toward the stern.
It is generally easier to De-Ice a shallow area by bringing the warmer water from a deeper area into the
shallow area. Angle your De-Icer from the deeper water toward the shallow water.
When using more than one unit, it is better to angle all units in one direction, creating a current rather than
installing De-Icers in opposing directions.
In tidal waters, split the difference in water depth so the De-Icer is in shallow water at low tide and deep
water at high tide. If you are De-Icing a boat, it is easier to tie your De-Icer to the boat and allow the boat
and De-Icer to rise and fall with the tide together.
STEP FOUR
When installing your Kasco De-Icer for suspended operation with the provided ropes, make sure the ropes or
suspension lines are spread at least 8 to 10 feet apart. The high starting torque of your Kasco De-Icer may
cause suspension lines that are too close together to twist up and possibly damage the electrical power cord.
Tie each rope with a secure knot from the dock piling, cleat, boat etc. so the De-Icer hangs vertically.
Angling your Kasco De-Icer with suspension operation can be accomplished easily by simply changing the
mounting location of one suspension line. There is no need to remove the knot and splice of the rope, simply
change the point at which the line leaves the propeller cage by looping the rope around the top circular band
over 1 to 4 vertical cage wires (more than 4 not recommended. This will move the support lines off center
9
and allow the unit to hang at a slight angle. After installation and the unit is turned on, your Kasco De-Icer
will swing up to an angle (the angle is dependent on how many cage wires you move the line) and the De-Icer
will hold that angle during operation. This allows you to aim the flow of warmer water in the desired location.
If the Universal Dock Mount or Horizontal Float were purchased, see their Assembly and Installation Instructions later in this manual.
STEP FIVE
Once your De-Icer is properly installed and secured, you can now plug the unit into a properly grounded and
GFI protected circuit. If a C-10 Thermostat or C-20 Timer/Thermostat Controller was purchased, they can be
plugged into the outlet receptacle and the De-Icer plugged into the controller. See Controller Instructions later
in this manual.
STEP SIX (OPTIONAL)
On installations where open water area is required or desired to be limited/controlled, a curtain technique can be
used to block the flow of water and restrict the open water area. By draping a canvas tarp as a curtain in the water, you can successfully disrupt the flow of water from
the De-Icer. The canvas can be tied above the water
level and weighted at the bottom (easiest if you fold the
tarp in half and lay a chain in the fold as the weight).
The curtain needs to hang into the water a few feet. This
curtain will allow you to protect only the area you need.
As always, we recommend the ice-free area is well
marked.
UNIT SPECS.
Model
Voltage
F2400D
F3400D
F3400HD
4400D
4400HD
110-120
110-120
208-240
110-120
208-240
Operating
Amps
5.0 @ 120V
6.7 @ 120V
3.4 @ 240V
11.3 @ 120V
5.7 @ 240V
Lock Rotor
Amps
12 @ 120V
18 @ 120V
9 @ 240V
40 @ 120V
20 @ 240V
Kasco De-Icer Sizing Chart
Average Low Air Temperature (OF)
Minus 1O to Minus
34O-20O Orientation 19O - 0O Orientation 20O Orientation Great Lakes Orientation
HP Size Angled
Vertical Angled Vertical Angled Vertical Angled
1/2 HP 30' x 100'
65'
25' x 60'
50'
25' x 50'
45'
20' x 40'
3/4 HP 35' x 120'
85'
30' x 80'
70'
30' x 75'
65'
25' x 50'
40' x 150'
95'
35' x 90'
80'
35' x 85'
75'
30' x 60'
1 HP
Assumption:
Unobstruted water
200 acre plus body of water with 20 feet plus maximum water depth or greater
Water depth in de-icing area 4 feet plus
* Size may vary greatly based on a number of local conditions
Vertical
35'
45'
55'
REPLACEMENT PARTS & ASSEMBLY DIAGRAM
10
ITEM NO.
1
2
3
4
4A
5
5A
5B
6
7
8
9
5
1
PART NO.
990275
990280
990285
243475
840475
240170
340125
440400
261234
261240
990201
261231
4
3
DESCRIPTION
CORD O RING
SEALING PLUG
SEALING WASHER
ZINC ASSEMBLY (2400 & 3400 MODELS)
ZINC ASSEMBLY (4400 MODELS)
2400 K PROP (2400 MODEL)
3400 J PROP (3400 MODEL)
4400 M PROP (4400 MODEL)
HEX NUT
5/16-18 X 1 HHCS
CAGE
FLAT WASHER
2
QTY.
1
1
1
1
1
1
1
1
1
1
1
2
8
6
7
9
11
C-10 Thermostat Unit Control
Owners Instructions
CAUTION:
To ensure the safe operation and long life of your
Kasco Equipment, always take the following precautions:
• Always keep people and objects clear of the DeIcer propeller when operating.
• Always disconnect the power before servicing or
removing your De-Icer.
• Always operate your Kasco De-Icer in the water!
Operating your De-Icer dry (on shore or dock)
can cause damage to the seals or injure operator.
• Always mount your C-10 on a vertical surface
and operate only with the cover closed.
• Never lift your Kasco De-Icer or C-10 control by
the power cable. This could damage the power
cable and make your De-Icer or control unsafe to
operate.
• Kasco Marine highly recommends that all possible precautions be taken around open water DeIcing areas to ensure the safety of the public, i.e.,
“Thin Ice” and/or “Open Water” signs, appropriate lighting, fencing or other safety measures as
required in your area.
• There are certain conditions under which no circulator can prevent ice damage such as ice that
moves due to wind or current, extremely cold
weather where ice forms all the way to the bottom
and in some cases where the bottom water temperature is the same as ice (very shallow water).
Effective operation can be somewhat restricted by
too little bottom clearance.
INSPECTING YOUR C-10 UNIT CONTROL:
Upon receiving your Kasco C-10 Unit Control, please
unpack and inspect your C-10 for any possible damage that may have happened during shipment. Any
damage or shortage should be reported to your dealer/
delivery service immediately to ensure prompt resolution.
INSTALLATION:
This unit must be mounted on a vertical surface close
enough to your power supply to allow at least a slight
slack in the power cord from the C-10. Select the
screw(s) with which to mount your C-10. You will
need two for the mounting holes at the top of the box
and one for the mounting hole located at bottom of
the C-10 box.
Important: Your C-10 is designed to operate only
one Kasco De-Icer. For the most accurate operation,
avoid placing your C-10 in direct sunlight.
OPERATION:
Step One:
Plug the C-10 Power Cord into a properly grounded
120V outlet.
Step Two:
Set the temperature you desire the De-Icer to turn on
using the Thermostat dial on the C-10. It is recommended to set the temperature at 30OF (top black
numbers). The C-10 works on temperature fall.
When the ambient air temperature reaches the set
point on the thermostat, the De-Icer will turn on.
There is a 2.5OF differential, so when the temperature
rises to 2.5OF above the set thermostat temperature,
the De-Icer will turn off.
Step Three:
Plug the INSTALLED Kasco De-Icer into the piggyback plug of the C-10.
RECOMMENDATIONS & INFO:
Use the following guide lines and hints to assist in
customizing your setting for local conditions.
• De-Icers set up small localized currents the longer
they run. Fewer and longer operation cycles will
prove to be more effective than more frequent and
shorter operation cycles.
O
O
• Fresh water freezes at 32 F, salt water at 28 F,
and brackish water will freeze somewhere in between depending on the salinity level.
• Once activated, the thermostat stays activated until the temperature rises the 2.5OF differential,
putting the temperature above the freezing point.
• If the temperature is hovering near the freezing
point, any ice formation is minimized.
• Daily observation is suggested for all de-icing
installation.
• A number of factors can increase freeze rates
such as wind, snow, and colder temperatures. A
sunny day can actually retard freezing.
12
TWO YEAR LIMITED WARRANTY:
Kasco Marine, Inc. warrants the C-10 Thermostat
Control to be free from defects in material and workmanship under normal use and service. The Kasco
Marine, Inc. obligation under this warranty is limited
to replacing free of charge any defective part within
two (2) years from date of purchase. Customer shall
pay all shipping charges.
THIS WARRANTY IS IN LIEU OF ANY OTHER
WARRANTIES EXPRESS OR IMPLIED, AND
ANY OTHER OBLIGATION OR LIABILITY
WHATEVER ON THE PART OF KASCO MARINE, INC. AND IN NO EVENT SHALL KASCO
MARINE, INC. BE LIABLE FOR ANY SPECIAL
OR CONSEQUENTIAL DAMAGES.
No warranty registration is required, only original
purchase receipt is needed for limited warranty coverage.
Warranty is void: If thermostat is damaged by unauthorized tampering or improper use.
The Industry Leader in
Ice Control Engineering.
KASCO MARINE, INC.
800 Deere Road
Prescott, WI 54021-1241
KASCO SERVICE PARTS:
If the service parts listed below are not available from
your local marine dealer, please order direct from Kasco
Marine.
F2400 (1/2 HP) “K” Propeller
F3400 (3/4 HP) “J” Propeller
4400 (1 HP) “M” Propeller
Zinc Anode
Electric Power Cable, 25’ length (16 gauge)
Other lengths and gauges are available by special order.
Specifications are subject to change without prior notice.
All orders shipped via United Parcel Service.
For Optional Kasco Parts or accessories, contact your local dealer or call Kasco Marine, Inc. at (715) 262-4488.
Phone (715) 262-4488 * Fax (715) 262-4487
www.De-Icer.com * [email protected]
13
Kasco Model C-20 Time & Temperature Unit Control
Owners Instructions
(Please read completely before installing and operating your Kasco Equipment)
CAUTION:
To ensure the safe operation and long life of your Kasco
Equipment, always take the following precautions:
• Always keep people and objects clear of the De-Icer propeller when operating.
• Always disconnect the power before servicing or removing your De-Icer.
• Always operate your Kasco De-Icer in the water! Operating your De-Icer dry (on shore or dock) can cause
damage to the seals or injure operator.
• Always mount your C-20 on a vertical surface and operate only with the cover closed.
• Never lift your Kasco De-Icer or C-20 control by the
power cable. This could damage the power cable and
make your De-Icer or control unsafe to operate.
• Kasco Marine highly recommends that all possible precautions be taken around open water De-Icing areas to
ensure the safety of the public, i.e., “Thin Ice” and/or
“Open Water” signs, appropriate lighting, fencing or
other safety measures as required in your area.
• There are certain conditions under which no circulator
can prevent ice damage such as ice that moves due to
wind or current, extremely cold weather where ice forms
all the way to the bottom and in some cases where the
bottom water temperature is the same as ice (very shallow water). Effective operation can be somewhat restricted by too little bottom clearance.
INSPECTING YOUR C-20 UNIT CONTROL:
Upon receiving your Kasco C-20 Unit Control, please unpack and inspect your C-20 for any possible damage that
may have happened during shipment. Any damage or shortage should be reported to your dealer/delivery service immediately to ensure prompt resolution.
INSTALLATION:
This unit must be mounted on a vertical surface close
enough to your power supply to allow at least a slight slack
in the power cord from the C-20. Select the screw(s) with
which to mount your C-20. You will need one for the slot
near the top of the box and you may wish to utilize the two
additional mounting holes located near the inside bottom of
the C-20 box. At this time, prior to final installation, you
may wish to do some pre-programming of the timer and
thermostat (see Programming below).
Install the De-Icer power cord through the hole in the
lower left portion of the C-20 housing and plug it into the
receptacle inside the C-20.
Important: Your C-20 is designed to operate only one
Kasco De-Icer. For the most accurate operation, avoid placing your C-20 in direct sunlight. Complete programming
the timer and thermostat now.
PROGRAMMING:
The advance design of Kasco’s C-20 gives you both time
and temperature control of your De-icer. The C-20 is wired
in a series configuration giving you control based on both
time and temperature. Your Kasco De-Icer will only operate
when both the timer and the thermostat are activated. The
red indicator light will only be lit when both time and temperature are activated.
You will need to program both the timer and thermostat to
complete your programming and we will address the how’s,
why, and recommendations for each separately below.
TIMER: The timer is programmable in 30 minute increments, but do not program the timer in segments of less than
a one hour period at any time.
• Setting Timer:
1. Pull out each tripper for every half hour of ON time be
tween desired hour mark on dial.
2. Turn dial clockwise
one or more revolutions until
correct time-of-day is adjacent to the timer arrow in the
center of dial.
THERMOSTAT: The thermostat has a 6OF differential.
This means that the De-Icer will come ON at the temperature setting and will not go OFF until the temperature
reaches 6OF above the ON setting.
• Setting Thermostat:
Set dial to temperature at which you wish to have
your Kasco De-Icer begin activation.
RECOMMENDATIONS:
Use the following guide lines and hints to assist in customizing your setting for local conditions.
• De-Icers set up small localized currents the longer they
run. Fewer and longer operation cycles will prove to be
more effective than more frequent and shorter operation
cycles.
• Fresh water freezes at 32OF, salt water at 28OF, and
brackish water will freeze somewhere in between depending on the salinity level. Most people find that by
setting the thermostat a couple degrees below the freezing point, they can minimize unneeded operation time
for two reasons:
A. Once activated, the thermostat stays activated until the
temperature rises the 6OF differential, putting the temperature above the freezing point.
14
B. If the temperature is hovering near the freezing point,
any ice formation is minimized.
• While picking time periods to operate, use these guidelines.
A. Daily observation is required for all de-icing installation, so pick a time for operation when your installation
would be observed, i.e., if you are De-Icing a dock at
your home, you may decide to have it operate during
your morning and/or evening meal time. If the unit is
installed at a marina, one of the operation times should
be during the Dockmaster’s daily inspection of the DeIced boats.
B. A number of factors can increase freeze rates such as
wind, snow, and colder temperatures. A sunny day can
actually retard freezing. While picking operation times,
remember to operate more when conditions will promote quicker freezing.
C. Your programming will likely require some fine tuning,
so remember to observe and be prepared to adjust your
timer cycles.
D. Remember that conditions do change, and you will need
to either choose to program for worst case conditions or
be willing to make some adjustments as time goes by.
E. Objectives for use of the timer will vary by region, but
as a general guideline, most people will be able to reduce operation time and energy consumption by 5066%. Users in more severe conditions, such as the Great
Lakes, will see less savings.
F. ON cycles should be 2 to 6 times per day with neither
ON nor OFF cycles being less than one hour.
G. The following is a simple program giving a 50% operating time and 4 ON cycles. We are allowing more operation time during after dark hours and less during day
light hours.
•
•
•
To bypass the time and operate only on temperature, pull
all trippers on the timer to the ON position.
Bypassing the thermostat to operate only on time can
only be done when temperatures are below 40OF. To do
so, set the thermostat to the highest temperature setting.
The thermostat is still functioning, but would only shut
down at that elevated temperature.
When not in use, store inside away from salt air and sun
light.
TWO YEAR LIMITED WARRANTY:
Kasco Marine, Inc. warrants the C-20 to be free from defects
in material or workmanship under normal use and service.
The Kasco Marine, Inc. obligation under this warranty is limited to replacing free of charge any defective part within two
(2) years from date of purchase. Customer shall pay all shipping charges.
THIS WARRANTY IS IN LIEU OF ANY OTHER WARRANTIES EXPRESS OR IMPLIED, AND ANY OTHER
OBLIGATION OR LIABILITY WHATEVER ON THE
PART OF KASCO MARINE, INC. AND IN NO EVENT
SHALL KASCO MARINE, INC. BE LIABLE FOR ANY
SPECIAL OR CONSEQUENTIAL DAMAGES.
No warranty registration is required, only original purchase
receipt is needed for limited warranty coverage.
Warranty is void: If thermostat is damaged by unauthorized
tampering.
KASCO SERVICE PARTS:
If the service parts listed below are not available from your
local marine dealer, please order direct from Kasco Marine.
F2400 (1/2 HP) “K” Propeller
F3400 (3/4 HP) “J” Propeller
4400 (1 HP) “M” Propeller
Zinc Anode
Electric Power Cable, 25’ length (16 gauge)
Other lengths and gauges are available by special order.
Specifications are subject to change without prior notice.
All orders
This is only a sample to demonstrate some of the choices
shipped via United Parcel Service.
For Optional Kasco Parts or accessories, contact your local
dealer or call Kasco Marine, Inc. at (715) 262-4488.
The Industry Leader in Ice Control Engineering.
KASCO MARINE, INC. 800 Deere Road, Prescott, WI 54021-1241
Phone (715) 262-4488 * Fax (715) 262-4487
www.de-icer.com * [email protected]
Universal Dock or Piling Mount
Assembly & Installation Instructions
PARTS INCLUDED
1. Dock Mount Base (1)
2. Clam Shell Pipe Clamp (1; set of 2 pieces)
3. 1/2”-13 x 1 1/4” Hex Head Bolt (5)
4. 1/2”-13 Nut (5)
5. 1/2” Flat Washer (2)
6. 9 Hole Plate (1)
7. 4 Hole Angle Bracket (1)
8. Dock Mount Strap (2)
9. 5/16” Flat Washer (2)
10. 5/16” Nut (2)
11. 5/16”-18 x 1 1/2” Hex Head Bolt (2)
12. 1/2” Lock Washer (3)
TOOLS & SUPPLIES NEEDED
•
•
1” NPT or BSPT (European) Threaded Galvanized or Stainless Steel Pipe up to 10’ long (1)
Lag Screws or Bolts for Mounting to Dock (8)
•
•
•
Assembly Instructions
Note: Customer must provide the 1” galvanized or
stainless steel threaded pipe extension not more than
10 feet in length. Since applications may vary, the
user will supply the appropriate lag screws or bolts to
secure the dock or piling base. Kasco urges that the
base be mounted as securely as possible. For salt
water use, Kasco suggests that you use 1” stainless
steel pipe.
STEP ONE:
Determine the most suitable application for your
situation. Install the Dock Mount Base to your dock
or piling using 8 mounting lag screws or bolts supplied by user. For mounting on dock surface or the
horizontal surface make one end of the Dock Mount
Base flush with the dock edge as shown. For piling or
other vertical surface mount large end down as
shown.
3/4” Wrench
1/2” Wrench or 1/2” Socket with Ratchet
3/4” Socket with Ratchet
STEP TWO:
Wrap one of the Dock Mount Straps around the Deicer can. Insert one 5/16 – 18 x 1 ½” Hex Head Bolt
through the 9 Hole Plate and then through the two
holes in the strap. Use a 5/16” Washer and 5/16” Nut
to hold the strap onto the can. Position the band as
close to the De-Icer cage as possible and tighten using the 1/2” Wrench or Socket. Do not over tighten.
STEP THREE:
Attach the 2nd draw strap to
the Deicer can following the
same procedure as step 2 using the lower hole on the 9
hole plate.
2400D (1/2HP) Band
Placement
3400D & 4400D (3/4 &
1HP) Band Placement
STEP FOUR:
First, thread the user supplied pipe extension (more
than 10 ft is not recommended) into the 4 Hole Angle
Bracket by hand to start to ensure the threads are
aligned properly. Then temporarily mount it to the
Dock Mount Base using one of the ½” Hex Head
Bolts included to tighten further. Hand tighten only.
STEP FIVE:
Remove the 4 Hole Angle Bracket from the Dock
Mount Base and attach the 4 Hole Angle Bracket to
the 9 Hole Plate using a ½ - 13x1 ¼” Hex Head Bolt,
½” Flat Washer and ½”-13 Nut. Hand tighten at this
point.
STEP SEVEN:
Place the Clam Shell Pipe Clamp
onto the pipe extension. Make sure
the two halves are interlocked. To
interlock, insert the tabs into the
openings and rotate 90 degrees.
STEP EIGHT:
Line up the 3 holes of the Clam Shell Pipe Clamp
with the 3 vertical holes on the Dock Mount Base
(connected to the dock or piling). Insert a ½ - 13x1
¼” Hex Head Bolt into the top hole of the clamp and
base. Use the 1/2” Lock Washer and ½-13” Nut to
hold the bolts in place. Make sure the De-Icer is at
the correct desired depth and hand tighten. Repeat
with the two remaining holes and use the 3/4”
Wrench and 3/4” Socket and Ratchet to tighten all
three. (Use the 3 side holes shown in picture for
mounting on a dock, or use the top 3 holes shown in
picture when mounting to a piling.) Your Universal
Dock Mount is now ready for use.
STEP SIX:
Adjust the angle of the 4 Hole Angle Bracket. The
deicer can be set in 15 degree intervals. Once the 4
Hole Angle Bracket is in the desired position, insert
one ½ - 13x1 ¼” Hex Head Bolts through the hole in
the 9 Hole Plate that is aligned with the hole in the 4
Hole Angle Plate. Use a ½” Flat Washer and ½”-13
Nut to hold the bolt in place and tighten using the
3/4” Wrench or Socket. Make sure all bolts and nuts
are now tight. (If more than one set of holes align use
the holes closest to the de-icer.)
The Industry Leader in
Ice Control Engineering.
KASCO MARINE, INC.
800 Deere Road
Prescott, WI 54021-1241
Phone (715) 262-4488 * Fax (715) 262-4487
www.De-Icer.com * [email protected]
Horizontal Float
Assembly & Installation Instructions
PARTS INCLUDED
A. Circulator (Unit with cord) (1)
B. Float in separate box (1) (Diagram to Right)
1. Float (1)
2. Base Strap (1)
3. Adjustment Bracket (1)
4. Angle Bracket (3)
5. Draw Band (1)
6. U-Bracket (2)
7. Spacer Bracket (2)
8. 1/4” x 1/2” Stainless Steel Bolt (8)
9. 1/4” x 1” Stainless Steel Bolt (3)
10. 1/4” x 1-1/4” Stainless Steel Bolt (2)
11. 1/4” Stainless Steel Lock Nut (8)
12. 1/4” Stainless Steel Hex Nut (2)
13. 1/4” Stainless Steel Lock Washer (5)
14. 50’ Black Nylon Ropes (2)
15. Nylon Tie (1)
TOOLS & SUPPLIES NEEDED
•
•
•
7/16” Wrench (1)
7/16” Socket & Ratchet (1)
Felt-Tip Marker (1)
•
•
STEP ONE
Remove all contents from package and place on a
clean, flat surface. Inspect the shipment for any damages. If damages are found, immediately notify your
carrier and your Kasco Marine, Inc. representative.
Make sure you have all the parts needed. If any
shortages are found, contact your Kasco representative immediately.
STEP TWO
Position the Float upside down (lengthwise channels
facing up) and place the Base Strap so the three holes
in the Base Strap align with the three threaded holes
that comprise the lengthwise midline of the Float.
Anchors or Stakes for Installation (2)
12” pieces of 1” galvanized pipe for weighting
ropes (optional) (2)
STEP THREE
Position the Adjustment Bracket over the two holes at
the back end of the Float and Base Strap. Loosely
secure the Adjustment Bracket to the Float using two
1/4” x 1/2” Stainless Steel Bolts and two Stainless
Steel Lock Washers. (See photo above for orientation.)
STEP FOUR
Place one of the three Angle Brackets perpendicular
to the Base Strap at the front end of the Base Strap.
One of the two center holes of the Angle Bracket
should be positioned over the hole in the Base Strap
and the threaded hole in the Float. Secure the Angle
Bracket to the Float using three 1/4” x 1/2” Stainless
Steel Bolts and three Stainless Steel Lock Washers.
(See photos on the next page for specific instructions
based on the size circulator purchased.) Tighten all
hardware at this time with the 7/16” socket and
wrench.
17
18
STEP SEVEN
Insert the Spacer Bracket under the U-Bracket and
inside the cage. Secure this assembly using one 1/4”
x 1” Bolt and a 1/4” Lock Nut, and one 1/4” x 1-1/4”
Bolt and a 1/4” Hex Nut. The longer bolt should be
on the side of the U-Bracket that is closer to the cord
clamp. Tighten the hardware using the 7/16” wrench
and socket & wrench until the U-Bracket clamps
firmly around the cage (U-Bracket should pull together slightly). Repeat with the second U-Bracket.
STEP FIVE
With a felt-tip marker, draw three to four marks
around the circumference of the motor housing at the
appropriate measurement
from the back (or bottom)
of the motor housing
given below:
Model F2400: 3/4”
Model F3400: 3-3/8”
Model 4400: 3-3/8”
Model 8400: 3-1/4”
STEP EIGHT
Attach an Angle Bracket to each of the longer (11/4”) bolts on the U-Brackets (See photo for orientation) with a 1/4” Lock Nut.
STEP SIX
Place the two U-Brackets directly across from each
other (180O) over the top ring of the motor cage. The
cord clamp on the cage should be 90O from each of
the U-Brackets.
STEP NINE
Wrap the Draw Band around the motor housing and
position so that the back of the Draw Band touches
the marks drawn in Step Five. There is no front or
back to the Draw Band itself - it is reversible. Orient
the arm of the Draw Band so it aligns with the cord
clamp on the cage of the motor housing and is parallel to the Angle Brackets attached in Step Eight. Secure using a 1/4” x 1” Stainless Steel Bolt and a 1/4”
Lock Nut. (See photo on next page.)
19
Step Nine
Horizontal
STEP TEN
Attach the Angle Bracket on the motor to the Angle
Bracket on the Float using two 1/4” x 1/2” Bolts and
two 1/4” Lock Nuts (one set for each Bracket). See
photo for orientation based on model size. Also, the
cord clamp on the cage should be oriented toward the
Float.
STEP ELEVEN
Attach the Draw Band on the motor to the Adjustment Bracket on the Float using a 1/4” x 1/2” Bolt
and a 1/4” Lock Nut. Select one of the five possible
positions to mount the Draw Band for your preferred
direction of flow (three are pictured on next page).
Angled Up
Angled Down
STEP TWELVE
Attach the Ropes to the front (on the cage) and back
(around the Draw Band) of the motor. At this time,
use the Nylon Tie provided to connect the power cord
and front Rope to prevent the cord from tangling in
the prop. Also, if the power cord has a Quick Disconnect and Additional Strain Relief, attach the
Strain Relief to the cage of the unit and double check
the threaded collar on the Quick Disconnect to ensure
it didn’t loosen during shipping.
STEP THIRTEEN
Float the circulator in the water and position where
desired. Tie the front Rope to a stake on the shore or
weight. If a weight is used sink weight in front of
unit so rope is taught. (Circulator create great force,
make sure weight is enough to prevent movement.)
Tie back Rope to a stake on opposite shore or weight.
Sink weight behind the unit so rope is taught. At this
time take up any slack in the line.
20
TROUBLESHOOTING TIPS
Below are some helpful troubleshooting tips. If a problem occurs, please double check the assembly and installation instructions as well as the instructions for the proper control panel. More troubleshooting tips can be found
at www.de-icer.com/general_info_troubleshooting.htm . Contact Kasco Marine at 715-262-4488 for further diagnosis if these fail.
“ My De-Icer trips the ground fault interrupter on the circuit.”
This is the most common symptom of several possible problems. To correctly diagnose the problem,
you will need to collect more information. A Ground Fault Interrupter (GFI) breaker that trips can indicate an electrical service problem, water contamination in the unit and/or cord, bad breaker, control
box problems, motor problems, etc. Try to find out the answers to these questions before you contact
Kasco to narrow down the problem.
* How long does it take to trip the breaker?
* Does it always take the same amount of time to trip?
* How many times has it tripped?
* Has there been any electrical problems in the area recently?
“My De-Icer seems to run slowly.”
This can also be a symptom of several possible problems. There could be an electrical problem where
the unit is not getting the proper voltage. This could also indicate a problem with the motor of the unit,
which needs to be looked at by an Authorized Repair Center. Check that the unit is receiving the
proper voltage, and, if so, contact Kasco for further steps.
“My De-Icer hums, but will not start. When I spin the prop with a stick, it starts up.”
This indicated a problem with the Starting Capacitor. Each Kasco De-Icer is equipped with a Starting
Capacitor to get the unit going when it is first plugged in. If it is operating, but not spinning and can be
started by spinning the prop with a stick, the Starting capacitor needs to be replaced by an Authorized
Repair Center.
“My De-Icer turns itself off and back on without the thermostat and without tripping the GFI breaker.”
Each Kasco De-Icer has a Thermal Overload built in that will turn the unit off when it overheats.
Once the unit has cooled down, it will start back up. If you are noticing these symptoms, the unit
should be unplugged immediately because the Thermal Overload will continue to turn on and off until it
burns out and damages the motor. The unit should be unplugged and taken out of the water to find the
cause of the problem. The problem could be one of many, such as, low water levels, build-up on the unit
to prevent heat dissipation, something inhibiting the free rotation of the shaft, etc. If something is caught
in the unit or there is a build-up on the unit, remove the debris and, if caught early enough, the unit should
be fine. Contact a Kasco representative before restarting the unit.
“My De-Icer flow seems to fluctuate and/or be less than usual.”
This can occur because of a few different reasons. Most of the time, this symptom is caused from unit
being clogged with debris. A mat of weeds, many leaves, plastic bags, etc. can clog up the unit and
cause it to be starved of water. If the unit does not have the proper amount of water, the flow or pattern
will fluctuate up and down and look sporadic. If you are seeing these symptoms, unplug the unit and
clean away the debris that is clogging the cage. Another possibility if these symptoms are noticed,
is a chipped or damaged prop that is causing the unit to wobble and not pump properly. When the unit
is unplugged, check the prop for damages and replace if damage is found.
“My C-20 does not seem to be working properly.”
Most of the time, a C-20 that is not working properly is from a setup error. The C-20 Time and Temperature Control must have BOTH the Timer AND Thermostat activated. (The timer must be in an ON
position and the outside air temperature must be lower than the setting on the thermostat.) Keep in
mind, the thermostat may take a few hours to adjust to the outside temperature. Make sure the C-20 is
not in direct sunlight which would heat up the thermostat. If both are activated, the small light in the
upper left hand corner of the control box will be lit up. A test that can be done is to put the C-20 in the
freezer for a couple hours and then test it. If your outdoor temperature is cold enough, you can set up
the C-20 and plug a light into it. Watch it throughout the evening to see if and when the light comes
on. If all else fails, please contact Kasco for assistance.
21
800 Deere Rd.
Prescott, WI 54021
Phone: 715-262-4488 - Fax: 715-262-4487
www.De-Icer.com [email protected]
Kasco Repair Sheet — Customer Info.
* Important Reminders *
•
•
•
•
•
•
All repairs sent in MUST be accompanied by a copy of this completed sheet!
Routine maintenance consists of checking the zinc anode regularly and replacing if necessary, keeping the
unit clean, keeping the stainless steel can clean, and having the seals and oil replaced every 3-5 years depending on use.
Address your Repair to Kasco Marine, Attn: Repairs (or to your Authorized Repair Center).
Shipping to Kasco or an Authorized Repair Center is paid for by the customer.
You must include the power cord and cage assembly with each unit sent in for repair to be considered for
warranty repair!
Do not ship the float and/or control box with the unit for repair, unless otherwise instructed.
Today’s Date:___________________
Customer Information
Name: _________________
Phone Number: _____________________
Address: __________________________
Alternate Number: ___________________
City: ____________________
Email Address: ______________________
State: _____________________
Zip Code: ______________________
Unit Information:
Model # (Ex. 3400D): ____________________
Serial # (Ex. 6001D34025): ____________________
Date Purchased: ________________________
Purchased From: _________________________
Earliest Date of Problem: _______________________
Description of Problem
Comments
22
De-Icer Warranty Information
Please register your Kasco De-Icer online at
www.de-icer.com/solutions_warranty_registration.htm
Also, fill in the information below and keep for your records.
Model # (Ex. 2400D)_______________________________
Serial # (Ex. 6001D21725)______________________________
Purchase Date:_____________________
Purchased From:___________________________________
Registration Date:___________________________
Kasco Marine, Inc.
800 Deere Rd.
Prescott, WI 54021
Phone (715) 262-4488 * Fax (715) 262-4487
www.de-icer.com. * [email protected] * [email protected]
824404