1
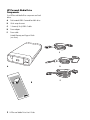
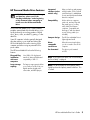
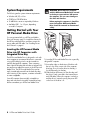
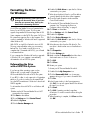
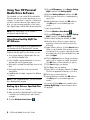
HP Personal Media Drive
User’s Guide
book title
The only warranties for HP products and services are set forth in the express warranty
statements accompanying such products and services. Nothing herein should be construed
as constituting an additional warranty. HP shall not be liable for technical or editorial errors
or omissions contained herein.
HP assumes no responsibility for the use or reliability of its software on equipment that is
not furnished by HP.
This document contains proprietary information that is protected by copyright. No part of
this document may be photocopied, reproduced, or translated to another language without
the prior written consent of HP.
Hewlett-Packard Company
P.O. Box 4010
Cupertino, CA 95015-4010
USA
Copyright © 2004–2007 Hewlett-Packard Development Company, L.P.
HP supports lawful use of technology and does not endorse or encourage the use of our
products for purposes other than those permitted by copyright law.
The information in this document is subject to change without notice.
Table of Contents
Introduction ................................................................................... 1
Safe Handling Information .........................................................................1
Care and Handling of Your HP Personal Media Drive ...................................1
HP Personal Media Drive Components ........................................................2
HP Personal Media Drive Features ..............................................................3
System Requirements..................................................................... 4
Getting Started with Your HP Personal Media Drive ....................... 4
Inserting the HP Personal Media Drive into HP Computers with
Integrated Drive Bay .................................................................................4
Drive Indicators and Connectors.................................................................5
Connecting the Drive to a Computer without a Drive Bay ..............................5
Locating the Drive.....................................................................................6
Disconnecting the Drive Safely ...................................................................6
Installing Drivers and Software ...................................................................6
Formatting the Drive for Windows ................................................. 7
Reformatting the Drive with a FAT32 File System...........................................7
Using Your HP Personal Media Drive Software............................... 8
Using Roxio BackUp MyPC for HP Software ................................................8
Restoring Damaged or Erased Files.............................................................9
Transferring Files to Another Computer Manually..........................................9
Playing Games.........................................................................................9
Using Your HP Personal Media Drive with an HP Computer and
Personal Media Drive Bay .........................................................................9
Using the Security Lock..............................................................................9
Table of Contents
iii
Troubleshooting ........................................................................... 10
Getting Help ................................................................................ 10
HP Personal Media Drive Specifications........................................ 11
FCC Regulatory and Safety Information (USA Only) ................................... 11
DOC Statement (Canada Only)................................................................ 12
Disposal of Waste Equipment by Users in Private Households in the
European Union (European Union Only) ................................................... 12
EMI statement (European Union only)........................................................ 12
iv
HP Personal Media Drive User’s Guide
Introduction
Thank you for selecting the HP Personal Media Drive.
This drive is an external hard disk drive with a large
capacity designed to quickly and easily store and
transfer media files such as digital photos, music,
video, and other important files.
The HP Personal Media Drive connects and
disconnects easily from a USB 2.0 connector on
the front or back of most computers.
For some HP Computers, the HP Personal Media Drive
is designed to fit inside a horizontal or vertical
drive bay.
Care and Handling of Your
HP Personal Media Drive
WARNING: The warnings for the care
and handling of the HP Personal Media
Drive are listed below.
• Do not move the drive while it is operating to avoid
•
Your HP Personal Media Drive comes with backup
software (select models only) that is compatible with
most Microsoft® Windows™ Operating systems.
•
•
•
•
Safe Handling Information
The HP Personal Media Drive is designed to be used
as a stationary unit. It is very important that you
handle this drive carefully to avoid hardware damage
and data loss. Please read the following warnings
before attempting to install, use, or move your
HP Personal Media Drive.
•
•
•
•
•
hardware damage and potential data loss. You can
safely move your drive only when you have
properly disconnected and powered off the drive
through the operating system.
When running for long periods of time, the
aluminum case of the Personal Media Drive may
become very warm. This is part of the HP Personal
Media Drive’s advanced design and is completely
normal.
The built-in, low-noise fan is designed to
automatically turn on at pre-set temperatures. If you
are using the HP Personal Media Drive connected
externally to your computer, please place the drive
in a well-ventilated area.
Do not move the computer with the HP Personal
Media Drive attached to a USB port, or while
inserted into specially designed Hewlett-Packard
computer drive bays.
Incorrect handling, such as dropping the drive, can
cause data loss and invalidates the warranty.
Do not attempt to open the drive’s case. This action
voids the warranty.
Do not set the drive on its side, as it may fall over
and cause damage.
Do not remove any cables or power cords without
properly disconnecting the drive through the
operating system.
Do not set any liquids or drinks on the drive. Liquids
can damage the internal electronics.
Do not block airflow around the drive while the
drive is turned on.
Do not stack anything on top of the drive; this can
overheat and damage your drive.
HP Personal Media Drive User’s Guide
1
HP Personal Media Drive
Components
Your HP Personal Media Drive components are listed
below:
A
Pre-formatted USB 2.0 external hard disk drive
B
Quick setup document
C
1.8 meter (6 foot) USB 2.0 cable
D
Power adapter
E
Power cable
Limited Warranty and Support Guide
(not shown)
C
D
A
E
B
2
HP Personal Media Drive User’s Guide
HP Personal Media Drive Features
WARNING: To avoid hardware damage
and data loss, please read “Safe
Handling Information” at the beginning
of this document before attempting to
install or use the HP Personal Media
Drive.
Your HP Personal Media Drive is a pre-formatted,
portable, external hard disk drive that allows you to
quickly and easily store a large number of digital
music, photo, video, recorded TV, gaming, or other
data files.
Some HP computers include a specially designed
drive bay where you can install and remove the
HP Personal Media Drive without turning off the
computer and without using any external USB or
power cables.
The HP Personal Media Drive has the following
features:
Plug and Play
installation
with most
computers
Uses USB 2.0 for high-speed
transfer of data, with backward
compatibility to USB 1.1.
Large storage
capacity
The large storage capacity allows
you to easily store files from your
digital cameras, digital video
camcorders, and MP3 players.
Integrated
software (select
models only)
Helps you back up and manage
a large number of files. Perform
system backups for added data
security and quickly transfer data
between computers.
Compatibility
Works with most computers,
notebooks, and any Plug and
Play ready port so you may
easily share files between
computers. Compatible with
Kensington® and other brand
security locking cables (not
included).
Compact design
The HP Personal Media Drive is
lightweight and small.
Warm
swappable
convenience
When disconnecting the drive,
you do not need to turn off the
computer.
Pre-formatted
This drive is pre-formatted
in NTFS.
NOTE: To disconnect your drive, see “Disconnecting
the Drive Safely” on page 6.
NOTE: Your drive displays a drive capacity that is
slightly less than the capacity stated on the box. This
is normal.
HP Personal Media Drive User’s Guide
3
System Requirements
The following are the system minimum requirements:
•
•
•
•
Windows ME, XP, or Vista
CD-ROM or DVD-ROM drive
32 MB RAM or more as required by Windows
Available USB 1.1 or 2.0 port, depending
on model of computer
WARNING: Do not move the computer
with the HP Personal Media Drive inserted
in the bay or connected to a USB port on
the computer. This can cause damage to
the drive and data loss.
Before moving the computer, it should be
turned off and the HP Personal Media
Drive should be removed or disconnected
safely.
Getting Started with Your
HP Personal Media Drive
You can get started with your HP Personal Media
Drive in a few easy steps. First install the software for
the HP Personal Media Drive, and then connect the
power cable and USB cable. See “Installing Drivers
and Software” on page 6.
Inserting the HP Personal Media
Drive into HP Computers with
Integrated Drive Bay
The HP Personal Media Drive is designed to work with
most computers as an external drive that is connected
using a USB cable, but it also can be inserted into
specially designed HP computers. These computers
have a special drive bay that includes an internal USB
port and power cable that connects to the HP Personal
Media Drive. The HP Personal Media Drive can be
easily inserted and removed from the hard drive bay
without turning off the computer, sometimes referred to
as warm swappable.
Some HP computers have vertically oriented drive
bays and some have horizontally oriented drive bays;
both accommodate your HP Personal Media Drive.
4
HP Personal Media Drive User’s Guide
To insert the HP Personal Media Drive into a specially
designed HP computer:
1 Line up the ridges on the bottom of the drive with
the two slots on the correct side of the computer
drive bay. Do not force the drive into the bay; it
should slide easily into the bay.
2 Slide the drive all the way into the drive bay until
the drive is firmly connected to the internal power
and USB cables. When the computer is turned on,
and the drive is inserted correctly, the power LED
on the front of the drive is lit.
Drive Indicators and Connectors
To connect the drive:
The HP Personal Media Drive comes with two LED
indicators, a USB connector, a power connector, and
a security lock connector.
1 Make sure you have installed the software and
drivers. See “Installing Drivers and Software” on
page 6.
2 Plug the round power cable from the power
adapter into the back of the HP Personal Media
Drive (L).
3 Plug power adapter into the power cable (J), and
then plug the power cable into the wall (K).
4 Turn on the computer.
Front of HP Personal Media Drive
B
A
L
G
C
H
Back of HP Personal Media Drive
J
D
E
F
K
A Drive activity LED indicator
B Power on LED
C HP Personal Media Drive guide rails/feet
D USB 2.0 connector
(USB 1.1 backward compatible)
E DC power connector
5 Plug the rectangular end of the USB 2.0 cable (G)
into an available USB port on your computer. Plug
the square end of the USB 2.0 cable (H) into the
USB connector on the back of the drive.
F Kensington security locking slot
NOTE: The Kensington security lock is sold separately.
Connecting the Drive to a
Computer without a Drive Bay
The HP Personal Media Drive is designed to work with
most computers as an external hard disk drive that you
connect using a USB 2.0 cable.
(G)
(H)
NOTE: The computer may take several seconds to
recognize the HP Personal Media Drive.
HP Personal Media Drive User’s Guide
5
Locating the Drive
When you plug the drive into a USB 2.0 connector,
the operating system automatically assigns a hard disk
drive letter to it. The assigned letter depends on other
storage devices connected to your computer.
The default volume label of this drive is HP Personal
Media Drive. You can rename the drive in the
Computer window by right-clicking the drive, selecting
Rename, and then typing in a new name.
HP recommends renaming a drive if you have more
than one HP Personal Media Drive.
To locate your HP Personal Media Drive, click the
, then click
Windows Start Button®
Computer for a list of all of the internal and external
drives.
Disconnecting the Drive Safely
CAUTION: To avoid hardware damage
and data loss, always disconnect your
HP Personal Media Drive safely when it is
not saving or transferring data.
1 Double-click the Safely Remove Hardware
icon in the system tray at the bottom of the
desktop. The Safely Remove Hardware
window opens.
NOTE: For some computers, this may be called the
Unplug Hardware or Eject Hardware icon.
2 Double-click USB Mass Storage Device. This
name may appear differently for some computers.
NOTE: USB Mass Storage Device may be listed
twice. One may contain a memory card reader or
other mass storage drives. Look for the label of this
drive, which is HP Personal Media Drive.
3 Select your device, and then click OK. A Safe to
Remove Hardware message appears in the System
tray at the bottom of your desktop letting you know
that the device is safe to disconnect.
4 Disconnect the drive from the computer.
NOTE: If your computer does not allow you to
disconnect the drive safely, you may need to close all
applications and documents, and then try again
to disconnect the drive.
Installing Drivers and Software
NOTE: Only install the applications that are
compatible with your language and your computer
operating system.
To install HP Personal Media Drive drivers and
software:
1 Click the Windows Start Button
on the
taskbar, click Computer, and then
double-click the HP Personal Media Drive icon.
2 Open the PMD folder.
3 Double-click HPDI.exe.
4 Select the items you want to install by placing a
check in the check box next to the software.
5 Click Install, and then follow the onscreen
instructions to install the software program. The
programs are installed automatically.
6 After installing the software, restart the computer.
If available, read the NEWUPDATE file for any
updates and changes to the software programs.
6
HP Personal Media Drive User’s Guide
Formatting the Drive
for Windows
CAUTION: Reformatting a hard disk drive
destroys all data on the drive. If you have
data that you want to keep, back up the
data before reformatting the drive.
Your HP Personal Media Drive was formatted at the
factory for an NTFS file system. This file system
supports large media files that are larger than 4 GB.
Some computers use the FAT32 file system. FAT32 is a
file system that organizes files on the computer. This
system is standard for Windows ME and is supported
under Windows XP.
With FAT32, a single file is limited in size to 4 GB.
This may create a problem when you are creating
backup files. If you need to use this drive on a
computer that is formatted with FAT32, you will need
to reformat the drive.
If your computer has Windows ME and you upgrade
to Windows XP, your computer is automatically
reformatted to use an NTFS file system.
Reformatting the Drive
with a FAT32 File System
If you have an older operating system such as
Windows ME, you may need to reformat the
HP Personal Media Drive with a FAT32 file system.
If your BIOS is older, it only supports 4 to 16 gigabyte
partitions. If you do not want your drive partitioned,
go to the BIOS manufacturer’s Web site to download
a BIOS upgrade.
To reformat the drive with FAT32 on a Windows ME
system:
1 Make sure the HP Personal Media Drive is NOT
connected to the computer.
2 Click Start on the taskbar.
3 Choose Settings and click Control Panel.
4 Double-click System.
5 Click the Device Manager tab.
6 Double-click Disk drives to open the list of drives
connected to your system.
7 Write down the drive(s) listed so you’ll be able to
correctly identify the new drive when it appears.
8 Close the System Properties window and the
Control Panel window.
9 Connect the HP Personal Media Drive to the
computer. See “Connecting the Drive to a
Computer without a Drive Bay” on page 5.
10 Click Start on the taskbar.
11 Choose Settings and click Control Panel.
12 Double-click System.
13 Click the Device Manager tab.
14 Double-click Disk drives to open the list of drives
connected to your system.
15 Select the new drive from the Disk drive list. The
new drive is the drive that was not listed before in
step 6.
16 Click Properties.
17 Click the Settings tab.
18 Make sure that the Removable check box has a
check mark next to it. Click it if it does not.
19 Click OK.
20 Click Close.
21 Restart your system.
To format your HP Personal Media Drive disk:
1 Double-click the My Computer icon.
2 Click the Removable Disk icon. A message
appears asking you if you want to format the disk.
3 Click Yes.
4 In the Format window, in the Format type area,
click Full. You can also type a label for the drive at
this time if you choose.
5 Click Start.
6 Click OK. Formatting can take longer than
60 minutes. Do not disconnect the drive during the
procedure.
7 When formatting is complete, click Close and then
click OK.
HP Personal Media Drive User’s Guide
7
Using Your HP Personal
Media Drive Software
Once installed, you can use the HP Personal Media
Drive the same way you use the other drives on your
computer. You can move or copy files or folders from
one drive to another. Because of the capacity of this
drive, you can save large media files such as video
clips, digital images, and hard disk drive backup files.
NOTE: Roxio BackUp MyPC for HP software is
included with select models only.
Using Roxio BackUp MyPC for
HP Software
NOTE: You must be logged on as an administrator to
run a backup with Roxio BackUp MyPC software.
With Roxio BackUp MyPC for HP software, you can:
• Store a large capacity of digital media files onto
•
•
•
•
your HP Personal Media Drive.
Easily schedule compressed backups of your most
important files with incremental saves.
Back up all or selected files and folders from a local
drive.
Back up all selected files or back up new and
changed files.
Enable backup of multiple computers from different
locations.
NOTE: To start scheduled backups, you must close the
Roxio BackUp MyPC program.
Backing Up a Drive or Specified Files
To back up a drive on your computer:
1 Make sure the Roxio BackUp MyPC for HP software
is installed. See “Installing Drivers and Software”
on page 6.
2 Click the Windows Start Button
.
8
HP Personal Media Drive User’s Guide
3 Choose All Programs, choose Roxio, Backup
MyPC, and then click Backup MyPC.
4 Select the Backup Wizard, and then click OK.
5 Follow onscreen instructions to complete backing
up your files.
6 After the backup is finished, click OK and then
click OK again to close the backup process
window.
To back up specified files:
1 Click the Windows Start Button
.
2 Choose All Programs, choose Roxio, Backup
MyPC, and then click Backup MyPC.
3 Select a blank backup job, and then click OK.
4 Select the drive or drives you want to back up
by placing a check in the check box next to the
drive letter.
5 Under Where to back up, click the Browse button
(folder icon at the bottom of the window) to send
your backup file to your drive. Select the drive letter
associated with your HP Personal Media Drive, and
then click Open.
6 Click the Options button to change your backup
options such as compression, media, and names.
Click OK when you have selected your options.
7 Click Start to begin your backup.
8 Click Yes to save your backup.
9 Type a title for your backup, and then click Save.
Your files are prepared for backup to your drive.
10 Follow any onscreen instructions.
11 After the backup is finished, click OK and then
click OK again to close the backup process
window.
You can also click the Help menu, and then select
Backup MyPC Help for more information about
this program.
Restoring Damaged
or Erased Files
With Roxio BackUp MyPC software, you can schedule
a complete disaster recovery backup without having to
reinstall Windows or any other software programs. An
integrated disaster recovery process starts the
computer from a customized set of backup media
(Disaster Recovery Set), restores the operating system,
and then recovers your data to the state it was in
when the Disaster Recovery Set was created.
Before performing a disaster recovery, you may want
to try other options. For example, if the problem
appears to be a Windows system problem, try to
recover by following the steps in the documentation
that came with your computer.
If you have a backup of your files, you can also
reinstall Windows, reinstall your backup software,
and then selectively restore the rest of the files you
need. This last option may be the best choice if your
hardware configuration has changed since you
created your Disaster Recovery Set.
To restore files on your computer:
1 Make sure the Roxio BackUp MyPC for HP software
is installed. See “Installing Drivers and Software”
on page 6.
2 Restart your computer.
3 Click the Windows Start Button
.
4 Choose All Programs, choose Roxio, Backup
MyPC, and then click Backup MyPC.
5 Select a blank backup job, and then click OK.
6 Click the Tools menu, and then click Restore
Wizard.
7 Follow the onscreen instructions.
You can click the Help menu, and then select
Backup MyPC Help for more information about this
program.
Transferring Files to
Another Computer Manually
To transfer your files manually:
1 Connect your HP Personal Media Drive to the
computer.
2 Select your files and then drag and drop them to
your HP Personal Media Drive in the Computer
window.
3 Disconnect your HP Personal Media Drive and then
connect it to another computer.
4 Select your files and then drag and drop them to
the other hard disk drive.
Playing Games
CD-ROM games typically run faster when they are
installed on a hard disk drive than when they run on a
CD. You can use your HP Personal Media Drive to
store and play CD-ROM games.
Using Your HP Personal Media
Drive with an HP Computer and
Personal Media Drive Bay
Some HP computers have a dedicated drive bay for
your HP Personal Media Drive. For more information,
refer to the documentation that came with your
computer. For information on using your HP Personal
Media Drive with an older version of HP Media
Center PC, go to http://www.hp.com/support and
enter the model number of your computer or
HP Personal Media Drive.
Using the Security Lock
Your drive includes a security locking slot on the back
of the drive. The security locking slot is compatible
with most security locking cables, including those
offered by Kensington.
These security cables are designed to prevent
unauthorized removal of the drive by locking it to an
unmovable object.
For more information about Kensington locking
cables, you can go to:
http://www.kensington.com
You can transfer your computer profile information,
which includes how your computer looks and feels as
well as the personal files such as photos, music, or
video you have created.
HP Personal Media Drive User’s Guide
9
Troubleshooting
Microsoft updates
Make sure you have the latest Microsoft operating
system service packs and other Windows updates
installed on your system before you try to
troubleshoot a drive problem. These service packs
are issued to fix bugs, add drivers, and enhance
the security features of your system. See
http://support.microsoft.com for details about
how to install service packs and Windows updates in
your system. Contact Microsoft Customer Service for
information about obtaining these system
enhancements if you don’t have Internet access.
Drive does not appear on my
computer
Try the following solutions in the order listed:
1 Check to see if the drive is on. The power LED on
the front of the drive and the light on the power
adapter should be lit.
2 Make sure the power adapter is securely plugged
into the drive and into a power outlet. If the drive is
plugged into a power strip, try plugging it directly
into the wall outlet.
3 Check that the USB cable is securely and properly
connected to the drive and the USB connector on
the computer.
4 While the computer is turned on, unplug the USB
cable. Wait 10 seconds and then reconnect
the USB cable.
5 See if the computer is recognizing the USB port you
are using by checking in the Device Manager
window. See the documentation that came with
your computer for more information.
I got a message that I have a
high-speed device connected to
a low-speed port (Windows XP)
This is normal. Windows XP displays a message that
you have connected your USB 2.0 drive to a USB 1.1
port. You will not have the high-speed capabilities that
you would have using a USB 2.0 port.
10
HP Personal Media Drive User’s Guide
I’m having data transfer
performance problems with my
USB 2.0 adapter card
Your HP Personal Media Drive runs as fast as the host
adapter card allows (up to the maximum burst rate of
480 MB per second). If you are having performance
issues, make sure that the USB 2.0 card drivers are
the most current available and are installed properly.
Software does not work or has
stopped working
Reinstall the software. See “Installing Drivers and
Software” on page 6.
Write Cache Enable Does Not Stay
Enabled
For protection of your data, Write Cache Enable is
turned off with the HP Personal Media Drive. For more
information, go to: http://www.hp.com/support
Administrator privilege for installing
software
Depending on your operating system, you may need
to be logged on as the Administrator to install
software. See the Windows Help files or the
documentation that came with your computer.
Getting Help
For additional help with your drive, its installation,
and the software, contact one of the following:
HP Customer Care Web Support
• For the latest updates and information about
your HP Personal Media Drive, go to:
http://www.hp.com/support
Other Support
• For technical support numbers and warranty
information, refer to the Limited Warranty and
Support Guide that came with this drive.
• Refer to the Help menu in the Roxio BackUp MyPC
software program for more information about the
software.
HP Personal Media Drive
Specifications
Category
Supported
operating
systems
USB format
Storage
capacity
Special features
Specifications
Windows ME, XP, and Vista
USB 2.0
(USB 1.1 backward compatible)
Varies depending on model
• Warm swappable
• High speed USB 2.0 data transfer
• Power and drive activity LED
indicators
• Kensington security lock ready
• Backup software
Rotational speed
Data transfer
rate
Physical
dimensions
Power adapter
Operating
temperature
Non-operating
temperature
(select models only)
7,200 RPM
USB 1.1 = 12 MBps* (megabytes per
second)
USB 2.0 = 480 MBps
Length: 207 mm (8.0 inches)
Width: 118 mm (4.5 inches)
Depth: 36 mm (1.4 inches)
Weight: 1 to 1.5 lbs, depending on
capacity
AC input voltage: 100–240 V∿
AC input frequency: 50/60 Hz
AC input current: 1A
DC output voltage: 12 VDC
DC output current: 2A
Output connector:
• Outer barrel diameter: 5.5 mm
• Inner pin diameter: 2 mm
+5 to +35 °C
–30 to +70 °C
*Byte is an abbreviation for binary term, a unit of storage
capable of holding a single character. On almost all
modern computers, a byte is equal to 8 bits. Large amounts
of memory are indicated in terms of kilobytes (1,024 bytes),
megabytes (1,048,576 bytes), and gigabytes
(1,073,741,824 bytes).
FCC Regulatory and Safety
Information (USA Only)
Federal Communications Commission (FCC) Radio
Frequency Interference Statement
This equipment has been tested and found to
comply with the limits for a Class B digital device,
pursuant to Part 15 of the FCC Rules. These limits
are designed to provide reasonable protection
against harmful interference in a residential
installation. This equipment generates, uses, and
can radiate radio frequency energy and, if not
installed and used in accordance with the
instructions, may cause harmful interference to
radio communications. However, there is no
guarantee that interference will not occur in a
particular installation. If this equipment does
cause harmful interference to radio or television
reception, which can be determined by turning the
equipment off and on, the user is encouraged to
correct the interference by one or more of the
following measures:
•
•
Reorient or relocate the receiving antenna.
•
Connect the equipment into an outlet that is on
a circuit different from the receiver.
•
Consult the dealer or an experienced radio/TV
technician for help.
Increase the separation between the equipment
and the receiver.
Hewlett-Packard’s peripheral RFI and Radiated
Immunity tests were conducted with an HP
computer and HP-shielded cables, such as those
you receive with your system. Changes or
modifications not expressly approved by
Hewlett-Packard could void the user’s authority to
operate the equipment. To comply with the limits
for an FCC Class B computing device, always use
shielded signal cables and the power cord
supplied with this unit.
HP Personal Media Drive User’s Guide
11
DOC Statement (Canada Only)
This Class B digital apparatus complies with
Canadian ICES-003.
Disposal of Waste Equipment
by Users in Private Households
in the European Union
(European Union Only)
This symbol on the product or on its
packaging indicates that this product must
not be disposed of with your other
household waste. Instead, it is your
responsibility to dispose of your waste
equipment by handing it over to a
designated collection point for the recycling of waste
electrical and electronic equipment. The separate
collection and recycling of your waste equipment at
the time of disposal will help to conserve natural
resources and ensure that it is recycled in a manner
that protects human health and the environment. For
more information about where you can drop off your
waste equipment for recycling, please contact your
local city office, your household waste disposal
service, or the shop where you purchased the product.
Part number: 5991-8932
12
HP Personal Media Drive User’s Guide
EMI statement
(European Union only)
This is a Class B product. In a domestic environment,
this product may cause radio interference, in which
case the user may be required to take adequate
measures.