1
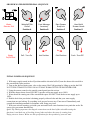
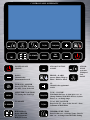
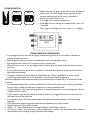
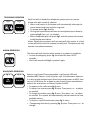
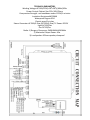
STEAM SHOWER ROOM
OPERATION MANUAL
For all Steam shower rooms which include the whirlpool tub
CONTENTS
NOTICE -------------------------------------------------------------- PG. 3
PERFORMANCE QUALITIES ------------------------------------- PG. 3
FINAL PREP NOTES ------------------------------------------------ PG. 3
WATER DIVERTER VALVE SCHEMATIC ------------------------ PG. 4
INITIAL POWER ON SEQUENCE -------------------------------- PG. 4
CONTROL PANEL SCHEMATIC ---------------------------------- PG. 5
FOOT MASSAGE ACCESSORY ----------------------------------- PG. 6
HANDHELD SHOWER HEADS ----------------------------------- PG. 6
ACCUPUNCTURE MASSAGE JETS ------------------------------ PG. 6
OVERHEAD RAIN SHOWER -------------------------------------- PG. 6
AROMA THERAPY ------------------------------------------------- PG. 7
JET/PUMP CONTROL DIALS AND SWITCHES --------------- PG. 7
WATER JET FUNCTIONS ----------------------------------------- PG. 7
DRAIN FUNCTION ------------------------------------------------ PG. 7
GENERAL STEAM GENERATOR INFORMATION ----------- PG. 8
STEAM GENERATOR MAINTENANCE ------------------------ PG. 8
TELEPHONE/ALARM OPERATION ---------------------------- PG. 10
RADIO/MP3 OPERATION --------------------------------------- PG. 10
TV/AV OPERATION ----------------------------------------------- PG. 11
TV/AV MENU SETTINGS ---------------------------------------- PG. 11
OZONE INFORMATION ----------------------------------------- PG. 11
TECHNICAL PARAMETERS ------------------------------------- PG. 12
ROUTINE MAINTENANCE ------------------------------------- PG. 13
TROUBLESHOOTING -------------------------------------------- PG. 14 - 17
Revision: B - JP - 8/8/2014
PRODUCTS YOU’LL ENJOY….. FOR A LIFETIME
FEATURES:
• Waterproof Multi-colored Liquid Crystal Display TV
• Power on auto water intake electronic valves
• Power off auto drainage system
• Steam Generator
• Whirlpool Bathtub Heater
• 30 Whirlpool Massage Jets
• 10 Acupuncture Massage Jets
• Underwater Ultra-Bright Multicolored LED Light
• MP3/MP4/USB Compatible Inputs
• Rainfall Overhead Shower
• Panic Alarm
• Overhead LED light
• Fan
• Ozone device
• Optional AV Cable
• Multi-Directional Spray Head Movement
• Multi-Functional Spray Controls
• Built in FM Stereo Module with Auto Search and Save Programming
• Built in Hands-Free Telephone System with One Touch Answer Function and Auto Audio Control
• Water Proof Remote Controller
NOTICE
The Manufacturer, its agents and/or representatives shall
not be held liable for injuries, death or illness resulting
from improper use and negligence.
220 connection. Connect this cable into a suitable socket with more than adequate power supply, preferably in
another room. Make certain no moisture or steam is can come in contact with the power supply. Never use an
extension lead. We provide the cable as is so you can easily install the final connection your own way, due to
continued additions to current regulations. Wire into an isolated GFI Circuit Breaker, connecting directly to the
homes service box.
The content in this manual covers several steam shower model types. So, a function listed below may or may not
pertain to your particular unit. We are constantly improving and updating our product lines and try our best to
keep all manuals current and up to date. If you feel your manual may be outdated, note the revision code listed in
the bottom left portion of this manual. Call or send us an email stating what revision you have of this manual. If
there is a newer one, we will email or fax you an updated one. The manufacturer reserves the right to update and
change this manual at its own discretion.
Do not leave children, elderly or disabled individuals unattended.
Do not use while intoxicated or allow anyone else to use while intoxicated.
K1 is the electrical safety switch diagram, illustrating how it functions.
K1 is an air switch. The principle of this switch is to utilize air pressure to activate the switch. When the switch is
activated, the power is automatically switched off in order to isolate any water contacting the electrical system.
220V
FINAL PREP NOTES
Before powering on ensure the following;
1. The shower has been sealed using a sealant, as outlined in the instruction manual and allowed to cure for
24-48 hours.
2. You have leak tested your unit as outlined in the instruction manual.
3. Ensure your drainage system is connected to your waste line and leak tested. See Fig. 1
4. Ensure your Hot, Cold and Steam connections are accurate.
Fig. 1
sewage
SHOWER WATER DIVERTER DIAL SEQUENCE
Water
Diverter Dial
Water
On/Off Dial
Waterfall/Tub
Outlet
Position A
Foot Massage
Accessory
Position B
Rain Shower
Body Jets
Position C
Pull - Turn On
Hot Position
Cold Position
Hand Held
Shower Heads
Position D
Push - Turn Off
INTIAL POWER ON SEQUENCE
1. With water supply turned in the off position and the electrical still off, turn the shower diverter dial to
the waterfall/tub spout position.
2. Turn on the showers main water valve to the center (Hot/Cold) position by lifting up on the dial. DO
NOT TURN STEAM FUNCTION ON AS IT MAY DAMAGE THE STEAM GENERATOR.
3. Using the remote control or the outside control panel turn the unit on.
4. With the shower doors closed, SLOWLY turn the cold water supply up to 100%.
5. Water should be coming out of the waterfall/tub spout. SLOWLY turn the hot water supply up to
100%.
6. Double check that your drain is draining properly without leaks and that your water supply
connections are not leaking. If everything is ok proceed to next step. If not turn off immediately and
consult the installation manual for assistance with fixing your issue.
7. With your unit still running, get inside your unit and test all water functions in no particular order. Be
sure to test your steam function last.
Quick Tip: Having a partner checking the connections on the back of the unit while testing the
functions, is an ideal way of checking for any leaks and where they may be coming from.
Enjoy your new shower. Below are the specifications for the operation of your new unit.
CONTROL PANEL SCHEMATIC
c
TV POWER
FM
MP3
MENU
TV/AV
TUN/VOL
MENU
FM
MP3
POWER ON/OFF
(On/Off)
STEAM FUNCTION
ON/OFF
STEAM PUMP
Activates
Whirlpool
DOWN
Channel select
down/manual search
PHONE - ALARM
Answer Phone, Hang up
Phone - Hold for Alarm
FAN
On/Off
FM RADIO - MP3/USB
Press 1x for FM - Press 2x
for MP3 - Press 3x for Off
UP
Channel select up/manual
search
MENU FOR TV OPTIONS
TV Settings See Next Page
TUNE - VOLUME
With Radio On Press 1x, then press + or - to
Change Stations. With MP3 on Press 1x, then
Press + or - to change songs
TUN/VOL
TV ON/OFF
TV POWER
TV/AV
BODY SPRAY RAIN SHOWER
See Acupuncture
Body Jet Section
c
TV/AV INPUT SWITCH
Press 1x for TV - Press 2x for Aux AV - Press
3x Return to Main Menu
TEMPERATURE - TIME
Press 1x then + or - to change Temp - Press 2x
then + or - to change Auto Off Timer Setting
FOOT MASSAGING ACCESSORY
• In order to use the Foot Massage Accessory simply remove the foot
Fig. 1
massager from the wallboard fig. 1.
Fig. 2
• Place it in the tub, with cover closed, adjust the shower diverter dial to
position B fig. 2.
• Using the shower water inlet valve, adjust the water pressure and
temperature to your desired level.
Position B
• Lift the foot massager cover, place your feet in and enjoy.
• Don’t forget to share.
HAND HELD SHOWER USAGE
•
Fig. 1
Fig. 2
•
Position D
•
•
There are up to six different spray functions fig. 1 (depending on
model) that can be used while showering. Simply rotate the shower
head nozzle as depicted to change the multiple functions.
In order for the hand held shower to operate, you will need to put the
water diverter to position D fig. 2.
How to operate both shower heads at the same time.
The shower head that is not working is positioned on a pole that goes
to the ceiling. This pole is called a shower riser. Approximately midway up the shower riser you will see a hexagon shaped metal adapter.
It’s located behind the hose going to the water head that’s not working.
Turn this metal hexagon dial to enable water to flow through to the
shower head.
ACUPUNCTURE BODY JETS
•
Fig. 1
•
•
Fig. 2
Fig. 3
Position C
•
•
•
•
•
•
The Acupuncture Body Jets (ABJ) fig. 1 on the main shower panel can
be adjusted in multiple directions by simply moving the nozzle
around.
In order to operate the body jets first turn the water diverter valve to
position C fig. 2.
On the control panel press the ABJ button fig. 3 and adjust the
incoming water to the pressure and temperature you desire.
Pressing the ABJ button once will turn the upper AB Jets on.
Pressing it twice will turn the mid-level AB Jets on.
Pressing it a third time will turn the lower AB Jets on.
Pressing it a fourth time will set the jets to alternate from top to bottom
in five second intervals.
Pressing it a fifth time will turn the AB Jets off.
Pressing it a sixth time will turn on the overhead Rain Shower.
OVERHEAD RAIN SHOWER
Fig. 2
Fig. 3
•
•
Position C
•
•
•
•
•
•
In order to use the Overhead Rain Shower first turn the water diverter
valve to position C.
On the control panel press ABJ button six times and adjust the
incoming water to the pressure and temperature you desire.
Pressing the ABJ button once will turn the upper AB Jets on.
Pressing it twice will turn the mid-level AB Jets on.
Pressing it a third time will turn the lower AB Jets on.
Pressing it a fourth time will set the jets to alternate from top to bottom
in five second intervals.
Pressing it a fifth time will turn the AB Jets off.
Pressing it a sixth time will turn on the overhead Rain Shower.
AROMATHERAPY BOX
COVER
COVER
AROMA BOX
STEAM HOUSING
Type 1
• Depending on the type of unit, you may have type 1 or type 2. Open the
cover as depicted and place your aroma scent in.
• The aroma will fill the steam shower unit once turned on.
• Quick Tip: You can make your own aroma scents by using essential oils.
Type 2
JET/PUMP CONTROL DIALS AND SWITCHES
1. Make sure the water level in the tub is high enough that all jets in the tub
Fig. 1
are completely submerged, before operating the pumps.
2. Press fig. 1. This is the water pump button to turn on the jets. For each side
of the tub (facing the tub) are two sets of fig. 1. The ones on the left control
the large jets and the ones on the right control the small jets.
ON/OFF
3. To increase water temperature, press fig. 2 on the Control Panel. The steam
will be controlled by the water temperature at this time. If the water
temperature is below 38 c steam will enter the tub through the water jet
Water Pump
located under the aroma therapy box. If water temperature is above 42 c, the
On/Off Switch
Water Jet
steam function will automatically turn off for your safety.
Pressure Dial
4. Adjust the pressure of the water jets by turning the water jet pressure dial
clockwise. Alternately, counter-clockwise to decrease.
Technical Note:
Fig. 2
Fig. 3
If the water jets do not come on, it’s due to air being in the pump system. In
order to purge the air from the system first, disconnect the hose at the foot
massage accessory. Turn the water diverter valve to fig. 3 position B and turn
the water on. Use the water coming from the hose to force water into a couple
Position B
of the small jets on the tub. Then try turning the jets on, if it still does not
come, this means not all of the air has been removed. Repeat these steps
using different water jet holes.
JET NOZZLE FUNCTIONS
Adjustable
Jet Nozzle
• The Jet Nozzles can move in various directions to ensure it delivers its
therapeutic effects wherever needed.
• Further more, by turning the Jet Nozzle clockwise will increase pressure.
• Turning it counter clockwise will decrease pressure.
• Note: Pressure can be adjusted independently on all Jet Nozzles.
• The smaller jets can only be adjusted by using the Jet/Pump Control Dials
as explained in previous step.
WATER DRAINAGE SYSTEM
• The Jet Nozzles can move in various directions to ensure it delivers its
Rotate
therapeutic effects wherever needed.
• Further more, by turning the Jet Nozzle clockwise will increase pressure.
• Turning it counter clockwise will decrease pressure.
• Note: Pressure can be adjusted independently on all Jet Nozzles.
• The smaller jets can only be adjusted by using the Jet/Pump Control Dials
as explained in previous step.
Drain
Plug
STEAM OPERATION
Fig. 2
Fig. 3
c
• Should you see a a green water faucet icon blinking on
your screen . DO NOT power steam generator. See
trouble shooting section for more information.
• Power on Steam Shower Unit
• Press fig 2 to turn steam function on
• Press fig 3 once to change the temperature , then + or
- to adjust
• Press again to change the timer, then + or - to adjust
STEAM GENERATOR INFORMATION
• To prolong the life of the unit we highly recommend the use of an inline water softener to
prevent build up of scale.
• Make regular checks to ensure the steam generator is operating correctly.
• Run at least once a week for 5 minutes if not in regular use.
• When the unit is not in use for long periods of time, close the water valve to prevent calcium
build up.
• Ensure that the steam generator is installed in the vertical position as shown by the arrow on
the machines housing.
• The water inlet on the steam pipeline should be over 15mm. Installation of valves on the
exhausting steam pipes is strictly forbidden. It could also void your warranty.
Electrical equipment not recommended by the manufacturers should NOT be connected to the
machine.
• Unauthorized disassembly and/or modifications to the steam generator is strictly prohibited.
Do not move, modify or make any changes to the wiring configuration.
• The drainage line from your steam generator is already connected to your drainage line. Do not
modify this connection.
• If your system requires connection of a water softner, It is suggested that it be connected to
the water inlet of the machine.
• In hard water areas, the main steam engine should be cleaned and water scale eliminated
regularly.
• The main steam engine should be checked and cleaned every three months.
• Range of steam timing: 0-99 minutes
• Range of steam temperature: 30 Degree Celsius to 60 Degree Celsius.
• The steam engine has automatic room temperature control and protection from extreme
temperatures, dry-heating, voltage overload and leakage.
STEAM GENERATOR MAINTENANCE
Warning: Make sure you allow several hours after steam generator usage to allow the steam to cool
in the unit before following the cleaning steps below. Further more ensure everyone is aware of the
cleaning process to keep anyone from accidently using the unit.
The procedures are as follows:
• Dilute 5-10 grams of citric acid (Lemon Juice) with 1.4 liters of warm water.
• Disconnect the pipe connecting to the outlet of the main steam engine.
• Poor the citric acid solution into the outlet.
• Re-connect the steam pipe and let it sit unused for 60 minutes.
• Power on the shower unit and let the steam generator run for 20 minutes.
• Power down the steam generator and your all done. The steam generator will drain off any
remaining materials automatically.
LCD Note:
1. When Powered on: The LCD screen will show the last users temperature setting value
and the original memory from factory. Which is 45 Degree Celsius.
2. When Powered on: The LCD screen will show the last users time setting value and the
original memory from factory. Which is 45min.
3. The screen will show Celsius only.
TELEPHONE OPERATION
Fig. 1
Fig. 2
TUN/VOL
With the built-in hands free telephone system users can accept
phone calls with a push of a button.
• When a call comes in the system will automatically interrupt the
stereo output and issue a phone ring tone.
• To answer press fig 1 directly.
• During the conversation volumes can be adjusted up or down by
pressing fig 2 then + or - as needed.
• When completed with call press fig 1 and the system will resume
audio functions as before.
Notes: Digital phone systems will not work with this system. It is best
to connect direct inline to a phone line wall jack. The system can only
operate one phone extension.
ALARM OPERATION
The alarm will only function when system is in power on condition.
• In case of emergency press fig 1 and hold for about 10-20
seconds.
• Alarm will sound until fig 1 is pressed again.
Fig. 1
RADIO/MP3 OPERATION
Fig. 1
Fig. 2
FM
MP3
TUN/VOL
System is not Smart Phone compatible. It will accept USB and
standard MP3 Players. It will only play .mp3 file extensions. However
it is easy to take selected music from Itunes and convert to MP3, then
save on a USB drive. Go to Apple or your Smart Phone manufactures
website for instructions on how to transfer to MP3.
• To power on the radio press fig 1 once.
• To adjust the volume press fig. 2 twice. Then press + or - to adjust
as needed.
• To change the station press fig. 2 once. Then press + or - to adjust
as needed. The system will automatically channel seek to the next
available station.
• To listen to .mp3 file extensions press fig. 1 twice.
• Change song selection by pressing fig. 2 twice. Then press + or - to
change.
TV/AV OPERATION
Fig. 1
Fig. 2
TV/AV
TUN/VOL
In order for the TV to operate the TV cable on the back must be
connected to a cable box or satellite box controller. Contact your local
TV provider for assistance with this connection if needed. System will
not work with Digital TV Antenna connections.
• To power on the TV press fig 1 once.
• To adjust the volume press fig. 2 twice. Then press + or - to adjust
as needed.
• To change the channel (depending on how setup) press fig. 2 once.
Then press + or - to adjust as needed.
• The AV function is an optional accessory connection. Once device
is connected press fig. 1 again if already in TV mode or twice if in
main menu.
• Pressing fig. 1 a third time will return screen to main menu.
TV/AV MENU SETTINGS
Fig. 1
Fig. 2
TV/AV
TUN/VOL
Fig. 3
MENU
In order to change the menu settings follow the below instructions
to move about the menu and change settings. The first set of
instructions below explain how to change the TV setting to “NTCS”.
Using this setting in the US will allow the TV to work properly.
• To power on the TV press fig 1 once.
• To adjust the volume press fig. 2 twice. Then press + or - to adjust
as needed.
• Press Menu fig. 3 to access menu features. Note: you will only
have 4 seconds of idle time to change settings before screen
returns to normal mode. If this happens just press the Menu
button again.
• Press Menu continuously to change through the different setting
options.
• When you get to “Format” section press fig. 2 then press + or - to
choose the Format setting.
• Press fig. 2 again and then + or - to change the setting to NTCS.
• Using the same methods above continue changing settings as
needed. One change that may be required is auto channel tuning.
Using the same procedures above will help in changing this
setting.
OZONE INFORMATION
The Ozone function will automatically operate upon power condition
off. After 15 seconds, you will here a clicking sound and a blue flash
of electricity in the Ozone controller located on the ceiling. This is
normal and ok. The Ozone function is killing any bacteria in the air.
TECHNICAL PARAMETERS
Working Voltage˖AC110V/220V(+10%̚-20%)/60Hz/50Hz
Power Control Cabinet Size˖255×185×70mm
Compressive Strength: not breakdown under 1250V/1 minutes
Insulation Resistance˖NJ200Mȍ
Waterproof Degree˖IPX4
Electric-proof˖1st class
Steam Generator˖AC110V/4.2kw (AC220V/4.2kw) TV Power˖DC12V
Light˖AC12V/20w
Fan˖DC12V/5w
Radio: 1) Range of Frequency˖FM88.0MHz̚108.0MHz
2) Maximum Output Power˖10w
3) Loudspeaker˖8 Ohms speaker, damproof
ROUTINE MAINTENANCE
„
• Clean using liquid dish detergent and soft cloth. DO NOT use acetone, ammonia and materials
containing organic solvent to clean unit. Using these abrasive cleaners will destroy the tub
surface.
• Should the surface of the tub obtain light scratches or cigarette burn, polish it with
waterproof abrasive paper NO. 1200 .Then use NO. 2000 waterproof abrasive paper to
polish carefully. Finally, use toothpaste to polish.
• Chromium-plated parts should be lightly polished with soft cotton flannel. DO NOT use coarse
cloth material to clean surface.
• To clean the water jets in the tub, first ad enough water to submerge all the jets in the tub. Add
Sanitizer (this is sold at pool stores and hardware stores) per the instructions on the
manufacturers label. Start the water pump system and let run for approx. 5 minutes. Then, stop
the pump and drain water. Add water again (this can be cold water) restart water pump again and
let run for approx. 3 minutes. Shut down and drain the water. DO NOT use cleaners or Sanitary
cleaners that foam. Doing so will clog up the water return
• Keep the bottom drain clean by removing drain plug often to clear any debris from the drain.
• Clean and maintain the steam generator as described in the steam generator maintenance
section of this manual.
• It is advisable to shut the water valves off at the water supply inlets when shower is not in use.
This action will help ensure there are no surprise leaks beyond the showers control, such as;
froze water line bursts, excessive water pressure forces, accidental acts of human nature, etc…
• It is also advisable (if power switch was connected) to turn the power switch off that connects
your shower to the 220 main power connection.
• When doing any maintenance make sure the power is off before you begin working.
TROUBLE SHOOTING
PROBLEM OR ERROR
CAUSE
SOLUTION
MP4/MP3 does not work
normally, no image, but
sound is normal
1. The USB Cable is connected
improperly or the TV set is
disconnected.
1. Power down Unit
Disconnect the USB cable and reconnect
Disconnect USB Device and reconnect
Power unit back on and try again
MP4 does not work at
all
1. USB cable connected incorrectly or
the connection is Broken.
1. Check wire connections and fix as
needed
Noisy, static noise or hum
from speaker when
MP3/Radio is working
1. The speaker wire connections are
not connected correctly and is
receiving interference
1. Check the speaker wire
connections on top of the unit and
repair if needed. Check to ensure
grounding is correct.
The TV has image but
no sound
1. The main AV Cable is connected
incorrectly. Or see previous audio
troubleshooting solution.
1. Check to ensure the main AV cables are
connected correctly to its source point,
satellite box or cable box. See previous
audio solution
The TV has got a reverse
image
1. TV is not formatted correctly or
cable is not secured to source.
1. See TV Menu Settings section in this
manual located on PG. 11 To ensure your
TV is set with the correct formatting of
“NTSC”.
The TV suddenly shut
down but it was working
normal.
1. Voltage stability issue
2. Source cable got disconnected
1. If using a AV Splitter ensure it has
enough built in power to push AV signals.
2. Check to ensure no one has accidently
disconnected the cable source.
Movable showerhead
and top showerhead
works at the same
time.
1. The top showerhead water pipe was
connect to the movable showerhead,
and the movable showerhead's water
pipe was connect to the top
showerhead.
1. Interchange the two water
pipes connection.
Water emerges from the
steam outlet yet the main
control panel flashes a
green icon symbol.
1. This green icon means low or no water
pressure.
2. The electronic power box may have
problem and the CIP might be burned off.
1. Ensure proper water flow to the Steam
Generator. Some models will show the
Green now water icon, if Steam Generator
is operating correctly, ignore this light and
continue use.
Water does not emerge
from the steam outlet and
the main control panel
does not show the green
flashing no to low water
pressure icon symbol.
1. TURN OFF STEAM GENERATOR
IMMEDIATELY. Check the User
Manual for further troubleshooting
tips
1. Check user manual
Water Pump will not turn
on.
1. Air in the pump lines will need to be
purged.
2. Power off at the main panel or the
push button pump switch on the tub is
not activated.
1. See Technical Note on page. 7 of this
manual.
2. Make sure pump switches have been
activated.
3. May need new Water Pump
Bathtub leaks water
1. Drain area leaks
1. Make sure drain is tightened properly.
Place Tub Adhesive Caulk around the drain
leak area and allow it to properly dry.
2. Massage jets leak
2. Place Tub Adhesive Caulk around the area
where the jet leaks. Allow it to dry for 24
hours.
Power Failure
1. Protection switch has been tripped
1. Locate the homes circuit breaker box and
reset tripped breaker.
If your outlet the shower is connected to has
a protections switch, reset it as well.
Control Panel does not
respond when buttons are
pressed or is flashing
intermittently
1. Some buttons are inoperable
depending on what mode its in.
Control Panel has overheated.
1. Power down unit and let it cool for an
hour, then re-start.
No steam
1. The steam generator is not receiving
water.
2. The heating element has burned out in
the steam generator.
1. Check the water supply connections as
well as all of the hose connections.
2. Call for replacement heating element.
This is normal wear and tear, as such will not
be covered under warranty. Cost will be
provided upon contacting us
3. See steam generator maintenance
4. Repair or replace.
3. Steam lines clogged
4. Thermal protection switch fails.
5. Thermal protection is disconnected.
6. The preset time is out.
7. The temperature setting is lower than
room temperature.
5.Reconnect or replace.
6. Reset the time as required.
7. Set the temperature higher.
Water oozes
from steam
generator
1. Level probe is ineffective.
1. Check the probe and connection.
2. Intake solenoid valve fails or has
impurities.
2. Check and replace solenoid valve or
remove the impurities.
Steam generator dry
burns with smoke
1. The warning pipe of steam generator is
blocked.
2. The intake solenoid valve is damaged.
1. Clean the air vent of steam generator.
1. Short circuit caused by incorrect
connection at the bottom of steam
generator.
1. Connect the half yellow and half green
wire to the steel chip.
2. Short circuit caused by leakage of
heating tube on steam generator.
2. Replace heating tube.
3. Short circuit on the circuit board.
3. Circuit service.
Protection switch trips
2. Replace the solenoid valve.
No or small spray
1. Water pressure is too low.
1. See the Pre-installation guide for tips on
fixing water pressure issues
2. The filter screen of cold/hot water
intake valve is blocked.
2. Clean filter screen.
3. The water supply pipe is blocked.
3. Replace or clean water supply pipe.
4. The spray-switching valve is not turned
on or seizes up.
5. Nozzles are blocked.
4. Turn on or repair the valve.
No water coming out of
the upper or lower nozzles
1. The solenoid valve is broken
1. Repair or replace
Water coming out of a few
nozzles
1. Low water pressure
1. Install pressure pump.
Back massager is noisy or
unmovable
1. Back against rear panel too heavily.
2. The grey pad is broken
3. The retaining screw is loose.
1. Back against the real panel gently.
2. Replace the grey pad
3. Check and tighten screw.
Water Leaks from the
steam generator
1. Defective O-ring
2. Clamp is loose
1. Replace O-ring
2. Bond again (w/ PVC glue) & tighten clamp
Water leaks from the outlet
1. Intake solenoid valve is damaged
2. Too high water pressure
1. Replacement
2. Install water valve reducer
No lighting
1. Electrical connection is disconnected
1. Check connection
2. LED Light is shorted out or burned out
2. Call for replacement LED Light
3. No voltage output from the circuit board 3. Call for further guidance
Ventilation fan doesn’t
work
1. Poor connection of wiring
1. Check and reconnect connection
No audio or Hum sound
present
1. Poor connection or no audio input
1. Check joint or connection to audio.
Phone not
functioning properly
1. Possible DSL Connection Filter Failure
1. If you have DSL ensure you are using a DSL
Filter on the shower connection.
2. Check for proper connection
Turn on and adjust the volume to proper
level (See User Manual)
2. Poor Electrical Connection
Volume button is not turned up loud
enough..
5. Clean Shower Head using Dishwasher
Radio not Functioning
Properly
1. No channel signal
1. Move antenna around until you
receive the best possible reception. If
reception is still poor you may have to
purchase a signal booster.
Water pumps not operating
properly
1. See page 12 of User Manual first
1. See User Manual Technical Notes
2. Ensure the air switch is secured tightly
3. Make sure water pumps electrical cords are
connected to the junction box
4. Pumps will not come on until water level
reaches above the massage jets and temp
probes on the tub
Help, I can't adjust the
massage strength
1.The clear air tube has not been
inserted closely.
1.Check the Air pumps to ensure the clear
plastic hose tubing is securely connected at
both ends.
The water pipe
leaks
1.Seal gasket is not
good
2.The nut not been
locked tightly, interface
place sticking is bad
3. The inner layer in the
water pipe breaks
1.Change the seal ring.
2.Screw down the nut,
and seal the interface.
3.change the water tube.
The underwater
LED light is not
bright
1.The fuse of the light is
melted
2. No water in the
bathtub or the water not
high enough
3.The light bulb has
been out of order.
1.Change the fuse with
specification.
2.Add water to be higher
than the nozzle.
3.Change the light bulb.
The radio
reception is bad
1.The Model Y aerial not
been
drawn well
2.The frequency of radio
station not been set well
3.Users are in the weak
signal area
1.Draw back the “Y”
antenna, and make it to
the best direction
2.set the frequency of
radio station againˈ
If it is not good to set
automatically, can adjust
it manually
The main plug
trips
1.There is leakage of
electricity in water pump
or in other load.
2.The total outlet itself
has already been
damaged.
1.Check and change the
leak electricity load
2.Change with the same
sharp plug.