1
Bredenberg Teknik
uppdate 2007-08-23
PileCap.exe User Manual
General
The PileCap.exe PC-program is used for the analysis of 3 -D pile groups cast into a rigid cap.
The soil and the pile top conditions (fixed or hinged) can be considered in the calculations.
The number of piles and loading cas es are only restricted by the resources of the user.
Pile/Soil/Load –data are input by means or a user friendly interface and modifications of the
task are easy to implement. In this way, the optimum design of a pile group within given
conditions can be obtained in an interactive manner , fast and effective
The method for analysis, direct stiffness method, is well proven for pile group design. The
output is all the time checked for numerical stability and accuracy, meaning the user can feel
confident that the results calculated. In case of attempts to analyse an instable structure, the
application will issue a warning.
Soil and pile properties are easy and hands on to input. It is possible to design a pile group
with every pile different from their neig hbours, although this is of course never the case in
practice. Nevertheless, the ability to analyse a pile group with one, or several, piles different
from the others is many times of great value. Pile group analysis after installation and
checking the piles, when unenviable deviations from original design usually shown up, is one
example.
The input data as well as the output can be stored for repeated use. The user can build a
library of data and thereby simplify the pile group design commonly performed.
The PileCap.exe is designed to run under MS Windows XP or later.
Calculation method
The method used for the analysis is described in detail in Appendix A. In short, the
calculation flow is as follows:
- for a single pile, calculate the forces and mome nts required at a pile top to give top the
translations and rotations = 1 in the 6 possible directions (3 translations, 3 rotations). The
coordinate system used is one with one axis parallel to the pile axis.
- transform these forces and moments to a coo rdinate system the axis parallel to the axis of
the pile cap.
- the transformed forces and moments are moved to the origin of the pile cap
- the process is repeated for all piles. The contributions of all piles are summed in a stiffness
matrix (6x6) at the pile cap origin. The element of the matrix expresses the force and
moment respectively to give the pile cap a specified translation/rotation when loaded in a
specific way.
- the loads (3 forces, 3 moments) are applied to the pile cap origin. Using the stiffness matrix
assembled, the corresponding translations/displacements of the pile cap origin are
calculated.
- the translation and rotation of a pile top is calculated, using the cap movements. These are
expressed in the pile cap coordinate syste m. The cap is assumed perfectly rigid.
- page 1(21) PileCap.exe User
Manual
--------------------------------------------------------------------------------------------------------------------------------www.bredenbergteknik.se
Bredenberg Teknik
uppdate 2007-08-23
- the pile top movements are transformed into the coordinate system of the pile. The pile
direction and slope provides input data for the transformation.
- finally, the pile forces and moments are calculated using the relationship between
movements and forces/moments established in the first item mentioned in the list.
- the process is repeated for all piles in the pile group. It is then assessed whether the
movements and forces/moments are acceptable. Usually, the design must be modified and
reanalysed a couple of times before a satisfactory result is obtained. Further, when the piles
have been installed, there are usually deviations, as for example in slope and direction,
who’s influence must be analysed and maybe must also additional piles be installed,
meaning further calculations.
It is obvious that the calculation process demands a vast amount of numerical calculations.
Fortunately, this can be handed over to a computer, a PC doing Win XP. Doing so, the
question arises how reliable are the results?
The computer uses a limited number if digits in its number crunching. In PileCap.exe all
calculations are carried out in so called floating point double precision, meaning the results
are as accurate as possible. Further, the reactions at each pile top are transformed and
moved back to the pile cap origin, where they are compared to the applied loads (forces and
moments). The difference is due to numerical truncations during all the calculations
performed, and the residual vector (difference between applied and back calculated load) is
a measure of the accuracy of the analysis.
It should be mentioned that numerical stability mirrors the physical stability of a pile group.
For example, a pile group wit h only vertical piles when subjected to a horizontal force
responds with an infinite translation, no matter how small the force is. Thus, such a pile
group can not be analysed by the direct stiffness method described above. However, by
cheating a little by applying a small amount of lateral soil resistance even such pile groups
can be analysed.
- page 2(21) PileCap.exe User
Manual
--------------------------------------------------------------------------------------------------------------------------------www.bredenbergteknik.se
Bredenberg Teknik
uppdate 2007-08-23
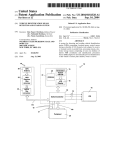
Start Page
At start, the PileCap.exe displays it’s Start Up for, figure 1.
Fig 1. PileCap.exe start form
On this form there are several items aimed at guide the user through the design process.
On the topmost bar the program version is displayed.
The menu row below shows the three items File, Help and About. The Help option simply
points to this manual. The About choice can give detailed information about the system
where PileCap.exe is run. This facility is useful in tracing eventual difficulties running the
application. The content of the File option is described later.
Below the title row and some general information using the appl ication, there are two main
frames containing Input Data and Calculated Data respectively. In between there is a
command button making analysing the Input Data to happen. The function of each button is
outlined later.
Next below there are two frames. The left one gives a schematic description of the usual
calculation flow. The frame to the right contains the names of the input data files loaded.
This frame also holds a status box, coloured green when a successful calculation has been
performed using the Input Data loaded. When some Input has changed and a calculation
has not yet been done, the status box is red.
- page 3(21) PileCap.exe User
Manual
--------------------------------------------------------------------------------------------------------------------------------www.bredenbergteknik.se
Bredenberg Teknik
uppdate 2007-08-23
Below the right frame is a frame containing 3 command buttons. The rightmost button
marked Exit offers the user the choice to stop the program. Th e leftmost button labelled
Open Project opens up a dialogue, enabling the user to load a complete set of Input Data
Files, see Figure 2.
Fig 2. Dialogue box for loading a Project Data File (= a set of Input Data Files ).
The function of this input box follows the standard Windows way to handle file input and is
not further explained here.
The button Save Project opens up a similar dialogue box making it possible for the user to
save the assembly of loaded Input Data files in to a Project Data File containing the
assembly, figure 3.
Fig 3. Dialogue box for saving a Project Data File. (= an assembly of Input Data Files)
As is the case with the Input Dialogue, this is standard Windows stuff and no fu rther
explanation is given here. Consult the Windows manual, if necessary.
- page 4(21) PileCap.exe User
Manual
--------------------------------------------------------------------------------------------------------------------------------www.bredenbergteknik.se
Bredenberg Teknik
uppdate 2007-08-23
The user can save his files where ever he wants in his system. However, it is recommended
to maintain a systematic way of building a folder structure in order to make it easy to fi nd and
use stored data files. The picture below is shown as a recommend structure .
Fig 4 Recommended folder structure for storing data for Pile Cap calculations
If the user tries to open a Project Data File which is not such a file, an error message is
displayed and the load is cancelled. The file extension (.pcp) is checked as well as a header
written into every Project Data File saved.
When a valid Project Data File has been loaded, the name of the file is shown in upper case
letters in the frame containing the names of the loaded data files. Further, the names of the
individual input data files contained in the Project Data file are displayed in the frame.
Returning to the Start page, the bottom frame contains some information about Bredenberg
Teknik, the copy right holder of PileCap.exe.
At the upper right corner on the Start form, the usual min, max, and stop buttons are found.
If the stop button is pressed, a confirmation message box is shown, in order to avoid
unintentional escape from the program.
The Start form can be minimised, maximised, moved and area modified the standard
Windows way. These facilities are handy when arranging the different forms on the screen,
when a pile group design is in progress.
Input Data
Input data are supplied by means of four different Input Data files for a Project. These Input
files are :
File
General Data
Geometrical Data
Material Data
Extension
.gdt
.geo
.ela
Example
Pgroup2.gdt
Group 9.geo
New Piles.ela
- page 5(21) PileCap.exe User
Manual
--------------------------------------------------------------------------------------------------------------------------------www.bredenbergteknik.se
Bredenberg Teknik
uppdate 2007-08-23
Cap Load Data
.ldt
LoadCase IV.ldt
Project Data
.pcp
ProjA11.pcp
The organisation of input data contained in the first four input files is described below
together with the functionality of the respective input forms. The content of a project data file
is an assembly of the data in the four ba sic files. The Project File Open/Save facilities makes
it easy to load or save all project data in a single sequence, whereas the individual data in
each of the four Input Data sets can be edited using the respective input form.
The user can save his files where ever he wants in his system. However, it is recommended
to maintain a systematic way of building a folder structure in order to make it easy to find and
use stored data files.
The file format for all Input Data files is simple ASCII -files (.txt-files). They can be edited by
using any text editor, as for example Notepad. However, such editing may result in corrupted
files, resulting in an error message when trying to make a calculation, or otherwise handling
such a faulty file. Avoiding such editing eliminates the risk of such errors.
If the user tries to open an Input Data File which is not a valid such a file, an error message
is displayed and the load is cancelled. The file extension is checked as well as a header
written into every Input Data File saved.
Each Input Data form contains two buttons labelled Open and Save. They operate the same
way as described above for Project Data files. The forms for the Input Data files can be
minimised, maximised, moved and re -shaped the standard Windows wa y. This makes it
possible to tailor the screen to the outfit that is best suited for the analysis being made. As
for example, when inputting geometrical data describing the location and direction of
individual piles, it is practical to make the geometrical input form and the pile plan view form
visible side by side. Doing so, the user gets an immediate check that each pile are given
correct coordinate and direction values.
If the user presses the X -button at the upper right corner of an Input Data form, a
confirmation request message is shown, in order to avoid unintentional loss of data
contained in the form, see fig 4 (as a bonus, you learn some Swedish, “Ja” =Yes and “Nej”
= No, ) .
Fig 4. Confirmation request when attempt ing to close an Input Data form
Should the form be closed this way anyhow, the data on the form are lost - however, if they
have been saved, they can easily be retrieved using the Open button on all Input Data forms.
It is recommended that input data are saved frequently.
- page 6(21) PileCap.exe User
Manual
--------------------------------------------------------------------------------------------------------------------------------www.bredenbergteknik.se
Bredenberg Teknik
uppdate 2007-08-23
On each Input form there is also a status box. The status box turns green when the data in
the text boxes have been Saved. If a box is changed the status box will turn red, alerting the
user the data should be saved in order not to be l ost in case the form is closed.
Below follows a description of the functionality of each of the four Input Data forms.
General Data Input form
Pressing the button General Data opens up an Input Form for such data, see Fig 5.
Fig 5. Form for Input of General Data.
The title bar contains the name of the input form, in this case General Data. Then there are a
set of input text boxes where the user can input project data. The time and date, taken from
the user system, can be put into the corresponding text boxes pressing the button labelled
Set Time and Date.
The Open and Save buttons gives the user the option to Open and Save files containing
General Data, by opening up dialogues as described above at the description of the
functions of the Start Form. The function of the status box has also been described, as well
as the control buttons in the upper rightmost corner.
Note that there is no exit button on the form. Usually the text boxes are filled and the data
saved, and the form is then minimised and maybe kept in this shape until the session is
ended. However, in case the user wants to close the form instead of minimising it, this ca be
accomplished by clicking the X up right and confirm the intention to close the form.
Geometric Pile Data
The next input form to be filled is the form where the geometrical data for each pile in the
group is typed. The form is activated by pressing the corresponding button in the input
frame. The geometrical data input form is shown in fig 6 .
- page 7(21) PileCap.exe User
Manual
--------------------------------------------------------------------------------------------------------------------------------www.bredenbergteknik.se
Bredenberg Teknik
uppdate 2007-08-23
Fig 6. Form for Input of pile geometrical data
Data are typed into the cells in the grid. A completed cell input should be confirmed by
pressing keyboard Enter. Piles can be inserted and deleted using the Insert and Delete
buttons. The rightmost part of the form gives a description of the input data. This can be a
handy reminder in case the user does not make pile group calculations very often, but this
part of the form is usually removed during a design session , by resizing the form. The data
to be filled in are as follows from left to right;
Pile ID : Any description the user wants to input to label the pile .
Type : a pointer to the material characteristics of the pile (see next form, material
properties).
x,y,z : coordinates of the pile top, relat ed to the cap coordinate system, note millimetres.
n : slope of the pile expressed as n:1, as for example 4:1. Input 0 (zero) for a vertical pile.
alpha: direction of the pile, degrees, projected to onto the horizontal plane.
L : pile length, where elastic compression is supposed to occu , note millimetres.
m : factor defining how the pile top is connected to the cap. Fixed is m = 1. Hinged is m=0.
The function of the Open and the Save buttons have been described above, as well as the
control buttons in the upper rightmost corner and the Status box down left.
In the control frame at the bottom of the form, the number of active piles in the grid is shown,
to the right. To the left of this info, there is a button labelled Draw plan.
Clicking this button shows a plan view of the piles fed into the grid on the Geometrical Data
input form, see figure 7.
- page 8(21) PileCap.exe User
Manual
--------------------------------------------------------------------------------------------------------------------------------www.bredenbergteknik.se
Bredenberg Teknik
uppdate 2007-08-23
Fig 7. Plan view of piles in input grid
The plan view can be zoomed in or out in order to get a suitable picture resolution. A grid
with 1 m grid line spacing can be turned on and of, as can the Pile ID:s also be. The center
of the plan view is always the center of the cap. This is the horizontal projection of the pile
cap origin, that is, where the loads acting on the cap are assumed to be situated (more
about that below, at the description of the Cap Load form).
The cap dimensions can be changed using the leftmost up/down buttons above the view.
However, these dimensions have no influence of the calculation results.
Pile and soil material data
When the geometrical data of each pile has been defined, it’s time to define the material
properties of the piles and also the soil surrounding the piles. This is done by calling up the
form called Pile Elastic Constants, see figure 8.
In order to calculate the cap response of external loads, the sum of all piles contributions to
the cap stiffness must be assembled. Therefore the relationship between forces and
moments and the corresponding translations and rotations for each pile top must be
evaluated. This is what the form in fig 8 is for.
The values used in the calculation are the ones in the uppermost boxes. Since there are 6
degrees of freedom (3 translations and 3 rotations) for the pile top, there should be 6 boxes,
but since symmetrical conditions for eac h pile top are assumed the number of stiffness
factors are reduced. The stiffness factor kij defines the force (moment) required in direction
“i” to give the pile to a translation (rotation) equal to 1 length unit (one radian) in direction “j”.
The direction of “i” and “j” are defined in the appendix describing the numerical method for
the analysis. For example, k33 is the force applied to the pile top which causes a unit
compression of the pile at the pile top.
- page 9(21) PileCap.exe User
Manual
--------------------------------------------------------------------------------------------------------------------------------www.bredenbergteknik.se
Bredenberg Teknik
uppdate 2007-08-23
The form shown in fig 8 is created to simpl ify the evaluation of the factors kij. Often the soil
resistance around the piles is neglected and then only factor kij to be considered is the axial
stiffens. In the form, a different cross section shape, the side/diameter length and the pile
material can be selected and the corresponding stiffness calculated. The E -modulus can be
selected as standard values, or modified using text box input.
In case the user wants to consider soil resistance around the piles (recommended),
PileCap.exe offers the option to do that by the input of a soil E -modulus ( see rightmost input
frame). The kij values are then calculated assuming the piles are equivalent to semi infinite
beams in a Winkler (linear spring) environment.
In case another way to calculate the stiffne ss factors are preferred by the user, maybe
factors evaluated from a load test, this can be accomplished by typing in the factors and then
upload them by pressing the button Upload all boxes. Upload is done to the row pointed at.
It should be mentioned that it is possible to use different stiffness properties for every pile in
a group. However, usually it is assumed that all piles have the same stiffness characterises.
Fig 8 Pile and soil material data, elastic properties
The Open and Save as also the control buttons up to the right have the same functionality as
is the case for the other Input Forms.
Pile Cap Load Data
The loads acting at the cap are input into the last of the four input forms, se figure 9.
- page 10(21) PileCap.exe User
Manual
--------------------------------------------------------------------------------------------------------------------------------www.bredenbergteknik.se
Bredenberg Teknik
uppdate 2007-08-23
Fig 9. Pile Cap Load form.
The loads are related to an origin usually chosen as the gravity centre of the cap. There are
6 generalised forces, 3 forces and 3 moments.
The directions of the positive axis are shown in a picture to the right of the input data grid.
Vertical loads (z-axis) are parallel to the direction of gravity, usually. If so, the x –y –
directions establishes the horizontal plane. The respective moment is assumed positive
turning right wise when looking in the respective axis.
In the form, info about sign conventions i s given in the picture to the right of the input grid.
This part of the form can be removed when the user has understood the force direction
rules. In case he will return to this form without a clear memory of the direction signs used
the picture may serve as a reminder.
Any number of load combinations can be loaded. The active number is shown at the right in
the control frame below the grid.
The functionality of the Open and the Save buttons, as well as the Status box different
states (green / red ) has bees described above.
Menu bar, the File option
As mentioned above, the File option at the menu bar have a special function. Pressing the
File item, a drop down list is presented, as shown I fig 10.
- page 11(21) PileCap.exe User
Manual
--------------------------------------------------------------------------------------------------------------------------------www.bredenbergteknik.se
Bredenberg Teknik
uppdate 2007-08-23
Fig 10.The File Option at the menu bar
From this list it is possible to make the same type of Open/Save operations as described
above.
Any attempt to load an input data file not compatible with the type assumed, will result in an
error alert from the program. It is recommended that input data files are created using
PileCap.exe, and that the input data file are kept in the format used by PileCap.exe.
Calculated data
O k, now the PileCap.exe has got enough info about your pile group. So let us analyse it ;
easiest part of the manual . Jus the press Ca lculate button between the two frames at the
top of the start6 page.
When you do so, a considerable amount of numerical analysis is done for you. It involves
matrix inversion, pivoting, and lots of number crunching. In case anything goes wrong during
the calculation, an error message is generated. However, if the input data files have passed
the tests the program generates and the pile group is reasonably stable in a physical sense,
the calculation should not raise any error flags. A successful calculation gives a green status
light for the status box at the calculation frame at in the Start form.
Stiffness matrix, flexibility matrix, cap displacements
The primary calculation result is the stiffness S matrix for the pile cap. It is a 6*6
symmetrical, positive definite, matrix containing the forces and moments required to
translate and rotate the cap one length unit for translation and one radian for moments,
respectively. The 6*6 order of the matrix reflects the 6 degrees of freedom (3 translations, 3
rotations) the cap can do. The element Sij of the stiffness matrix is thus the force (moment)
- page 12(21) PileCap.exe User
Manual
--------------------------------------------------------------------------------------------------------------------------------www.bredenbergteknik.se
Bredenberg Teknik
uppdate 2007-08-23
required to give a translation (rotation) equal to 1 length (rotation) unit. The stiffness matrix is
symmetrical.
Fig 11 Stiffness matrix, flexibility matrix and pile cap displacements
The stiffness matrix is made visible by clicking the Stiffness button on the Start form. An
example is shown in fig 11.
Below the stiffness matrix on this form, there are also the flexibility matrix, the check matrix
and the cap displacements.
The flexibility matrix is the inverse matrix S
calculated by the matrix multiplication
S
-1
-1
of the stiffness matrix. The check matrix is
S
which shall yield the 6*6 identity matrix I, in which all diagonal elements are equal to 1 and all
others 0. A look at figure 11 shows that the off diagonal elements of the check matrix are not
-6
-19
really zero, but instead something like 10 to 10
. The reason is truncation errors, since
real number multiplication is carried out using a limited nu mber of digits. However, a number
that small is in most pile cap calculations something that can be considered zero.
As can be seen from fig 11, the results are given with lots of decimals. In order to make grids
presenting the output easier to read, the number of decimals can be decreased using the
- page 13(21) PileCap.exe User
Manual
--------------------------------------------------------------------------------------------------------------------------------www.bredenbergteknik.se
Bredenberg Teknik
uppdate 2007-08-23
up-down button at the upper right corner of the form. For example, letting the number of
decimals tick down to zero gives the example shown in fig 11 the following look :
Fig 12. Same as fig 11, but with ze ro decimals
In the 3:d grid, the check matrix, it is now seen that the diagonal elements are all 1 and the
others zero. However, information about the elements of the flexibility matrix (not often
required, though), and the pile cap displacements require more decimals than zero in order
to find out actual values. This is easily done with the up -down button up right.
The last grid shows the translations (millimetres) and the rotations (radians) of the cap. The
values are calculated as
{u} = S
-1
{F}
where {F} is a column vector holding the forces (F1, F2, F3) and the moments (M1, M2, M3)
acting at the cap origin. As for the grids above, the numbers of decimals shown are set by
means of the up-down button at the upper right corner of the form. The first column of the
grid gives the number of the load case corresponding to the loads and displacements.
Pile loads, pile displacements
Next two calculation-show buttons that can be clicked at the Start Up form makes the pile
load grid and the pile displaceme nt grid visible, se fig 13 and fid 14. Again, the number of
decimals can be set by an up -down button situated upper right. Note that the moments and
the rotations for hinged pile -cap connections are 0, as in the figures shown.
- page 14(21) PileCap.exe User
Manual
--------------------------------------------------------------------------------------------------------------------------------www.bredenbergteknik.se
Bredenberg Teknik
uppdate 2007-08-23
In the pile force grid, the maximum and the minimum axial force are shown in bold red and
bold blue font, respectively.
Fig 13. Pile reaction forces and moments (at the pile -cap interface)
Fig 14. Pile translations and rotations (at the pile -cap interface)
Like the input data forms, a warning is given if the user presses the close button for any of
the forms presenting calculated data. Should however an unintentional close be done, this is
not critical, since the calculation can be repeated just by pressing the Calculation b utton on
the Start form again.
Equilibrium check
On screen there are a lot of pile loads and pile top displacements displayed. How do you
know they are accurate? Well, actually you ca’nt unless you get some support. If there are
huge and obvious errors it’s safe to conclude the calculated data are not reliable. But if there
are errors say 10 – 30 %, it’s generally not possible to figure out something is wrong.
- page 15(21) PileCap.exe User
Manual
--------------------------------------------------------------------------------------------------------------------------------www.bredenbergteknik.se
Bredenberg Teknik
uppdate 2007-08-23
The stiffness matrix, the flexibility matrix and the calculation of the product of these will give
one indication of the reliability of the results displayed. The fact that the matrix inversion was
possible to carry out means that the pile group analyzed is stable from an engineering point
of view – that is, there is no direction in the cap coordinate system where a infinitely small
force (moment) will give a huge (unlimited) translation (rotation).
Further, as a check maybe easier to understand, an equilibrium check is made, se figure
15.. All the calculated forces and moments at each pile top are rotated into the cap
coordinate system and the corresponding force and moment at the cap origin is calculated.
The contribution from each pile is accumulated, and when all piles have been calculated this
way, the sum is compared to the loads applied to the cap. The difference is calculated and
presented. An example is shown in fig 15.
Fig 15. Equilibrium check. Cap Loads, back calculated loads and differences.
Form fig 15 it there are errors in the magnitude of 10 ^ -14 or less. This is pretty close to
zero, which is the correct value of course. For engineering purposes such a small resulting
truncation error means that the results of the calculation are validated. The reason exact
zero is not obtained is that the computer uses a limited number of digits doing the math.
The double precision math, and the numerical method used a re very powerful when dealing
with marginally stable pile groups. If you are interested in testing the abilities of PileCap.exe
in this respect, you will find that un unstable configuration of piles ( as for example only a few
vertical piles with hinged connection to the cap) cap be analyzed applying only a very small
soil support to one of the piles in the group.
A division by zero situation ( e g a horizontal pile) can not yield a result, by there will be no
crash to your desktop, and the error messages are not intimidating. Not by purpose, anyhow.
The results of the equilibrium check are displayed by pressing the Equilibrium Check button
on the Startup form.
- page 16(21) PileCap.exe User
Manual
--------------------------------------------------------------------------------------------------------------------------------www.bredenbergteknik.se
Bredenberg Teknik
uppdate 2007-08-23
Pile Cross Section capacity check
When the axial load and the bending moments at the pile top has been calculated, it ’s time
to check whether the pile cross section can take these load effects. Usually, this is checked
using an interaction formula,
Ns/Nd + Ms/Md <=1
where
Ns = axial load
Nd = axial load capacity
Ms = bending moment acting together with the axial force
Md = moment capacity
Usually reduction factors are added in order to consider local buckling and other effects
affecting the bearing capacity of the cross section. However, the basic formula for a section
subjected to both a normal force (for piles usually a compressive force) and a connected
bending moment is the one shown above.
For a 3D pile group, the individual piles will usually have bending moments in three
directions, two bending moments Mx and My acting around the two horizontal axis’s x and y
respectively and a twisting moment Mz. The moment Ms to feed into the interaction formula
is the resulting moment from Mx and My, that is
Ms = sqr(Mx^2+My^2)
That is, the resultant of the two moments if they are looked at as vectors, se fig 16.
Fig 16. Resulting bending moment from Mx and My
The influence of the twisting mom ent Mz must also be considered when the cross section is
checked. The moment Mz gives shear stresses in the section. These stresses are combined
with stresses caused by compression/tension and the other two bending moments. National
building codes have rules how to take such situations into consideration.
PileCap.exe has a facility to make the calculation of the necessary pile cross section
capacity. This option is activated by pressing the Cross Section button on the Start Up form.
A new form is the ´displayed, se fig 17.
- page 17(21) PileCap.exe User
Manual
--------------------------------------------------------------------------------------------------------------------------------www.bredenbergteknik.se
Bredenberg Teknik
uppdate 2007-08-23
Fig 17. Pile cross section check form . The capacity of pile 9 seems too low (red).
On this form, the values of resulting bending moment Ms, as outlined above, is calculated.
Then the interaction quotient is calculated. If >= 1, it is displayed in r ed. The value is
calculated for every pile in the pile group and also for each load case. The capacity values
Nd and Md can be input to boxes above the grid, se e fig 17. The calculation is invoked by
pressing the UpDate button. A status box displays red when a change input data of Nd or Md
ahs been made and an Update calculation is to be done.
In case a value >1 is displayed , the capacity of the pile section must usually be increased. In
case of a steel tube pile, this can be accomplished by increasing the diameter and/or the wall
thickness of the tube, for exa mple.
Further cross section examination
The horizontal forces Fx and Fy at the pile head will cause a bending moment in the pile at
sections below the pile/cap interface. The resultant of these two forces (Hmax) is calculated
in the same manner as for the bending moments, that is
Hmax = sqr(Fx^2 + Fy^2)
See also fig 16. The resultant Hmax is calculated in PileCap.exe and displayed in column 3
on the form shown in figure 17.
The bending moment at the pile top will decrease downwards the pile, whereas the bending
moment from the horizontal force Hmax will increase downwards until a peak I reached, and
after that the moment will decrease. The value of this moment depends on the soil and the
pile properties. The two bending moments will interact and a maximum is reached at some
- page 18(21) PileCap.exe User
Manual
--------------------------------------------------------------------------------------------------------------------------------www.bredenbergteknik.se
Bredenberg Teknik
uppdate 2007-08-23
depth. This is the section of peak interaction factor. The shear is zero where the bending is
max.
Note also that the interface section between the pile and the cap must be analyzed taking
the shear Fs on the stresses into account, together with the stresses caused by the resulting
bending and the twisting moment and the axial force. In practice, this can be difficult to
validate for some types of piles.
This dilemma is sometimes ‘solved’ by assuming that the piles are ball point connected to
the cap, and thus no moments will occur. Further the influence of the soil is neglected. With
these assumptions, the piles are loaded by an axial force only, making the analys is easier to
carry out. Considering that both numerical models and calculation tools are c ommonly
available, such an over simplification appears hardly justified. There is no longer any reason
to treat piles different than other structural members for building structures , as far as
analysis of structural issues are consi dered.
A closer look down along the pile
In order to simplify the calcula tion of the peak bending moment, the option “Pile Bending
Moment” is given in the Cross Section Analyse form shown in fig 17. The bending moment
down along the pile is made, se fig 18. The calculated bending moments are assuming the
pile acts as a beam in an semi infinite elastic surrounding.
Fig 18 Bending moments caused by a moment and a horizontal force at the pile top
The resulting horizontal force and the resulting bending moment are assumed to act in the
same vertical plane. The corresponding bending moments are shown in figure 19. These
results ca be used for design of pile groups and other engineering structures possessing
same characteristics as a pile group, a for example elements bolted together in order to
avoid welding.
Modifying Input data
When an calculation run has been made, modification of input data, as for example
additional piles, changing cap load data, changing pile and soil data, and so on can be
analysed without saving any data. Bring up the form(s) where the changes are required, hit
Enter to get rid of any yellow grid markers, and make a new calculation. Used this way,
PileCap.exe is a very powerful design tool.
Presentation of results. Distribution of results from PileCap.exe.
In order to print out data on paper, or sending them to some application converting data into
Adobe pdf-format för mailing them somewhere, the use of some application taking care of
information on screen is assumed.
One solution not demanding any software other than components supplied with a standard
Windows installation is as follows:
1.
2.
3.
4.
5.
6.
Bring up the forms to be printed
Press the PrintScreen command.
Start Paint and press Paste to copy the screen image to the Paint canvas.
Cut the part you are interested in of the pasted image
Start new, don’t save, and paste. The copied part will appear alone.
Print, mail, and store the image, as required.
- page 19(21) PileCap.exe User
Manual
--------------------------------------------------------------------------------------------------------------------------------www.bredenbergteknik.se
Bredenberg Teknik
uppdate 2007-08-23
In order to make a pdf of the image, you need a pdf -converter. Many freeware such
applications ca be found for free on the internet, or be purchased from Adobe in case you
will go for the full functionality of the pdf-file format.
- page 20(21) PileCap.exe User
Manual
--------------------------------------------------------------------------------------------------------------------------------www.bredenbergteknik.se
Bredenberg Teknik
uppdate 2007-08-23
- page 21(21) PileCap.exe User
Manual
--------------------------------------------------------------------------------------------------------------------------------www.bredenbergteknik.se