1
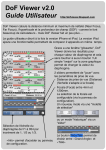
toothwalker.org/optics/vwdof.html Calculator version 2.1, April 2005 Document version 2.1.1, February 2009 © P.A. van Walree 2002–present VWDOF user manual 2. Units By default, VWDOF adopts the Système International d’Unités (SI) and uses the metric system. However, it is possible to switch to the English system of inches, feet, and other deprecated units of length, via the OPTIONS/UNITS dialogue window. The full range of units that can be encountered with VWDOF is as follows: Metric mu mm m km 1. Introduction This document describes VWDOF, a versatile depthof-field (DOF) calculator. In addition to the DOF it calculates quantities like the field of view, effective aperture, depth of focus, the amount of background blur, etc. The document is not intended as an introduction to depth of field. It assumes some familiarity with the concept of depth of field and mainly functions as a sort of manual for the calculator. More information on the concept of DOF can be found at http://toothwalker.org/optics/dof.html micrometer millimeter meter kilometer English in inch ft foot yd yard mi mile 0.000001 m 0.001 m 1000 m 0.0254 m 0.3048 m 0.9144 m 1609.344 m The OPTIONS/UNITS dialogue window allows individual unit choices for each input or output parameter. VWDOF attempts to format the output fields such that the order of magnitude is reflected by the prefix and not by the number itself. For instance, 0.00174 m is formatted as 1.74 mm. If you don’t like a mixture of VWDOF user manual mu, mm, m, and km in the calculated values, you can force an output in meters at the bottom of the dialogue window. The above value would then be displayed as 0.00174 m. Likewise, the output of English units can be forced in feet. To get a feeling about the units and conversions, you could play with the HELP/UNIT -30 are set CONVERSION utility. Numbers smaller than 10 30 to zero and numbers larger than 10 are written as “Inf” (infinity). This should be no limitation even for astronomers. 3. Precision At default, VWDOF rounds off the calculated values to three significant digits. Via the OPTIONS/PRECISION dialogue it is possible to increase the precision up to six digits, but this is useful only for academic excursions. For any normal photographic application three digits are more than sufficient. There are many reasons for this. One of them is that the true lens focal length may differ up to 5% from its nominal value and that it is not uncommon for a lens aperture to deviate by 0.1 or 0.2 stops from the set F-number. So why bother with a high precision at the output with this degree of uncertainty at the input? Further, a hyperfocal distance of 59.6238 m has little practical importance given the fact that it’s hard enough to focus at either 59 m or 60 m, let alone to notice a difference in the image if one could. 2 strictly only required for the field of view and the object width and height. The reason is that the circle of confusion (COC) value intimately connects with the format, so whenever the COC is required for a calculation the format shows up as well. A flexible feature of VWDOF is that either the object distance, the image magnification or the lens extension can be placed among the input fields. In this manner a certain magnification or extension can be inserted directly, instead of finding it via a trial-anderror procedure by adjustment of the object distance. OPTIONS/FIELDS OF INTEREST. 4. Fields of interest VWDOF can employ a total of seven input fields and fifteen output fields. This may lead to a slightly overwhelming array of numbers, especially in combination with a large number of scenarios. The OPTIONS/FIELDS OF INTEREST dialogue window enables a selection of fields. The fewer fields are selected, the smaller and more surveyable the VWDOF window becomes. The input fields are coupled to the output fields in the sense that those input fields that are not required to calculate the selected output quantities are omitted. An exception is made for the format, which is present with most output quantities although it is Finally, there are choices for the POI (point of interest). The input value can be taken as the distance relative to the object or to the lens and the output can be either the blur disk diameter or the ratio of the blur disk diameter to the COC. The former quantity has the unit of length, the latter is dimensionless. VWDOF user manual NB: When the pupil factor is not selected its value always equals one for the calculations. 5. Scenarios OPTIONS/SCENARIOS is used to fix the number of scenarios (columns) to be calculated . Up to eight scenarios can be set, but like the fields of interest a large number could result in a large, overwhelming VWDOF window. The scenarios dialogue further offers the possibility to synchronize certain input fields. For instance, when the F-number is synchronized all columns inherit the F-number of the left column. 3 7. Sharpness criterion Any calculation that involves the depth of field or depth of focus requires a sharpness criterion. When we take a picture, only one plane in the object space is rendered tack sharp, but there is a surrounding region which will be acceptably sharp. That is to say, acceptable according to a criterion set by the user. VWDOF provides three built-in sharpness criteria in the form of automatically inserted COC values upon selection of a film format. This COC is based on the format diagonal and yields nicely rounded values for the 35-mm format. OPTIONS/COC CRITERION dialogue. When the multiple F-stops view is selected, VWDOF will have eight columns with F-numbers increasing by one-stop increments. The initial F-number can be picked in the dialogue window. The multiple F-stops view does not yield anything that cannot be achieved otherwise, it just saves you the trouble to manually fill the columns with an array of F-numbers. 6. Check input To avoid calculations with input values outside the valid range of the theory, or to avoid dubious regimes of lens performance, all input quantities have a lower and/or upper limit. At input, parameters are subjected to a validity check. When a value is outside the accepted range, the number shows red in the input box. If the calculate button is hit nonetheless, VWDOF will launch a pop-up warning message that mentions the allowed range for the illegal input parameter. Alternatively, the OPTIONS/CHECK INPUT option provides the choice of letting VWDOF silently replace illegal input values with the closest value that is accepted. When this happens the replaced value shows in blue in the input box, as a sign that the calculation took place with another value than the one you typed. For most other formats the automatic assignment yields funny figures, but at least they ensure that a comparison between different formats will be based on a fair comparison when prints of the same (diagonal) size are compared. The possibility to choose between three sharpness criteria (conventional, demanding and critical) sounds nice, but every scenario ideally requires an individual approach. VWDOF does not know the size of a print or the viewing distance adopted by the observer. If you arbitrarily pick one of the three criteria you could underestimate or overestimate the COC needed for your application. A better approach is to determine the required COC value C yourself: C= V 1000 × Q × M p VWDOF user manual Here, V is the viewing distance of the print (or slide projection, or screen display), M p the print magnification, i.e. the ratio of the print size to the format size, and Q a quality parameter that indicates how carefully the photograph will or can be examined. Q = 1: conventional Q = 2: demanding Q = 3: critical On the assumption of good viewing conditions and a normal visual acuity of the human eye of one minute of arc, Q = 3 corresponds to the smallest COC that makes sense for a person with normal vision. 4 inserted manually via the custom-format fields. Every format has a height, a width and a reminder string. For the predefined formats the height and width are fixed, but it’s possible to replace the reminder string with the name of your favorite camera. Just to add a personal touch. Most of the predefined formats are given with their nominal height and width. In real terms a small margin is usually lost. For instance, a slide mount or print mask will reduce a 24×36 mm image to something like 22×34 mm and the 6×6 cm format is often closer to 56×56 mm than to the nominal 60×60 mm. If the effective format is known precisely, it could be entered among the custom fields. As an example, a high-quality print from a 6×6 cm negative measuring 30×30 cm (i.e. a 5× print magnification), and viewed from a distance of 50 cm in a bright room, would require a COC of C= 50 cm 1000 × 3 × 5 = 0.033 mm if we want it to pass a meticulous examination. On the other hand, a picture displayed at 200×300 pixels (some 6×9 cm) on a computer screen is more likely to get away with C= 50 cm = 0.20 mm 1000 × 1× 2. 5 Here the quality factor is taken as Q = 1 because the resolution of a computer screen (72-96 dpi) is lower than that of high-quality print paper (300 dpi). In this case the screen resolution is the limiting factor, not our vision. 8. The film format Eighteen predefined film formats can be selected via the OPTIONS/IMAGE FORMATS dialogue. The vast number of new formats that came with the emergence of digital cameras are not included, but these can be 9. The edit menu If you want to use the outcome of a calculation in another application it is not necessary to copy the values by hand as VWDOF can copy the columns to the Windows clipboard. EDIT/COPY LAST copies the last valid calculation to the clipboard, EDIT/COPY ALL copies all scenarios. A valid calculation is recognized by a blue bar below the calculate button, an invalid calculation by a red bar. The last valid column has a green bar. The red bar signifies that the Calculate button was not yet hit or that the calculation is invalid (illegal input). The presence of one or more red bars disables one or both copy options. VWDOF allows five clipboard text formats, where the difference is in the field separator. Blank spaces or dots yield horizontally aligned fields, but only when the clipboard contents are copied into a text application using a monospace (fixed-pitch) font such as Courier new. The comma, semicolon or tab might be useful to insert the calculations into spreadsheet applications. A typical copy-and-paste action looks like: VWDOF user manual VWDOF 2.0---------input--------------------Format 24x36 mm 24x36 mm COC 0.0300 mm 0.0300 mm Focal length 50 mm 100 mm F-number 8 8 Magnification 1 1 ------------------output-------------------Extension 50.0 mm 0.100 m Field of view 24.4 deg 12.3 deg Depth of field 0.960 mm 0.960 mm Or, with the semicolon separator: Format;24x36 mm;24x36 mm COC;0.0300 mm;0.0300 mm Focal length;50 mm;100 mm F-number;8;8 Magnification;1;1 Extension;50.0 mm;0.100 m Field of view;24.4 deg;12.3 deg Depth of field;0.960 mm;0.960 mm The two lines designating the input and output are omitted when the comma, semicolon, or tab delimiter is used. The EDIT/CLEAR menu entry is perhaps clueless. It just brings back VWDOF to its state with two columns and the default fields of interest. It could be useful if this is what you want, or when strange output results from a ‘forgotten’ setting. EDIT/CLEAR brings all settings to default, but preserves the (custom) formats and their reminder strings. 10. The view menu VIEW/MULTIPLE F-STOPS is a shortcut to the multiple Fstops view in the OPTIONS/SCENARIOS dialogue window. VIEW/STANDARD brings VWDOF back to its normal state. The VIEW/WINDOW LAYOUT dialogue box offers the choice between two font sizes for the window, the choice between two colors for the output fields, and the option to show or hide the tooltipstring (the yellow text boxes that appear when the mouse is moved over a field). 5 11. Input parameters Five parameters are required to calculate all numbers in the output fields. Format Eighteen predefined film formats are available, and an additional eighteen custom formats. The accepted format dimensions range from 1 mm to 1 m. You can go to the image formats dialogue box by either clicking on the format field, or via the OPTIONS/IMAGE FORMAT menu. COC Being the sharpness criterion, the circle of confusion is of paramount importance. When a film format is selected, VWDOF automatically sets a value for the COC. This value is proportional to the format diagonal to allow a fair comparison between two formats when prints of the same (diagonal) size are compared. Three levels for the general criterion can be chosen in the OPTIONS/COC CRITERION dialogue. However, you are free to change the COC value to your liking or needs. Just type a number in the input field. VWDOF accepts values between 0.1 µm and 10 mm. Focal length VWDOF accepts focal lengths between a certain lower limit and a telescopic 100 m. The lower limit depends on the format and relates to the so-called fisheye limit. This limit says that any rectilinear lens will have a poor optical performance when the field of view exceeds a value of ~ 140 degrees. For that reason the calculator refuses focal lengths that would exceed the fisheye limit in combination with the set format. Pupil factor The pupil factor P (also known as the pupil magnification) is a measure of the symmetry of the lens design. It can be ignored for faraway subjects (an image magnification of ~ 0.1 or smaller) but it becomes important in the macro regime. The pupil magnification is defined as VWDOF user manual P= exit pupil diameter entrance pupil diameter and may be evaluated by the pupil sizes specified in the information sheet for your lens. If this information is not available, you may estimate P by inspection of the lens. Close down the lens by a few stops and estimate the size of the diaphragm opening when you look into the lens from the front (entrance pupil) and from the rear (exit pupil). The ratio of the diameters is more important than their absolute values. More often than not, a wideangle lens for an SLR camera (retrofocus design) will have P > 1 and a telephoto lens P < 1. Wideangle lenses for rangefinder cameras 6 dialogue. For some purposes it is preferred to indicate the POI location relative to the lens. For instance, if a lens is focussed at infinity the POI blur of a nearby point can only be evaluated by specifying it relative to the lens. POI re lens uses the same distance scale as the object distance. Thus, an input value for POI re lens that is identical to the subject distance yields a blur disk of zero diameter as the POI is in the plane of sharp focus. The accepted values for the POI are between the focal length f (to be precise: a distance f in front of the front principal plane) to infinity. Theoretically it can be closer to H, but with most lenses that would place the POI inside the glass and make it an academic matter. are nearly symmetrical with P ≈ 1. Be careful with zoom lenses or lenses that employ “floating elements” because the pupil sizes (and hence P ) may depend on the focal length or object distance. The pupil magnification affects the effective aperture, the near and far points, the front and rear DOF, the depths of field and focus, the POI blur and the field of view. For all these quantities the influence of P is only significant at close focus. The accepted range for P is between 0.1 and 10. F-number Among other things, the F-number (often referred to as the aperture) is instrumental in the control of the depth of field. VWDOF accepts F-numbers from 0.5 to 128. Use the true F-number and not the effective aperture that is sometimes used for exposure compensation at close range. If you set a lens at F/8, the true F-number is 8 regardless of the focussing distance. POI re lens and POI re subject The POI (Point of Interest) is an advanced feature that allows to calculate the blur size for an arbitrary point in object space. The position of this point can be entered relative to the subject or relative to the lens. To determine how unsharp a point at a certain distance in front of or behind the subject is rendered, select POI re subject in the OPTIONS/FIELDS OF INTEREST 12. Intermediary parameters Either one of the object distance, the image magnification or the lens extension can be chosen as an input parameter. The other two quantities (if selected) will be among the output fields. Object distance The distance to the object that is in sharp focus. The close limit depends on the focal length. VWDOF allows image magnifications from 100×lifesize to zero, corresponding to object distances from 1.01 times the focal length to infinity. Type “Inf” to put an object at infinity. It is important to realize that the DOF equations rely on object distances measured from the lens (or more precisely, the front principal plane) whereas the distance scale imprinted on lenses traditionally gives the values relative to the film plane. For faraway objects the difference can be ignored, but not for close-up photography. If you don’t know where the front principal plane is you can perhaps find it in the lens specifications – some manufacturers provide this information. If the information is not available you can circumvent the problem by specifying the image magnification or lens extension instead of the object distance. For macrophotography, these parameters are often more useful than the object distance anyway. VWDOF user manual Magnification The image magnification is the ratio of the size of the image to the real size of the subject in object space. A stamp that has the same size on the negative as in real life has a magnification M = 1 . Macro lenses that achieve this magnification will have the designation 1:1. Likewise, a photograph where the image is half the size of the original has M = 0.5 (1:2), which implies that 1 cm on the film corresponds to 2 cm of the real object. At infinity focus M = 0 . VWDOF allows image magnifications from 100 to zero. Extension The lens extension can be useful as an input parameter when bellows or extension rings are used. Notice that the extension is the sum of the added extension and the extension of the lens itself. When the lens is set at infinity, the extension is just the length of the bellows or the ring(s), but if the lens focussing ring is used to fine-tune the focus the lens own extension must be added to the added extension. 13. Output parameters Field of view This field gives the full diagonal angle of view. Note that this angle depends on the object distance and narrows when a lens is used at close range. Lens manufacturers tend to specify the angle of view with the lens used at infinity. If you want to check this infinity angle, type a very large number (or better: “Inf”) for the object distance. The field of view also depends on the pupil magnification. The reason is that the field of view originates from the center of the lens entrance pupil, whereas the object distance is measured from the front principal plane. For asymmetrical lenses (P ≠ 1) the entrance pupil and front principal plane are separated. Lenses with identical focal lengths but different pupil magnifications, when used at the same image magnification (the subject framed in the same 7 way) will have different fields of view. That is to say, the perspectives are different and one picture will show more of the background than the other. Object width and height The width and height of the plane placed in sharp focus, in case you want to know the dimensions of an object that fills the frame. Landscape orientation is assumed. Effective aperture When a lens is used at close focus, the collected light is spread over a larger circle than at infinity focus. Consequently, the light intensity per unit area decreases and exposure compensation is necessary. TTL metering automatically takes the effect into account, but a handheld meter does not. The effective aperture (or better: effective F-number) gives a value for the F-number that should be used to evaluate the exposure, instead of the true F-number set on the lens. Hyperfocal distance Depending on the focal length, the F-number and the COC, the hyperfocal distance H gives the object distance at which maximum depth of field can be achieved. A lens focused at H yields a sharp image from H/2 up to ∞. Near point The near point is the point closest to the camera that meets the COC criterion. Anything in front of the near point is considered out of focus. Far point The far point is the point furthest from the camera that meets the COC criterion. Anything beyond the far point is considered out of focus. Front DOF The depth of field in front of the object. It is simply the difference between the object distance and the near point. VWDOF user manual Rear DOF The depth of field behind the object. It is the difference between the far point and the object distance. Depth of field The total DOF, also known as the depth of field, is the sum of the front DOF and the rear DOF. Depth of focus The depth of focus may be regarded as the depth of field in image space. It gives the margin around the focal plane (i.e. the plane of exact focus, where the film is supposed to be) where the image blur is smaller than the prescribed COC. Precisely half of the depth of focus is in front of the focal plane, and half of it in rear. Since a film can usually not curl backwards, owing to the presence of the pressure plate, the depth of focus should be divided by 2 in the context of film flatness issues. For example, if the depth of focus amounts to 0.34 mm the film flatness should be 0.17 mm or better to avoid image degradation. Infinity blur This field gives the amount of blur imposed upon a distant background. It is the diameter of the circle of confusion, measured on the film, for an object point at infinity. Control of the background blur is of considerable importance and can make the difference between a subject that “sticks to the background” or a subject that “stands out” against a nicely blurred background. Notice that a large amount of background blur is not necessarily the same as a small DOF. The infinity blur is a special case of the POI blur; if you’re only interested in the rendering of a faraway background the infinity blur is easier to use.. POI blur disk / relative POI blur The POI blur can be used to determine the blur disk diameter for an arbitrary point in object space. The position of this point is specified with the input parameters. The OPTIONS/FIELDS OF INTEREST dialogue gives the choice between two output options: the blur disk diameter (POI blur disk) or the ratio of the 8 blur disk diameter to the COC. The former gives the diameter of the blur disk on the film/sensor, the latter is a dimensionless quantity. For example, a COC of 0.030 mm and a POI blur disk of 0.060 mm yield a relative POI blur of 2, indicating that the blur of the selected point exceeds the sharpness criterion by a factor of two. When the point of reference is placed at infinity, the “POI blur disk” yields the same value as the infinity blur. 14. Feedback Bug reports or suggestions for improvements are welcome. Send your comments by e-mail to the current address found at toothwalker.org/about.html. When you report a bug, be sure to include a screen shot or a clipboard dump that shows the misbehavior. 15. Terms of usage VWDOF is freeware and may be freely distributed. 16. Acknowledgment I am very grateful to my good friend muchan, who translated my original Matlab code into C++ in order to keep the file size of the program within bounds. He added numerous useful features as well. 17. Examples of use Bellows A 50-mm lens mounted on bellows is given a 10-cm extension. What is the image magnification? VWDOF 2.0---------input---Focal length 50 mm Extension 100 mm ------------------output--Magnification 2.00 The object is projected on the film at twice its lifesize. Full moon 6 The moon has a diameter of 3.476×10 m and its 6 distance to the earth is 384×10 m. At what size will the moon be imaged when a 600-mm lens is used? VWDOF 2.0---------input-----Focal length 600 mm Object dist 384E6 m ------------------output----Magnification 1.56E-09 Then, 1.56E-9 × 3.476×106 m = 5.4 mm. Butterfly The insect is photographed at unit magnification with two different macro lenses. An inspection reveals that the 60-mm lens is symmetrical with a pupil magnification of 1, whereas the 100-mm lens is somewhat asymmetrical with P = 0.7. VWDOF 2.0---------input----------------Format 24x36 mm 24x36 mm COC 0.030 mm 0.030 mm Focal length 60 mm 100 mm Pupil factor 1.0 0.7 F-number 16 16 Magnification 1 1 ------------------output---------------Object dist 0.120 m 0.200 m Field of view 20.4 deg 10.2 deg Hyperfocal dist 7.56 m 20.9 m Depth of field 1.92 mm 2.33 mm Front DOF 0.952 mm 1.16 mm Rear DOF 0.968 mm 1.17 mm Infinity blur 3.75 mm 6.25 mm The calculation shows that the 100-mm lens provides a longer object (working) distance. Thus, the butterfly is less likely to be chased off. Another advantage might be that the telephoto lens yields 20% more DOF, which increases the chance of getting the wings all sharp. Finally, the (absolute) blur size of a faraway background is larger, which, together with the smaller FOV, may result in a less distracting background. The ratio of front:rear DOF is close to one in both cases. In this example the depths of field are not influenced by the focal lengths, but solely determined by the image magnification and the lens (a)symmetry in the form of the pupil magnification. Rhinoceros Suppose we use the same lenses of the butterfly example, but now to photograph a rhinoceros. The image magnification must be considerably smaller if the entire animal is to be depicted. Let’s take M=0.01. An object width of 3.60 m and a height of 2.40 m should be enough. VWDOF 2.0---------input----------------Format 24x36 mm 24x36 mm COC 0.030 mm 0.030 mm Focal length 60 mm 100 mm Pupil factor 1.0 0.7 F-number 16 16 Magnification 0.01 0.01 ------------------output---------------Object dist 6.06 m 10.1 m Field of view 39.3 deg 24.1 deg Object width 3.60 m 3.60 m Object height 2.40 m 2.40 m Hyperfocal dist 7.56 m 20.9 m Front DOF 2.69 m 3.29 m Rear DOF 24.2 m 9.36 m Depth of field 26.9 m 12.7 m Infinity blur 37.5 mu 62.5 mu Several changes are noticed with respect to the butterfly case. For starters, the fields of view are larger because of the increased object distance. Further, the depth of field is now larger for the 60-mm lens because the pupil magnification is of no significance at such a small magnification. Instead, the rhinoceros is not far from the hyperfocal distance of the 60-mm lens, whose DOF thus rapidly increases towards the rear. Unlike the butterfly case, the lens focal lengths now influence the DOF. The infinity blurs are 100 times as small as in the butterfly example. They are still larger than the permissible COC value, which is another way of saying that the depth of field does not stretch away to infinity. VWDOF user manual 10 Small versus large format Suppose we take a picture with two different cameras. A small (digital) one with a sensor size of 0.4×0.5” and a large-format camera using 4×5” film, and equipped with a 100-mm lens. The ratio of the format dimensions amounts to 10. If we focus at infinity, the smaller format needs a lens with a focal length that is ten times as small to yield the same angle of view. VWDOF 2.0---------input---------------Format 0.4x0.5" 4x5" COC 0.0113 mm 0.113 mm Focal length 10 mm 100 mm F-number 5.6 5.6 Object dist Inf Inf ------------------output--------------Field of view 78.2 deg 78.2 deg Hyperfocal dist 1.59 m 15.9 m Near point 1.58 m 15.8 m Far point Inf Inf Depth of focus 0.127 mm 1.27 mm Moreover, if prints of the same size are compared, the digital image needs a print magnification that is 10 times as large. Therefore, the COC needs to be 10 times as small in order to compare the two formats on basis of the same viewing sharpness criterion. From the above clipboard dump we notice that the factor of 10 reappears at the output of the calculator. The hyperfocal distance is smaller for the smaller format, and the depth of field larger. Although the DOF has a value of ∞ in both cases, the near point is much closer for the small camera. Finally, the depth of focus is 10 times as small for the smaller format. So although its depth of field is larger, the smaller camera is more vulnerable to camera misalignment and focussing errors. Wiremesh A photograph of a building is taken through a wiremesh with a 50/1.4 lens at full aperture. The lens is held close to the wiremesh and the distance between the wires and the lens front principal plane happens to be 50 mm. To what degree will the wiremesh be blurred? VWDOF 2.0---------input--Focal length 50 mm F-number 1.4 Object dist 100 m POI re lens 50 mm ------------------output-POI blur disk 35.7 mm Every point of the wiremesh is smeared out over a disk with a diameter of 3.6 cm, which is large enough to render the wires invisible in the image. 18. The equations For the sake of completeness the equations used by VWDOF are given. There are many ways to represent the DOF equations; the below formulae may look different from those encountered elsewhere, but usually it’s just a matter of algebraic rearrangement. The below equations are exact within the theory of Gaussian optics. When a computer does the work there is no reason to use simpler, approximated equations with a restricted applicability. All too often such approximations start to lead their own life in which the original restrictions are forgotten. Input parameters Format height L1 Format width L2 Circle of confusion C Focal length f Pupil magnification P F-number N POI re lens w POI re object u Intermediary parameters Object distance v Image magnification M Lens extension e VWDOF user manual 11 Dummy parameters Lens aperture D =f /N Image distance b= fv v −f POI image distance z= fw w −f z= f (v + u ) v +u −f Near point (P − 1)(v − f ) C f + P D f v P C (v − f ) + PD f Far point (P − 1)(v − f ) C f − P D f v P C (v − f ) − PD f Front DOF C ( v − f )[f + P (v − f ) ] P C (v − f ) + PD f (POI re lens) (POI re object) Calculated quantities Rear DOF When the object distance is given: b v Magnification M= Extension e=Mf Total DOF When the magnification is given: Object distance f v =f + M Extension e=Mf f ⎞ ⎛ v = f ⎜1 + ⎟ e ⎝ ⎠ M= Magnification e f ⎛ ⎞ ⎟ 2f (1 + M / P ) ⎟ ⎝ ⎠ Field of view α = 2 × atan ⎜⎜ Object height L1 × v b Object width L2 × v b ⎛ ⎝ Effective aperture N ⎜1 + Hyperfocal distance L21 + L22 M⎞ ⎟ P⎠ f ⎞ ⎛ H = f ⎜1 + ⎟ NC ⎝ ⎠ v <H ∞ v ≥H 2 f C D ( v − f ) [(P − 1) f − P v ] P C 2 (v − f )2 − P D2 f 2 Depth of focus M⎞ ⎛ 2 N C ⎜1 + ⎟ P⎠ ⎝ Infinity blur k POI blur disk k POI = When the extension is given: Object distance C ( f − v )[f + P (v − f ) ] P C (v − f ) − PD f ∞ = fM N PD | z − b | z + (P − 1) f