1
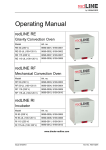
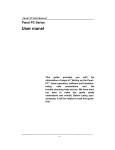
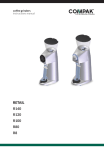
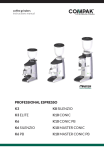
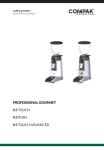
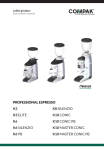
USER’S MANUAL
“MINI” PROFESSIONAL
WARNING
The producer is given the right to modifiy the present manual without updating previous editions.
IDENTIFICATION PLATE
DALLA CORTE S.r.l
Via Broglio, 24
20158 Milano Italy
N.F.
Lt.
ANNO
1,50
0.15MPa
MOD. MINI
VOLT.
220 Hz 50 - 60
WATT. 1850 IPX2
COFFEE MACHINE’S DOTATION
A
Filter holder with two cups spout
B
Filter set
C
Shower
D
Brush
E
Tamper
F
“T” key for shower screw
G
Dosing measure
USER’S INSTRUCTION
LII REV. 05
1
Installation must be carried out by qualified or authorized service people following producer’s
instructions.
WARNING
Please read carefully all advices of the present manual, since it gives important indications
regarding safety, installation use and service.
Incorrect installation might damage people, animals or objects ,and the producer cannot be considered
responsible for this damage.
WARNING
The machine’s electrical safety is guaranteed only when the machine is properly and effectively installed as
for seen in the current electric safety regulations.
The installer cannot change the electric circuit.
USER TIPS
After unpacking, put the coffee machine on a flat surface.
Use only cold drinkable water.
Machine is supplied without plug. It is necessary to provide oneself with an approved safety one-phase plug.
MAINTENANCE AND WARNING
This product is to be used only for the aim for which it has been projected:
- making espresso coffee by hot water infusion on roasted and milled coffee.
- production of steam.
Be careful ! Any different use is to be considered improper and therefore dangerous.
The producer is not responsible for damage caused to people, objects, or to the machine itself if used in a
different way from what is described in the present manual, or if service and safety maintenance indications
are not observed.
The coffee machine safety is guaranteed only when the machine is connected with a good earthing electric
installation.
This primary requirement must be checked by qualified people. The producer is not responsible for damages
caused by faulty or missing earth connection.
Use of any electric appliance requires some basic rules:
-do not touch appliance with wet hands or feet.
-do not use appliance when barefoot.
-do not let non-supervised children or non-authorized people use appliance.
-do not pull power cable to unplug the machine.
-do not set in water or any liquid.
-do not leave appliance unattended.
-make ordinary maintenance to preserve appliance from damage.
USER’S INSTRUCTION
LII REV. 05
2
-in case of trouble or bad function ,turn off the appliance (turn off the
main switch and the main clock).
Any improper use or no observance of the present “User's instruction” will not give right to any
term of guarantee or liability by the producer.
STARTING UP PROCEDURES
Follow the instruction with help of drawing (page 5)
•Raise the upper grill (5) and take out the water tank (6) putting pipe out. Refill the water tank with fresh
water (about 3 liter ).
Use natural mineral water with low calcium content , essential condition to assure a
correct and long-lasting functioning of the machine
•Replace the water tank and put inlet pipe. Put back upper grill(5).
•Turn on main switch (1) .
•In few minutes the boiler will be refilled up to correct level. All the leds on push-button panel(3) blink.
•Immediately after the refilling has finished its function, press the star button until water comes out from the
group head.
•Until boiler does not reach the temperature the head group is off.
•When group (4) reaches correct temperature, leds stop blinking.
•The coffee machine is ready.
HOW TO MAKE AN ESPRESSO
NOTE
To obtain a good coffee it is necessary to have filter holder (7) always connected to the group (4) in
order to have the correct temperature.
Take out filter holder(7). Be careful, do not touch hot metal parts! Clean the filter
and fill filter holder with fresh ground coffee (1 coffee dose for 1 cup filter – 2 coffee doses for 2 cups filter ).
Press coffee lightly with special tamper and clean the filter ring in order to take away possible coffee remains .
Connect the filter holder(7) to the group(4) until it locks and push the requested coffee switch(PI-P2).
When the light switches off, coffee is ready.
NOTE
This coffee machine has 3 coffee switches (2 for electronic dosage and 1 with for continuous coffee supply
and stop).
Only the tecnician can program the doses during the installation .The user cannot program the machine by
ATTENTION
Do not put the hands under the coffee groups when they are functioning.
Do not touch metallic parts of the coffe groups and of the filter-holders because they may cause bad burns
USER’S INSTRUCTION
LII REV. 05
3
HOW TO HEAT MILK (FOR CAPPUCCINO)
Put milk in a jug. Place steam tube (9) in milk jug and open steam tap (8). When milk temperature is
right as desired, turn off steam tap(8).
Remember tol clean steam tube with a damp cloth in order to remove all milk deposit on steam tube !
WARNING
Do not open steam tap(8) before put steam tube(9) inside milk jug, because it is possible to burn
oneself!
USER’S MAINTENANCE
The good functioning of coffee machine is guaranteed by good maintenance.
WARNING
Incorrect maintenance that caused damage to harm people or animals cannot be considered a
responsibility of the producer.
Before starting maintenance, wear protective gloves for high temperature.
Before starting maintenance, turn off coffee machine through main switch(1)and close the water of the
system
CLEANING COFFEE MACHINE BODY
Clean with a squeeze cloth. Don’t use abrasive detergent.
CLEANING COFFEE MACHINE PARTS IN CONTACT WITH GROUND COFFEE
Daily and only when coffee machine is turned off, take out filter holder(7) from the group(4) and take
out filter from filter holder(7).
Wash all parts with equipped brush in order to remove possible coffee remains.
Clean coffee group and shower with brush.
Pull out the basin (10) and the cups-grill (11) and remove ground coffee.
PERIODIC CLEANING
Every 15 days take out shower and holder-shower under the group through equipped “T” key , and
clean the parts with brush.
Reassemble parts carefully. Wrong reassembling can cause bad coffee and group damage.
USER’S INSTRUCTION
LII REV. 05
4
2
P1
2
P2
2
P3
FIG 2
LEGENDA
1
2
3
4
5
6
7
8
9
10
11
12
13
14
15
16
Main swicth
Led
Push-button panel (3 switches)
Group head
Upper grill
Water tank 3 liter capacity
Complete filter holder
Steam tap
Steam tube
Cup-ret basin
Cups grill
Manometer
Back panel
Screws
Grill for boiler protection
Temperature regulation knob
ALARMS
Electronic control board guarantee correct functions.
If there are problems we could have some alarms:
Slow blinking of the led when the push buttom has been pressed
This alarm could be triggered either in the programming or in erogation operations after keep
pressing P2 and P3 for 3 sec.It means that the volumetric counter does not work. The user
must press P3 to stop the erogation of coffee.
Slow blinking of all leds
This alarm could be triggered when the boiler’s automatic charging keeps inserted for more
than 2 seconds.Machine locks out.The user must turn off main switch and and then turn on
again.
Sequential blinking of all leds
This alarm could be triggerede when the water tank is empty.The user must refill the water tank
Fast blinking of all leds
This alarm could be triggered when the temperature probe does not work.
USER’S INSTRUCTION
LII REV. 05
6
COFFEE GROUP TEMPERATURE REGULATION
The installed electronic central control unit has got a temperature which can be regulated between
85° C and 110° C
In order to set the temperature of the coffee group, follow these instructions:
•
In order to raise the temperature of the group, turn the regulation knob (pic. 3) clockwise, in order
to decrease it turn it anticlockwise (the regulation knob can turn by ¾ of the rev to reach the
maximum range in the regulation between 85° and 110° )
.
TEMPERATURE
REGULATION
85° C - 110° C
Pic 3
HOW TO PROGRAM THE COFFEE DOSES
The coffee doses are programmed in the following way:
• Keep on pressing the button P3 of the keyboard until all the three leds light up (about 30”)
• Prepare the filterholder and press the button P1( coffee supply starts), when You get the
quantity you want ,press the button P3 to stop (the led of the button P1 switches off)
• Repeat the procedure pressing the button P2 (coffee supply starts) , when You get the
quantity you want ,press the button P3 to stop ( only the led of the of the button P3 stays on)
• In order to record the doses and finish the procedure , press again the button P3 (the
corresponding led switches off too).
HOW TO PROGRAM THE PRE-INFUSION TIME
It is possible to regulate the pre-infusion time as follows:
While you keep on pressing the button P1 , turn on the machine; the led of button P1 will lighten ,
turn off the machine and turn it on again , in this way you have set the pre-infusion time at 4 s.
If You prefer a shorter time (2 s), perform the same operation but press the button P2 instead of
P1, the led of button P2 will then lighten up.
In order to cancel the pre-infusion time completely, follow the procedure described here above but
press button P3 when you turn on the machine; the corresponding led will lighten up, then switch
off and on again the machine.
FOLLOWING INFORMATION IS ONLY FOR AUTHORISED ASSISTANCE CENTRES
BOILER PRESSURE REGULATION
Steam pressure in the boiler is checked by an adjustable pressostat.
For pressure regulation:
USER’S INSTRUCTION
LII REV. 05
7