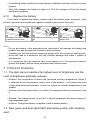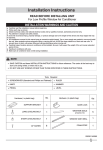
1
Nightshot HD DV
User Guide
Ver1.0-20140623
Content
7KHGHFODUDWLRQ 3URKLELWLRQDQGZDUQLQJV 3URGXFWLQWURGXFWLRQ 6WUXFWXUHRYHUYLHZ ,QGLFDWRUODPSVRYHUYLHZ 2SHUDWLRQJXLGH 7XUQRQRII 9LGHRUHFRUGLQJDQGSKRWRJUDSK )RUPDWWLQJ7)&DUGRQWKH'HYLFH 2XWSXW9LGHR3LFWXUHVDQG0DQDJH)LOHVWKURXJK+'0,,QWHUIDFH 2XWSXW9LGHR3LFWXUHVDQG0DQDJH)LOHVWKURXJK$9RXW,QWHUIDFH
8VH5HPRYDEOH'LVNV 6HW3URGXFW7LPHDQG3DUDPHWHUVWKURXJK7;7)LOH6HWWLQJV +LJKOLJKW,OOXPLQDWLRQDQG)LOO/LJKW 5HFRPPHQGDWLRQRQWKH6HOHFWLRQRI%ULJKWQHVVDQGWKH'LVWDQFHV
IURP5HFRUGHGREMHFWV 2SHQDQGFORVH626IODVKVLJQDO &KDUJH 5HSODFHWKHEDWWHU\ )$4DQG6ROXWLRQV 7KHOLJKWFDQQRWPDLQWDLQWKHKLJKHVWOHYHORIEULJKWQHVVDQGWKH
OHYHORIEULJKWQHVVJUDGXDOO\UHGXFHV 5HGJUHHQDQGEOXHOLJKWVIODVKDOWHUQDWHO\TXLFNO\ZLWK
YLEUDWLQJDOHUW 3RZHUOLJKWIODVKHVDQGWKHQVKXWVGRZQ 7KH'9SRZHURUWKHIODVKOLJKWFDQQRWEHWXUQHGRQ 7KHYLGHRILOHVFDQ
WSOD\ 1RUHVSRQVHWRDQ\RSHUDWLRQ 2WKHU8QNQRZQ(UURUV 7KHPDLQSDUDPHWHUVRIWKHSURGXFW 2
1. The declaration
Thanks for your purchase of our product, before the product use, please read this
manual carefully. One shall use this product strictly according to the instructions in
this manual, Especially one can not violate the contents restricted in 'Prohibitions and
warnings'.
This product belongs to a consumer digital product, for anything not covered
here, please refer to other digital cameras, mobile phones and other consumer digital
products.
If one uses the product not in accordance with the manual, or obviously violates the
use and maintenance of electronic products, which cause personal injuries, property
and equipment damages, the user shall bear all responsibility and producers or sellers
are not responsible for anything.
2. Prohibition and warnings
Prohibition:
•
•
•
•
•
•
•
•
•
•
•
•
•
Prohibition: Use the lithium batteries without self protection mechanism.
Prohibition: Use the lithium batteries without quality guarantee.
Prohibition: Use other-type batteries not according to STD 18650.
Prohibition: Use batteries of other materials not by 3.7V standard lithium ion.
Prohibition: Install on products or chargers by placing poles wrongly.
Prohibition: Use poor chargers or without self protection mechanism.
Prohibition:Dispose batteries by improper manners like burning, discarding,
damaging, shorting and smashing.
Prohibition: Attack, vibrate, collide and press products and accessories.
Prohibition: Disassemble the product and accessories by yourself, which will be
harmful to the product and lead to accident.
Prohibition: Expose strong lights to eyes.
Prohibition: Young or mentally defective persons use this product.
3URKLELWLRQ8VHWKLVSURGXFWLQVWURQJHOHFWULF¿HOGRUPDJQHWLF¿HOGHQYLURQPHQW
Prohibition: Keep using when products or accessories are found faulty.
Warning:
• Warning: Please strictly abide by relevant State laws. This cannot be used for
illegal purposes, and one shall take its own responsibility for that.
• Warning: If one does not use for long time, please remove batteries after charge,
and short-circuit shall be avoided.
• Warning: The product is not professional equipment which is not able to fully
guarantee data security and integrity. A usual backup is recommended.
• Warning: This product is not professional video equipment, and please makes sure
a reasonable illumination and stable operation while use.
• Warning: Please keep the use and storage of products and accessories under the
temperature between 0-40 degrees.
3
• Warning: Please keep the use and storage of products and accessories under the
humidity between 20%-80%.
• Warning: The product can only prevent small amount of water splash and is not
completely waterproof.
• Warning: Do not use the product under very dusty environment.
• Warning: Wears and falloffs of aluminum alloy black oxide layers are normal.
• Warning: If products or accessories in use are faulty, please stop immediately,
remove the battery and unplug the power.
• Warning: Do not use the product under very dusty environment.
• Warning: Lens must be kept clean.
Declaration:
Because we cannot fully estimate the specific situations from users' faulty
operations, all prohibitions and warnings related to products and accessories cannot
be covered. When you have doubts or questions about this part, please refer to
relevant contents of portable digital products in your home. A lot safe uses and daily
maintenances are also applicable to this product.
3. Product introduction
Functions of this product:
• 1080P@30FPS full HD video recording.
• 1080P time lapse video recording.
• 720P@60FPS HD video recording.
• 720P time lapse video recording.
• +LJKGH¿QLWLRQSKRWRJUDSK\
• Capture picture when video recording.
• Video and picture can be output through HDMI interfaces.
• Video and picture can be output through AVout interfaces.
• Removable disk & Micro SD (TF) card reader.
• Fill light with dual LED.
• +LJKSRZHUÀDVKOLJKW
• 626ÀDVKVLJQDO
4
4. Structure overview
5
1
2
3
4
12
13
10
11
6
7
8
9
14
15
16
17
18
21
19
22
20
23
NO
Item
Description
1
LED button 1
LED button-1 controls the two highlight LEDs according to the sequence
of shutdown - weakest - weaker - stronger - strongest – shutdown.
Meanwhile, it can also be used with another button to turn on/off the SOS
ÀDVKVLJQDO$GMXVWWKHEULJKWQHVVRIWKH626ÀDVKVLJQDO
2
LED button 2
LED button-2 controls the two highlight LEDs according to the sequence
of shutdown - strongest - stronger - weaker - weakest – shutdown.
Meanwhile, it can also be used with another button to turn on/off the SOS
ÀDVKVLJQDO$GMXVWWKHEULJKWQHVVRIWKH626ÀDVKVLJQDO
Menu / Delete
3
button
Power / Mode
4
button
5
Mic
When not connecting to TV, hold this button down about 6s to format the
memory card.
:KHQFRQQHFWLQJWR79GHOHWH¿OHVRURSHQFORVHWKHVHWWLQJVLQWHUIDFH
Turn on and off the DV.
After connecting to TV, this button can switch work mode.
Used to catch the audio signals.
5
6
In recording mode, this button can be used to start/stop the
1080p@30FPS ordinary recording or start/stop 1080P time-lapse
recording.
1080P Video REC / Left
In video/picture playing back mode, this button can be used to select the
SUHYLRXV¿OH:KHQFRQQHFWLQJWR79YLDDQ$9FDEOHSUHVVLQJWKLVEXWWRQ
button
can fast rewind the video.
In parameter settings mode, this button can be used to select setting
items or adjust parameters.
7
Indicator
8
In recording mode, this button can be used to start/stop the 720p@60FPS
ordinary recording or start/stop 720P time-lapse recording.
720P Video REC / Right In video/picture playing back mode, this button can be used to select the
QH[W¿OH:KHQFRQQHFWLQJWR79YLDDQ$9FDEOHSUHVVLQJWKLVEXWWRQFDQ
button
fast forward the video.
In parameter settings mode, this button can be used to select setting
items or adjust parameters.
Photo / OK
9
button
Indicates the current mode and working status of DV.
In recording mode, this button can be used to take photos, it also can be
used to capture pictures when recording videos.
In video/picture playing back mode, this button can be used to start/pause
the video playing and show pictures in full-screen mode.
,QSDUDPHWHUVHWWLQJVLWFDQEHXVHGWRFRQ¿UPWKHVHWWLQJLWHPVRU
parameters.
10
USB port
Micro USB socket, For charging and data transmission.
11
AVout port
Used to output NTSC/PAL video signals. When connected to TV via this
LQWHUIDFHPRUHRSHUDWLRQVFDQEHSHUIRUPHGVXFKDVSOD\LQJYLGHR¿OHV
VHWWLQJSDUDPHWHUVOLYHYLHZ¿QGLQJRU¿OHPDQDJHPHQW
12
HDMI port
Mini HDMI interface is used to connect to TV and output high quality
video signals.
13
Storage card slot
Micro SD˄TF˅card slot.
14
Battery Compartment
Used to install and load standard 18650 lithium ion batteries.
15
Wrist strap hole
Use to install wrist strap.
16
Lithium Battery
Standard 18650 lithium batteries can be replaced easily at any time.
17
Highlight LED 1
8VHGWR¿OOOLJKWIRUUHFRUGLQJZKHQWKHHQYLURQPHQWDOLOOXPLQDWLRQLV
LQVXI¿FLHQW
8VHGIRUÀRRGOLJKWLQJ
8VHGWRVHQG626ÀDVKVLJQDOV
18
Highlight LED 2
8VHGWR¿OOOLJKWIRUUHFRUGLQJZKHQWKHHQYLURQPHQWDOLOOXPLQDWLRQLV
LQVXI¿FLHQW
8VHGIRUÀRRGOLJKWLQJ
8VHGWRVHQG626ÀDVKVLJQDOV
19
Camera
Used to capture video/image signal.
20
Screw Hole
Standard 1/4" screw hole can be used with general tripods on the market,
DVZHOODVVRPH¿[HGEUDFNHWV
21
Power/Temperature
indicator
Indicate the battery/temperature status.
22
Dustproof Stopper
Used to prevent dust or debris from entering the interface.
23
Battery Compartment
Cap
Used to connect the battery cathode.
6
5. Indicator lamps overview
Mode&Status indicator:
Indicator Color
Status of Indicator
Red + Blue + Green
Solid light
Descriptions
Red + Blue + Green
Alternate and quick
ÀDVK
Red
4XLFNÀDVK
Formatting the memory card.
Red
6ORZÀDVK
1080P namal recording.
Red
Solid light
1080P time-lapse recording.
Booting and initializing.
Abnormal memory card (no card, damaged card or full
card).
Blue
6ORZÀDVK
720P namal recording.
Blue
Solid light
720P time-lapse recording.
Green
4XLFNÀDVK
Green
Solid light
Take photos, capture picture.
Booting is completed and waiting for further action.
Power&Temperature indicator:
Indicator Color
Status of Indicator
Yellow
4XLFNÀDVK
The temperature is too high
Descriptions
Yellow
6ORZÀDVK
In normal use, it means low battery.
When connected to the charger, it means being charged
now.
Yellow
Solid light
In normal use, it means the DV is power on.
When connected to the charger, it means the battery is
fully charged.
7
6. Operation guide
6.1. Turn on/off
Turn on:
• Hold down the button
for about 3 seconds, then release.
• When red, green and blue lights are illuminated simultaneously, it means that the
DV is being initialized.
• When the green indicator shows solid light and gives vibrating alert, it means that
the booting is completed.
Note:
• When the battery is low, you can not use the DV, but the lighting functions can still
be used for some time.
• If you can't turn on the DV according to the above procedures, please check
whether the battery is installed, battery is put wrong way, battery is dead or press
wrong buttons.
• The start-up time has something to do with card capacity. The bigger the capacity
is, the slower it takes to start up.
• If the memory card is not inserted, or the inserted card is corrupted, it will show
the storage card is faulty. After the indication it will automatically shut down. The
indicator of a faulty card is: red, blue, green lights quick flash alternately, and
gives vibrating alert.
• After it connects computers and chargers, it will automatically start up.
Turn off:
• Hold down the button
for about 3 seconds, then release.
• Vibrate twice, status indicator is off, it means that the DV is power off.
Note:
• Please shutdown according to certain steps, such as direct access to the battery,
can cause product damage, or loss of data, according to the normal procedure, or
shut down, in order to save is video content and related information.
6.2. Video recording and photograph
1080P video recording (Normal mode):
• When waiting for recording after booting, the green indicator shows solid light.
once, the recording begins. The indicator light turns to red
• Press the button
VORZÀDVKYLEUDWHRQFH
8
• Press the button
again, the recording stops. The indicator light turns to green
and shows solid light, vibrate twice.
1080P time-lapse video recording:
• When waiting for recording after booting, the green indicator shows solid light.
for 3 seconds, time-lapse recording begins. The
• Press down the button
indicator light turns to red and shows solid light, vibrate once.
• Press down the button
for 3 seconds, time-lapse recording stops. The indicator
light turns to green and shows solid light, vibrate twice.
720P video recording (Normal mode):
• When waiting for recording after booting, the green indicator shows solid light.
once, the recording begins. The indicator light turns to blue
• Press the button
VORZÀDVKYLEUDWHRQFH
• Press the button
again, the recording stops. The indicator light turns to green
and shows solid light, vibrate twice.
720P time-lapse video recording:
• When waiting for recording after booting, the green indicator shows solid light.
for 3 seconds, time-lapse recording begins. The
• Press down the button
indicator light turns to blue and shows solid light, vibrate once.
• Press down the button
for 3 seconds, time-lapse recording stops. The indicator
light turns to green and and shows solid light, vibrate twice.
Taking Photos:
• When waiting for recording after booting, the green indicator shows solid light.
• Press the button
once, take a photo.
• When taking photos, the green light flashes quickly, vibrate once. After taking
photos, the green indicator shows solid light.
9
Capture pictures when recording videos:
• When recording videos, you can capture static pictures at any time.
• Press the button
once, capture a picture.
• When capturing pictures the green light flashes quickly, .After capturing, the
indicator light will return to the original state.
Note:
• In order to obtain the best recording effect, please record in a well-lighted place. If
WKHHQYLURQPHQWDOLOOXPLQDWLRQLVLQVXI¿FLHQWRUWKHUHLVQROLJKWSOHDVHRSHQWKH
¿OOOLJKWIXQFWLRQ6LQFHWKH¿OOOLJKWV\VWHPEXLOWLQWKHSURGXFWKDVDVPDOOSRZHU
its illumination intensity is not as good as that of natural light or indoor lamplight.
There will be obvious noise in the photos. This phenomenon is normal.
• Please ensure that camera is not blocked, body upright and stable, 50cm distance
from the record items or persons in the sufficient lighting environment in order
to get correct direction, natural color, distinct pictures and stable images. Do not
shelter the pickup part of microphone in order to get clear voice recording.
• Photo processing time varies from different pixel settings. The higher the pixel is,
WKHORQJHUWKHSURFHVVLQJWDNHVVRGRHVWKHJUHHQOHGÀLFNHULQJ
• Setting method for photo taking pixel, please refer to parameter setting in the
relevant sections.
• The resolution of captured pictures is the same as that of the current video.
6.3. Formatting TF Card on the Device
• After booting, press down the button
card.
for 6 seconds, start formatting the TF
• :KHQVWDUWLQJWRIRUPDWWKHUHGOLJKWÀDVKHVTXLFNO\$IWHUIRUPDWWLQJWKHJUHHQ
indicator shows solid light.
6.4. Output Video/Pictures and Manage Files through HDMI Interface
Connect to TV:
•
•
•
•
Connect the DV to TV with a HDMI cable.
Turn on TV and the DV.
Switch TV to corresponding channels (such as HDMI1, HDMI2, etc.).
After connecting correctly, you can see a list of photograph thumbnails on the TV
screen, as follows:
10
Play the Video:
• In video playback mode, the functions of relevant buttons are as follows:
Select the previous video: Select the next video:
press this button.
press this button.
Play the video:
Press this button.
Pause the video:
Press this button again.
Play the photos:
• Press the button
and enter photo playback mode (Notes: press this button
again in the interface of list, you can switch back to video playback mode).
• In photo playback mode, the functions of relevant buttons are as follows:
11
Select the previous
picture:
press this button.
Select the next picture:
press this button.
Full-screen display:
press this button
Exit full-screen display:
press this button again
Delete videos or photos:
• ,QWKHOLVWRI¿OHWKXPEQDLOV\RXFDQVHOHFWD¿OHWREHGHOHWHGZLWKOHIWULJKWEXWWRQ
DGHOHWLRQFRQ¿UPDWLRQGLDORJZLOOSRSXS6HOHFW<(612
• Press this button
with left/right button.
• Press this button
, Complete the operation.
6.5. Output Video/Pictures and Manage Files through AVout Interface
Connect to TV:
•
•
•
•
Connect the DV to TV with a AV cable.
Turn on TV and the DV.
Switch TV to corresponding channels (such as AV1, AV2 etc.).
After connecting correctly, you can see real time images in the lens on TV screen.
Live View Finding:
:KHQWKH'9LVFRQQHFWHGWR79FRUUHFWO\\RXFDQHQWHUOLYHYLHZ¿QGLQJVWDWXV
immediately after booting. The images on TV screen are precisely the images in current
recorder.
12
Play the Video:
• Press the button
to enter video playback mode.
• In video playback mode, the functions of relevant buttons are as follows:
Select the previous video: Select the next video:
press this button.
press this button.
Play the video:
FR in video play:
FF in video play:
Press this button.
Hold down this button to Hold down this button to
select fast rewind speed. select fast forword speed.
Play the photos:
13
Pause the video:
Press this button again.
• Press the button
and enter photo playback mode.
• In photo playback mode, the functions of relevant buttons are as follows:
Select the previous
picture:
press this button.
Select the next picture:
press this button.
Full-screen display: press Exit full-screen display:
this button
press this button again
Delete videos or photos:
• ,QWKHOLVWRI¿OHWKXPEQDLOV\RXFDQVHOHFWD¿OHWREHGHOHWHGZLWKOHIWULJKWEXWWRQ
DGHOHWLRQFRQ¿UPDWLRQGLDORJZLOOSRSXS6HOHFW<(612
• Press this button
with left/right button.
• Press this button
, Complete the operation.
Parameter Settings:
• 3UHVVWKLVEXWWRQWRVZLWFKWRYLHZ¿QGLQJPRGHHQWHULQJWKLVPRGHOLPPHGLDWHO\
after booting as default).
• Press this button to open the settings menu, shown as follows:
14
After the above menu appears, the functions of relevant buttons are as follows:
Menu interface :
Menu interface :
Select the previous item. Select the next item.
Menu interface :
Enter the selected item.
Settings interface:
Adjust parameters.
Settings interface:
&RQ¿UPVHWWLQJV
Settings interface:
Adjust parameters.
Press this button to exit
settings
Close the settings menu:
Press this button until it
is closed.
Set functions and items in the menu:
•
•
•
•
•
•
•
•
•
•
Set pixels of photos.
Open and close the loop recording function.
Open and close automatic shutdown when no operation is performed.
Open and close time watermarks.
Set the time of automatic video segmentation and saving
Set dates and time.
Set intervals between time-lapse video frames.
Set AV Out video format
Reset all setting parameters
Format memory cards
6.6. Use Removable Disks
• Connect the DV to a computer via a USB cable.
• Make sure that the memory card has been inserted into the DV.
• Open the removable disk in the computer. You can read the recorded video/picture
¿OHVLPPHGLDWHO\
DV
PC
6.7. Set Product Time and Parameters through TXT File Settings
The setting of product time and parameters can also be done in texts, without
connecting to TV.
Before setting parameters, you should first connect it to the computer and make
sure that an available memory card has been inserted in the product.
15
Set the time:
6HWWKHWLPHWKURXJKWH[W¿OHDQGWKHVWHSVDUHDVIROORZ
• Connect the recorder to a computer.
• Create a txt document in the root directory of the storage card, and named it 'time'.
3OHDVHUHPHPEHUWKDWWKHH[WHQVLRQPXVWEH
W[W
LHWKH¿OHQDPHLV
WLPHW[W
• Input the date and time you want. Please pay attention to type the correct
separator and spaces, in which separators support English half-angle "-", "." ":"
characters. There must be a space between the date and time. When the date or
time is less than two digits, 0 is required. The reference format is:
Format one: yyyy-mm-dd hh:mm:ss
Example one: 2014-01-10 08:15:38
Format two: yyyy.mm.dd hh.mm.ss
Example two: 2014.12.24 21.35.00
• Edit and save the text file and then unload the product from the computer and
unplug it. Shutdown and restart the camera, and the settings are done.
• After the settings are effective, the time text file inside the storage card will be
automatically deleted.
Set the parameters:
6HWWKHSDUDPHWHUWKURXJKWH[W¿OHDQGWKHVWHSVDUHDVIROORZ
• Shutdown the camera, insert the memory card and connect to the computer.
• Use a notepad or any other text editor to open "SETUP.TXT" file in the root
directory of the storage card.
• Edit and save the text file and then unload the product from the computer and
unplug it. Shutdown and restart the camera, and the settings are done.
A detailed description of product parameters are as follows:
Item
Default Range
AutoPowerOff
Y
(Automatic Shutdown
When No Operation is
Performed.)
Y
N
Y
CycleRecord
N
(Loop Recording)
Note
Y: If there are no operations after booting, the device will
shut down automatically.
N
N: Even if there are no operations after booting, the
device will not shut down automatically.
Loop recording means during recording, when the
memory card runs out of space, the device will delete the
HDUOLHVWYLGHR¿OHVDXWRPDWLFDOO\WRPDNHDYDLODEOHVSDFH
and continue recording a new video.
Y: Enables the loop recording function. There will be no
alarm when the card is full.
N: Disables the loop recording function. There will be an
alarm when the card is full.
16
Y
Timestamp
N
N
(Time Watermark)
Time watermark refers to the recording date and time
PDUNHGRQUHFRUGHGYLGHR¿OHV
<$GGLQJWLPHZDWHUPDUNVRQYLGHR¿OHV
11RWDGGLQJWLPHZDWHUPDUNVRQYLGHR¿OHV
MaxRecordTime
(Time of Automatic Video
Segmentation)
10
1 ̚ 30
In the process of recording, according to setting values,
YLGHR¿OHVDUHVHJPHQWHGDQGVDYHGDXWRPDWLFDOO\
Unit: min.
It suggests the photo resolution and its pixel.
ImageSize
3
2
3
5
8
12
1
1 ̚ 60
TimeLapseTime
2: 2M pixel.
3: 8M pixel.
5: 5M pixel.
8: 8M pixel.
12: 12M pixel
Set the interval between two time-lapse recording frames.
(Intervals of Time-lapse
Recording)
Unit: sec.
6.8. Highlight Illumination and Fill Light
Fill light and highlight illumination functions provide four kinds of brightness. Users
can select a brightness according their actual situation, to obtain the best effect.
It is very convenient for you to operate the device by controlling the button. In the
DERYH¿JXUH/HYHOUHSUHVHQWVWKHVWURQJHVWOLJKW/HYHOUHSUHVHQWVVWURQJHUOLJKW
Level 3 represents weaker light and Level 4 represents the weakest light. The operation
of the two buttons and light changes are as follows:
LED
OFF
LED
Level 4
LED
Level 3
LED
OFF
LED
Level 1
LED
Level 4
LED
Level 2
LED
Level 3
LED
Level 1
LED
Level 2
The button with a " + " sign will increase the brightness by a level with one press,
XQWLO¿QDOO\WXUQHGRII7KHEXWWRQZLWKDVLJQZLOOUHGXFHWKHEULJKWQHVVE\DOHYHO
17
ZLWKRQHSUHVVXQWLO¿QDOO\WXUQHGRII,WORRSVLQWKHZD\
If the light is too bright, you can reduce a level at any time. If the light is not bright
enough, you can increase a level.
If you donÿt want to press many times to turn off the light, you can press down
either of the two buttons to turn it off directly.
6.9. Recommendation on the Selection of Brightness and the
Distances from Recorded objects
This product is subject to cooling, electricity and other factors, so the brightness that
it can give is very limited. When turning on the strongest light, to the extent that human
eyes can distinguish, it can only illuminate within a scope of 20m. For DV, the distance
is even shorter, about 12 m.
:KHQWKHHQYLURQPHQWLOOXPLQDWLRQLVLQVXI¿FLHQWZHFDQXVHWKH¿OOOLJKWIXQFWLRQ
%XWLWLVQRWWUXHWKDWWKHJUHDWHU¿OOOLJKWLVWKHEHWWHUHIIHFWWKHUHZLOOEH7KHXVHRI
strong light in a short distance may cause excessive exposure of photos and increase
energy consumption. The use of weak light in a long distance, on contrary, cannot
achieve the effect of lighting. Therefore, we need to depend on the types of landscapes
DQGWKHLUGLVWDQFHVIURPWKHUHFRUGHUWRDGMXVWWKH¿OOOLJKWLQWHQVLW\WRREWDLQWKHEHVW
video effect and the most effective power consumption.
$VORQJDVWKHDPELHQWOLJKWGRHVQ
WDIIHFWUHDGLQJWKHUHLVQRQHHGWR¿OOOLJKW,IWKH
ambient light affects reading and normal vision, you can refer to the following content:
Objects
Light objects
or
UHÀHFWLYHREMHFWV
Dark objects
6.10.
Distances
Brightness level
0-3m
Level 4
3-6m
Level 3
6-9m
Level 2
9-12m
Level 1
0-3m
Level 3
3-6m
Level 2 or Level 1
6-9m
Level 1
9-12m
Level 1
1RWH7KH¿OOOLJKWHIIHFW
is poor.
2SHQDQGFORVH626ÀDVKVLJQDO
This device is equipped with an SOS flash signal function for rescue. When you
are in danger and carrying this product accidentally, you can use this function to send a
rescue signal to others.
• 2SHQ626ÀDVKVLJQDO3UHVVWKHVHEXWWRQV˄
WKH626ÀDVKVLJQDO
18
˅at the same time to open
• &ORVH626ÀDVKVLJQDO3UHVVWKHVHEXWWRQV˄
˅again at the same time
WRWXUQRIIWKH626ÀDVKVLJQDORUSUHVVGRZQHLWKHURIWKHWZREXWWRQVWRWXUQLW
off directly (
).
When you are in danger, energy should be used economically. Thus, SOS functions
provide two levels of brightnessüstrong and weak, for you to choose according to the
actual situation.
After turning on SOS, the way to adjust light intensity is:
• Press down the button (
) , you can use strong light SOS signal.
• Press down the button (
) , you can use weak light SOS signal.
6.11.
Charge
Directly use USB interface:
•
•
•
•
Connect the USB cable to the DV.
Connect the USB cable to a computer or a charger.
Turn on the computer or charger .
The DV boots automatically. The power light is turned on and indicates the status
of charging.
• :KHQFKDUJLQJWKHSRZHULQGLFDWRUÀDVKHVVORZO\
• When fully charged, the power indicator lights constant.
Charge the battery with a charger.
• Take out the battery from the DV.
• Load the battery into the charger.
• Plug the charger into an electrical socket.
• When being charged, the power indicator is red.
• When fully charged, the power indicator is green.
Note:
• Please strictly distinguish the negative, positive poles of the charger and battery,
and put into the charger by correct directions.
19
• &RQVLGHULQJVDIHW\SOHDVH¿UVW¿QLVKEDWWHU\LQVWDOODWLRQDQGWKHQFRQQHFWWRPDLQ
powers.
• After fully charged, the battery is taken out. Pull the charger out from the socket
and place it properly.
6.12.
Replace the battery
If you want to replace the battery, please rotate the bottom cover as shown in the
picture---positive faces inside and negative outside, and screw in the cover.
1
2
3
According to the above directions According to the direction of load According to the direction of the
to open the bottom cover.
bottom cover.
cell.
Note:
• Do not put battery in the wrong direction, otherwise it will damage the battery and
product and has the potential to cause safety accidents.
• Installing the tail cap without remaining upright with the cylindrical shell portion,
which will lead to a deflective tail cap, threads damage and make it unable to
disassemble.
• It is normal for the cap thread to have some grease on it. The grease is used to
protect the thread, reduce rotary resistance and rotation noise.
7. FAQ and Solutions
7.1. The light cannot maintain the highest level of brightness and the
level of brightness gradually reduces.
• Reason: the temperature is above the permitted working temperature. When it
is detected by the temperature control core of the product, it will reduce the level
of light brightness automatically, in order to reduce the overall temperature of the
product.
• Solution: Use the product after it is cooled. Or change another environment to use
it.
• Reason: The battery power is too low. It cannot guarantee the power supply of
high brightness light.
• Solution: Charge the battery or replace it with a backup battery.
7.2. 5HGJUHHQDQGEOXHOLJKWVÀDVKDOWHUQDWHO\TXLFNO\ZLWKYLEUDWLQJ
alert.
20
7KHTXLFNÀDVKRIUHGJUHHQDQGEOXHOLJKWVPHDQVWKDWWKHPHPRU\FDUGLVLQDQ
abnormal state. Please eliminate the abnormalities according to the following steps.
• Reason: No card is inserted.
• Solution: Insert a memory card.
• Reason: The card is full.
• 6ROXWLRQ&RQQHFWWRWKHFRPSXWHUEDFNXSLPSRUWDQW¿OHVGHOHWHXQZDQWHG¿OHV
or replace it with a new card. If loop recording is set, the device will not prompt if
WKHFDUGLVIXOO,WZLOORYHUULGHWKHHDUOLHVWYLGHR¿OHVDXWRPDWLFDOO\
• Reason: The card is damaged or unsupported.
• Solution: Change another memory card.
7.3. 3RZHUOLJKWÀDVKHVDQGWKHQVKXWVGRZQ
• Reason: The battery level is low. It cannot support recording.
• 6ROXWLRQ5HFKDUJHWKHEDWWHU\RUFKDQJHDQHZEDWWHU\ZLWKVXI¿FLHQWSRZHU
7.4. 7KH'9SRZHURUWKHÀDVKOLJKWFDQQRWEHWXUQHGRQ
• Reason: The battery goes wrong. It is likely that no battery is loaded, the battery is
reversely loaded or the power is low.
• Solution: Load high quality batteries with sufficient power which conform to the
requirements.
7.5. 7KHYLGHR¿OHVFDQ
WSOD\
• Reason: the media player doesn't support them.
• Solution: please use a mainstream media player which support H.264 to replace
the current one.
• 5HDVRQLQDSSURSULDWHRSHUDWLRQUHVXOWVLQGDPDJHG¿OHV
• Solution: please strictly follow the direction of this manual and use the product
properly, particularly, don't remove the battery under the work condition.
• 5HDVRQWKHGDWDZURWHLQWKHYLGHR¿OHVPDOIXQFWLRQ
• Solution: please use a high-speed memory card to replace the current one.
• Reason: damaged card or inferior false memory card.
• Solution: please use a superior high-speed memory card with a regular brand.
7.6. No response to any operation.
Press down the power button for about 10 seconds. The product will be reset.
If pressing down the power button cannot solve the problem, please taking out the
battery and reload it.
21
7.7. Other Unknown Errors
For other abnormal conditions, please refer to Notes in corresponding operation
parts. Basically, all the descriptions and solutions about the abnormal conditions of this
product have been covered. If you still fail to solve the problem, please consult the local
dealer.
8. The main parameters of the product
ITEM
Parameters
Video format
AVI
Video encode
H.264
Video resolution
Picture format
Picture resolution
Video output
Storage support
OS Support
LED lamp
illumination
1920 x 1080@30 FPS / 1280 x 720@60FPS
JPG
2M-12M pixel
HDMI / AV out(NTSC/PAL)
1GB-32GB High speed TF card
Windows / Linux / Mac / Android OS
High power CREE LED x 2
80 ~ 320 Lm
USB interface
Micro USB
Direct charger
DC 5V output with a standard USB port
Battery Charger
Power
Standard 18650 LiB charger with battery management functions
Min(ablut 0.7W) ü Max(ablut 6.0W)
Battery type
1 x 18650 3.7V Li-ion, high-quality battery with protection board
Dustproof
&Waterproof
Normal dust proof & not waterproof
Thank you for reading this manual patiently and carefully.
Hopefully this product can bring you pleasant user experience and enable
\RXWRGLVFRYHUDQGUHFRUGPRUHIXQDQG¿QHYLHZVLQ\RXUOLIH
22
23