1
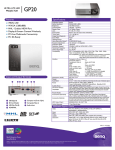
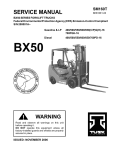
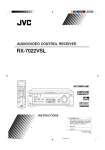
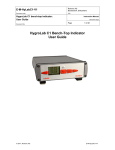
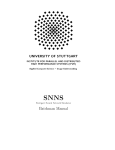
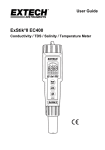
User’s Guide
PL-700AL pH/ORP/Conductivity/TDS/Salt/DO/Temp.
PL-700PC pH/ORP/Conductivity/TDS/Salt/Temp.
PL-700PD pH/ORP/DO/Temp.
PL-700PV pH/ORP/Temp.
Index
Features:................................................................................. 3
Specifications: ...................................................................... 4
Accessories:.......................................................................... 5
Functions of Keyboard:...................................................... 7
Preparation: ........................................................................... 8
<pH, ORP, COND, TDS, Salt> .................................... 8
<DO> ................................................................................ 8
Calibration: ............................................................................ 8
<pH>................................................................................. 8
<ORP> ............................................................................. 9
<COND, TDS, Salt> ...................................................... 9
<DO> .............................................................................. 10
Measurement:...................................................................... 11
<pH>............................................................................... 11
<ORP> ........................................................................... 12
<COND, TDS, Salt> .................................................... 12
<DO> .............................................................................. 13
Store and Recall mode: .................................................... 14
Advanced Setting:.............................................................. 15
Membrane Cap Replacement:......................................... 17
Connect to PC:.................................................................... 19
<System Requirement> ............................................ 19
<Software Installation> ............................................. 19
<Operations>............................................................... 19
Introduction:
We thank you for having purchased PL-700 series bench
top multi-parameters meter.
Before using the instrument, please note that the
operation instructions should be read carefully, which will
help you to operate and maintain the instrument, as well
as to avoid trouble caused by unsuitable operation and
maintenance.
PL-700 series bench top multi-parameters meter employs
leading edge technology with integrated microprocessor,
which is suitable for measurement in water solutions for
institutes, industrial labs and production fields.
The information presented in this manual is subject to
change without notice as improvements are made.
Features:
1. Microprocessor based designed, and rugged housing
with splash proof keyboard.
2. The large backlight LCD displays pH or ORP or
Conductivity or DO and Temperature simultaneously.
3. Automatic Temperature Compensation(ATC), Manual
Salinity(MSC) and Altitude(MAC) Compensation.
4. Memory function stores and recalls up to 150 points.
MAX/MIN and data Lock. ℃ or ℉ are available.
5. Combine special platform and electrode holder, or a
Stirrer (optional) for convenient measuring.
6. Output data for capturing on PC directly via USB.
3
Specifications:
Range
pH
ORP
-2.00~16.00 pH
-1999 ~ -200 mV
-199.9 ~ 499.9 mV
500 ~ 2000 mV
Accuracy
±0.01+1 digit
±2+1 digit
Resolution 0.01 pH
Compensation ATC: 0~100 ℃
0.1/1 mV
N/A
Conductivity
TDS
Salt
Range
0.0~ 199.9µS
200~ 1999µS
2.00~ 19.99 mS
20.0~ 200.0 mS
0.0~131.9 ppm
132~1319 ppm
1.32~13.19 ppt
13.2~132.0 ppt
0.0~99.9 ppm
100~999 ppm
1.00~9.99 ppt
10.0~100.0 ppt
Accuracy
±2% FS
±2% FS
±2% FS
Resolution 0.1/1µS/0.01/0.1 mS 0.1/1ppm/0.01/0.1ppt 0.1/1ppm/0.01/0.1p
pt
ATC: 0~60 ℃
ATC: 0~60 ℃
ATC: 0~60 ℃
DO
O2
Range
0~20.00 mg/L
0~20.00 ppm
0~200.0 %
Temp.
0~110 ℃
Accuracy
±0.2+1 digit
±2% FS
Compensation
Resolution 0.01 mg/L
Compensation ATC: 0~50 ℃
0.10%
MSC: 0~50 ppt
MAC:0-20000 ft
4
±0.2+1 digit
0.1 ℃
Accessories:
Please verify the corresponding accessories as below.
PL700-AL, PL700-ALS
pH glass electrode, Conductivity cell, DO probe, Temp.
probe, Membrane cap x 4 pcs, Buffer 7.00 x 100ml, Buffer
4.01 x 100ml, 1413µS x 100ml, 12.88mS x 100ml,
Electrolyte x 50 ml, Plastic burette, Sandpaper, Electrode
clamp & rod, Software and USB cable, AC/DC adaptor,
Instruction manual, Gift box, Stirrer(PL-700ALS)
PL700-PC, PL700-PCS
pH glass electrode, Conductivity cell, Temp. probe, Buffer
7.00 x 100ml, Buffer 4.01 x 100ml, 1413µS x 100ml,
12.88mS x 100ml, Electrode clamp & rod, Software and
USB cable, AC/DC adaptor, Instruction manual, Gift box,
Stirrer(PL-700PCS)
PL700-PD, PL700-PDS
pH glass electrode, DO probe, Temp. probe, Membrane
cap x 4 pcs, Buffer 7.00 x 100ml, Buffer 4.01 x 100ml,
Electrolyte x 50 ml, Plastic burette, Sandpaper, Electrode
clamp & rod, Software and USB cable, AC/DC adaptor,
Instruction manual, Gift box, Stirrer(PL-700PDS)
PL700-PV, PL700-PVS
pH glass electrode, Temp. probe, Buffer 7.00 x 100ml,
Buffer 4.01 x 100ml, Electrode clamp & rod, Software and
USB cable, AC/DC adaptor, Instruction manual, Gift box,
Stirrer(PL-700PVS)
5
Display Description:
1.
2.
11.
3.
4.
5.
6.
7.
8.
9.
Function Mode
1. Measuring Value
2. Calibration Mode
3.
4.
5.
6.
Calibration error indicator
Reading stored indicator
MAX & MIN Value
Recall Mode
7. Auto lock or manually lock current reading
8. Temperature Indicator
9. Auto Temperature Compensation
10. Unit
6
10.
Functions of Keyboard:
Lock the current reading, press for 3 sec. to
enter or exit MAX/MIN mode. In this mode, press
to browse MAX and MIN reading.
Store the current reading. Press 3 sec. to enter
Recall mode.
In Recall mode, browse records. Press both
together 3 sec. to enter advanced setting (see
page 12).
Choose different function mode. Press 3 sec. to
switch ℃/℉, or switch pH-mV or ORP-mV(in
ORP mode), or switch mg/L or ppm (in DO
mode)
Turn on or off power. Press 3 sec. to enter
calibration mode
Increase stirrer speed
Decrease stirrer speed
Press to turn on the stirrer or set
stir mode (30, 60, 120 minutes or
continuously)
Press 3 sec. to turn off the stirrer
Stir mode LED indicator:
30, 60, 120 minutes or stir continuously.
7
Preparation:
<pH, ORP, COND, TDS, Salt>
1. Connect AC adaptor with power source.
2. Remove the protection cap from the electrode and
connect to input connector.
3. Connect the Temp. probe to meter and turn on the
power switch.
4. Rinse the electrode with clean water and wipe it dry.
<DO>
1. Connect the probe to meter and remove the protection
cap from the probe.
2. Remove the membrane cap carefully.
3. Fill the membrane cap with the electrolyte solution up
to the bottom of the threads on the inside of the cap.
(Please see step 7~10 in “Membrane Cap
Replacement” on page 16 for details)
4. Press
button to turn the meter power on.
Calibration:
<pH>
1. Make sure the sensor is pH electrode.
2. Dip the electrode into the buffer solution pH 7.00. Stir
gently and wait until the reading is stable. Press and
hold
for 3 sec. to enter calibration mode. The
display will appear CAL and flashing 7.00. When the
display stops flashing and indicates “SA", then "End”
while calibration ends, and will return to measurement
mode.
8
3. Rinse the electrode with clean water and wipe it dry.
Dip the electrode into the buffer solution pH 4.01 as
previous steps.
4. After slope calibration, pH 4.01 or pH 10.01, the
display will indicate the percentage of slope (PTS) to
show the status of the electrode. If the PTS is below
70% or above 130%, the electrode must be replaced.
A slope of 100% is ideal.
Note:
1. Calibration error indicator icon will appear, and “Err”
instead of “SA”, if calibration fails.
2. When doing a 2 or 3 point calibration, Calibrate with
buffer pH 7 first, and then follow with buffer pH 4 or pH
10.
3. pH calibration type “USA” or “NIST” can be changed in
advanced setting.
4. The calibration points of “USA” are 1.68, 4.01, 7.00,
10.01 and 12.45.
5. The calibration points of “NIST” are 1.68, 4.01, 6.86,
9.18 and 12.45.
<ORP>
Calibration is not necessary for ORP. However, it could be
tested with specific ORP standard solution to check
whether the electrode is good.
<COND, TDS, Salt>
1. Make sure the probe is Conductivity cell.
2. Dip the cell into the standard solution 1413 µS/cm. Stir
gently and wait until the reading is stable. Press and
9
hold
for 3 sec. to enter calibration mode. The
display will appear CAL and flashing 1413µS/cm.
When the display stops flashing and indicates “SA",
then "End” while calibration ends, and will return to
measurement mode.
Note:
1. Calibrated by 12.88 mS/cm standard solution would
be better for measuring high conductivity solution.
2. The icon COND will display automatically during
calibration mode.
3. Calibration error indicator icon will appear, and “Err”
instead of “SA”, if calibration fails.
4. If the reading is not 0 µS/cm while the cell is in the air
and not dipped into any solution, calibrate it in the air
to make reading becomes 0 µS/cm.
5. The calibration point of Conductivity are 0, 84 µS/cm,
1413 µS/cm, 12.88 mS/cm and 80.0 mS/cm.
<DO>
1. Make sure the sensor is DO probe and remove the
protection cap.
2. Press
to turn on power and press
to
choose O2 mode. Wait 10 minutes to 30 minutes for
the probe to polarize. The reading should be approx.
101.7% (saturation) after the probe has completely
polarized
3. Let the probe in the air. Press and hold
10
for 3
sec. to enter calibration mode. The display will appear
CAL and flashing 101.7%. When the display stops
flashing and indicates “SA", then "End” while
calibration ends, and will return to measurement
mode.
4. Optional ’zero oxygen’ calibration: (improves
measurement accuracy for very low or very high DO
measurements). Place the probe into a zero oxygen
calibration solution, such as 5% sodium sulfite, wait for
stability and press and hold
to enter calibration.
Stability in a zero solution may take many minutes,
depending on probe history.
Note:
1. The icon O2 will display automatically during
calibration mode.
2. Calibration error indicator icon will appear, and “Err”
instead of “SA”, if calibration fails.
3. If the reading is not 0 % while the probe is not
connected, calibrate it in the air without probe to make
reading becomes 0%.
Measurement:
<pH>
1. Press
to choose pH mode.
2. After calibration, rinse the pH electrode with clean
water and wipe it dry. Dip the electrode into the sample
solution which is going to be measured. Stir gently and
wait until a stable reading can be obtained.
11
<ORP>
1. Insert ORP electrode, and press
to choose
ORP mode.
2. Rinse the ORP electrode with clean water and wipe it
dry. Dip the electrode into the sample solution which is
going to be measured. Stir gently and wait until a
stable reading can be obtained.
Note:
1. The display will appear “----” when it is over measuring
range.
2. After measurement, rinse the electrode with clean
water. Replace the soaking bottle. The soaking bottle
should be always filled with soaking solution (4M
KCL).
<COND, TDS, Salt>
1. Insert Conductivity cell, and press
to choose
COND, TDS or Salt mode.
2. After calibration, rinse the conductivity cell with clean
water and wipe it dry. Dip the electrode into the sample
solution which is going to be measured. Stir gently and
wait until a stable reading can be obtained.
Note:
1. The display will appear “----” when it is over measuring
range.
2. The unit will auto-range to µS/cm or mS/cm, or ppm or
ppt.
3. After measurement, rinse the cell with clean water and
replace the protective cap.
12
4. Don’t touch or wipe the surface of the inner black plate
of the conductivity cell.
<DO>
1. Remove the protection cap and turn on the power and
press
to choose O2 mode. Wait 10 minutes to
30 minutes for the probe to polarize. The reading
should be approx. 101.7% (saturation) after the probe
has completely polarized.
2. Select the desired units of measure by pressing
until the proper units are shown in the display.
3. Place the probe in the sample to be measured. Stir the
probe in the sample to remove any trapped air bubbles
from the membrane surface.
4. Allow the meter time to settle to the final measurement
value.
Note:
1. The larger the difference in temperature between the
probe and the solution the longer it will take for the
reading to stabilize. Stabilization time can vary from
ten (10) seconds to five (5) minutes.
2. Cover the probe with the probe cap. The sponge
contained in the cap should be moistened (not soaked)
with DI (distilled water) or clean tap water.
13
MAX/MIN mode:
1. Press and hold
button until the display appear
flashing MAX and MIN icons to enter MAX/MIN. Press
lightly to browse MAX and MIN value during this
mode.
2. To exit this mode, press and hold
button again
until the flashing MAX and MIN icons disappear and
return to measuring mode.
Store and Recall mode:
1. In measuring mode, press
to store the current
reading. The Store icon and the ordinal of this record
will appear on the display.
2. Press and hold
In this mode, use
Press and hold
for 3 sec. to enter Recall mode.
or
to browse records.
to exit this mode and return to
measuring mode.
3. In Recall mode, press
together for 3 sec.
to clean all the records in the memory.
14
Advanced Setting:
1. In pH, TDS or DO measuring mode, press
together for 3 sec. will enter advanced setting.
2. In pH advanced setting,
(1) Press
use
to set “pH calibration type”, and
or
to choose “USA” or “NIST”.
Then press
to confirm and return to
measuring mode.
(2) Press
to turn on or off “Auto Lock”
function. Use
or
Then press
to choose on or off.
to confirm and return to
measuring mode.
3. In TDS advance setting, press
to set the ratio
between conductivity and TDS. Use
adjust ratio from 0.5 to 1.0. Then press
or
to
to
confirm and return to measuring mode.
4. In DO advanced setting,
(1) Press
to set “Salt Compensation”. Use
15
or
to adjust the value from 0 to 50 ppt.
to confirm and return to
Then press
measuring mode.
(2) Press
Use
to set “Altitude Compensation”.
or
to adjust the value from 0 to
20K ft. Then press
to confirm and return
to measuring mode.
5. In any advanced setting, press
to reset all
settings to factory setting (except “ph calibration type”
and “Auto Lock”).
16
Membrane Cap Replacement:
1. Do not touch the membrane as skin oils will interfere
with the oxygen permeability rate of the membrane.
Replace the cap carefully.
2. It is recommended that the probe remain attached to
the meter during this replacement process.
3. Unscrew the cap firmly and carefully from the probe.
4. Rinse the old electrolyte solution from the Cathode
and Anode.
5. Use the supplied Polishing Strips to clean, polish,
shine, and/or remove scratches from the cathode. Be
sure to moisten the cloth before polishing the cathode.
Do not over-polish the sensitive gold cathode.
6. Set the new replacement membrane cap on a flat
surface. Leave the cap in this position during the
replacement process.
7. Fill the membrane cap with the electrolyte solution up
to the bottom of the threads on the inside of the cap.
8. Tap the membrane cap to release and prevent air
bubble in electrolyte solution.
9. Keeping the cap in a fixed position on a flat surface,
carefully insert the probe into the new cap by first
dipping and removing the probe several times from the
cap. With each dip, push the probe progressively
deeper into the bonded cap. Finally, screw the probe
slowly onto the cap until fully tightened. The dipping
and removal technique minimizes the introduction of
air bubbles into the electrolyte solution. Air bubbles in
the electrolyte can affect measurements.
10. It is normal that excess electrolyte solution will leak out
17
the cap during this replacement since it minimizes the
introduction of air pockets. Clean off the excess
electrolyte before use.
DO probe
Anode
Cathode
Membrane Cap
18
Connect to PC:
<System Requirement>
1. OS: Windows 2000, Windows XP, Windows Vista,
Windows 7.
2. USB host controller.
<Software Installation>
1. Open USB Driver folder and install USB
“PL2303_Prolific_DriverInstaller_vXXXXX.exe”
2. Copy “GOnDO.exe” from the CD-ROM to the folder
you want to put in.
<Operations>
1. Double-click “GOnDO.exe” to start the program.
2. Click setting button to set COM port in the Setup
window.
19
Choose the responding Port and then click OK. In
normal situation, other settings do not need to be
changed.
3. Fill in desired measuring interval seconds, and click
set.
4. Click Connect to get readings and draw the curve.
20
5. Click the small graphs of each mode in the main
window can enter a big window with detail reading
information. Click MainPage to back to the main
window.
6. In each big window, click SaveResult will export the
readings to .txt file.
21
7. Click SaveData and then press and hold
enter Recall mode. Press
to
to export all the
records to the program. The records can also be
saved as a .txt file by clicking SaveResult in this
window.
Note:
Please click Disconnect or close the program before turn
off power or remove the USB cable.
22