Transcript
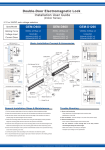
Single-Door Electromagnetic Lock
Installation User Guide
(Indoor Series)
※12 or 24VDC auto voltage selection (except GEM-300M)
Spec/Model
GEM-300
GEM-600
GEM-800
GEM-1200
Holding Force
300lbs (136kg)
600lbs (272kg)
800lbs (363kg)
1200lbs (545kg)
Voltage Input
12/24VDC
420mA/12VDC
210mA/24VDC
12/24VDC
500mA/12VDC
250mA/24VDC
12/24VDC
500mA/12VDC
250mA/24VDC
12/24VDC
500mA/12VDC
250mA/24VDC
Current Draw
Basic Installation Concept & Accessories
UBK Bracket For
Glass Frame & Glass Door
General Installation
12/24 VDC
Power
Glass
Frame
Door
Frame
Cable Wire
EM Lock
Mounting Plate
Self-tapping
Screw x5
EM Lock
Door
Outswing
Inswing
Glass
Door
EM Bracket For
Inswing Door With Cover
U Bracket For Glass Door
Door
Frame
Cover
Screw
Door
Frame
EM Lock
Glass
Door
PCB Cover
Armature
Screw
Fixing Screw
x2
Door
Inswing
LZ Bracket For Inswing Door
EM Lock
Outswing
Anti Residual
Magnetism
Button
Electromagnet
Door
Frame
Allen Wrench
Door
Frame
Rubber
Washer
Armature Plate
EM Lock
L Bracket For Outswing Door
Guide Pin x2
Door
Sexnut Bolt
Metal Washer
x2
EM Lock
Door
Outswing
Inswing
General Installation Steps & Maintainance
Trouble Shooting
1. Drill the armature plate holes in the door using the sticker template provided.
1. Sensor not functioning
2. Attach the armature plate to the door with the hardware provided per the illustration.
3. With the door closed, mark the door frame at the edge of the armature in order to
properly align the electromagnet to the armature.
4. Attach the mounting plate to the door frame using the self-tapping screws provided.
Align the mounting plate with the mark from the previous instruction.
- Align attachment of electromagnet and armature plate
- Modification of the PCB
2. Door not locked - Incorrect wiring or no power from power supply
3. Reduced holding force
- Poor contact of electromagnet and armature plate.
5. Adjust the magnet direction according to left or right open door.
Be sure armature is loose enough that it can fully contact
6. Insert the wires through the hole in the mounting plate and into the electromagnet unit.
electromagnet along the entire length.
Attach the electromagnet unit to the mounting plate with the Allen head fixing screw.
7. Screw in the mounting plate to prevent unauthorized access and to prevent the fixing
- Make sure surface is not dusty or damaged.
- Improper input voltage or wire specifiction.
screw from loosening over time.
8. Connect the power wires according to the instruction and test the system.
9. It is recommended that you apply a light coat of silicon lubricant to the mating surface
on a monthly basis to prevent rust.
Copyright © 2010 Gianni Industries, Inc. All rights reserved.
P-MU-MA-GEM-S Ver.B
Publish: 2010.10.13