1
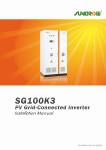
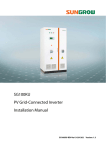
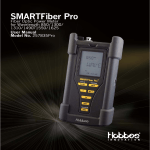
http://www.sunbox.com.tw Tel: 886-2-82218189 Fax:886-2-82218190 CT-7836D USER MANUAL Rev 1.00 CT-7836D INTRODUCE CT-7836D with four wavelengths is an easy to use and lightweight fiber optic power meter that measures the power of light transmitting from an optical fiber. The CT-7836D includes replacement type adaptor to connect FC, ST, and SC type fiber connectors. It utilizes an InGaAs detector to improved sensitivity and temperature stability to test for standard optical power from +3 to -60dBm dynamic range. It can test both single mode and multi-mode fiber cables,with the optional adaptor, users can test 2.5mm and 1.25mm fiber cables. For identification purposes, the CT-7836D can also receive modulate signals (270Hz, 1KHz, 2KHz) simultaneously. FEATURES Simple to use and portable Calibrated at 850nm, 1300nm, 1310nm, 1550nm Accuracy: ±0.15 dB±1nw@1300nm/1310nm/1550nm; ±0.25 dB±1nw@850nm Optical power range from +3 to -60dBm Measurement units in dBm, and Watt Ideal for both multi-mode and single-mode optical fibers Optional adapter to test both 2.5mm/1.25mm fiber cables. Can receive modulate signal (270Hz, 1KHz, 2KHz) simultaneously for identification Battery indicator and power auto off function Automatic wavelength detection (when used with Hobbes OPTISource as laser light Source) APPEARANCE 1. Connector 2. LCD Display 3. Power on/off 4. Wavelength selection button 5. Absolute value measurement unit 6. Power Auto-off 7. Rubber Cover (Skid proof) 8. Stand -1- CT-7836D SPECIFICATIONS Sensor Type InGaAs Wave Length 850nm, 1300nm, 1310nm, 1550nm Dynamic Range +3 to -60dBm Accuracy ±0.15dB±1nW@1300nm/1310nm/1550nm; ±0.25 dB±1nW@850nm Resolution 0.01dBm Unit dBm, Watt Fiber Connector Replacement type for FC, ST, SC 2.5 mm to 1.25mm adapter spec. Insertion Loss: ≤0.3dB Pull strength test:100~300g 2.5mm and 1.25mm universal Battery AAA battery * 4 Dimension(L*W*H) Around 131*86*40 mm Weight Around 230g (6V) OPERATION Key Definition Marking λ W <=>dBm Auto Off Name Function Power button Power Unit on/off Wavelength selection button Wavelength selection: 850,1300,1310 and 1550nm Absolute value measurement mode button Optical power measurement in Watt or dBm Auto off button Set or cancel auto off function Power 1) Power on: Press the button and hold it until the unit powers on. 2) Power off function: Press the button and hold it until the unit powers off. Remark: The battery status will be shown on the lower right corner of the screen. Wavelength Select Wavelengths (850nm/1300nm/1310nm/1550nm) are selected by pressing the λ button -2- CT-7836D Remark: a) In order to receive the correct result, select the appropriate wavelength base on the source specification before testing the cable. The connector for the power meter is located on the top side of the device. b) With the optional adapter, it can test suitable 2.5mm and 1.25mm ferrule diameter connectors. c) When the CT-7836D is connected to Hobbes OPTISource, they can cooperate to finish the “auto-identify the sourcing wavelength” function. The Hobbes OPTISource works in “Auto-identify wavelength” mode, the CT-7836D identifies and automatically switches to the corresponding wavelength the Hobbes OPTISource sent, without having to select the wavelength manually. At the same time CT-7836D’s LCD will display “Auto”. W/dBm: W/dBm button is used to measure the optical power by Watt or dBm. Auto Off: Auto off button is used to set or cancel Auto off function. The power auto off time is 5 minutes. 1. Wavelength 2. Measurement unit (dBm/Watt) 3. Auto Off 4. Battery indicator Preparation before Use Physical Check: Check the physical appearance for damages or other abnormal symptoms which may have been caused during transportation before operation. Check contents if all items are included on the packages. Operation Check: Connect the Power Meter with the Light Source using optical cable and press the wavelength button to select the specific wavelength of optical signal to be measured. (850, 1300, 1310 and 1550nm). The result of the optical power measurement and the set wavelength are shown on the screen. -3- CT-7836D Instructions For Operation Step 1: Press the Power button to turn the power meter on and the optical power will be displayed on the Screen. Step 2: Select the wavelength by pressing λ button 850, 1300,1310 and1550 nm Step 3 : Connect the optical cable to the power meter and the wavelength of the optical signal will be measured. Step 4: Press the W/dBm button to measure the optical power in the dBm or Watt. Instruction for Battery The CT-7836D displays a battery icon on the Screen to indicate the battery status. When the “Low Batt” flashes on the screen, it is indicating that the battery status is low and need to be replaced. After finishing using the CT-7836D, please put batteries out. Maintenance Carefully check cleanliness of sensor surface. Do not use nonstandard optical connectors and plugs with bad polished ends as it can damage the sensor surface. Storage Conditions From -30 to +60°C and humidity non-condensing up to 95 % at temperature 35°C. -4-