1
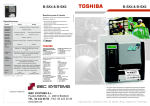
SRF-C210 Handheld UHF RFID Reader User’s Manual Overview As a long-range hand-held radio frequency identification (RFID) reader, the SRF- C210 is a 900MHz (UHF band) UHF RFID reader operable at various operating bands specified by individual countries. It also complies with all standard protocols defined in ISO18000-6C (EPC GEN2). Relevant equipment 1. SRF- C190: Long-range stationary RFID reader with an ideal sensing range over 10m for use on driveway and access control systems. 2. SRF-C390: High-sensitivity RFID reader with an ideal sensing range over 20m for use in special environments. 3. SCR-F180: RFID controller automatically resetting and adjusting parameters in the field to increase sensing range and adjust other functions. Features Support 900MHz (UHF band) and comply with tags specified in ISO18000-6C (EPC GEN2). Compact appearance design, built-in antenna and RF module, convenient to carry. Interact with the smartphone and tablet over apps using BLE interface. Support both iOS and Android platforms. Sensing range >50cm. Special energy-saving design reduces power consumption. Avoid the interference of other radio frequencies with the look-up table frequency-hopping spread spectrum(FHSS) Pass R&D patent for EMI reduction in many countries. Pass NCC/FCC certification Built-in lithium battery without the need of external power supply. Work continuously for at least 5 hours in normal use after fully charged. Micro USB interface for connection with the smartphone and tablet to charge battery. Points for attention 1. The product pattern is certified by the FCC. Unauthorized modification of the frequency, power, or originally designed functions and characteristics of the RFID reader are prohibited. 2. Lithium battery inside, keep product away from hot environments (over 60°C) such as inside a car due to the built-in lithium battery. 3. Lithium battery inside, store product in an environment below 40°C if not in use for some time. 4. Do not over discharge or overcharge product to prevent battery from damage and reduce battery life. 5. Although the power indicator is blue, the battery may be unable to activate the Bluetooth device. Please charge product first or connect to an auxiliary power supply. Recommended uses UHF RFID registration management system. Logistics related management. 1 Certification NCC : FCC : Federal Communications Commission (FCC) Statement 15.21 You are cautioned that changes or modifications not expressly approved by the part responsible for compliance could void the user’s authority to operate the equipment. 15.105(b) This equipment has been tested and found to comply with the limits for a Class B digital device, pursuant to part 15 of the FCC rules. These limits are designed to provide reasonable protection against harmful interference in a residential installation. This equipment generates, uses and can radiate radio frequency energy and, if not installed and used in accordance with the instructions, may cause harmful interference to radio communications. However, there is no guarantee that interference will not occur in a particular installation. If this equipment does cause harmful interference to radio or television reception, which can be determined by turning the equipment off and on, the user is encouraged to try to correct the interference by one or more of the following measures: -Reorient or relocate the receiving antenna. -Increase the separation between the equipment and receiver. -Connect the equipment into an outlet on a circuit different from that to which the receiver is connected. -Consult the dealer or an experienced radio/TV technician for help. This device complies with Part 15 of the FCC Rules. Operation is subject to the following two conditions: 1) this device may not cause harmful interference and 2) this device must accept any interference received, including interference that may cause undesired operation of the device. RF exposure: To comply with the FCC RF exposure compliance requirements, this device and its antenna must not be co-located or operating in conjunction with any other antenna or transmitter. For body worn operation, this reader has been tested and meets FCC RF exposure guidelines when used with an accessory that contains no metal and that positions the handset a minimum of 5 mm from the body. Use of other accessories may not ensure compliance with FCC RF exposure guidelines. 2 Antenna Pattern 3 Product Specifications Input voltage UHF Antenna gain BLE Antenna gain Antenna receiving APP interface Operating frequency Emission power Modulation scheme Current Protocol Receiving sensitivity Sensing range Operating temperature Storage temperature Humidity Dimensions Weight Built-in lithium battery 0.5dBi (linear polarization) 5dBi 50 ohm U.FL. BLE 902-928 MHz 18.6 dBm PR-ASK, ASK <300mA ( Max ) EPC Gen2 (ISO 18000-6C) -81 dBm >50cm 0℃ ~ +45 ℃ 45℃ ( 1 month ) 5-90% 110x95x32mm 225g 4 Appearance 1. Charger input. 1.1. Charger specifications: DC 5V/1A 1.2. Micro USB compatible with the smartphone and tablet charging interface. 1.3. Support external battery packs to operate and charge the handheld RFID reader at the same time. 1.4. Work continuously for at least 5 hours in normal use after fully charged. 2. Power switch 2.1. ON: Turn on the handheld RFID reader. 2.2. OFF: Turn off the handheld RFID reader. 3. 3.1. 3.2. 3.3. Charge indicators Red: Charge in progress. Amber: Fully charged and remove charger to prevent overcharge. No signal: No charging behavior. 4. 4.1. 4.2. 4.3. Power indicators Blue: The battery of the handheld RFID reader is discharging. No signal: The handheld RFID reader is off or the batter level is low. After using or not using for a long time, although the power indicator is blue, the Bluetooth device may not be activated due to low battery level. Please charge product or connect to an auxiliary power supply. 5. 5.1. 5.2. 5.3. Antenna Antenna gain is 0.5dBi. Please aim the antenna at the tag to facilitate reading data in the tag. Rotate at 100° for users to aim at the tag more easily. 5 Operating Procedure and Description 1. Turn on the SRF-C210, and the devices placed in the car hood, the table or elsewhere. 2. Check the antenna pattern and adjust the support angle for the antenna to face the tag. 3. Open BLE function on the tablet, and using the application software (APP)to connect SRF-C210 via Bluetooth. 4. Operation APP to read EPC code, TID code and card number. Recommended procedure for use on iOS platforms 1. Apply for a Gmail or Webmail account. If you already have one of them, skip this step. 1.1. The App will import the “Individual Information Form” from this e-mail account. 1.2. The App will export the edited “Individual Information Form” from this e-mail account. 1.3. This e-mail account is same as cloud account. The App will set this as the default storage path. 2. Set the above e-mail account in the handheld device. Skip this step if you have already set it in the handheld device. 3. Fill out the “Application Form” (Appendix 1) 3.1. This data sheet contains recommended behaviors and formats for creating different kinds of data. 3.2. Fill out the form appropriately as necessary. 3.3. There is no format limit of this data sheet. It can be a text file, a Word file, etc. 4. 4.1. 4.2. 4.3. Produce the “Individual Information Form” (Appendix 2) Users are recommend to finish this step on a PC or a notebook. Fill out the form appropriately as necessary. You can define the header of each column in the first row of the “Individual Information Form”. You must define the header with any characters to better understand the content. 4.4. If users do not define a header, keep the header column and do not delete or leave blank. 4.5. Produce the “Individual Information Form” with MS Excel or similar spreadsheet software and save file as CSV, so as to import to the App. 5. Send the “Individual Information Form” to the said Gmail or Webmail account. 6. Run the IPAD procedure (Appendix 3). 7. If you need to take a break before finish reading or editing data, make sure to import (send) the “Individual Information Form” to the said e-mail account again. When you continue with the work next time, please repeat step 6. 6 Contents SRF-C210 Handheld RFID Reader................................................. 1 User’s Manual..................................................................................1 Power Supply Adaptor Cable...........................................................1 Warranty 1. This product is covered by a one-year warranty from the date of purchase. 2. Warranty covers free inspections and repair of the product to good condition if there are problems or poor product condition. 3. Warranty does not cover product damage due to an act of God (e.g. flood, fire, earthquake, typhoon, thunder strike, etc.). 4. Warranty does not cover willful damage (e.g. scratch, fall, impact, etc.) or damage due to negligence (loss, loosened screws, etc.). 5. Warranty will be voided if labels on the case are removed or damaged. 7 Appendix 1: Application Form Application Form SN ( administrative center ) Card # ( APP generation ) Group (administrative center) Zone ( administrative center ) Level ( administrative center ) Begin ( administrative center ) Expiry ( administrative center ) Alias ( Applicant ) APB ( administrative center ) Mode ( administrative center ) Name ( Applicant ) UserID ( Applicant ) PIN ( Applicant ) Car # ( Applicant ) Address ( Applicant ) TEL#1 ( Applicant ) TEL#2 ( Applicant ) VISA_ID ( Applicant ) Dep.(1) ( Applicant ) Dep.(2) ( Applicant ) Birthday ( Applicant ) Duty Group ( Applicant ) EPC Code ( APP generation ) TID ( APP generation ) Email ( Applicant ) 8 Instructions for form completion: 1. SN: The user serial number of user. 2. Card #: The card internal code of user generated automatically by the App and fill in the data sheet. 3. Group: The door group or zone that the user can pass through. 4. Zone: Set the period and time point that the user can pass through. 5. Level: Set the level of the user. 6. Begin: Set the start day of use of the user. 7. Expiry: Set the end date of use of the user. 8. Alias: The nickname or aka of the user. 9. APB: Set if the anti-passing back policy applies to the user. 10. Mode: Set if the user is free to go or needs a password. 11. UserID: The ID of the user. 12. PIN: The personal identification number of the user. 13. Car #: The car plate number of the user. 14. Address: The contact address of the user. 15. TEL: The contact phone number of the user. 16. VISA_ID: The ID card number of the user. 17. Dep.: The department of the use. 18. Birthday: The birthday of the user. 19. Duty Group: The duty group of the user. 20. EPC: The card electronic product number generated automatically by the App after user data creation. 21. TID: Card ID generated automatically by the App after user data creation. 22. Email: User email. 9 Example Mode Case: 008tek SN Application Form 007 Card # Group 1 By Controller Zone 1 By Controller Level 1 By Controller Begin 19990808 Year/month/day Expiry 20880808 Year/month/day Alias JJ APB N Mode 0 Name Johnny UserID River 7 PIN 5168 Car # XO-2444 Address 8F.,No.8,Ln.8,Sec. 8,Jiouzong Rd.,Neihu Dist TEL #1 (02)5882-5252 TEL #2 060-616-6212 VISA_ID A123456789 Dep. #1 Sales Dep. #2 US Area Birthday 0606 Duty Group day Day/night EPC Code TID Email 10 Appendix 2:Individual Information Form 1. As in Appendix 1, fill out column description on the first row of the spreadsheet (header column) and register data from the second row. 2. Fill in any form of characters in the header column. 11 Appendix 3: iOS Operation Step 1: Search for “BLERFID” from App Store and click download. Step 2: After installing BLERFID app, go to “Settings” to turn on the handheld device and the IPAD/Bluetooth. 12 Step 3: Open Mail, and press and hold User Database (SF.csv in the following example) to open the App with a mail attachment on the iOS platform. Step 4: When the App for opening this file appears, click BLERFID. 13 Step 5: After the user database is shown on the screen, click the Import button in the upper right corner. Step 6: After reading user data, click the Connect button at the lower right corner. 14 Step 7: Wait for a few second to connect with the handheld device. Step 8: Click “OK” in the dialog box. 15 Step 9: Switch to “Settings”. In this page, you can configure the Band / Power / Sensitivity of the handheld device. Band: Select the right band for individual countries. Power: Set the power of the device. In general, the higher the power is, the longer the sensing range will be. Sensitivity: Set the sensitivity of the signal reading area. Step 10: Switch to Data Zone page to create tag data. 16 Step 11: Click Plate Number to show the data of that user. Aim the handheld device at the tag and click Read at the lower right corner. Step 12: The EPC, TID, and Card # in the tag are show on the screen. Click Return in the upper left corner and create the tag data of other place number. 17 Step 13: Select other plate numbers (plate numbers in the dark grey zone have no data). Step 14: Click Read in the lower right corner to read tag data and click Return in the upper left corner. 18 Step 15: After reading all tag data, click Export in the upper right corner. Step 16: After inputting all data, send it to relevant personnel by email. Input Recipient and click Send in the upper right corner. 19 Step 17: Click “OK” in the dialog box to confirm email delivery. Step 18: Import and open user database again to validate of data is correctly created. 20