1
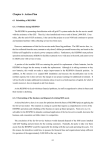
Industrial Automation Headquarters Delta Electronics, Inc. Taoyuan Technology Center No.18, Xinglong Rd., Taoyuan City, Taoyuan County 33068, Taiwan TEL: 886-3-362-6301 / FAX: 886-3-371-6301 Asia Delta Electronics (Jiangsu) Ltd. Wujiang Plant 3 1688 Jiangxing East Road, Wujiang Economic Development Zone Wujiang City, Jiang Su Province, P.R.C. 215200 TEL: 86-512-6340-3008 / FAX: 86-769-6340-7290 Delta Greentech (China) Co., Ltd. 238 Min-Xia Road, Pudong District, ShangHai, P.R.C. 201209 TEL: 86-21-58635678 / FAX: 86-21-58630003 Delta Electronics (Japan), Inc. Tokyo Office 2-1-14 Minato-ku Shibadaimon, Tokyo 105-0012, Japan TEL: 81-3-5733-1111 / FAX: 81-3-5733-1211 Delta Electronics (Korea), Inc. 1511, Byucksan Digital Valley 6-cha, Gasan-dong, Geumcheon-gu, Seoul, Korea, 153-704 TEL: 82-2-515-5303 / FAX: 82-2-515-5302 Delta OPC User Manual Delta Electronics Int’l (S) Pte Ltd. 4 Kaki Bukit Ave 1, #05-05, Singapore 417939 TEL: 65-6747-5155 / FAX: 65-6744-9228 Delta Electronics (India) Pvt. Ltd. Plot No 43 Sector 35, HSIIDC Gurgaon, PIN 122001, Haryana, India TEL : 91-124-4874900 / FAX : 91-124-4874945 Americas Delta Products Corporation (USA) Raleigh Office P.O. Box 12173,5101 Davis Drive, Research Triangle Park, NC 27709, U.S.A. TEL: 1-919-767-3800 / FAX: 1-919-767-8080 Delta Greentech (Brasil) S.A. Sao Paulo Office Rua Itapeva, 26 - 3° andar Edificio Itapeva One-Bela Vista 01332-000-São Paulo-SP-Brazil TEL: 55 11 3568-3855 / FAX: 55 11 3568-3865 Europe Deltronics (The Netherlands) B.V. Eindhoven Office De Witbogt 15, 5652 AG Eindhoven, The Netherlands TEL: 31-40-2592850 / FAX: 31-40-2592851 AH-4949120-01 *We reserve the right to change the information in this manual without prior notice. 2013-10-15 www.deltaww.com Delta OPC User Manual Contents Chapter 1 Introduction 1.1 Introduction of Delta OPC and System Requirements ..............................1-3 1.1.1 Characteristics ...................................................................................1-3 1.1.2 System Requirements ........................................................................1-3 1.2 Installing Delta OPC ..................................................................................1-3 1.2.1 Installing OPC Core Components ......................................................1-3 1.2.2 Installing the Main Program of Delta OPC..........................................1-4 1.2.3 Uninstalling Delta OPC.......................................................................1-7 1.3 Usage and Introduction of Delta OPC Hard Key .......................................1-7 1.3.1 Introduction of Hard Key.....................................................................1-7 1.3.2 Usage of Hard Key .............................................................................1-7 Chapter 2 Basic Description of Delta OPC 2.1 Basic Concept ...........................................................................................2-2 2.1.1 First Step toward Delta OPC ..............................................................2-2 2.2 Guide to Starting Delta OPC and Introduction of the Environment in Delta OPC...........................................................................................................2-2 2.2.1 Starting Delta OPC .............................................................................2-2 2.2.2 Description of a Configurator Screen .................................................2-5 2.2.3 Window Title and Status Bar ..............................................................2-6 2.2.4 Menu bar and Toolbar ........................................................................2-7 2.2.5 Project Management Area and Working Area.....................................2-8 2.2.6 Display Area of Monitor View..............................................................2-9 Chapter 3 Using Delta OPC 3.1 Basic Setting .............................................................................................3-2 3.1.1 Steps ..................................................................................................3-2 3.1.2 Manipulating a Config File..................................................................3-2 3.1.3 Setting a Port .....................................................................................3-3 3.1.4 Setting a Device .................................................................................3-5 3.1.5 Setting a Data Item.............................................................................3-7 3.1.6 Starting Monitor View .........................................................................3-9 3.2 Other Basic Manipulations.......................................................................3-10 3.2.1 Edit Menu and View Menu ...............................................................3-10 i 3.2.2 Other Related Manipulations............................................................ 3-11 Chapter 4 Advanced Functions of Delta OPC 4.1 Advanced Setting and Connection Test ....................................................4-2 4.1.1 Conversion.........................................................................................4-2 4.1.2 Simulation ..........................................................................................4-4 4.1.3 Alarm .................................................................................................4-7 4.1.4 Testing the Connection of an OPC Client......................................... 4-10 ii iii Chapter 1 Introduction Contents 1.1 Introduction of Delta OPC and System Requirements ..............................1-3 1.1.1 Characteristics ...................................................................................1-3 1.1.2 System Requirements ........................................................................1-3 1.2 Installing Delta OPC ..................................................................................1-3 1.2.1 Installing OPC Core Components ......................................................1-3 1.2.2 Installing the Main Program of Delta OPC..........................................1-4 1.2.3 Uninstalling Delta OPC.......................................................................1-7 1.3 Usage and Introduction of Delta OPC Hard Key .......................................1-7 1.3.1 Introduction of Hard Key.....................................................................1-7 1.3.2 Usage of Hard Key .............................................................................1-7 1-1 Delta OPC User Manual Note Graphic representations : Clicking the left mouse button : Clicking the right mouse button : Double-clicking the left mouse button : Pressing and holding the left mouse button, and then moving the mouse without releasing the button : Typing with a keyboard Operating sequence (The graphic representation is used when an operating sequence : is mentioned. For example, and .) : Number used with a picture : Point for attention (The item mentioned may be related to damage to equipment, property, or a human body.) Trademark declaration 1-2 The products and trademarks which do not belong to Delta Electronics, Inc. belong to the companies which produce and declare them. Ch ap te r 1 In tro duc tio n 1.1 Introduction of Delta OPC and System Requirements Delta OPC is a Delta communication tool. SCADA and OPC clients can communicate with and monitor Delta products by means of Delta OPC. Besides, users can set communication and devices which they want to monitor by means of OPC configurators. 1.1.1 Characteristics Most SCADA software and OPC client software on the market is supported, e.g. iFIX and Matrikon OPC Explorer. Simple user interface and complete functions Conversions: The states or values that an OPC server receives from a PLC can be converted or processed. For example, the square root of a value can be calculated. Simulation: Users can set the signal function generated by a PC to simulate the state of a register or the value in a register in a PLC. For example, they can set a wave. Alternatively, the users can set a particular value or state to execute simulation. Monitor View: It is a simple quick client. When users do not use SCADA, they can use Monitor View to test a connection, and check whether setting is correct. Files whose formats are different can be imported/exported. Users can copy a large quantity of data conveniently. 1.1.2 System Requirements Before using Delta OPC, users have to make sure that an operating system meets the requirements below. Table 1-1 System requirement table Item System requirement Operating system Windows XP/7/8 (32/64 bits) CPU Pentium 1.5 G or above 256 MB or above (A memory having a capacity of 512 MB or above is Memory recommended.) Hard disk drive Capacity : 500 MB or above CD-ROM drive For installing software (It is optionally required.) Monitor Keyboard/Mouse USB port Models and connection modes supported Resolution: 800×600; 16-bit color quality or above A general keyboard/mouse, or devices compatible with Windows For testing Hard Key (It is obligatorily required.) (1) Ethernet: AH series (2) Serial port: AH series *. Delta OPC can be connected to multiple clients. Before users connect a client to Delta OPC, they have to make sure of the communication port with which the model used is equipped, and the connection mode supported by the model used. 1.2 Installing Delta OPC Users have to install OPC Core Components before they install Delta OPC. Delta OPC can run normally only after OPC Core Components and Delta OPC are installed. 1.2.1 Installing OPC Core Components OPC Core Components is software provided by the OPC authorities. First, users need to visit the OPC Foundation official website (https://www.opcfoundation.org/Login.aspx?PageState=2), and create an account. Then, they need to download OPC Core Components from the website http://www.opcfoundation.org/Downloads.aspx?CI=280. If a 32-bit operating system is used, they have to download OPC Core Components 3.00 Redistributable (x86). If a 64-bit operating system is 1-3 Delta OPC User Manual used, they have to download OPC Core Components 3.00 Redistributable (x64). After OPC Core Components is downloaded, the users have to follow instructions, and complete the installation of OPC Core Components. 1.2.2 Installing the Main Program of Delta OPC (1) Users can download the latest Delta OPC from the Delta official website (http://www.deltaww.com/). Delta OPC can be installed only after it is decompressed. The contents of the folder which is decompressed are as shown in figure 1-1. If an old version of Delta OPC has been installed on a computer, the users have to uninstall it before installing a new version of Delta OPC. (Please refer to section 1.2.3 for more information about uninstalling Delta OPC.) After the users double-click Delta OPC Setup.exe, Delta OPC will be installed. Figure 1-1 Installing Delta OPC (2) Click Next in the installation window appears, as shown in figure 1-2. Figure 1-2 Installation window 1-4 Ch ap te r 1 In tro duc tio n (3) Read the license terms in the license agreement window. If the users agree to the terms, they have to select the I accept the terms of the License Agreement option button, and click Next, as shown in figure 1-3. If the users do not agree to the terms, they have to click Cancel. Figure 1-3 License agreement (4) After the users select a folder in which Delta OPC will be installed, or accept the default installation path, they have to click Install, as shown in figure 1-4. The process of installing Delta OPC is as shown in figure 1-5. Figure 1-4 Installation path 1-5 Delta OPC User Manual Figure 1-5 Process of installing Delta OPC (5) Finally, click Finish to complete the installation of Delta OPC, as shown in figure 1-6. Figure 1-6 Completing the installation of Delta OPC After Delta OPC is installed, the short cuts to it will be automatically created on the desktop and the Start menu (Start\Programs\Delta Industrial Automation\Delta OPC). 1-6 Ch ap te r 1 In tro duc tio n 1.2.3 Uninstalling Delta OPC (1) There are two methods of uninstalling Delta OPC. Method 1: Open the Control Panel window, and click Add or Remove Programs. In the Currently installed programs box, click Delta OPC vx.xx, and then click Remove. x.xx denotes the version of Delta OPC, as shown in figure 1-7. Figure 1-7 Uninstalling Delta OPC Method 2: Click Uninstall below the Delta OPC menu on the Start menu. (Default position: Start>Programs>Delta Industrial Automation>Delta OPC>Uninstall) (2) After users click Yes, Delta OPC will be uninstalled. 1.3 Usage and Introduction of Delta OPC Hard Key 1.3.1 Introduction of Hard Key The main purpose of Hard Key is to drive Delta OPC so that Delta OPC can be connected to a PLC and monitor the PLC. The appearance of Hard Key is as shown in figure 1-8. Figure 1-8 Appearance of Hard Key (for reference only) 1.3.2 Usage of Hard Key Users can try out a connection for 30 minutes without using Hard Key. After a connection is tried out for 30 minutes, the monitoring software connected to Delta OPC (e.g. SCADA software or Monitor View provided by a Delta OPC server) can not correctly communicate with and monitor Delta products by means of Delta OPC, and a cross will be put on the icon representing a configurator on the system tray. If Hard Key is inserted into a USB port, the communication and monitoring will return to normal. As a result, in order to monitor products continuously, users need to insert Hard Key into a USB port on a computer. (Note: If Hard Key is inserted into a USB port on a computer for the first time, the computer may show that a new device is detected, but Hard Key still can not be 1-7 Delta OPC User Manual used. To install Hard Key on the computer correctly, users need to remove Hard Key, and insert it again.) Figure 1-9 shows icons representing incorrect connections on a system tray. The left icon represents an RS-232 connection, and the right icon represents an Ethernet connection. Figure 1-9 Icons representing incorrect connections 1-8 Chapter 2 Basic Description of Delta OPC Contents 2.1 Basic Concept ...........................................................................................2-2 2.1.1 First Step toward Delta OPC ..............................................................2-2 2.2 Guide to Starting Delta OPC and Introduction of the Environment in Delta OPC...........................................................................................................2-2 2.2.1 Starting Delta OPC .............................................................................2-2 2.2.2 Description of a Configurator Screen .................................................2-5 2.2.3 Window Title and Status Bar ..............................................................2-6 2.2.4 Menu bar and Toolbar ........................................................................2-7 2.2.5 Project Management Area and Working Area.....................................2-8 2.2.6 Display Area of Monitor View..............................................................2-9 2-1 Delta OPC User Manual 2.1 Basic Concept 2.1.1 First Step toward Delta OPC Delta OPC provides configurators and an OPC server for users so that the users can conveniently set and connect a device (e.g. a PLC). Users write a setting into a config file (an .mdb file) by means of a configurator in an OPC server. Client software gets the names of the data items (corresponding to registers in a device) in the config file by means of the OPC server, and then sends a request to the OPC server for accessing the data in registers in a device which corresponds to the names of the data items in the config file. The OPC server sends a request by means of the communication format set by the configurator and a communication port to the device for accessing data. As shown in figure 2-1, after the users go though the process, they can read the data sent to the client software. Figure 2-1 Framework 2.2 Guide to Starting Delta OPC and Introduction of the Environment in Delta OPC 2.2.1 Starting Delta OPC After Delta OPC is installed successfully, the shortcuts to Delta OPC - SerialPort Configurator and Delta OPC - Ethernet Configurator will be automatically created on the desktop and the Start menu. If users want to connect a device by means of a serial port, they have to use Delta OPC SerialPort Configurator. If the users want to connect a device by means of Ethernet, they have to use Delta OPC - Ethernet Configurator. After the users click a Delta OPC configurator, it will be started, as shown in figure 2-2. No matter what configurator the users start, the initial screen which appears is as shown in figure 2-3. There are only some basic functions available in a configurator window. 2-2 Ch ap te r 2 Bas ic D escr ip tio n of De lta OPC Figure 2-2 Starting a configurator Figure 2-3 Initial screen After the users click New on the File menu or shown in figure 2-4. on the toolbar, a config file will be created, as Figure 2-4 Creating a new config file The users have to type a file name, select a path, and click Save in the Save New MS Access Database window, as shown in figure 2-5. 2-3 Delta OPC User Manual Figure 2-5 Path denoting the config file created After a config file is created, the functions related to the configurator will be available, as shown in figure 2-6. Figure 2-6 Configurator screen in the upper right corner of the configurator window which appears, the If the users click configurator window will be minimized, and the icon representing the configurator will be displayed in the on the system tray. If the users want to close the configurator window, they can click upper right corner of the configurator window, or Exit on the File menu. If the users close the congfigurator window after they save the config file created as a new file, the dialog box which asks the users whether they want to use the new config file as a default file will appear. If the users click Yes in the dialog box, the new config file will be read next time the configurator is started, as shown in figure 2-7. 2-4 Ch ap te r 2 Bas ic D escr ip tio n of De lta OPC Figure 2-7 Changing the default config file 2.2.2 Description of a Configurator Screen A configurator screen is composed of seven parts, as shown in figure 2-8. Figure 2-8 Configurator screen Window title: It displays the name that users give to the config file which is edited, and the name of the configurator which is used. Menu bar: There are six menus. Toolbar: There are two toolbars. Project management area: It adopts an interface which uses a hierarchical structure. Working area: The boxs which can be set vary with the item clicked in the project management area. Status bar: It displays the information about the item clicked. Display area of Monitor View: When Monitor View is executed, the values read and the quality of the connection created are displayed in this area. 2-5 Delta OPC User Manual 2.2.3 Window Title and Status Bar A title is at the top of a configurator window. The title at the top of a configurator window varies with the config file that users open, as shown in figure 2-9. Figure 2-9 Title at the top of a configurator window A status bar is at the bottom of a configurator window, as shown in figure 2-10. Figure 2-10 Status bar at the bottom of a configurator window The description of the function to which the mouse used moves is displayed on the left side of the status bar in a configurator window, as shown in figure 2-11. Figure 2-11 Status bar at the bottom of a configurator window The number of items in the section that users click is displayed on the right side of the status bar in a configurator window, as shown in figure 2-12. 2-6 Ch ap te r 2 Bas ic D escr ip tio n of De lta OPC Figure 2-12 Status bar at the bottom of a configurator window 2.2.4 Menu bar and Toolbar There are six menus in the menu bar in a configurator window, as shown in figure 2-13. The items on the menus vary with the editing work carried out and the item clicked. The items shown in grayscale can not be clicked. A brief introduction of the menu bar in a configurator window is presented here, and a more detailed introduction of the menu bar in a configurator window will be presented in the following chapters. Figure 2-13 Menu bar File: It provides the functions needed for accessing config files, as shown in figure 2-14. Figure 2-14 Menu bar - File Edit: It provides the functions needed for editing the config file created, as shown in figure 2-15. Figure 2-15 Menu bar - Edit View: It provides the functions needed for viewing the information in a project, and setting the way in which a working environment is displayed, as shown in figure 2-16. 2-7 Delta OPC User Manual Figure 2-16 Menu bar - View Go: It provides the functions needed for switching among different editing windows or different items, as shown in figure 2-17. Figure 2-17 Menu bar - Go Tools: It is used to display setting options, as shown in figure 2-18. Figure 2-18 Menu bar - Tools Help: It is used to display the information about the software, as shown in figure 2-19. Figure 2-19 Menu bar - Help Users can rapidly edit a project by clicking icons in the toolbar in a configurator window. The functions provided by the toolbar in a configurator include some common functions provided by the menu bar, as shown in figure 2-20. Figure 2-20 Toolbar 2.2.5 Project Management Area and Working Area The contents of the project management area in a configurator window are objects related to the 2-8 Ch ap te r 2 Bas ic D escr ip tio n of De lta OPC setting of a config file. The project management area in a configurator window adopts an interface which uses a hierarchical structure, as shown in figure 2-21. Address Space is used to create the objects that users want to monitor. Conversion is used to create conversions. Alarm Definition is used create limit values. Device Parameters and Templates are not provided by Delta OPC version 1.0. Please refer to the following chapters for more information about the project management area in a configurator window. Figure 2-21 Project management area The boxes in the working area in a configurator window vary with the item clicked in the project management area. If the item clicked in the project management area in a configurator window has subitems, the subitems will be displayed at the top of the working area, as shown in figure 2-22. Please refer to the following chapters for more information about the working area in a configurator window. Figure 2-22 Working area 2.2.6 Display Area of Monitor View When Monitor View is executed, the values in the registers monitored or the states of the registers monitored, and the information about the connection created are shown in the display area of Monitor View, as shown in figure 2-23. Please refer to the following chapters for more information about the usage of Monitor View. Figure 2-23 Display area of Monitor View 2-9 Delta OPC User Manual MEMO 2-10 Chapter 3 Using Delta OPC Contents 3.1 Basic Setting .............................................................................................3-2 3.1.1 Steps ..................................................................................................3-2 3.1.2 Manipulating a Config File..................................................................3-2 3.1.3 Setting a Port .....................................................................................3-3 3.1.4 Setting a Device .................................................................................3-5 3.1.5 Setting a Data Item.............................................................................3-7 3.1.6 Starting Monitor View .........................................................................3-9 3.2 Other Basic Manipulations.......................................................................3-10 3.2.1 Edit Menu and View Menu ...............................................................3-10 3.2.2 Other Related Manipulations............................................................3-12 3-1 Delta OPC User Manual 3.1 Basic Setting 3.1.1 Steps Users can complete the setting of target registers, and write data into a config file which is used by an OPC server by following the steps below. Manipulate a config file. Set a port. (Delta OPC - Ethernet Configurator is not equipped with the function needed for setting ports. If Delta OPC - Ethernet Configurator is used, this step can be skipped.) Set a device. Set a data item. Start Monitor View. 3.1.2 Manipulating a Config File Users can not only create a new config file, but also open an old config file. After they click on the toolbar, or Open… on the File menu, the Open window will appear, as shown in figure 3-1. The users can select a config file which has been created in the Open window. Figure 3-1 Opening an old file 3-2 Chapter 3 Using Delta OPC After the users click an historic item on the File menu, a file which was edited before will be opened, as shown in figure 3-2. Figure 3-2 Historic item list If the users want to save a config file with a new name or in a new path, they have to click Save As… on the File menu, and type a file name, select a path, and click Save in the Save As window. If the users want to export/import a config file, they can click Export (WinCE, Embedded WinNT)…/CSV Export/CSV Import/XML Export…/XML Export Schema…/XML Import…/XML Validate... on the File menu, or CSV Export/CSV Import on the toolbar, as shown in figure 3-2 and figure 3-3. The functions needed for importing/exporting config files are described below. Figure 3-3 CSV Import/CSV Export Table 3-1 Functions needed for importing/exporting config files Item Description Users can export data to a .txt file which is used by an Export (WinCE, Embedded embedded system functioning as an OPC server. WinNT)… Users can select the items which they want to export to a .csv CSV Export file, and select the items which they want to import from a .csv file. When they export data, they can select an option button in the Delimiters section, and select the LF cell line breaks checkbox in the Save As window. When they import data, they CSV Import can select checkboxes in the Import settings section, and select the Insert all invalid records into file checkbox in the Open window. Users can export a config file to an .xml file. XML Export… A schema file in which there is no data set is exported to an .xml file so that users can edit the .xml file by means of XML Export Schema… another tool. Users can import a config file saved as an .xml file. XML Import… XML Validate… is used to check whether the file selected is a XML Validate… config file conforming to an XML format. Only the file conforms to an XML format can be imported to Delta OPC. 3.1.3 Setting a Port If a port is set, the communication format used to connect a PLC can be set. If users want to create a port, they can click Address Space in the project management area, right-click it, point to New 3-3 Delta OPC User Manual on the context menu, and click Port, as shown in figure 3-4. The users can also click toolbar, or click the File menu, point to New, and click Port. on the Figure 3-4 Creating a new port After a new port is created, the window appearing will be as shown in figure 3-5. The items which need to be set are described below. Figure 3-5 Setting a port Users can type the name of the port created. They can type 50 characters at most. Underlines can be typed, but special marks such as *, #, ?, \, %, and @ can not be typed. Setting the communication format used by a computer: Users have to make sure of the communication port number used, and the communication format used by the object which is connected. After the users complete the setting of a port, they have to click Apply to write the setting into the config file created. If the users click Reset, the previous setting saved will be restored. If the users click Add New, a new port will be created. Please note that Delta OPC - Ethernet Configurator is 3-4 Chapter 3 Using Delta OPC not equipped with the function needed for setting ports. If Delta OPC - Ethernet Configurator is used, the step of setting ports can be skipped. 3.1.4 Setting a Device If users set a device, they can set the model which they want to connect, and set a connection. The way in which a device is set in Delta OPC - SerialPort Configurator is different from the way in which a device is set in Delta OPC - Ethernet Configurator. Setting a device in Delta OPC - SerialPort Configurator After users complete the setting described in section 3.1.3, they have to click a port in the project management area, right-click it, point to New on the context menu, and click Device, on the context menu, or click the Edit as shown in figure 3-6. The users can also click menu, point to New, and click Device. Figure 3-6 Creating a new device (Delta OPC - SerialPort Configurator) After a new device is created, the window appearing will be as shown in figure 3-7. The items which need to be set are described below. Figure 3-7 Setting a device (Delta OPC - SerialPort Configurator) Users can type the name of the device created. They can type 50 characters at most. Underlines can be typed, but special marks such as *, #, ?, \, %, and @ can not be typed. The first character can not be a numeral. The station address that the users can type is the station address of a communication port on the model which the users want to connect. Users have to select a model. Only AH500 series PLCs are supported for the time being. 3-5 Delta OPC User Manual Users have to set a communication format. They can set timeouts, the number of times the reading/writing of data is retried, and a time interval. (A millisecond is a unit.) In the Optimizations section, the users can set the maximum quantity of data which can be read/written at a time. After the users complete the setting of a device, they have to click Apply to write the setting into the config file created. If the users click Reset, the previous setting saved will be restored. If the users click Add New, a new device will be created. Setting a device in Delta OPC - Ethernet Configurator If users want to create a device, they can click Address Space in the project management area, right-click it, point to New on the context menu, and click Device, as shown in figure 3-8. on the toolbar, or click the Edit menu, point to New, and click The users can also click Device. Figure 3-8 Creating a new device (Delta OPC - Ethernet Configurator) After a new device is created, the window appearing will be as shown in figure 3-9. The items which need to be set are described below. Figure 3-9 Setting a device (Delta OPC - Ethernet Configurator) Users can type the name of the device created. They can type 50 characters at most. Underlines can be typed, but special marks such as *, #, ?, \, %, and @ can not be typed. The first character can not be a numeral. The IP address that the users can type is the IP address of the model which the users want to connect, and the TCP port that the users 3-6 Chapter 3 Using Delta OPC can set is the TCP port of the model which they want to connect. Users have to select a model. Only AH500 series PLCs are supported for the time being. Users have to set a communication format. They can set timeouts, the number of times the reading/writing of data is retried, and a time interval. (A millisecond is a unit.) In the Optimizations section, the users can set the maximum quantity of data which can be read/written at a time. After the users complete the setting of a device, they have to click Apply to write the setting into the config file created. If the users click Reset, the previous setting saved will be restored. If the users click Add New, a new device will be created. If the setting value in a box exceeds the limit set by the box, a warning message as shown in figure 3-10 will appear. The setting value in a box can be saved only if it does not exceed the limit set by the box. Figure 3-10 Warning message 3.1.5 Setting a Data Item A data item corresponds to a register in a PLC. If users want to create a data item, they have to click a device in the project management area, right-click it, and point to New on the context menu, on the context menu, or and click Data Item, as shown in figure 3-11. The users can also click click the Edit menu, point to New, and click Data Item. Figure 3-11 Creating a new data item If the users want to manage several data items under a device in the project management area, they can click the device, right-click it, point to New on the context menu, click Folder, and move the data items to the folder created or create data items in the folder created. After a data item is created, the window appearing will be as shown in figure 3-12. The items which need to be set are described below. After the users complete the steps above, they can access the items set by means of SCADA software as long as Delta OPC runs on the operating system. 3-7 Delta OPC User Manual Figure 3-12 Setting a data item Users can type the name of the data item created. They can type 50 characters at most. Underlines can be typed, but special marks such as *, #, ?, \, %, and @ can not be typed. The first character can not be a numeral. If the name typed is a register name, the starting address and the data type in will change by themselves. (If the name typed is a register name, it can not be different from the starting address in . The users can select a data type in accordance with their needs.) The users can type any characters in the Description box. They can type 50 characters at most. Users can set the data type of the register which they want to use. If the users select the Vector checkbox, and set the number of elements, the number of registers which they want to use will be the number of elements they set, and the registers which they want to use will start from the starting address set. After the users select the Use conversion checkbox, they can select a conversion which has been created in the Conversions section. Please refer to section 4.1.1 for more information about Conversions. If users select the Simulate checkbox, they can select a simulated signal which has been created in the Simulation Signals section, and the value that the OPC server used gets will be the simulated signal selected, whether the OPC server used is connected to a PLC or not. The users can select a waveform in the Signal drop-down list box. They can also select the Manual checkbox. The constant in the Value box can be used as a simulated value. Please refer to section 4.1.2 for more information about Simulation Signals. After users select the Generate Alarms checkbox, they can select an alarm which has been created in the Alarm Definitions section. If the value in a register in a client reaches a limit value, an alarm will occur in the client. Please refer to section 4.1.3 for more information about Alarm Definitions. After the users complete the setting of a data item, they have to click Apply to write the setting into the config file created. If the users click Reset, the previous setting saved will be restored. If the users click Add New, a new data item will be created. If the users click Additional properties…, they can describe the data item in the Data Item – Additional Properties window. 3-8 Chapter 3 Using Delta OPC 3.1.6 Starting Monitor View Monitor View is a simple built-in SCADA tool. Monitor View can be used to check whether a connection is correct. After users complete the setting described above, and connect a device, on the toolbar, by right-clicking the project they can start Monitor View by clicking management area, and clicking Monitor View on the context menu which appears, or by clicking Monitor view on the View menu, as shown in figure 3-13. After Monitor View is started, the display area of Monitor View will appear at the bottom of the window. Figure 3-13 Monitor View If the users click a device in the project management area after Monitor View is started, the data items which have been created for this device will be displayed in the display area of Monitor View, as shown in figure 3-14. Figure 3-14 Display area of Monitor View After users select a data item, the cells at the right side of the data item will display data. Please refer to table 3-2 for more information about the columns in the display area of Monitor View. 3-9 Delta OPC User Manual Item Item ID Value Timestamp Quality Subquality Limit Table 3-2 Description of the display area of Monitor View Description It is a path pointing to a data item, and is represented by Name of a port. Name of a device. Name of a data item. Value of data item Time when a connection is started Quality of a connection Subquality of a connection If a connection can not be started, the reason that the connection can not be started will be displayed. Reserved If Delta OPC Hard Key is not inserted, Monitor View or SCADA software can only be connected for 30 minutes. If Monitor View or SCADA software is disconnected automatically, users can connect Monitor View or the SCADA software again by restarting Monitor view or the SCADA software. As a result, Hard Key must be inserted. Please refer to chapter 1 for more information about Hard Key. 3.2 Other Basic Manipulations 3.2.1 Edit Menu and View Menu Users can complete basic setting by following the steps described above. Delta OPC also provides convenient interfaces. After users create items in the project management area, the subitems that an item in the project management area has will be displayed at the top of the working area if the item is clicked. A shown in figure 3-15, there are two data items displayed at the top of the working area. If users double-click an item, the page for the item will appear. The items at the top of the working area can also be edited. For example, they can be cut, copied, and pasted. Figure 3-15 Viewing the data items created If users want to further edit an item in the project management area or at the top of the working area, they can right-click the item, and click an item on the context menu which appears, or click an item on the Edit menu or the View menu. The context menu which will appear after an item in the project management area is right-clicked and the context menu which will appear after an item at the top of the working area is right-clicked are as shown in figure 3-16. The Edit menu and the View menu are as shown in figure 3-17. They are described in table 3-3 and table 3-4. 3-10 Chapter 3 Using Delta OPC Figure 3-16 Context menus Figure 3-17 Edit menu and View menu Table 3-3 Description of the Edit menu Description Creating a new item (e.g. a port, a device, or a data item) New Renaming an item Rename Setting the names of items, the number of digits in a serial number ,a starting serial number, and the number of items Multiply… which will be created Cut, Copy, Paste, Delete Editing the item selected Select All, Invert Selection Selecting items Item Item Toolbars Status Bar Large Icons, Small Icons, List, Details Dialog view Monitor view Sort by Show/hide columns Global Refresh Subtree Refresh Table 3-4 View menu Description Opening/Closing the toolbar Opening/Closing the status bar at the bottom of the window Large Icons, Small Icons, List, and Details on the View menu can be used to switch among the ways in which the items in the working area are on the toolbar can be used to switch displayed. Alternatively, among the ways in which the items in the working area are displayed. Dialog view on the View menu can be used to open or close the pane at on the toolbar can be the bottom of the working area. Alternatively, used to open or close the pane at the bottom of the working area. Monitor view on the View menu can be used to enable/disable Monitor View. Alternatively, on the toolbar can be used to enable/disable Monitor View. on the toolbar is clicked, the items at If Details on the View menu, or the top of the working area will be organized in the order specified. Users can set the columns which they want to display. After the Details on on the toolbar is clicked, the columns that the the View menu, or users want to display will be displayed at the top of the working area. Writing all setting values into a config file , and then reading the setting values in the config file Writing the setting values of the item selected into a config file, and then reading the setting values in the config file 3 - 11 Delta OPC User Manual 3.2.2 Other Related Manipulations If users want to switch among different items or different pages, they can click an item on the Go menu, as shown in figure 3-18. The Go menu is described in table 3-5. Figure 3-18 Go menu Table 3-5 Description of the Go menu Description Jumping to the previous page, jumping to the next page Jumping to item at the upper level Jumping to the next item or the previous item in the project Next Item, Previous Item management area Expand Item, Collapse Item Expanding or collapsing the item selected Page Up, Page Down Jumping to the first item or the last item displayed in the window Jumping to the first item or the last item in the project Home, End management area Item Back, Forward Up One Level After Options… on the Tools menu is clicked, the Options window will appear, as shown in figure 3-19. The Options window is described in table 3-6. Figure 3-19 Options window Item Automatically apply changes when selection is changed Enable hover selection 3-12 Table 3-6 Description of the Options window Description If there are changes in a page, users do not need to click Apply, and the changes will be saved automatically. As long as the number of milliseconds for which the mouse cursor hovers over an item reaches the number of milliseconds that users set, the item will be selected. Chapter 3 Using Delta OPC Item Update Rate Description Users can set the frequency with which the data in the display area of Monitor View is updated. After About Application… on the Help menu is clicked, the About Delta OPC window will appear, as shown in figure 3-20. The version of the software used and other information are displayed in the About Delta OPC window. Figure 3-20 About Delta OPC window 3-13 Delta OPC User Manual MEMO 3-14 Chapter 4 Advanced Functions of Delta OPC Contents 4.1 Advanced Setting and Connection Test ....................................................4-2 4.1.1 Conversion .........................................................................................4-2 4.1.2 Simulation ..........................................................................................4-4 4.1.3 Alarm..................................................................................................4-7 4.1.4 Testing the Connection of an OPC Client .........................................4-10 4-1 Delta OPC User Manual 4.1 Advanced Setting and Connection Test In addition to the basic setting described in chapter 3, Delta OPC provides convenient advanced tools. These advanced tools are conversions, simulations, and alarms. They are described in the following sections. 4.1.1 Conversion If users want to adjust the values in registers in the device which they want to connect, they can set a conversion. After the setting of a conversion is complete, and the conversion is started, an OPC client will monitor the values gotten from the conversion. If users want to create a conversion, they have to click Conversion in the project management area, right-click it, point to New on the context menu, and click Conversion, as shown in figure 4-1. Figure 4-1 Creating a new conversion After a new conversion is created, the window appearing will be as shown in figure 4-2. The items which need to be set are described below. 4-2 Ch ap te r 4 Ad va nced Fu nc tions o f De lta O PC Figure 4-2 Setting a conversion Users can type the name of the conversion created. They can type 50 characters at most. Users can select a conversion type. If the No (make float) option button is selected, no conversion will be carried out. If the Linear option button is selected, a register value in the range of the maximum register value set to the minimum register value set will correspond to a value in the range of the maximum engineering value set to the minimum engineering value set. If the Square root option button is selected, the square root of a value will be calculated. In the Conversion parameters section, the users can set a minimum register value in the Low IR (instrument range) box, a maximum register value in the High IR (instrument range) box, a minimum engineering value in the Low EU (engineering unit) box, and a maximum engineering value in the High EU (engineering unit) box. If the None option button in the Clamping section is selected, there will be no maximum engineering value and no minimum engineering value. If the Clamp on EU option button in the Clamping section is selected, the value in the Low EU box will be a minimum engineering value, and the value in the High EU box will be a maximum engineering value. If the As specified option button is selected, the value in the Low clamp box will be a minimum engineering value, and the value in the High clamp box will be a maximum engineering value. After the users complete the setting of a conversion, they have to click Apply to write the setting into the config file created. If the users click Reset, the previous setting saved will be restored. If the users click Add New, a new conversion will be created. After the users complete the setting of conversions, they can click a data item which needs to be converted in the project management area. After the users select the Use conversion checkbox, they can select a conversion which has been created in the Name drop-down list box, as shown in figure 4-3. Figure 4-3 Using a conversion 4-3 Delta OPC User Manual 4.1.2 Simulation After a simulation is created, the simulated signal set or the constant set will be used as the value in a register. After the setting of a simulation is complete, and the simulation is started, an OPC client will monitor simulated values. If users want to create a simulation, they have to click Simulation Signals in the project management area, right-click it, point to New on the context menu, and click Simulation Signal, as shown in figure 4-4. Figure 4-4 Creating a new simulation After a new simulation is created, the window appearing will be as shown in figure 4-5. The items which need to be set are described below. Figure 4-5 Setting a simulation Users can type the name of the simulation created. They can type 50 characters at most. The parameters which can be set in the Parameters section vary with the option button selected in the Type section. The option buttons in the Type section are described below. Read count: The value read from a register automatically increases by one every time. 4-4 Ch ap te r 4 Ad va nced Fu nc tions o f De lta O PC Users do not need to set any parameters. Write count: The value written into a register automatically increases by one every time. Users do not need to set any parameters. Random: Users have to set a value in the Position box, and a value in the Amplitude box. A random value in the range of the value in the Position box to the value in the Position box plus the value in the Amplitude box is generated. Ramp: Users have to set a value in the Position box, a value in the Amplitude box, a value in the Period box, and a value in the Phase box. A ramp in the range of the value in the Position box to the value in the Position box plus the value in the Amplitude box is generated. Sine: Users have to set a value in the Position box, a value in the Amplitude box, a value in the Period box, and a value in the Phase box. A sine wave in the range of the value in the Position box minus the value in the Amplitude box to the value in the Position box plus the value in the Amplitude box is generated. Square: Users have to set a value in the Position box, a value in the Amplitude box, a value in the Period box, a value in the Phase box, and a value in the Ratio box. A square wave in the range of the value in the Position box to the value in the Position box plus the value in the Amplitude box is generated. The ratio of the time for which a position of the square wave generated lasts to the period of the square wave depends on the value in the Ratio box. In figure 4-6, the ratio of the time for which a position of the square wave lasts to the period of the square wave is 0.2. Amplitude Position 2 8 Figure 4-6 Square wave Triangle: Users have to set a value in the Position box, a value in the Amplitude box, a value in the Period box, a value in the Phase box, and a value in the Ratio box. A triangle wave in the range of the value in the Position box to the value in the Position box plus the value in the Amplitude box is generated. The ratio of the time for which the triangle wave generated moves up to the period of the triangle wave depends on the value in the Ratio box. In figure 4-7, the ratio of the time for which the triangle wave moves up to the period of the triangle wave is 0.6. 6 4 Figure 4-7 Triangle wave 4-5 Delta OPC User Manual Step: Users have to set a value in the Position box, a value in the Amplitude box, a value in the Period box, a value in the Phase box, and a value in the # of steps box. A step wave in the range of the value in the Position box to the value in the Position box plus the value in the Amplitude box is generated. If the value in the # of steps box is 3, the step wave generated will be as shown in figure 4-8. Figure 4-8 Step wave After the users complete the setting of a simulation, they have to click Apply to write the setting into the config file created. If the users click Reset, the previous setting saved will be restored. If the users click Add New, a new simulation will be created. After the users complete the setting of simulations, they can click a data item which needs to be simulated in the project management area. After the users select the Simulate checkbox, they can select a simulation which has been created in the Signal drop-down list box, as shown in figure 4-9. If the users select the Manual checkbox, and type a value in the Value box, the value will be simulated. Figure 4-9 Starting a simulation 4-6 Ch ap te r 4 Ad va nced Fu nc tions o f De lta O PC 4.1.3 Alarm Users can set an alarm which is triggered when the value in a register reaches a limit value. After the setting of an alarm is complete, and the alarm is enabled, an OPC client which supports OPC AE can monitor the alarm if the alarm is triggered. If users want to create an alarm, they have to click Alarm Definitions in the project management area, right-click it, point to New on the context menu, and click Limit Alarm Definition or Digital Alarm definition, as shown in figure 4-10. Digital Alarm definition is used to define an alarm for Boolean registers. Limit Alarm Definition is used to define an alarm for other register types (exclusive of string registers). Figure 4-10 Creating a new alarm 4-7 Delta OPC User Manual Limit Alarm Definition After a new limit alarm is created, the window appearing will be as shown in figure 4-11. The items which need to be set are described below. Figure 4-11 Setting an alarm Users can type the name of the alarm created. They can type 50 characters at most. The value in the Update rate box indicates the frequency with which the status of the alarm created is updated. The users can set a value in the Deadband box. In order to prevent an alarm from being triggered continually by the oscillations of a value around a limit value, the alarm is triggered only once when the oscillations of a value stay within a deadband. Users can set limit values in the Limit alarm definition section. Limit: If the Limit checkbox for a limit value is selected, the alarm created is triggered when the value in a register reaches the limit value. Users can set four limit values. If the Return to normal checkbox is selected, a message is displayed when the value in a register returns to normal. Value: Users can set limit values. Message Body: Message displayed in a client when the value in a register reaches a limit value Severity: Degree of severity displayed in a client when the value in a register reaches a limit value Req. Ack.: If the alarm created is triggered, it will not be canceled until an acknowledgement is given. After the users complete the setting of an alarm, they have to click Apply to write the setting into the config file created. If the users click Reset, the previous setting saved will be restored. If the users click Add New, a new alarm will be created. 4-8 Ch ap te r 4 Ad va nced Fu nc tions o f De lta O PC Digital Alarm Definition After a new digital alarm is created, the window appearing will be as shown in figure 4-12. The items which need to be set are described below. Figure 4-12 Setting an alarm Users can type the name of the alarm created. They can type 50 characters at most. The value in the Update rate box indicates the frequency with which the status of the alarm created is updated. Users can set the message which appears when the alarm created is triggered in the Digital alarm definition section. If the Enable checkbox is selected, the alarm created will be enabled. Value: Users can set the state which triggers the alarm created. If the Return to normal checkbox is selected, a message is displayed when the state of a register returns to normal. Message Body: Message displayed in a client when the state of a register is the state selected in the Value drop-down list box Severity: Degree of severity displayed in a client when the state of a register is the state selected in the Value drop-down list box Req. Ack.: If the alarm created is triggered, it will not be canceled until an acknowledgement is given. After the users complete the setting of an alarm, they have to click Apply to write the setting into the config file created. If the users click Reset, the previous setting saved will be restored. If the users click Add New, a new alarm will be created. After the users complete the setting of alarms, they can click a data item which needs to use an alarm in the project management area. After the users select the Generate Alarms checkbox, they can select an alarm which has been created in the Limit Alarm drop-down list box or in the Digital Alarm drop-down list box, as shown in figure 4-13. If a limit alarm is selected, the message typed in the Mess. prefix box and an alarm message set appear when the alarm is triggered. If a digital alarm is selected, the message typed in the Mess. prefix box and the alarm message set appear when the alarm is triggered. 4-9 Delta OPC User Manual Figure 4-13 Starting an alarm 4.1.4 Testing the Connection of an OPC Client If users want to connect an OPC client to Delta OPC, they have to use the OPC client to search for the OPC servers which exist in the computer used, and select a connection. The creation of a connection between iFIX and a Delta OPC server is shown in figure 4-14. (Note: Please refer to related manuals for more information about the operation and usage of iFIX.) In figure 4-14, iFIX finds the OPC servers which have been installed on the computer used. If users want to connect iFIX to a Delta serial OPC server, they have to select Delta.AHModbusSerialDA or Delta.AHModbusSerialDA.1. If the users want to connect iFIX to a Delta Ethernet OPC server, they have to select Delta.AHModbusEthernetDA or Delta.AHModbusEthernetDA.1. Figure 4-14 Selecting a Delta OPC server which is running The users have to select the registers which they want to monitor. A shown in figure 4-15, the hierarchical structure created in a Delta OPC configurator is shown in the Path section, and the data items created in the Delta OPC configurator are shown in the Items section. In figure 4-15, Port_1.PLC_1.TAG1 indicates the port, device, and data item created in a Delta OPC configurator. After the users select data items, they can add the data items to the list which iFIX will monitor. 4-10 Ch ap te r 4 Ad va nced Fu nc tions o f De lta O PC Figure 4-15 Selecting data items which have been created If the monitoring function that iFIX has is executed after the users complete related setting, the data items selected will be monitored, as shown in figure 4-16. Figure 4-16 Information about a data item monitored 4 - 11 Delta OPC User Manual MEMO 4-12