1
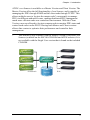
eco Sensors eco PDU Power Management Software V1.3.1 User Manual www.aten.com eco Sensors User Manual User Information Online Registration Be sure to register your product at our online support center: International http://eservice.aten.com Telephone Support For telephone support, call this number: International 886-2-8692-6959 China 86-10-5255-0110 Japan 81-3-5615-5811 Korea 82-2-467-6789 North America 1-888-999-ATEN ext 4988 United Kingdom 44-8-4481-58923 User Notice All information, documentation, and specifications contained in this manual are subject to change without prior notification by the manufacturer. The manufacturer makes no representations or warranties, either expressed or implied, with respect to the contents hereof and specifically disclaims any warranties as to merchantability or fitness for any particular purpose. Any of the manufacturer's software described in this manual is sold or licensed as is. Should the programs prove defective following their purchase, the buyer (and not the manufacturer, its distributor, or its dealer), assumes the entire cost of all necessary servicing, repair and any incidental or consequential damages resulting from any defect in the software. The manufacturer of this system is not responsible for any radio and/or TV interference caused by unauthorized modifications to this device. It is the responsibility of the user to correct such interference. The manufacturer is not responsible for any damage incurred in the operation of this system if the correct operational voltage setting was not selected prior to operation. PLEASE VERIFY THAT THE VOLTAGE SETTING IS CORRECT BEFORE USE. PE Device Safety Notice Set the maximum permissible breaker protection in the building circuitry to the current rating specified on the rating plate. Observe all national regulations and safety codes as well as deviations for breakers. Only connect the PE Device to a grounded power outlet or a grounded system! Make sure that the total current input of the connected systems does not exceed the current rating specified on the rating plate of the PE Device. There is a risk of explosion if the battery is replaced with an incorrect type. Dispose of used batteries according to the relevant instructions. ii eco Sensors User Manual Contents User Information . . . . . . . . . . . . . . . . . . . . . . . . . . . . . . . . . . . . . . . . . . . . . ii Online Registration . . . . . . . . . . . . . . . . . . . . . . . . . . . . . . . . . . . . . . . . ii Telephone Support . . . . . . . . . . . . . . . . . . . . . . . . . . . . . . . . . . . . . . . . ii User Notice . . . . . . . . . . . . . . . . . . . . . . . . . . . . . . . . . . . . . . . . . . . . . . ii PE Device Safety Notice . . . . . . . . . . . . . . . . . . . . . . . . . . . . . . . . . . . . ii Chapter 1. Introduction Overview . . . . . . . . . . . . . . . . . . . . . . . . . . . . . . . . . . . . . . . . . . . . . . . . . . . 1 Features . . . . . . . . . . . . . . . . . . . . . . . . . . . . . . . . . . . . . . . . . . . . . . . . . . . 3 Requirements . . . . . . . . . . . . . . . . . . . . . . . . . . . . . . . . . . . . . . . . . . . . . . . 4 Sensors . . . . . . . . . . . . . . . . . . . . . . . . . . . . . . . . . . . . . . . . . . . . . . . . . . . . 4 Supported NRGence Devices . . . . . . . . . . . . . . . . . . . . . . . . . . . . . . . . 5 Chapter 2. Installation Before You Begin . . . . . . . . . . . . . . . . . . . . . . . . . . . . . . . . . . . . . . . . . . . . 6 Installing eco Sensors . . . . . . . . . . . . . . . . . . . . . . . . . . . . . . . . . . . . . . . . . 6 Database Considerations . . . . . . . . . . . . . . . . . . . . . . . . . . . . . . . . . . 10 Chapter 3. First-time Setup Logging In . . . . . . . . . . . . . . . . . . . . . . . . . . . . . . . . . . . . . . . . . . . . . . . . . 11 The eco Sensors Main Page. . . . . . . . . . . . . . . . . . . . . . . . . . . . . . . . . . . 12 Page Components. . . . . . . . . . . . . . . . . . . . . . . . . . . . . . . . . . . . . . . . 12 Quick View Step-by-Step Setup . . . . . . . . . . . . . . . . . . . . . . . . . . . . . . . . 13 Chapter 4. Energy Management Overview . . . . . . . . . . . . . . . . . . . . . . . . . . . . . . . . . . . . . . . . . . . . . . . . . . 14 Dashboard. . . . . . . . . . . . . . . . . . . . . . . . . . . . . . . . . . . . . . . . . . . . . . . . . 14 Device Sensors . . . . . . . . . . . . . . . . . . . . . . . . . . . . . . . . . . . . . . . . . . 14 Quick View Color Scale . . . . . . . . . . . . . . . . . . . . . . . . . . . . . . . . . . . . 21 Power Management . . . . . . . . . . . . . . . . . . . . . . . . . . . . . . . . . . . . . . 21 Thermal Management . . . . . . . . . . . . . . . . . . . . . . . . . . . . . . . . . . . . . 22 Air Management . . . . . . . . . . . . . . . . . . . . . . . . . . . . . . . . . . . . . . . . . 23 Humidity Management . . . . . . . . . . . . . . . . . . . . . . . . . . . . . . . . . . . . 24 Power Control . . . . . . . . . . . . . . . . . . . . . . . . . . . . . . . . . . . . . . . . . . . . . . 25 Device Status . . . . . . . . . . . . . . . . . . . . . . . . . . . . . . . . . . . . . . . . . . . 25 Sensor Status . . . . . . . . . . . . . . . . . . . . . . . . . . . . . . . . . . . . . . . . . . . 25 Outlet Status . . . . . . . . . . . . . . . . . . . . . . . . . . . . . . . . . . . . . . . . . . . . 25 Group Control . . . . . . . . . . . . . . . . . . . . . . . . . . . . . . . . . . . . . . . . . . . . . . 26 iii eco Sensors User Manual Power Analysis . . . . . . . . . . . . . . . . . . . . . . . . . . . . . . . . . . . . . . . . . . . . . 27 Generate Report . . . . . . . . . . . . . . . . . . . . . . . . . . . . . . . . . . . . . . . . . 27 Report Result . . . . . . . . . . . . . . . . . . . . . . . . . . . . . . . . . . . . . . . . . . . 28 Report Management . . . . . . . . . . . . . . . . . . . . . . . . . . . . . . . . . . . . . . 31 Thermal Analysis . . . . . . . . . . . . . . . . . . . . . . . . . . . . . . . . . . . . . . . . . . . 32 Generate Report . . . . . . . . . . . . . . . . . . . . . . . . . . . . . . . . . . . . . . . . . 32 Report Result and Report Management . . . . . . . . . . . . . . . . . . . . . . . 32 Chapter 5. User Management Overview. . . . . . . . . . . . . . . . . . . . . . . . . . . . . . . . . . . . . . . . . . . . . . . . . . 33 User Information . . . . . . . . . . . . . . . . . . . . . . . . . . . . . . . . . . . . . . . . . 34 Device Access Rights . . . . . . . . . . . . . . . . . . . . . . . . . . . . . . . . . . . . . 35 Chapter 6. Device Management Overview. . . . . . . . . . . . . . . . . . . . . . . . . . . . . . . . . . . . . . . . . . . . . . . . . . 36 Zone Define . . . . . . . . . . . . . . . . . . . . . . . . . . . . . . . . . . . . . . . . . . . . . . . 36 Rack Install . . . . . . . . . . . . . . . . . . . . . . . . . . . . . . . . . . . . . . . . . . . . . . . . 38 Device Setup . . . . . . . . . . . . . . . . . . . . . . . . . . . . . . . . . . . . . . . . . . . . . . 39 Adding New Devices . . . . . . . . . . . . . . . . . . . . . . . . . . . . . . . . . . . . . . 40 Configuration Levels . . . . . . . . . . . . . . . . . . . . . . . . . . . . . . . . . . . . . . 41 Device Level . . . . . . . . . . . . . . . . . . . . . . . . . . . . . . . . . . . . . . . . . . . . 41 Bank Level . . . . . . . . . . . . . . . . . . . . . . . . . . . . . . . . . . . . . . . . . . . . . 43 Outlet Level . . . . . . . . . . . . . . . . . . . . . . . . . . . . . . . . . . . . . . . . . . . . . 44 Sensor Level . . . . . . . . . . . . . . . . . . . . . . . . . . . . . . . . . . . . . . . . . . . . 46 Define Data Group . . . . . . . . . . . . . . . . . . . . . . . . . . . . . . . . . . . . . . . . . . 47 Chapter 7. System Management Overview. . . . . . . . . . . . . . . . . . . . . . . . . . . . . . . . . . . . . . . . . . . . . . . . . . 49 Sys Settings . . . . . . . . . . . . . . . . . . . . . . . . . . . . . . . . . . . . . . . . . . . . . . . 49 System Parameters. . . . . . . . . . . . . . . . . . . . . . . . . . . . . . . . . . . . . . . 49 SNMP Settings . . . . . . . . . . . . . . . . . . . . . . . . . . . . . . . . . . . . . . . . . . . . . 51 Default SNMP Agent Settings. . . . . . . . . . . . . . . . . . . . . . . . . . . . . . . . . . 51 SNMP Trap Receiver . . . . . . . . . . . . . . . . . . . . . . . . . . . . . . . . . . . . . 52 SMTP . . . . . . . . . . . . . . . . . . . . . . . . . . . . . . . . . . . . . . . . . . . . . . . . . . . . 54 Other Settings. . . . . . . . . . . . . . . . . . . . . . . . . . . . . . . . . . . . . . . . . . . . . . 55 Sessions . . . . . . . . . . . . . . . . . . . . . . . . . . . . . . . . . . . . . . . . . . . . . . . . . . 56 Maintenance . . . . . . . . . . . . . . . . . . . . . . . . . . . . . . . . . . . . . . . . . . . . . . . 57 Database . . . . . . . . . . . . . . . . . . . . . . . . . . . . . . . . . . . . . . . . . . . . . . . . . 59 Database Settings. . . . . . . . . . . . . . . . . . . . . . . . . . . . . . . . . . . . . . . . 59 Database Capacity . . . . . . . . . . . . . . . . . . . . . . . . . . . . . . . . . . . . . . . 59 Database Maintenance . . . . . . . . . . . . . . . . . . . . . . . . . . . . . . . . . . . . 60 Tasks . . . . . . . . . . . . . . . . . . . . . . . . . . . . . . . . . . . . . . . . . . . . . . . . . . . . 61 iv eco Sensors User Manual Group Power Control. . . . . . . . . . . . . . . . . . . . . . . . . . . . . . . . . . . . . . 61 Configuration Backup . . . . . . . . . . . . . . . . . . . . . . . . . . . . . . . . . . . . . 62 Billing. . . . . . . . . . . . . . . . . . . . . . . . . . . . . . . . . . . . . . . . . . . . . . . . . . . . . 64 Settings . . . . . . . . . . . . . . . . . . . . . . . . . . . . . . . . . . . . . . . . . . . . . . . . 64 Generate Report . . . . . . . . . . . . . . . . . . . . . . . . . . . . . . . . . . . . . . . . . 65 Report Management . . . . . . . . . . . . . . . . . . . . . . . . . . . . . . . . . . . . . . 67 Chapter 8. Log Overview . . . . . . . . . . . . . . . . . . . . . . . . . . . . . . . . . . . . . . . . . . . . . . . . . . 68 System Log . . . . . . . . . . . . . . . . . . . . . . . . . . . . . . . . . . . . . . . . . . . . . 68 Log Options . . . . . . . . . . . . . . . . . . . . . . . . . . . . . . . . . . . . . . . . . . . . . 69 Events . . . . . . . . . . . . . . . . . . . . . . . . . . . . . . . . . . . . . . . . . . . . . . . . . 69 Chapter 9. Client Overview . . . . . . . . . . . . . . . . . . . . . . . . . . . . . . . . . . . . . . . . . . . . . . . . . . 71 Installing eco Sensors Client. . . . . . . . . . . . . . . . . . . . . . . . . . . . . . . . . . . 71 Logging In . . . . . . . . . . . . . . . . . . . . . . . . . . . . . . . . . . . . . . . . . . . . . . . . . 74 The eco Sensors Client Main Page. . . . . . . . . . . . . . . . . . . . . . . . . . . . . . 75 Page Components. . . . . . . . . . . . . . . . . . . . . . . . . . . . . . . . . . . . . . . . 75 Dashboard. . . . . . . . . . . . . . . . . . . . . . . . . . . . . . . . . . . . . . . . . . . . . . . . . 76 Device Sensors . . . . . . . . . . . . . . . . . . . . . . . . . . . . . . . . . . . . . . . . . . 76 Quick View Color Scale . . . . . . . . . . . . . . . . . . . . . . . . . . . . . . . . . . . . 83 Power Management . . . . . . . . . . . . . . . . . . . . . . . . . . . . . . . . . . . . . . 83 Thermal Management . . . . . . . . . . . . . . . . . . . . . . . . . . . . . . . . . . . . . 84 Air Management . . . . . . . . . . . . . . . . . . . . . . . . . . . . . . . . . . . . . . . . . 85 Humidity Management . . . . . . . . . . . . . . . . . . . . . . . . . . . . . . . . . . . . 86 Power Control . . . . . . . . . . . . . . . . . . . . . . . . . . . . . . . . . . . . . . . . . . . . . . 87 Device Status . . . . . . . . . . . . . . . . . . . . . . . . . . . . . . . . . . . . . . . . . . . 87 Sensor Status . . . . . . . . . . . . . . . . . . . . . . . . . . . . . . . . . . . . . . . . . . . 87 Outlet Status . . . . . . . . . . . . . . . . . . . . . . . . . . . . . . . . . . . . . . . . . . . . 87 Group Control . . . . . . . . . . . . . . . . . . . . . . . . . . . . . . . . . . . . . . . . . . . . . . 88 v Chapter 1 Introduction Overview NRGence eco Sensors software has been developed to work with ATEN’s new generation of NRGence PE series green energy power distribution units (PDUs) to effectively increase the efficiency of data center power usage. With the use of dynamic Rack Cooling Index (RCI) and Return Temperature Index (RTI) by zone, NRGence eco Sensors software, in conjunction with sensorenabled eco PDUs*, gives you the means to assess, diagnose and estimate how much energy you can save. Following the suggestions generated by the sensorenabled system allows you to optimize energy usage to save energy without harming your IT equipment’s reliability. The NRGence eco Sensors utility provides secure and centralized (single portal, single login) access, administration and management of up to 1000 PE devices over the network – local and worldwide – anywhere and anytime. Because NRGence eco Sensors offers a single, integrated window-based application program to manage all your devices, users no longer need to learn the interface for each individual device or remember every device’s IP addresses, making system management easier and more efficient. By consolidating the management of your NRGence devices, NRGence eco Sensors allows every NRGence device to be accessed and controlled by means of a single IP address. All outlets in different NRGence devices are integrated into a single tree view, making eco Sensors ideal for the power management of large data centers and branch office server rooms located in several remote locations within the same intranet. NRGence eco Sensors is able to automatically discover all NRGence devices within the same intranet and has the ability to monitor/manage these devices. This software provides monitoring/managing of PE device outlet power ON/ OFF/Reboot, sequential ON/OFF of outlet, current / kWH / environmental monitoring at PDU/outlet level, name of outlet, current / kWH / environment sensor threshold setting/alert, etc. through SNMP. Threshold exceed alerts are also available through Syslog/SMTP. * See Supported NRGence Devices, page 5, for a list of compatible NRGence sensor-enabled eco PDUs. 1 Chapter 1. Introduction ATEN’s eco Sensors is available as a Master Version and Client Version. The Master Version offers the full functionality of eco Sensors, and is capable of managing the PDU through SNMP and the client node through TCP/IP. This allows multiple users to log into the master node* concurrently to manage PDUs in different authorized zones, making distributed PDU management much more efficient under one centralized environment. With the Client Version, users are allowed to log into a master node to monitor PDU status and control each outlet on the PDUs. Having both Master and Client versions allows data centers to optimize their performance and centralize their management. * This feature is only available with the Master Version of NRGence eco Sensors (available on the ESC100 CD-ROM and ATEN website). It is not available with the Single User version that is found on the included CD-ROM. eco Sensors Client Version eco Sensors Client Version eco Sensors Master Version eco Sensors Client Version IP Network MySQL IP Network 2 eco Sensors User Manual Features Automatic discovery of all NRGence devices within the same intranet Remote real-time power measurement and monitoring PDU level current / voltage / power dissipation / power consumption Outlet ON / OFF / Recycle status Circuit breaker status monitoring Remote real-time power outlet management* Power outlet ON / OFF / Cycle switching by outlet User-defined outlet level delays for sequential power up Current / Voltage / Power Dissipation / Power Consumption threshold level setting User access assignment for every outlet Name assignment to individual outlets Remote real-time environment sensor monitoring Temperature / Temperature + Humidity reading Temperature and Humidity threshold level setting Plotting/Monitoring of all NRGence devices Add data center server racks Add NRGence devices for each server rack Manage device/device outlet status for each plot Exceed threshold alert through SMTP and Syslog Supports VMWare ESXi 5.1 10240 line event log provision Syslog provision Client version available Allows access to Dash Board, Power Control and Group Control Note: Not all functions are supported by all NRGence eco PDU PE models. Please see Supported NRGence Devices, page 5, and your eco PDU PE User Manual for further details. 3 Chapter 1. Introduction Requirements Systems that the eco Sensors software will be installed on should meet the following requirements: Master Version Client Version Operating System Windows 7/Windows Server 2003 and above Windows 7/Windows Server 2003 and above CPU 2.5 GHz Quad Core 2.0 GHz Dual Core Resolution Larger than 1024x768 Larger than 1024x768 Memory 4GB 2GB Disk 500GB 100GB Network 10/100/1000 Mbps Ethernet 10/100/1000 Mbps Ethernet Sensors For complete energy management of an instrumented data center with the use of the NRGence eco PDU and eco Sensors software, you should install 4 sensors for each of the racks in your data center in order to generate a complete energy-efficient data chart. Higher sensor installation density is helpful to generate more accurate data. 8-port models have 2 sensor ports. In this case, Sensor 1 needs to be installed at the intake of the rack (EA1140 or EA1240) and sensor 2 needs to be placed at the exhaust of the IT equipment of the rack (EA1140 or EA1240) or the floor (EA1340). To get the most complete eco Sensors Dashboard data, the recommended 2 eco PDU unit per rack sensor setup is show in the table, below: eco PDU eco PDU 1 eco PDU 2 Port Location Part Number Sensor Sensor 1 Intake EA1240 Temperature / Humidity Sensor 2 Floor EA1340 Differential Pressure / Temperature Sensor 1 Intake EA1240 Temperature / Humidity Sensor 2 Exhaust EA1240 Temperature / Humidity 4 eco Sensors User Manual Supported NRGence Devices Outlets Metering Level PE1108A / B / G NEMA 5-15R / IEC C13 PDU PE1208A / B / G NEMA 5-20R / IEC C13 / C19 PE3108A / B / G NEMA 5-15R / IEC C13 PE3208A / B / G NEMA 5-20R / IEC C13 / C19 Model PE52220sA / B / G Outlet NEMA 5-15R / IEC C13 Bank PE5312sGR / GL UK BS1363 Bank PE5340sB / J / G IEC 320 C13 Bank PE6108A / B / G NEMA 5-15R / IEC C13 PDU PE6208A / B / G NEMA 5-20R / IEC C13 / C19 PE8108A / B / G NEMA 5-15R / IEC C13 PE8208A / B / G NEMA 5-20R / IEC C13 / C19 PE5216 / 6216 IEC 320 C19 + IEC 320 C13 PE5324 / 6324 Outlet Bank x 1 Bank x 2 PE7216 / 8216 / 9216 Outlet PE7324 / 8324 / 9324 Outlet PE7328B / J / G IEC 60320 C13 / IEC 60320 C19 PDU / 2 x Bank / Outlet PE5324kJA NEMA 5-15R Twist Lock Bank PE7324kJA NEMA 5-15R Twist Lock PDU / 2 x Bank / Outlet PE8121kJ IEC 320 C13 with lock PDU / 1 x Bank / Outlet PE8316G IEC 320 C19 + IEC 320 C13 PDU / 2 x Bank Outlet PE8324A / JA NEMA 5-15R PDU / 2 x Bank Outlet PE9222B / G IEC320 C13 / IEC320 C19 Outlet IEC 60320 C13 / IEC 60320 C19 PDU / 2 x Bank / Outlet Depends on PDU models attached – PE1216 / PE1324 Bank x 1/2 PE9330B / J / G EC1000 / EC2004 Note: For detailed outlet information as well as the complete specifications of an individual model, please reference the respective user manual. 5 Chapter 2 Installation Before You Begin The Single User version of NRGence eco Sensors can be downloaded from the ATEN website. The download link for this can be found on the software CD provided with the NRGence eco PDU package. The Master and Client versions can be found on the ESC100 CD-ROM and ATEN website. For more information on the different software versions available, see Overview, page 1. Once you have downloaded and saved the installation file to a convenient location, follow the instructions below: Installing eco Sensors 1. Double click on the eco Sensors exe file to open the installer. The Welcome window appears: Click Next to continue. 2. The License Agreement window appears: 6 eco Sensors User Manual Enable the “I agree to the terms of this license agreement” radio button, and then click Next to continue. 3. The Serial Number window appears: Enter your serial number (which can be found on the cover of the bundled CD-ROM) and click Next to continue. 4. The User Information window appears: Enter your user information and click Next to continue. 5. The Installation Folder window appears: 7 Chapter 2. Installation Choose the folder where you would like eco Sensors to be installed, and click Next to continue. 6. The Shortcut Folder window appears: Choose the folder where you would like eco Sensors shortcuts to be installed, and click Next to continue. 7. The Database Option window appears: Make your database selection (options are Access or MySQL) and click Next to continue. 8 eco Sensors User Manual Note: We strongly recommend you choose MySQL for formal data center applications. See Database Considerations, page 10, for details. (Continues on next page.) 9 Chapter 2. Installation (Continued from previous page.) 8. The Ready to Install window appears: Check the information and click Next to proceed with the installation. 9. When the installation is complete, the eco Sensors icon appears on your desktop (or wherever you specified). Note: For Windows 7 use, it is recommended to run eco Sensors with administrator privileges. Database Considerations If your data center is small (10 or fewer eco PDU units) and you only require the system to record, store and access approximately 3 months of data history (± 1 million data records or files totaling 200 MB), Access performance will remain satisfactory. For larger data centers, and for complete storage of all data history, we strongly recommend you select MySQL. Note: If you decide to select MySQL, please ensure that you have MySQLDatabase 5.5 installed before you install eco Sensors. Visit the MySQL website for installation information. 10 Chapter 3 First-time Setup Logging In Open the eco Sensors program and the Login screen appears: 1. Provide a valid User ID and Password. Note: Since this is the first time you are logging in, use the default User ID: administrator; and the default Password: password. For security purposes, we recommend changing them to something unique. 2. Select your language. (Options are: English [default]; Traditional Chinese; Simplified Chinese; Japanese; German; Italian and French). 3. Then Click Login to bring up the interface’s Main Page. 11 Chapter 3. First-time Setup The eco Sensors Main Page After you have successfully logged in, the eco Sensors Main Page comes up with the Energy Management Dashboard page displayed: Page Components The screen components are described in the table, below: No. Item Description 1 Tab Bar The tab bar contains the eco Sensor’s main operation categories. 2 Menu Bar The menu bar contains operational sub-categories that pertain to the item selected in the tab bar. 3 Dashboard Alert Bar The Dashboard Alert bar is a special feature of the Dashboard page. Similar to the Menu Bar, it contains operational sub-categories that pertain to the item selected in the tab bar, but it also has an extra colorcoded function that allows you to instantly see the category status: RED: Critical ORANGE: Warning GRAY: Offline GREEN: Normal 4 Logout / Monitor Click the far right button to log out of your eco Sensors session. Click on the Monitor icon to start the real-time Energy Performance Indicator. 5 Interactive Display Panel This is your main work area. The screens that appear reflect your menu choices. 12 eco Sensors User Manual Quick View Step-by-Step Setup Once you have logged in, you need to define your data center and configure various parameters before you can begin to use eco Sensors to monitor and manage your devices. The steps below provide a quick reference to the sections of the user manual you should refer to in order to do this smoothly. 1. Plot the position of the individual racks in your data center. See Rack Install, page 38. 2. Establish the threshold settings and other parameters for your NRGence devices at the device and outlet level. See Device Setup, page 39. Note: Not all PE models support outlet level monitoring (see Supported NRGence Devices, page 5, and your eco PDU User Manual for details 3. Group the racks in your data center into zones. See Zone Define, page 36. 4. Establish your System parameters, event notification and database preferences (see System Management, page 49). 5. Set your Log preferences (see Log, page 68). Once you have completed these basic setup steps, please proceed to Energy Management, page 14. 13 Chapter 4 Energy Management Overview The Energy Management section displays the real-time power measurements and environment monitoring information of your data center in a variety of formats, at the zone, rack, device, and outlet level. You can also generate customized reports about your data center’s status that include energy saving suggestions. Dashboard The Dashboard Alert bar is a special feature of the Dashboard page that features color-coded tabs that allows you to instantly see a category’s status: RED: Critical; ORANGE: Warning; GRAY: Offline; GREEN: Normal. Device Sensors The PDU Sensors tab displays collated data in formats that provide an overall view of the various levels being monitored by your sensors. In combination with the four-color dashboard scheme (outlined above), you can easily assess the overall status of the groups/devices at a glance. Threshold Monitor This displays the overall threshold monitoring information. See Device Setup, page 39, for information on setting the thresholds. 14 eco Sensors User Manual Real-time Measurements Hover your mouse over a rack in the display for real-time power measurement and monitoring information, as below: The meanings of the icons are show in the table, below: Icon Device PDU Icon Reading Unit Power Dissipation KWh (Kilowatt-Hour) Power W (Watt) Bank Voltage V (Volt) Current A (Ampere) Sensor Humidity % RH (Relative Humidity) Temperature °C / °F (Celsius / Fahrenheit) Pressure Pa (Pascal) 1 Pa = 1 N/m2 Note: The icons are color-coded so you can instantly see a category’s status: RED: Critical; ORANGE: Warning; GREEN: Normal; GRAY: Offline 15 Chapter 4. Energy Management Available Power Capacity The Available Power Capacity displays the available power using a standard formula for rack devices: Total Power Capacity (KWh) - Power in Use (KWh) = Available Power Capacity (KWh). The box at the top right corner of the page displays the Average % of available power for all the racks. The Var % uses the formula: Var(X) = E [(X-µ)2] to calculate the variance value of all devices. You can move the mouse over each rack to display the percentage of available power for that rack. The colors represent the available power capacity for each rack displayed in 5% increments. 16 eco Sensors User Manual Overall Rack Cooling Effectiveness This displays the Rack Cooling Index (RCI). RCI is a measure of how effectively equipment racks are cooled and maintained within industry temperature guidelines and standards, and functions as a useful cooling performance metric. In addition to a graphical representation, this page also provides you a ‘Hi” and a “Lo” for quick reference. Overall Rack Humidity Effectiveness This displays the Return Temperature Index (RTI). RTI is a measure of the performance of the air-management system, and functions as a useful airflow performance metric. 17 Chapter 4. Energy Management Overall Rack Pressure Effectiveness This displays the RPI. Overall Rack Airflow Effectiveness This displays the RAI. 18 eco Sensors User Manual Overall Air Management Effectiveness This displays the RTI. Overall Indices Dashboard This displays all five indices (RCI, RHI, RPI, RAI, RTI) for the last hour. 19 Chapter 4. Energy Management Energy Saving Estimation This displays energy savings estimates for Fan Energy (measured/potential) and Chiller Energy (measured/potential/aggressive). Rack Door Status The Rack Door Status displays the open/close status of each cabinet door installed with an eco Sensors door sensor (EA1440, EA1441, or EA1442). GREEN: Rack Door is Closed. GRAY: No Door Sensor Installed. ORANGE: Rack Door is Open. 20 eco Sensors User Manual Quick View Color Scale The Power Management, Thermal Management, Air Management, and Humidity Management tabs use the same color scale, but with different units for each reading. For example, the Heat Load Dissipation page, under the Power Management tab, displays a scale from 4000–40000 kWh, as shown below: For quick view purposes, the racks in the data center are displayed in a color related to their status on the various scales. For example, the racks below are currently registering in the region of 4000 kWh for Heat Load Dissipation: Power Management This tab provides detailed real-time information related to Power Management, as outlined in the following sections. Heat Load Dissipation The page displays the real-time Heat Load Dissipation values, the current average, and the variance [in kWh]. Detailed readings for Heat Load Dissipation can also be viewed in daily, weekly, monthly, quarterly, or yearly formats. The color scale displays a range from 4000–40000 kWh. Heat Load Density This page displays the real-time Heat Load Density values, the current average, and the variance [in W]. The color scale displays a range from 500–4500 W. 21 Chapter 4. Energy Management Thermal Management This tab provides detailed real-time information related to Thermal Management, as outlined in the following sections. Cold Intake Temperature This page displays the real-time Cold Intake Temperature values, the current average, and the variance [in °C]. The color scale displays a range from 10–45 °C. Intake Differential Temperature This page displays the real-time Intake Differential Temperature values, the current average, and the variance [in °C]. The color scale displays a range from 2–20 °C. Hot Exhaust Temperature This page displays the real-time Hot Exhaust Temperature values, the current average, and the variance [in °C]. The color scale displays a range from 2–20 °C. Exhaust Differential Temperature This page displays the real-time Exhaust Differential Temperature values, the current average, and the variance [in °C]. The color scale displays a range from 10–45 °C. Cold-Hot Across Temperature Rise This page displays the real-time Cold-Hot Across Temperature Rise values, the current average, and the variance [in °C]. The color scale displays a range from 5–55 °C. 22 eco Sensors User Manual Air Management This tab provides detailed real-time information related to Air Management, as outlined in the following sections. Intake Differential Pressure Distribution This page displays the real-time Intake Differential Pressure Distribution values, the current average, and the variance [in Pa]. The color scale displays a range from 10–200 Pa. Heat Load Airflow Across Distribution This page displays the real-time Heat Load Airflow Across Distribution values, the current average, and the variance [in v_equip (cfm)]. The color scale displays a range from 10–200 cfm. Floor Plenum Airflow Supply Distribution This page displays the real-time Floor Plenum Airflow Supply Distribution values, the current average, and the variance [in Q_floor (cfm)]. The color scale displays a range from 500–2500 cfm. Heat Load Airflow Supply Distribution This page displays the real-time Heat Load Airflow Supply Distribution values, the current average, and the variance [in Q (cfm)]. The color scale displays a range from 500–2500 cfm. Hot Recirculation/Airflow w Distribution This page displays the real-time Hot Recirculation/Airflow w Distribution values, the current average, and the variance [in ∆A_circk (%)]. The color scale displays a range from 10–50 %. Cold Bypass/Airflow Distribution This page displays the real-time Cold Bypass/Airflow Distribution values, the current average, and the variance [in ∆A_bypas (%)]. The color scale displays a range from 10–50 %. 23 Chapter 4. Energy Management Humidity Management This tab provides detailed real-time information related to Humidity Management, as outlined in the following sections. Cold Intake Relative Humidity This page displays the real-time Cold Intake Relative Humidity values, the current average, and the variance [in h_rel (%)]. The color scale displays a range from 10–90 % Cold Intake Dew Point Temperature This page displays the real-time Cold Intake Dew Point Temperature values, the current average, and the variance [in t_dew (C)]. The color scale displays a range from 0–15 °C 24 eco Sensors User Manual Power Control The Power Control tab allows you to perform manual power management at the device or outlet level. Note: Not all NRGence eco PDU PE models support outlet level power management. Please see Supported NRGence Devices, page 5, and your User Manual for further details. Click on the device in the side bar and its page appears, as below: Device Status Use the ON, OFF and Reboot options to manually power manage the device Sensor Status This section is view only and provides status information about the sensors. Outlet Status Use the ON, OFF and Reboot options to manually power manage the individual outlet. 25 Chapter 4. Energy Management Group Control The Group Control tab allows you to perform simultaneous manual power management at the outlet level on data groups that you have already created. Note: 1. See Define Data Group, page 47, for details about creating groups for power management control. 2. Not all NRGence models support outlet level power management. Please see Supported NRGence Devices, page 5, and your User Manual for further details. Click on a group in the side bar and its page appears, as below: The Outlets in Group section displays information about how many outlets in the group are controllable or non-controllable. The Power Control section allows to power on, off or reboot all of the controllable outlets in the group simultaneously. The Controllable Outlet Information section displays information about the outlets in the group, such as their power status, device/rack/zone location. 26 eco Sensors User Manual Power Analysis Generate Report The Generate Report section allows you to establish the parameters and schedule for your reports. The fields are explained in detail in the following table: Field Report Info Explanation Fill in the report name and the writer in the Title and Author fields. Enter the Time and Start from (when you want the report to begin), and then enter the Period (options are hour, day, week, month, or quarter) and the Duration (1–24). Note: How far back the system stores data depends on your database type. See Database Considerations, page 10, for details. Group In this field, select the date group that is the subject of the report. See Report Management, page 31, for details. Chart In this field, check the analysis that components that you want to be included in the report and enter values for CO2/KG, /1KWH, and 1KG. After filling in the information, click Generate and the Set Group Total Power window will appear, as shown on the next page. 27 Chapter 4. Energy Management Set Group Total Power Enter the Total Power (KWh) use of the data center. This information will be used to calculate the Power Usage Effectiveness (PUE) of IT equipment in the data center by subtracting the IT energy use from the Total Power (KWh) use. Note: eco Sensors automatically loads the current system time as report time. To generate a report based on the current status / latest available analysis, leave the Report Period, Begin Report, and Duration fields as default, complete the Group and Chart fields, and click Generate Report Result After you Generate the report it appears in a tabbed format in four parts – Line Chart, Energy Saving Suggestion, IT Power Capacity, IT Inventory List, and Power PUE as shown below. If chosen, the Line Chart is the first to appear: Note: In any of the tabs, click Save to save the report in your desired location (see Report Management, page 31, for specifying the location); or click Choose Chart to return to the Generate Report page to adjust parameters or exit. 28 eco Sensors User Manual Energy Saving Suggestion This report tab provides energy saving suggestions in the form of charts displaying measured and potential savings for fan energy and chiller energy, and a list of actions that you can undertake to improve your data center’s energy efficiency, as shown below: IT Power Capacity This report tab provides information about the IT capacity of your data center (or specified areas in the data center) in the form of tables and charts, as shown in the following illustrations: 29 Chapter 4. Energy Management IT Inventory List This report tab provides a breakdown of all power usage and cost data for each piece of IT inventory that you have listed in groups and/or individual servers, as shown below: Power PUE This report tab provides the Power Usage Effectiveness (PUE), which calculates how much energy is used by IT equipment in the data center. It subtracts IT Power from Total Power to give you the PUE, as shown below: 30 eco Sensors User Manual Report Management This page allows you to select the Location where you want to save reports, and also provides various Search options, as detailed in the following table: Field Explanation Report Folder Use this field to specify the folder where the reports are saved. Use Browse to locate a folder; click Save to save the location. Search By Search parameters in the drop-down menu allow you search for reports using Time, Title, or Author. Enter the Title or Author in the field on the right. Time Range Enter a time range for your report search and click Search. Reports The main window displays the reports. Here, you can select to Show All or Delete reports. After clicking Search, a list of Reports are displayed. Click Open HTML to open the report in a browser to display it on a single page. You can also go to the Report folder and open the individual CSV and PDF report files. 31 Chapter 4. Energy Management Thermal Analysis Generate Report The Generate Report section allows you to establish the parameters and schedule for your Thermal Analysis reports. The fields are explained in detail in the following table: Field Report Info Explanation Fill in the report name and the writer in the Title and Author fields. Enter the Time and Start from (when you want the report to begin), and then enter the Period (options are hour, day, week, month, or quarter) and the Duration (1–24). Note: How far back the system stores data depends on your database type. See Database Considerations, page 10, for details. Group In this field, select the date group that is the subject of the report. See Report Management, page 31, for details. Chart In this field, check the analysis that components that you want to be included in the report\. Report Result and Report Management The report results can be managed in exactly the same way as those generated in the Power Analysis tab. Please reference sections Report Result, page 28, and Report Management, page 31, for details. 32 Chapter 5 User Management Overview When you select the User Management tab the screen comes up with Accounts and All Users displayed in the main panel. eco Sensors supports up to eight local user accounts with administrator. Note: eco Sensors does not support concurrent login sessions. 33 Chapter 5. User Management User Information To add a user, do the following: 1. Click Add. The New User page appears: 2. In the General section, key in a name and password in the User and Password fields, and confirm the password. Note: The default username and password length is six characters; this is configurable to from 1–16 characters. 3. In the User Type section, select the user type. Options are Administrator and User. Note: Administrators have full access rights by default; users have no access rights by default. 4. In the Permissions section, set the broad permissions of the user. To set the device-by-device permissions for a User account, see Device Access Rights, below. 5. Click Save to save your settings. 34 eco Sensors User Manual Device Access Rights Click on the Device Access Rights button to bring up a list of all the NRGence devices in the installation. The list displays Device Name, MAC and IP address, Model type and Rack information. Use this page to set which individual NRGence devices the user has access to. Put a checkmark in the box next to the device name to enable access, and then click Save to save your settings. 35 Chapter 6 Device Management Overview The Device Management tab allows you to define your data center layout by rack and zone grouping for customized power analysis. You can also define detailed parameters, such as Device Threshold Settings, at the PDU and outlet level. See the following sections for more detailed information. Note: 1. Defining zones is optional; but at least one rack must be installed and defined for eco Sensors to work. 2. Not all functions (such as outlet level monitoring) are supported by all NRGence models. Please see Supported NRGence Devices, page 5, and your eco PDU User Manual for details Zone Define The Zone Define section allows you to group racks in your data center into zones, or define areas that you wish to get readings for. 1. To define a zone, use your mouse to highlight a rack, group of racks, or any area in your data center – the highlighted area will display yellow – and then click New. 36 eco Sensors User Manual 2. In the window that appears, give the group a name and set a color, and click Save: 3. The group appears as a Zone in the data center layout and its name appears in the sidebar. Note: 1. Once a zone has been defined in the data center layout, you cannot modify its position or move it (you can only modify its name or color). You must delete the zone by selecting it in the sidebar and clicking Delete. Then, define a new zone. 2. For easy reference when there are multiple zones, when an individual zone is selected in the list, the zone area flashes in the diagram. 37 Chapter 6. Device Management Rack Install The Rack Install section allows you to plot the position of the individual racks in your data center: 1. Click New to add a rack. 2. Give the rack a name and plot its position using the parameters, as shown below: 3. Click Save. The rack appears in the data center layout and its name appears in the sidebar. Note: 1. Once a rack has been defined in the data center layout, highlight its name and click Modify to change its position or orientation. 2. You can also move it by clicking on it and dragging it to its new position. 38 eco Sensors User Manual Device Setup The Device Setup section displays a list of the NRGence devices on your installation and allows you to set detailed parameters for all the NRGence devices – at the device, bank, outlet and sensor levels. Note: 1. Click on the + sign next to All Devices in the side bar to expand the tree. 2. Double click on a device in the side bar tree or main page list to go directly to the device’s Device Settings page. 39 Chapter 6. Device Management Adding New Devices eco Sensors software can automatically discover all NRGence devices located on the same intranet. Click New to bring up the New Device window: Method Setup the subnet to be scanned or specific the IP address, and click Search. The devices will then be displayed in a list. Device SNMP Agent This section allows you to set up your SNMP and system parameters so that eco Sensors can connect to the NRGence devices in your installation: 1. Enter a Username/Community, Port ID and Trap Port for the events. 2. Set the timeout and retry values. 3. Select the SNMP version, Privacy, and Authentication protocols from the drop-down menus. 4. Key in the Privacy and Authentication passwords. Note: Certain parameters in this section must match those of all the eco PDU devices in the installation. See Synchronizing SNMP Parameters, page 53. 5. Select the Device type and Click Search. The devices will then be displayed in a list. 40 eco Sensors User Manual Configuration Levels Once a device is selected, available tabs are Device, Bank, Outlet, and Sensor, depending on the device’s features and level of configuration. See the following sections for details. Device Level 1. Highlight the device you want to configure, and click Setup. 2. In the window that appears with the Device tab open, enter the Device Settings (Basic/Advanced), as in the diagram and table below: Device Basic Settings: Advanced Settings: 41 Chapter 6. Device Management Device Info This section displays the Name, IP, Model and Rack information for configuration. SNMP Agent Configure the SNMP Agent here (see Device SNMP Agent, page 40, for further details). Sensor Location Type Select the sensors’ locations from the drop-down menus. Threshold Set the device threshold settings (min.–max), using the parameters provided, for: Aggregate Current Voltage Aggregate Power Aggregate Power Dissipation Note: For these settings to appear click the Advanced Settings radio button. 3. There are two save options: Click Apply to save these settings for the specified device; or click Apply to same Model (Advanced Settings) to save and apply these settings to all devices of the same model as the specified device. 42 eco Sensors User Manual Bank Level 1. Highlight the device you want to configure, and click Setup. 2. In the window that appears with the Device tab open, enter the Device Settings and other parameters, as in the diagram and table below: Device Info This section displays the device Name, IP, Model and Rack information. Bank Select an individual bank by clicking on the bank icon, and then proceed to configure its parameters, as below. Name Give the bank a name (optional) Threshold Set the outlet threshold settings (min.–max), using the parameters provided, for: Current Voltage Power Power Dissipation Note: Depending on your NRGence device, not all these options may be available. 3. There are two save options: Click Apply to save these settings for the specified device; or click Save Apply to All Banks to save and apply these settings to all banks on the same model as the specified device. 43 Chapter 6. Device Management Outlet Level If your device supports outlet level monitoring (see Supported NRGence Devices, page 5, and your User Manual for details), you can also set detailed parameters for all the devices in your installation at the outlet level. 1. Click on the Outlet tab, highlight the device/outlet you want to configure, and click Setup. 2. In the window that appears, enter the Outlet Settings, as below: Device Info This section displays the device Name, IP, Model and Rack information. Outlet Select an individual outlet by clicking on the outlet icon, and then proceed to configure its parameters, as below. Name Give the outlet a name (optional) Configuration Select one of the three choices for the Shutdown Method from the drop-down menu – see Shutdown Methods, page 45, for details. Set MAC address and Delay Time On/Off for the selected method. Threshold Set the outlet threshold settings (min.–max), using the parameters provided, for: Aggregate Current Voltage Aggregate Power Aggregate Power Dissipation 44 eco Sensors User Manual 3. There are two save options: Click Save to save these settings for the specified outlet; or click Apply to all Outlets to save and apply these settings to all outlets of the specified device. Shutdown Methods The three available shutdown methods are explained in detail below: Kill the Power – If this option is selected, the NRGence device waits for the amount time set in the Power Off Delay field, and then turns the Outlet's power Off. Turning the power off performs a cold (non-safe) shutdown. Wake on LAN – This is a Safe Shutdown and Restart option. If this is selected, when an Outlet is turned Off, the NRGence device first sends a message to the computer telling it to prepare for a shutdown; it then waits for the amount time set in the Power Off Delay field to give the OS time to close down before the computer is powered down to standby mode. Likewise, when the Outlet is turned On, the NRGence device waits for the amount time set in the Power On Delay field, then sends an Ethernet message to the computer connected to the Outlet telling the computer to turn itself On. Note: For Safe Shutdown and Restart, the computer must be running Windows (Windows 98 or higher), and the Safe Shutdown program (available by download from our website), must be installed and running on the computer. System after AC Back – This is a Safe Shutdown and Restart option. If this is selected, when an Outlet is turned Off, the NRGence Device first sends a message to the computer telling it to prepare for a shutdown; it then waits for the amount time set in the Power Off Delay field to give the OS time to close down before the computer is powered down. When the Outlet is turned On, the NRGence device waits for the amount time set in the Power On Delay field, then sends power to the server. When the server receives the power, it turns itself on. Note: For Safe Shutdown and Reboot, the computer must be running Windows (Windows 98 or higher), and the Safe Shutdown program (available by download from our website), must be installed and running on the computer. 45 Chapter 6. Device Management Sensor Level 1. Highlight the device with the sensors you want to configure, and click Setup. 2. In the window that appears with the Device tab open, enter the Device Settings and other parameters, as in the diagram and table below: Device Info This section displays the device Name, IP, Model and Rack information for configuration. Sensor 1, 2, 3, 4 Set the sensor threshold settings (min.–max), using the parameters provided, for: Temperature Humidity Pressure 3. There are two save options: Click Apply to save these settings for the specified device; or click Save Apply to same Model to save and apply these settings to all devices’ sensors of the same model as the specified device. 46 eco Sensors User Manual Define Data Group The Define Data Group section allows you to create groups of zones, racks, devices or outlets for power management control. The List section displays the Type of group (zone, rack, device, or outlet) and its Name, and the Members section displays the individual zones, racks, devices or outlets that are in that group. To define a group, do the following: 1. Click Add to bring up the Data Group Information window, as below: 2. Give the group a name in the Group Name field. 47 Chapter 6. Device Management 3. Select the type of group from the options in the drop-down menu. Options are Zone, Rack, Device and Outlet. Note: Zones must be defined before they appear in the List. See Zone Define, page 36, for details. 4. Select the members of the group by clicking on them, or select everything in the list by putting a check in the All checkbox. 5. Click Save to create the group. It now appears in the List on the main opening page. 48 Chapter 7 System Management Overview The Sys Management tab allows you to set up the parameters for eco Sensors software System settings and to use the SNMP protocol to connect to the NRGence devices in your installation, as well as perform other maintenance, database and task related functions. Sys Settings This section allows you to set up the eco Sensors software system parameters: System Parameters Enter the Service Delay time in seconds that the software will wait before it requests new data from the Energy Box. Enter the total size for the Data Center Layout, this will set the maximum parameters for the devices in your eco Sensors software installation, as displayed on the Energy and Device tabs. 49 Chapter 7. System Management Enter a User Defined or Link to a (random) Device to set a Voltage value for the Energy Box. Note: The EC1000 measures current only. Enter a reference voltage value here to calculate power and power dissipation in EC installations. In the Others section you can set the default values that the eco Sensors software will use for generating data. The Currency drop-down menu allows you to select the type of currency symbol to use. Select the Temperature Unit: Celsius or Fahrenheit, to use for all environmental calculations. Check Enable rack full name to enable multi-language rack names. For example, this feature allows you to use Chinese, Japanese, and other characters when creating a rack’s name. 50 eco Sensors User Manual SNMP Settings This section allows you to set up your SNMP and system parameters so that eco Senors can connect to the eco PDUs in your installation: Default SNMP Agent Settings This section allows you to set up your default SNMP and system parameters so that eco Senors can connect to the NRGence devices in your installation: 1. Enter a Username/Community, Port ID and Trap Port for the events. 2. Set the timeout and retry values. 3. Select the SNMP version, Privacy, and Authentication protocols from the drop-down menus. 4. Key in the Privacy and Authentication passwords. Note: Certain parameters in this section must match those of all the NRGence devices in the installation. See Synchronizing SNMP Parameters, page 53. 5. Click Search. The devices will then be displayed in a list. 51 Chapter 7. System Management SNMP Trap Receiver To be notified of SNMP trap events, do the following: 1. Enter a Username, Port ID and Trap Port for the events. 2. Set the timeout and retry values. 3. Select the SNMP version, Privacy, and Authentication type from the dropdown menus. 4. Key in the Privacy and Authentication passwords. Note: Certain parameters in this section must match those of all the eco PDU devices in the installation. See Synchronizing SNMP Parameters, page 53. 52 eco Sensors User Manual Synchronizing SNMP Parameters In order for eco Senors to access the NRGence devices on the installation, it is essential that three of the SNMP parameters are the same. These parameters are Username, Privacy PW, and Authen PW. The default values, which are the same for eco Sensors and eco PDU units, are shown in the following table: Parameter Default Web UI Username administrator Administrator Account ID Privacy PW privacypwd SNMP Privacy PW Authen PW password Administrator Account Password If any of these parameters are modified on the Web GUI of the eco PDU device(s), the same parameters in eco Sensors must also be modified. Note: eco Sensors will only access eco PDUs with the same parameters, so it is essential that these parameters are synchronized for all eco PDUs in your installation. Reference the Browser Operation chapter of your eco PDU User Manual for further information. 53 Chapter 7. System Management SMTP To have eco Sensors email reports from the SMTP server, do the following: 1. Enable the Enable report from the following SMTP server, and key in the IP address and port number of your SMTP server. 2. Key in the email address of where the report is being sent from in the Send From field. Note: 1. Only one email address is allowed in the From field, and it cannot exceed 64 Bytes. 2. 1 Byte = 1 English alphanumeric character. 3. Key in the email address (addresses) of where you want the SMTP reports sent to in the Email List field. Note: 1. If you are sending the report to more than one email address, separate the addresses with a semicolon. The total cannot exceed 256 Bytes. 2. 1 Byte = 1 English alphanumeric character. 4. If your server requires authentication, put a check in the Server requires authentication checkbox, and key in the appropriate account information in the Account Name and Password fields. 54 eco Sensors User Manual Other Settings The Other Settings page allows you to enable the Enquiry Service, and set the Service port and Security string. This page is used to establish a connection to a third party software’s billing service. 55 Chapter 7. System Management Sessions The Sessions page lists the clients that are connected to eco Sensors across the network. SEE PAGE This page displays the username, client node IP address and the time that the user logged in. Use the box to the left to select a client’s session and click End Session to disconnect the user from the master node. 56 eco Sensors User Manual Maintenance The Maintenance function allows you to use eco Sensors to upgrade the firmware of the connected NRGence device’s firmware. When you click the Maintenance tab, the display opens with Firmware Upgrade page, as below: The Main Panel A description of the items shown in this panel are given in the table, below: Item Description Check Main Firmware Version If you enable Check Main Firmware Version, the device’s current firmware level is compared with that of the upgrade file. If the current version is equal to or higher than the upgrade version, a popup message appears, to inform you of the situation and stops the upgrade procedure. Firmware File As new versions of the firmware become available, they are posted on our website and can be downloaded to a convenient location on your computer. Click the Browse button to select the downloaded upgrade file. Device Name Lists all of the NRGence devices. In the Select column, select the device’s whose firmware you want to upgrade. Firmware Version Displays the device’s current firmware version. IP Address Displays the IP address of the selected NRGence device. Upgrade Status Displays the upgrade status of the selected devices. Upgrade Click this button to perform the upgrade on the selected devices. 57 Chapter 7. System Management Upgrading the Firmware To upgrade the firmware refer to the screenshot on the preceding page, and do the following: 1. Go to our website and download the new firmware file to a convenient location on your computer. 2. Click the Browse button; navigate to where the firmware file is located and select it. 3. Click Upgrade to start the upgrade procedure. If you enabled Check Main Firmware Version the current firmware level is compared with that of the upgrade file. If the current version is equal to or higher than the upgrade version, a popup message appears, to inform you of the situation and stops the upgrade procedure. If you didn't enable Check Main Firmware Version, the upgrade file is installed without checking what its level is. Once the upgrade completes successfully, the switch resets itself. 4. Log in again, and check the firmware version to be sure it is the new one. 58 eco Sensors User Manual Database Database Settings This section allows you to set MySQL database and Database Clean up Options: Use the Database Clean up Options to maintain your database size. Check Keep data for and enter the number of months for the system to log data before it begins to purge files. Check Delete oldest data to delete older data files first. Database Capacity This section gives you information about your current database capacity: 59 Chapter 7. System Management Database Maintenance This section allows you to backup and restore the systems database and configuration information. Data Import / Export The Data Import and Data Export tabs allow you to import and export data tables related to the Power Analysis, Thermal Analysis, and Billing information. Config Restore / Backup The Config Restore and Config Backup tabs allow you to restore and backup configuration data related to the eco Sensors software settings found in the User and Device tabs, which include user account and device information. 60 eco Sensors User Manual Tasks This section allows you to schedule Group Power Control tasks (On/Off) using built-in group parameters and schedule Configuration Backup tasks, which automatically backup configuration data. Group Power Control These tasks can be performed on all devices, all racks, or all outlets. On the main page, click Add to open the Add/Modify Task window, as shown below: To schedule a group power control task, do the following: 1. Key in a Name for the task. 2. Select the task Type from the drop-down menu (Daily, Weekly, or Yearly). 61 Chapter 7. System Management 3. Select the Target Group from the drop-down menu. 4. Use the Scheduling section to set the power on and power off times, and to add Exceptions to Yearly tasks. Note: Exceptions will override all scheduling parameters. 5. Click Save to save the task. It now appears on the main page: Select a task in Group Power Control Tasks main page and use the buttons to Modify or Delete. Configuration Backup These tasks are set on a daily or weekly basis to automatically backup the eco Sensors configuration data. On the main page, click Add to open the Add/ Modify Configuration Backup Task window, as shown below: To schedule a configuration backup task, do the following: 1. Key in a Name for the task. 2. Select the task Type from the drop-down menu (Daily, or Weekly). 3. Select Save in folder or Save via FTP, and fill in the related information: 62 eco Sensors User Manual Save in folder: Browse to select a location where backup is saved. Provide the Username and Password for the folder if it is set with security that requires authentication*. Save via FTP: Enter the FTP Server, Port number, FTP Directory and check the box to Log on anonymously. Provide the Username and Password for the folder if it is set with security that requires authentication*. Note: If you provide a Username/Password for the folder, and the folder is not set with username/password security, the Configuration Backup task will not save the data. 4. Use the Scheduling section to set the days of the week (Weekly) and time of day (Weekly/Daily) for the configuration backup task to begin. 5. Click Save to save the task. 63 Chapter 7. System Management Billing The Billing section allows you to calculate energy costs using actual usage to create data and generate billing reports. Settings Single Rate: Enter the KW/per hour rate that you wish to use to calculate your data center’s billing costs. Dual-Rate: Use this option if your energy costs are split into peak and non-peak hours. Peak: Enter the time of day (From) that the peak-rate begins, how many hours (Duration) the peak-rate occurs, and the Rate ($/KWH) per hour. Non-Peak: Enter the non-peak Rate ($/KWH) per hour. Click Save. 64 eco Sensors User Manual Generate Report The Generate Report section allows you to establish the parameters for your billing reports. The fields are explained in detail in the following table: Field Report Info Explanation Fill in the report name and the creator in the Title and Author fields. Enter the Time which will represent when the report was created. Enter the Type: Total: will give you a report that is an accumulation of all the energy costs for all the racks. Rack: will give you a break down of the energy costs accumulated by each rack. Select a Month for which you wish to calculate the billing data for. Note: Rack reports will take longer to generate as much more data is required to provide the detailed billing information. Group In this field, click Add to select the data group(s) that is the subject of the billing report. After filling in the information, click Generate and a new window will appear with the Total or Rack Billing Information, as shown on the next page. 65 Chapter 7. System Management Total Report From this page click Save to save the billing information, or Choose Chart to return to the previous page and reconfigure the parameters for your billing report. Rack Report From this page click Save to save the billing information, or Choose Chart to return to the previous page and reconfigure the parameters for your billing report. 66 eco Sensors User Manual Report Management This page allows you to select the Location where you want to save reports, and also provides various Search options, as detailed in the following table: Field Explanation Report Folder Use this field to specify the folder where the reports are saved. Use Browse to locate a folder; click Save to save the location. Search By Search parameters in the drop-down menu allow you search for reports using Time, Title, or Author. Enter the Title or Author in the field on the right. Time Range Enter a time range for your report search and click Search. Reports The main window displays the reports. Here, you can select to Show All or Delete reports. After clicking Search, a list of Reports are displayed. Click Open HTML to open the billing report in a browser and display it on a single page. You can also go to the Report folder and open the individual CSV and PDF report files. 67 Chapter 8 Log Overview eco Sensors keeps a record of transactions that take place on its installation, and stores up to 128 events at one time. The System Log page provides a powerful array of filters and functions that allow you to view and export the log file data, as well as be informed by email of specified events as they occur. System Log Clicking on a device in the Sidebar displays its log events in the main panel’s log event list. Clicking the Refresh button brings the log list up to date with the latest events. The entry box to the right of the Refresh button lets you set the number of events to display per page. Simply key in the number of your choice. The top right of the main panel shows the total number of pages in the log file, and what page you are currently viewing. The buttons on the bottom row function as follows: Clear – click to erase the contents of the log event list First Page – click to go to the first page of the log event list 68 eco Sensors User Manual Previous Page – click to move to the previous page of the log event list Next Page – click to move to the next page of the log event list Last Page – click to move to the last page of the log event list Export Log – click to save the contents of the log event list to file Log Options Use this tab to set your log Maintenance and Display options: Events Use this tab to set the Events that you want the system to log locally and/or be sent out by email via SMTP. Check the events to Log or Email. For events to be sent via email you must configure the SMTP settings (see SNMP Settings, page 51). 69 Chapter 8. Log This Page Intentionally Left Blank 70 Chapter 9 Client Overview The eco Sensors Client software is installed on secondary computers and allows access to the data provided by PDUs through the eco Sensors Master (server) software. The eco Sensors Client connects over the LAN to log into the eco Sensors Server to receive data about the PDUs. The eco Sensors Client computers can access PDU information and energy usage, and have power outlet control of the PDUs. Installing eco Sensors Client 1. Double click on the eco Sensors Client exe file to open the installer. The Welcome window appears: Click Next to continue. 2. The License Agreement Windows appears: 71 Chapter 9. Client Click the “I accept the terms in the license agreement” button, and then click Next to continue. 3. The Customer Information window appears: Enter a User Name and Organization (optional), then the Serial Number (which can be found on the cover of the bundled CD-ROM) and click Next to continue. 4. The Ready to Install the Program window appears. Click Next to continue. 5. As the client software installs a bar appears to show the Status: 72 eco Sensors User Manual 6. When the installation is finished the InstallShield Wizard Completed window appears: Click Finish to exit. 7. When the installation is complete, the eco Sensors Client icon appears on the desktop and in the Start Menu → All Programs → ATEN → eco Sensors Client folder. 73 Chapter 9. Client Logging In Open the eco Sensors Client program by clicking the icon from the desktop or start menu and the Login screen appears: 1. Enter the following information: Server IP: The IP address of the computer running the eco Sensors Server software. Port: Port number of the eco Sensors Master computer. Default is 19999. Username / Password: A username and password created on the eco Sensors Server (see User Management, page 33). 2. Select your language. Options are: English (default); German; Spanish; French; Italian; Japanese; Korean; Portuguese; Russian; Traditional Chinese; or Simplified Chinese. 3. Click Login to bring up the Main Page. 74 eco Sensors User Manual The eco Sensors Client Main Page After you have successfully logged in, the eco Sensors Client Main Page comes up with the Energy Management Dashboard page displayed: Page Components The screen components are described in the table below: No. Item Description 1 Menu Bar The menu bar contains three operational categories: Dash Board, Power Control and Group Control. 2 Dashboard Alert Bar The Dashboard Alert bar is a special feature of the Dashboard page. Similar to the Menu Bar, it contains operational sub-categories that pertain to the item selected in the tab bar, but it also has an extra colorcoded function that allows you to instantly see the category status: RED: Critical ORANGE: Warning GRAY: Offline GREEN: Normal 3 Logout / Monitor Click on the far right button to log out of your eco Sensors session. Click on the Monitor icon to start the real-time Energy Performance Indicator. 4 75 Interactive Display Panel This is your main work area. The screens that appear reflect your menu choices. Chapter 9. Client Dashboard The Dashboard Alert bar is a special feature of the Dashboard page that features color-coded tabs that allows you to instantly see a category’s status: RED: Critical; ORANGE: Warning; GRAY: Offline; GREEN: Normal. Device Sensors The PDU Sensors tab displays collated data in formats that provide an overall view of the various levels being monitored by your sensors. In combination with the four-color dashboard scheme (outlined above), you can easily assess the overall status of the groups/devices at a glance. Threshold Monitor This displays the overall threshold monitoring information. See Device Setup, page 39, for information on setting the thresholds. 76 eco Sensors User Manual Real-time Measurements Hover your mouse over a rack in the display for real-time power measurement and monitoring information, as below: The meanings of the icons are show in the table, below: Icon Device PDU Icon Reading Unit Power Dissipation KWh (Kilowatt-Hour) Power W (Watt) Bank Voltage V (Volt) Current A (Ampere) Sensor Humidity % RH (Relative Humidity) Temperature °C / °F (Celsius / Fahrenheit) Pressure Pa (Pascal) 1 Pa = 1 N/m2 Note: The icons are color-coded so you can instantly see a category’s status: RED: Critical; ORANGE: Warning; GREEN: Normal; GRAY: Offline. 77 Chapter 9. Client Available Power Capacity The Available Power Capacity displays the available power using a standard formula for rack devices: Total Power Capacity (KWh) - Power in Use (KWh) = Available Power Capacity (KWh). The box at the top right corner of the page displays the Average % of available power for all the racks. The Var % uses the formula: Var(X) = E [(X-µ)2] to calculate the variance value of all devices. You can move the mouse over each rack to display the percentage of available power for that rack. The colors represent the available power capacity for each rack displayed in 5% increments. 78 eco Sensors User Manual Overall Rack Cooling Effectiveness This displays the Rack Cooling Index (RCI). RCI is a measure of how effectively equipped racks are cooled and maintained within industry temperature guidelines and standards, and functions as a useful cooling performance metric. In addition to a graphical representation, this page also provides you a ‘Hi” and a “Lo” for quick reference. Overall Rack Humidity Effectiveness This displays the Return Temperature Index (RTI). RTI is a measure of the performance of the air-management system, and functions as a useful airflow performance metric. 79 Chapter 9. Client Overall Rack Pressure Effectiveness This displays the RPI. Overall Rack Airflow Effectiveness This displays the RAI. 80 eco Sensors User Manual Overall Air Management Effectiveness This displays the RTI. Overall Indices Dashboard This displays all five indices (RCI, RHI, RPI, RAI, RTI) for the last hour. 81 Chapter 9. Client Energy Saving Estimation This displays energy savings estimates for Fan Energy (measured/potential) and Chiller Energy (measured/potential/aggressive). Rack Door Status The Rack Door Status displays the open/closed status of each cabinet door installed with an eco Sensors door sensor (EA1440, EA1441 or EA1442). GREEN: Rack Door is Closed. GRAY: No Door Sensor Installed. ORANGE: Rack Door is Open. 82 eco Sensors User Manual Quick View Color Scale The Power Management, Thermal Management, Air Management and Humidity Management tabs use the same color scale, but with different units for each reading. For example, the Heat Load Dissipation page, under the Power Management tab, displays a scale from 0.5–4.5 U kWH per hour, as shown below: For quick view purposes, the racks in the data center are displayed in a color related to their status on the various scales. For example, the racks below are currently registering in the region of 1.5 U kWH for Heat Load Dissipation: Power Management This tab provides detailed real-time information related to Power Management, as outlined in the following sections. Heat Load Dissipation The page displays the real-time Heat Load Dissipation values, the current average and the variance [in kWh]. Detailed readings for Heat Load Dissipation can also be viewed in daily, weekly, monthly, quarterly or yearly formats. The color scale displays a range from 4000–40000 U kWH. Heat Load Density This page displays the real-time Heat Load Density values, the current average and the variance [in W]. The color scale displays a range from 500–4500 W. 83 Chapter 9. Client Thermal Management This tab provides detailed real-time information related to Thermal Management, as outlined in the following sections. Cold Intake Temperature This page displays the real-time Cold Intake Temperature values, the current average and the variance [in °C]. The color scale displays a range from 10–45 °C. Intake Differential Temperature This page displays the real-time Intake Differential Temperature values, the current average and the variance [in °C]. The color scale displays a range from 2–20 °C. Hot Exhaust Temperature This page displays the real-time Hot Exhaust Temperature values, the current average and the variance [in °C]. The color scale displays a range from 2–20 °C. Exhaust Differential Temperature This page displays the real-time Exhaust Differential Temperature values, the current average and the variance [in °C]. The color scale displays a range from 10–45 °C. Cold-Hot Across Temperature Rise This page displays the real-time Cold-Hot Across Temperature Rise values, the current average and the variance [in °C]. The color scale displays a range from 5–55 °C. 84 eco Sensors User Manual Air Management This tab provides detailed real-time information related to Air Management, as outlined in the following sections. Intake Differential Pressure Distribution This page displays the real-time Intake Differential Pressure Distribution values, the current average and the variance [in Pa]. The color scale displays a range from 10–200 Pa. Heat Load Airflow Across Distribution This page displays the real-time Heat Load Airflow Across Distribution values, the current average and the variance [in v_equip (cfm)]. The color scale displays a range from 10–200 cfm. Floor Plenum Airflow Supply Distribution This page displays the real-time Floor Plenum Airflow Supply Distribution values, the current average and the variance [in Q_floor (cfm)]. The color scale displays a range from 500–2500 cfm. Heat Load Airflow Supply Distribution This page displays the real-time Heat Load Airflow Supply Distribution values, the current average and the variance [in Q (cfm)]. The color scale displays a range from 500–2500 cfm. Hot Recirculation/Airflow w Distribution This page displays the real-time Hot Recirculation/Airflow w Distribution values, the current average and the variance [in ∆A_circk (%)]. The color scale displays a range from 10–50 %. Cold Bypass/Airflow Distribution This page displays the real-time Cold Bypass/Airflow Distribution values, the current average and the variance [in ∆A_bypas (%)]. The color scale displays a range from 10–50 %. 85 Chapter 9. Client Humidity Management This tab provides detailed real-time information related to Humidity Management, as outlined in the following sections. Cold Intake Relative Humidity This page displays the real-time Cold Intake Relative Humidity values, the current average and the variance [in h_rel (%)]. The color scale displays a range from 10–90 % Cold Intake Dew Point Temperature This page displays the real-time Cold Intake Dew Point Temperature values, the current average and the variance [in t_dew (C)]. The color scale displays a range from 0–15 °C 86 eco Sensors User Manual Power Control The Power Control tab allows you to perform manual power management at the device or outlet level. Note: Not all NRGence eco PDU PE models support outlet level power management. Please see Supported NRGence Devices, page 5, and your User Manual for further details. Click on the device in the side bar and its page appears, as below: Device Status Use the ON, OFF and Reboot options to manually manage device power. Sensor Status This section is view only and provides status information about the sensors. Outlet Status Use the ON, OFF and Reboot options to manually manage individual outlet power. 87 Chapter 9. Client Group Control The Group Control tab allows you to perform simultaneous manual power management at the outlet level on data groups that you have already created. Note: 1. See Define Data Group, page 47, for details about creating groups for power management control. 2. Not all NRGence models support outlet level power management. Please see Supported NRGence Devices, page 5, and your User Manual for further details. Click on a group in the side bar and its page appears, as below: The Outlets in Group section displays information about how many outlets in the group are controllable or non-controllable. The Power Control section allows to power on, off or reboot all of the controllable outlets in the group simultaneously. The Controllable Outlet Information section displays information about the outlets in the group, such as their power status and device/rack/zone location. 88