1
4-port Router
User’s Manual
Table of Contents
1. INTRODUCTION ................................................................................................................. 1
Package Contents .............................................................................................................. 3
Physical Details .................................................................................................................. 4
2. INSTALLATION .................................................................................................................. 6
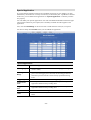
Requirements ..................................................................................................................... 6
Cable Connection .............................................................................................................. 6
3. CONFIGURATION .............................................................................................................. 8
Overview ............................................................................................................................ 8
Configuration Program..................................................................................................... 9
Setup Wizard ................................................................................................................... 11
Status Screen.................................................................................................................... 12
Management Screen ........................................................................................................ 13
Advanced Screen ............................................................................................................. 16
Firewall Screen ................................................................................................................ 26
CHAPTER 4 PC CONFIGURATION................................................................................... 3 5
Overview .......................................................................................................................... 35
Windows Clients .............................................................................................................. 35
APPENDIX A TROUBLESHOOTING .................................................................. 43
Overview .......................................................................................................................... 43
General Problems ............................................................................................................ 43
Internet Access................................................................................................................. 51
APPENDIX B SPECIFICATIONS.......................................................................... 45
General ............................................................................................................................. 45
Environmental ................................................................................................................. 45
Regulatory........................................................................................................................ 45
Physical............................................................................................................................. 45
1. Introduction
This 4-port router is a multi-function device providing the following services:
•
•
Shared Broadband Internet Access for all LAN users.
4-Port Switching Hub for 10BaseT or 100BaseT connections.
Wireless Router Features
The 4-Port Router incorporates many advanced features, carefully designed to provide sophisticated functions while being easy to use.
Internet Access Features
•
Shared Internet Access. All users on the LAN can access the Internet through the
WAN, using only a single external IP Address. The local (invalid) IP Addresses are hidden
from external sources. This process is called NAT (Network Address Translation).
•
DSL & Cable Modem Support. The 4-Port Router has a 10/100BaseT Ethernet port
for connecting a DSL or Cable Modem. All popular DSL and Cable Modems are supported.
•
PPPoE Support. The Internet (WAN port) connection supports PPPoE (PPP over
Ethernet), Unnumbered IP with PPPoE & Multiple PPPoE are also supported.
•
Dynamic IP Address. On the Internet (WAN port) connection, the 4-port Router support Dynamic IP Address (IP Address is allocated on connection) .
Advanced Internet Functions
•
Communication Applications. Support for Internet communication applications, such
as interactive Games, Telephony, and Conferencing applications, which are often difficult
to use when behind a Firewall, is included.
•
Special Internet Applications. Applications which use non-standard connections or
port numbers are normally blocked by the Firewall. The ability to define and allow such
applications is provided, to enable such applications to be used normally.
•
DDNS Support. DDNS (Dynamic DNS) allows Internet users to connect to Virtual
Servers on your LAN using a domain name, even if your IP address is not fixed.
•
DMZ. One PC on your local LAN can be configured to allow unrestricted 2-way communication with Servers or individual users on the Internet.
•
URL Filter. Use the URL Filter to block access to undesirable Web sites by LAN users.
Internet Access Log. See which Internet connections have been made.
•
LAN Features
•
4-Port Switching Hub. The 4-port Router incorporates a 4-port 10/100BaseT switching
hub, making it easy to create or extend your LAN.
•
DHCP Server Support. Dynamic Host Configuration Protocol provides a dynamic IP
address to PCs and other devices upon request. The 4-port Router can act as a DHCP
Server for devices on your local LAN.
Configuration & Management
•
•
Easy Setup. Use your WEB browser from anywhere on the LAN for configuration.
Remote Management. The 4-port
-1-
•
Router can be managed from any PC on your LAN. And, if the Internet connection exists,
it can also (optionally) be configured via the Internet.
•
Network Diagnostics. You can use the 4-port Router to perform a Ping.
UPnP Support. UPnP (Universal Plug and Play) allows automatic discovery and con-
•
figuration of the 4-port Router. UPnP is by supported by Windows ME, XP, or later.
Security Features
•
Password - protected Configuration. Optional password protection is provided to
prevent unauthorized users from modifying the configuration data and settings.
•
•
NAT Protection. An intrinsic side effect of NAT (Network Address Translation) technology is that by allowing all LAN users to share a single IP address, the location and even
the existence of each PC is hidden. From the external viewpoint, there is no network, only a
single device - the 4-port Router.
•
Protection against DoS attacks. DoS (Denial of Service) attacks can flood your
Internet connection with invalid packets and connection requests, using so much bandwidth
and so many resources that Internet access becomes unavailable. The 4-port Router incorporates protection against DoS attacks.
-2-
Package Contents
The following items should be included:
•
The 4-port Router Unit
•
Power Adapter DC 7.5V/2A
•
Quick Installation Guide
•
CD-ROM containing the on-line manual and QIG.
If any of the above items are damaged or missing, please contact your dealer immediately.
-3-
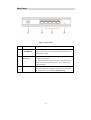
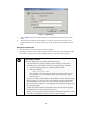
Physical Details
Front-mounted LEDs
Figure 1: Front Panel
c
Power LED
On - Power on.
Off - No power.
d~
g
LAN LEDs
h
WAN LED
On - Corresponding LAN (hub) port has Ethernet connection.
Off - Corresponding LAN (hub) port has no Ethernet connection.
On - Connection to the Broadband Modem attached to the
WAN (Internet) port is established.
Off - No connection to the Broadband Modem.
Flashing - Data is being transmitted or received via the WAN
port.
-4-
Rear Panel
Figure 2: Rear Panel
1
Power port
Connect the supplied power adapter here.
2
Internet port
(10/100BaseT)
Connect a DSL or Cable Modem here. If your modem
came with a cable, use the supplied cable. Otherwise, use a
standard LAN cable.
3
10/100BaseT
LAN port
Use standard LAN cables (RJ45 connectors) to connect
your PCs to these ports.
If required, any port can be connected to another hub. Any
LAN port will automatically function as an "Uplink" port
when necessary.
4
Reset button
Press this button and release it to reboot this device.
Press this button for 3 seconds and release it to reboot this
device and reset it to the factory default setting.
-5-
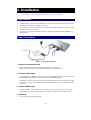
2. Installation
This Chapter covers the physical installation of the 4-port Router.
Requirements
•
Network cables. Use standard 10/100BaseT network (UTP) cables with RJ45 connectors.
•
TCP/IP protocol must be installed on all PCs.
•
For Internet Access, an Internet Access account with an ISP, and either of a DSL or Cable
modem (for WAN port usage)
•
To use the 4-port Router, all Wireless devices must be compliant with the IEEE802.11g
specifications.
Cable Connection
Figure 3: Installation Diagram
1. Choose an Installation Site
Select a suitable place on the network to install the 4-port Router.
Ensure the 4-port Router and the DSL/Cable modem are powered OFF.
2. Connect LAN Cables
Use standard LAN cables to connect PCs to the Switching Hub ports on the 4-port Router.
Both 10BaseT and 100BaseT connections can be used simultaneously.
If required, connect any port to a normal port on another Hub, using a standard LAN cable.
Any LAN port on the 4-port Router will automatically function as an "Uplink" port when
required.
3. Connect WAN Cable
Connect the DSL or Cable modem to the WAN port on the 4-port Router. Use the cable
supplied with your DSL/Cable modem. If no cable was supplied, use a standard cable.
4. Power Up
•
Power on the Cable or DSL modem.
-6-
•
Connect the supplied power adapter to the 4-port Router and power up.
Use only the power adapter provided. Using a different one may cause hardware damage
5. Check the LEDs
•
The Power LED should be ON.
•
For each LAN (PC) connection, the LAN LED should flash (provided the PC is also ON.)
•
The WAN LED should be ON.
-7-
3. Configuration
This Chapter provides Setup details of the 4-port Router.
Overview
This chapter describes the setup procedure for:
•
Internet Access
•
Management ( user account/ password, Network Time Protocol, firmware)
•
Advanced Setup (PPPoE, DHCP, UPnP, Dynamic DNS, Access Control, Server Port,
special application, DMZ, URL Filter, Ping, DoS, UDP Block, ALG, Static Router, and
EventLog)
PCs on your local LAN may also require configuration. For details, see Chapter 4 - PC Configuration.
-8-
Configuration Program
•
The 4-port Router contains an HTTP server. This enables you to connect the router, and
configure it by using your web browser.
Preparation
Before attempting to configure the 4-port Router, please ensure that:
•
Your PC can establish a physical connection to the 4-port Router. The PC and the 4-port
Router must be directly connected (using the Hub ports on the 4-port Router) or on the
same LAN segment.
•
The 4-port Router must be installed and powered ON.
•
If the 4-port Router's default IP Address (192.168.1.254) is already used by another device,
the other device must be turned OFF until the 4-port Router is allocated a new IP Address
during configuration.
Using UPnP
If your Windows system supports UPnP, an icon for the 4-port Router will appear in the system
tray, notifying you that a new network device has been found, and offering to create a new
desktop shortcut to the newly-discovered device.
•
Unless you intend to change the IP Address of the 4-port Router, you can accept the
desktop shortcut.
•
Whether you accept the desktop shortcut or not, you can always find UPnP devices in My
Network Places (previously called Network Neighborhood).
•
Double click the icon for the 4-port Router (either on the Desktop, or in My Network
Places) to start the configuration.
Using your Web Browser
To establish a connection from your PC to the 4-port Router:
1. After installing the 4-port Router in your LAN, start your PC. If your PC is already running,
restart it.
2. Start your WEB browser.
3. In the Address box, enter "HTTP://" and the IP Address of the 4-port Router, as in this
example, which uses the 4-port Router's default IP Address:
HTTP://192.168.1.254
-9-
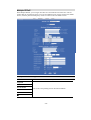
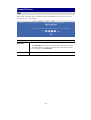
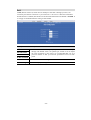
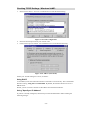
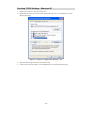
Figure 4: Login Dialog
1.
2.
Type “admin” into the User Name field, as set on the Enter Network Password screen
above.
Enter the password for the 4-port Router, as set on the Password screen above. If no
password has been set (or the first time entry), leave the Password field blank and enter
OK.
Navigation & Data Input
•
Use the menu bar on the top of the screen for navigation.
•
Changing to another screen without clicking "Save" does NOT save any changes you may
have made. You must "Save" before changing screens or your data will be ignored.
L
If you can't connect
If the 4-port Router does not respond, check the following:
•
The 4-port Router is properly installed, LAN connection is OK, and it is
powered ON. You can test the connection by using the "Ping" command:
•
Open the MS-DOS window or command prompt window.
•
Enter the command:
ping 192.168.1.254
If no response is received, either the connection is not working, or your
PC's IP address is not compatible with the 4-port Router's IP Address.
(See next item.)
•
If your PC is using a fixed IP Address, its IP Address must be within the range
from 192.168.1.1 to 192.168.1.253 to be compatible with the 4-port Router's
default IP Address of 192.168.1.254. Also, the Network Mask must be set to
255.255.255.0. See Chapter 4 - PC Configuration for details on checking your
PC's TCP/IP settings.
•
Ensure that your PC and the 4-port Router are on the same network segment.
(If you don't have a router, this must be the case.)
•
Ensure you are using the wired LAN interface. The Wireless interface can only
be used if its configuration matches your PC's wireless settings.
- 10 -
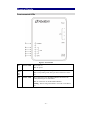
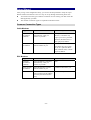
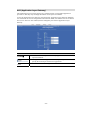
Setup Wizard
After you log in the configuration utility, you can use the Setup Wizard to setup the 4-port
Router and have the Internet access in a snap. To set up through the Wizard, please note:
z
You need to know the type of Internet connection service used by your ISP. Check the
data supplied by your ISP.
z
The common connection types are explained in the tables below.
Common Connection Types
Cable Modems
Type
Details
ISP Data required
Dynamic
IP Address
(DHCP)
Your IP Address is allocated
automatically, when you
connect to you ISP.
Usually, none.
Static (Fixed)
IP Address
Your ISP allocates a permanent IP Address to you.
IP Address allocated to you.
Type
Details
ISP Data required
Dynamic
IP Address
(DHCP)
Your IP Address is allocated
automatically, when you
connect to you ISP.
None.
Static (Fixed)
IP Address
Your ISP allocates a permanent IP Address to you.
IP Address allocated to you.
PPPoE
You connect to the ISP only
when required. The IP address
is usually allocated automatically.
User name and password.
However, some ISP's may
require you to use a particular
Hostname, Domain name, or
MAC (physical) address.
Some ISP's may also require
you to use a particular Hostname, Domain name, or MAC
(physical) address.
DSL Modems
- 11 -
Status Screen
Use the Status link on the main menu to view this screen.
- 12 -
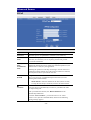
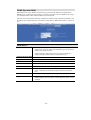
Management Screen
In the Management screen, you can:
z
change the user account and its password for managing this device;
z
enter your time zone and NTP ( network time protocol) servers;
z
upgrade the firmware of this device.
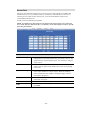
User management
The default user account for managing this device is admin, password is not required. It is
recommended that you change this default setting to other to have better protection of the
settings saved in this4-port router.
User Management
Account
•
Enter the user name for managing this device. Maximum Input is
15 alphanumeric characters.
Password
•
Enter the password. Maximum Input is 15 alphanumeric characters.
Confirm
•
Re-enter the password to confirm.
- 13 -
Time Zone Management
You can set your system time according to your time zone. Click ▼ to select your Time zone.
Time Zone Management
Time Zone
•
Click the down arrow d to select your time zone.
NTP Server #
•
You can enter the Internet addresses of three NTP (Network
Time Protocol) Servers for your system to synchronize with.
- 14 -
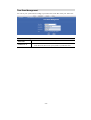
Firmware Management
The firmware (software) in the 4-port Router can be upgraded by using your Web Browser.
Firmware Management
•
You must first download the upgrade file to your PC, then enter
the file name with the right path in the field or click Browse to
direct to the file location.
•
Press Update when file has been uploaded and directed.
Factory Default
•
Press to restore the 4-port Router to its factory default settings.
System Restart
•
Press to reboot this 4-port Router.
Firmware Update
- 15 -
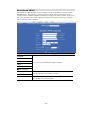
Advanced Screen
PPPoE
PPPoE
Login ID
Maximum input is 32 alphanumeric characters (case sensitive).
Password
Maximum input is 32 alphanumeric characters (case sensitive).
Service
Name
For identification purpose. Maximum input is 32 alphanumeric
characters (case sensitive). If it is required, your ISP will provide
you with the information.
MTU (Maximum
Transmission
Unit)
Dial on
demand
Click the down arrow to select the most appropriate MTU
(Maximum Transmission Unit, namely the maximum packet size, the
default value is 1492) for your application.
Reducing the packet size can help connecting to certain web sites or
speeding up packet transfer rate. If the incorrect selection is entered,
you may not be able to open certain web sites.
Configure this device to disconnect the PPPoE connection when
there is no activity for a predetermined period of time (set in the
following Silent timeout field).
~Autoreconnect
Silent timeout : Enter the number for the time (unit is second)
To keep the line always connected, set 0 for the silent timeout.
Check to enable auto-reconnected with PPPoE line. This function
allows the device to automatically reconnect to your ISP when there
is a request being sent.
When you enable this function, the “Dial on demand” will be
automatically enabled too.
To enable “Auto-reconnect”, you will also have to set “silent
timeout” to 0 or just leave the field blank, otherwise the following
warning message appears.
- 16 -
- 17 -
Unnumbered PPPoE
The unnumbered PPPoE enables users to configure a range of IP addresses but only need to
dial PPPoE once. When an IP is received at gateway, driver uses the netmask (previously
configured in the unnumbered PPPoE web page) to configure the subnet to ASIC. At the server
side, users must delete the corresponding host route and add a new network route so packets
can be correctly routed to gateway.
Unnumbered PPPoE
Login ID
Password
Service Name
MTU
Refer to the corresponding description for PPPoE.
Dial on demand
~Auto-reconnect
IP Address
Subnet Mask
NAPT
Enter the information provided by your ISP.
Check to enable the NAPT function so that LAN can use one
set of IP address for internal traffic.
- 18 -
Multiple PPPoE
With Multiple PPPoE, you can logon two ISPs for concurrent Internet connection. The all
packets that do not match the policy set in the non-default session will be routed to the default
session, whereas packets match policy routes are routed to the non-default session.
Multiple PPPoE 0 Configuration
Default
Click the down arrow b to select your default session
Login ID
Password
Service Name
MTU
Refer to the corresponding section described in PPPoE.
Dial on demand
~Auto-reconnect
- 19 -
Multiple PPPoE 1 Configuration
Login ID
Password
Service Name
MTU
Refer to the corresponding section described in PPPoE.
Dial on demand
~Auto-reconnect
LAN Type
Unnumbered IP
Address
Unnumbered
Subnet Mask
Destination
Network 1~4
Click the down arrow b to select using Unnumbered or
NAPT.
Provided by your ISP. Required only when you select Unnumbered to be your LAN type.
These fields are valid only when you select NAPT to be your
LAN type.
None: No policy has been set for this session, which means
all packets to all ports or domains are allowed to take this
session when the default PPPoE (PPPoE 0) fails. Note that
when the default session is functioning, all packets will be
routed to default session.
Port Range: you can set a single port or use a hyphen to set
a range of ports for policy, e.g. if you enter 80-90 in this
field, it means all packets with destination to port 80-90 will
be routed to this non-default session. .
Domain: you can set one single domain name for policy, e.g.
if you enter yahoo.com in this field, it means all packets with
destination to yahoo.com will be routed to this non-default
session.
UDP port : you can set one single UDP or use a hyphen to
set a range of UDP ports for policy.
TCP port: you can set one single TCP or use a hyphen to set
a range of TCP ports for policy.
- 20 -
DHCP
A DHCP (Dynamic Host Configuration Protocol) Server allocates a valid IP address to a
DHCP Client (PC or device) upon request.
DHCP Server
•
You can set to distribute IP address to local PCs by enabling this
function.
•
The range of IP addresses (from Start IP to End IP) decides the number of clients allowed for the assigned IP addresses. Note that all the
PCs on the same LAN should use the same subnet Mask.
Save
•
Press to save the new settings on the screen.
Undo
•
Press to discard the data you have entered since last time you press
Save.
DHCP Server
Status
DHCP Server IP
Pool Start IP
DHCP Server IP
Pool End IP
- 21 -
UPnP
If your Windows system supports UPnP, and when UPnP is enabled, an icon for the 4-port
Router will appear in the system tray, notifying you that a new network device has been found,
and offering to create a new desktop shortcut to the newly-discovered device.
UPnP
UPnP Service
•
Check the box to enable the service.
- 22 -
DDNS (Dynamic DNS)
With DDNS, this 4-port Router will ensure that your current IP Address is recorded at the
DDNS server, so that users will be able to connect to your Server Port (or DMZ PC) by using
your Domain Name (URL) rather IP address over the Internet.
This also solves the problem of having a dynamic IP address. With a dynamic IP address, your
IP address may change whenever you connect, which makes it difficult for others to connect to
you.
DDNS Service
DDNS Service
•
This 4-port Router provides two DDNS servers for the dynamic
DNS service. You can select from DynDNS.org or No-IP.com as
listed in the pull-down menu.
•
After registration, follow the service provider's procedure to
request a Domain Name and have it allocated to you.
Enable Dynamic DNS •
The DDNS function will only work when this is checked.
Login (User Name)
•
Enter your Username for the DDNS Service.
Password
•
Enter your current password for the DDNS Service.
Confirm
•
Re-enter your password for confirmation.
Domain name
•
Enter the host name of DDNS, e.g. myname.dyndns.org.
Update Interval
•
Enter the time interval that the DDNS will update your host
name. Valid interval is within the range from 30 to 4320 minutes.
Result
•
Messages for updating IP replied by your DDNS server.
Apply
•
Press to save the new settings on the screen, and to start the
DDNS updating when the above “Enable Dynamic DNS” is also
checked.
- 23 -
Server Port
The Server Port function enables users to set a local server with specific port number that
stands for the service (e.g. web(80), FTP(21), Telnet(23)). When this device receives an
incoming access request for this specific port, it will be forwarded the request to the
corresponding internal server.
Virtual servers are added by port number.
NOTE: To enable Server Port is like to open the firewall, which exposes your network to
users on the Internet, that means the 4-port Router’s NAT will no longer be able to provide
protection from hackers.
Server Port
WAN Port Range
•
Enter the port number that is used for Internet application, for
example port 21 is usually used for ftp, port 80 for www, etc. For
applications that require multiple ports, you will have to assign a
range of ports.
Server IP address
•
This is the destination IP address that the wireless router will
redirect service request from outside users to the corresponding
local server.
Server Port Range
•
Enter the port number that you want to set for server port. This
can be a port number or a range of ports. When an incoming
packet matches the port number or within the range, it will be
forwarded to the port(s).
Port Type
•
Select the port type (TCP or UDP) for the port number that was
entered for server port.
Save
•
Press to save the new settings on the screen.
Undo
•
Press to discard the data you have entered since last time you
press Save.
- 24 -
Special Application
If you use Internet applications that use non-standard connections or port numbers, you may
find that they do not function correctly because they are blocked by the 4-portRouter's firewall.
In this case, you can define those applications as "Special Application" so that they can function properly.
You can define your Special Applications. You will need detailed information about the application such as number of port required; this is normally available from the supplier of the
application.
Also, note that "Incoming" on this screen refer to traffic from the client (PC) viewpoint.
You have to firstly check Enable before you can add/edit an application.
Special Applications
Name
•
Enter the application name.
Incoming Type
•
Click the down arrow b to select the incoming application type
(TCP or UDP)
Incoming Port
Range
•
Enter one or more set(s) of port number range as the incoming
ports. Once the trigger port is detected, the incoming packets are
allowed to pass the firewall to these already specified Incoming
Ports.
Trigger Type
•
Click the down arrow b to select the trigger type (TCP or UDP)
Trigger Start
Port
•
Enter a port number as the starting outbound port for the special
application defined in the preceding field.
Trigger Finish
Port
•
Enter a port number as the ending outbound port for the special
application defined in the preceding field.
Save
•
Press to save the new settings on the screen.
Undo
•
Press to discard the data you have entered since last time you press
Save.
- 25 -
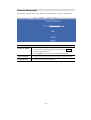
Firewall Screen
DMZ
This feature, if enabled, allows the DMZ computer (the DMZ Host) on your LAN to be exposed to all users on the Internet.
Special Applications
DMZ Host
Save
•
This allows almost any application to be used on the "DMZ Host".
•
The "DMZ Host" will receive all "Unknown" connections and data.
•
If the DMZ feature is enabled, you must enter the IP Address of this
PC to be used as the "DMZ Host".
•
Press to save the new settings on the screen.
- 26 -
ACL
The Access Control allows administrators to restrict the level of Internet access available for
PCs on your LAN. PCs with their IP addresses listed will be restricted to the Internet access
with this function being enabled; or certain Internet services with their IP and ports listed will
be blocked. With the default settings, everyone has unrestricted to the Internet access.
From the policy field you can click the down arrow bto select with or without log. If you select
to have log recorded, you can press “View ACL Log” to list all attempted Internet accesses that
have been blocked by the Access Control function. This will be useful for trouble-shooting or
for managing purpose.
Access Control
Policy
You can click the down arrow bto select with or without log record.
If you select to have log, you can press “View ACL Log” below to
display all activities that have been blocked.
Direction
ACL Topology:
•
Outbound, Destination IP/Port: Outbound packets (packets
from this wireless router to WAN) that are sent to the destination
IP and port will be blocked.
Example:
Consequence:
192.168.2.2
²
192.168.2.3
²
192.168.2.2
192.168.2.2
- 27 -
10.0.0.1 (port: 80)
10.0.0.1 (port: 80)
10.0.0.2
10.0.0.2
•
Inbound, Destination IP/Port: Inbound packets (packets from
LAN to this wireless router) that are sent to the destination IP and
port will be blocked.
Example:
Consequence:
192.168.2.2
²
192.168.2.2
192.168.2.3
10.0.0.2
²
192.168.2.3
•
10.0.0.1 (21)
10.0.0.2
Outbound, Source IP/Port: Outbound packets (packets from
this 4-port router to WAN) will be blocked. Note that the IP address given in this illustration (10.0.0.254) is the WAN IP of this
wireless router.
Example:
Consequence:
192.168.2.2
192.168.2.2
192.168.2.3
192.168.2.3
•
10.0.0.1(21)
²
²
²
²
10.0.0.1
10.0.0.2
10.0.0.1
10.0.0.2
Inbound, Source IP/Port: Inbound packets (packets from LAN
to this wireless router) that are sent from the source IP will be
blocked.
Example:
Consequence:
192.168.2.2
²
192.168.2.2
²
192.168.2.3
192.168.2.3
10.0.0.1
10.0.0.2
10.0.0.1
10.0.0.2
IP
•
Enter the IP address that you want to block.
Type
•
Enter the port type (TCP, UDP or IP) for the port number that
was entered in the previous field.
Port
•
Enter the port number to or from which you want to block
activities.
- 28 -
URL Filter
The URL Filter allows you to block access to undesirable Web site(s).
URL Filter
Filter String
•
To use this feature, you must enable and then enter String(s) that you
define to be filtered. If the "Filter String" appears in a requested URL,
the request will be blocked.
Save
•
Press to save the new settings on the screen.
View URL Filter •
Log
Press to display URL Filter log events.
- 29 -
Ping
This screen allows you to perform a "Ping". The response messages that will appear below
can be useful in diagnosing network problems.
Ping
Ping Address/
Host name
•
Enter the IP address or domain name that you want to ping.
- 30 -
DoS
A DoS (Denial of Service) attack does not attempt to steal data or damage your PCs, but
overloads your Internet connection so you cannot use it - the service is therefore unavailable.
If DoS function is enabled, DoS attacks will be detected and blocked. The default is unabled. It
is strongly recommended that this setting be left enabled.
DoS (Denial of Service )
SYN Threshold
•
Set the threshold for the frequency of packets that are allowed to pass
through. The default value is 50 packets per seconds. You can adjust
the value according to your need. It is recommended that you set a
practical number so that your network performance won’t be hampered.
Save
•
Press to save the new settings on the screen.
View DoS log
•
Press to display DoS log events.
FIN Threshold
UDP Threshold
ICMP Threshold
- 31 -
ALG (Application Layer Gateway)
The application layer serves the purpose of a window between correspondent application
processes so that they may exchange information on the open environment.
To use the Application Layer Gateway, the appropriate Application Layer Gateway definition
was selected in the service configuration item. Network traffic, that matches the service definition (service has to be also enabled) will be managed by the selected Application Layer
Gateway.
ALG
Enable
Save
•
Check to enable the specified two-ways applications to work in this
open environment.
•
For applications that support multi-users, e.g. FTP, you will have to
specify the local IP port used for this application.
•
Press to save the new settings on the screen.
- 32 -
Static Route
If you connect several routers with this 4-port
Router, you may need to set up a predefined routing rule to have more effective network
topology/traffic, this is called static route between those routers and the 4-port Router.
To set static routers, enter the settings including route IP address, route mask route gateway the route Interface from LAN or WAN.
Static Route
Route
•
The network address of the destination LAN segment. When a packet
with destination IP address that matches to this field, it will route to the
device set in the Route Gateway field (see below).
Route Mask
•
The network mask for the destination LAN segment. For standard
class “C” LAN, the default mask is 255.255.255.0.
Route Gateway
•
The IP address of the gateway where packets are routed.
Route Interface
•
You can select to use LAN or WAN as the physical interface from
where the packets will be sent.
Save
•
Press to save the new settings on the screen.
Undo
•
Press to discard the data you have entered since last time you press
Save.
- 33 -
Eventlog
Event Logs records various types of activities on the 4-port Router. This data is useful for
troubleshooting, but enabling all logs will generate a large amount of data and adversely affect
performance.
Event Log
System Log
Check the box to enable this function.
Apply
Press to immediately generate the log events.
- 34 -
Chapter 4
PC Configuration
This Chapter details the PC Configuration required on the local ("Internal")
LAN.
Overview
For each PC, the following may need to be configured:
•
TCP/IP network settings
•
Internet Access configuration
Windows Clients
This section describes how to configure Windows clients for Internet access via the Wireless
Router.
The first step is to check the PC's TCP/IP settings.
The 4-port Router uses the TCP/IP network protocol for all functions, so it is essential that the
TCP/IP protocol be installed and configured on each PC.
TCP/IP Settings - Overview
If using the default 4-port Router settings, and the default Windows
TCP/IP settings, no changes need to be made.
•
By default, the 4-port Router will act as a DHCP Server, automatically providing a suitable
IP Address (and related information) to each PC when the PC boots.
•
For all non-Server versions of Windows, the default TCP/IP setting is to act as a DHCP
client.
If using a Fixed (specified) IP address, the following changes are required:
•
The Gateway must be set to the IP address of the 4-port Router
•
The DNS should be set to the address provided by your ISP.
L
If your LAN has a Router, the LAN Administrator must reconfigure the Router itself.
- 35 -
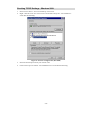
Checking TCP/IP Settings - Windows 9x/ME:
1.
Select Control Panel - Network. You should see a screen like the following:
2.
3.
Figure 5: Network Configuration
Select the TCP/IP protocol for your network card.
Click on the Properties button. You should then see a screen like the following.
Figure 6: IP Address (Win 95/98)
Ensure your TCP/IP settings are correct, as follows:
Using DHCP
To use DHCP, select the radio button Obtain an IP Address automatically. This is the default
Windows setting. Using this is recommended. By default, the Wireless Router will act as a
DHCP Server.
Restart your PC to ensure it obtains an IP Address from the Wireless Router.
Using "Specify an IP Address"
If your PC is already configured, check with your network administrator before making the
following changes:
- 36 -
•
On the Gateway tab, enter the 4-port Router's IP address in the New Gateway field and
click Add, as shown below. Your LAN administrator can advise you of the IP Address they
assigned to the 4-port Router.
Figure 7: Gateway Tab (Win 95/98)
•
On the DNS Configuration tab, ensure Enable DNS is selected. If the DNS Server Search
Order list is empty, enter the DNS address provided by your ISP in the fields beside the
Add button, then click Add.
Figure 8: DNS Tab (Win 95/98)
- 37 -
Checking TCP/IP Settings - Windows 2000:
1.
2.
Select Control Panel - Network and Dial-up Connection.
Right - click the Local Area Connection icon and select Properties. You should see a
screen like the following:
Figure 9: Network Configuration (Win 2000)
3.
4.
Select the TCP/IP protocol for your network card.
Click on the Properties button. You should then see a screen like the following.
- 38 -
Figure 10: TCP/IP Properties (Win 2000)
5.
Ensure your TCP/IP settings are correct, as described below.
Using DHCP
To use DHCP, select the radio button Obtain an IP Address automatically. This is the default
Windows setting. Using this is recommended. By default, the 4-port Router will act as a
DHCP Server.
Restart your PC to ensure it obtains an IP Address from the 4-port Router.
Using a fixed IP Address ("Use the following IP Address")
If your PC is already configured, check with your network administrator before making the
following changes.
•
Enter the 4-port Router's IP address in the Default gateway field and click OK. (Your LAN
administrator can advise you of the IP Address they assigned to the 4-port Router.)
•
If the DNS Server fields are empty, select Use the following DNS server addresses, and
enter the DNS address or addresses provided by your ISP, then click OK.
- 39 -
Checking TCP/IP Settings - Windows XP
1.
2.
Select Control Panel - Network Connection.
Right click the Local Area Connection and choose Properties. You should see a screen
like the following:
Figure 11: Network Configuration (Windows XP)
3.
4.
Select the TCP/IP protocol for your network card.
Click on the Properties button. You should then see a screen like the following.
- 40 -
Figure 12: TCP/IP Properties (Windows XP)
5.
Ensure your TCP/IP settings are correct.
Using DHCP
To use DHCP, select the radio button Obtain an IP Address automatically. This is the default
Windows setting. Using this is recommended. By default, the 4-port Router will act as a
DHCP Server.
Restart your PC to ensure it obtains an IP Address from the 4-port Router.
Using a fixed IP Address ("Use the following IP Address")
If your PC is already configured, check with your network administrator before making the
following changes.
•
In the Default gateway field, enter the 4-port Router's IP address and click OK. Your LAN
administrator can advise you of the IP Address they assigned to the 4-port Router.
•
If the DNS Server fields are empty, select Use the following DNS server addresses, and
enter the DNS address or addresses provided by your ISP, then click OK.
- 41 -
Internet Access
To configure your PCs to use the4-port Router for Internet access:
•
Ensure that the DSL modem, Cable modem, or other permanent connection is functional.
•
Use the following procedure to configure your Browser to access the Internet via the LAN,
rather than by a Dial-up connection.
For Windows 9x/ME/2000
1. Select Start Menu - Settings - Control Panel - Internet Options.
2. Select the Connection tab, and click the Setup button.
3. Select "I want to set up my Internet connection manually, or I want to connect through a
local area network (LAN)" and click Next.
4. Select "I connect through a local area network (LAN)" and click Next.
5. Ensure all of the boxes on the following Local area network Internet Configuration screen
are unchecked.
6. Check the "No" option when prompted "Do you want to set up an Internet mail account
now?".
7. Click Finish to close the Internet Connection Wizard.
Setup is now completed.
For Windows XP
1. Select Start Menu - Control Panel - Network and Internet Connections.
2. Select Set up or change your Internet Connection.
3. Select the Connection tab, and click the Setup button.
4. Cancel the pop-up "Location Information" screen.
5. Click Next on the "New Connection Wizard" screen.
6. Select "Connect to the Internet" and click Next.
7. Select "Set up my connection manually" and click Next.
8. Check "Connect using a broadband connection that is always on" and click Next.
9. Click Finish to close the New Connection Wizard.
Setup is now completed.
Accessing AOL
To access AOL (America On Line) through the 4-port Router, the AOL for Windows software
must be configured to use TCP/IP network access, rather than a dial-up connection. The configuration process is as follows:
•
Start the AOL for Windows communication software. Ensure that it is Version 2.5, 3.0 or
later. This procedure will not work with earlier versions.
•
Click the Setup button.
•
Select Create Location, and change the location name from "New Locality" to "4-port
Router".
•
Click Edit Location. Select TCP/IP for the Network field. (Leave the Phone Number blank.)
•
Click Save, then OK.
Configuration is now complete.
•
Before clicking "Sign On", always ensure that you are using the "4-port Router" location.
- 42 -
Appendix A
Troubleshooting
This Appendix covers the most likely problems and their solutions.
Overview
This chapter covers some common problems that may be encountered while using the 4-port
Router and some possible solutions to them. If you follow the suggested steps and the 4-port
Router still does not function properly, contact your dealer for further advice.
General Problems
Problem 1:
Can't connect to the 4-port Router to configure it.
Solution 1:
Check the following:
•
The 4-port Router is properly installed, LAN connections are OK, and it
is powered ON.
•
Ensure that your PC and the 4-port Router are on the same network
segment. (If you don't have a router, this must be the case.)
•
If your PC is set to "Obtain an IP Address automatically" (DHCP
client), restart it.
•
If your PC uses a Fixed (Static) IP address, ensure that it is using an IP
Address within the range 192.168.1.1 to 192.168.1.253 and thus compatible with the 4-port Router's default IP Address of 192.168.1.254.
Also, the Network Mask should be set to 255.255.255.0 to match the 4port Router.
In Windows, you can check these settings by using Control PanelNetwork to check the Properties for the TCP/IP protocol.
Internet Access
Problem 1:
When I enter a URL or IP address I get a time out error.
Solution 1:
A number of things could be causing this. Try the following troubleshooting
steps.
Problem 2:
•
Check if other PCs work. If they do, ensure that your PCs IP settings are
correct. If using a Fixed (Static) IP Address, check the Network Mask,
Default gateway and DNS as well as the IP Address.
•
If the PCs are configured correctly, but still not working, check the 4port Router. Ensure that it is connected and ON. Connect to it and check
its settings. (If you can't connect to it, check the LAN and power connections.)
•
If the 4-port Router is configured correctly, check your Internet connection (DSL/Cable modem etc) to see that it is working correctly.
Some applications do not run properly when using the 4-port Router.
- 43 -
Solution 2:
The 4-port Router processes the data passing through it, so it is not transparent.
Use the Special Applications feature to allow the use of Internet applications
which do not function correctly.
If this does solve the problem you can use the DMZ function. This should
work with almost every application, but:
•
It is a security risk, since the firewall is disabled.
•
Only one (1) PC can use this feature.
- 44 -
Appendix B
Specifications
General
Standards
Firewall /Alert
NAT, DoS (Denial of Service), Access Control
Management
Web-based management, Remote Management
Network Interface
5 Ethernet:
4 * 10/100BaseT (RJ45) LAN connection
1 * 10/100BaseT (RJ45) for WAN
Supported Protocols
TCP/IP, PPPoE/Multi-PPPoE, DHCP (client), NTP (Network
Time Protocol), DNS Relay, DDNS
Functions
Exposed Host (DMZ), MAC Address authentication, URL
Content Filtering, Ping, Server Port, ALG
Applications
Dynamic DNS, UPnP, Special Internet Applications, DMZ
Host, Dial-on-Demand and Auto-Disconnect
Firmware Upgrade
HTTP, TFTP download or proprietary network protocol
download
LED Indicators
7 LEDs (Power, WAN, 4 x LAN)
Power Adapter
7.5 V, 2A (DC External)
Environmental
Operating Temperature
-5° C to 55° C
Storage Temperature
-20° C to 70° C
Regulatory
EMI/RFI
FCC Class B, CE, TELEC
Physical
Dimensions
141mm(W) * 100mm(D) * 27mm(H)
Weight
235g
- 45 -