1
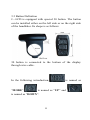
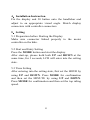
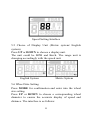
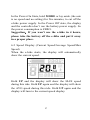
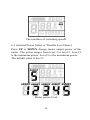
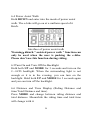
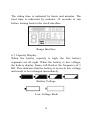
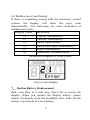
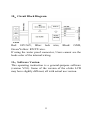
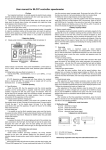
MOUNTAIN BIKE
OWNERS MANUAL
Contents
1、Preface …………………………………………….18
2、Appearance and Size……………………………….19
2.1 Material and color……………………………19
2.2 Display Size and Installation Size …………19
3、Function Summary and Button Definition …………20
3.1 Brief Introduction of User Setting………… 20
3.2 Normal Display Area ………………………20
3.3 Button definition…………………………..…21
4、Installation Instruction……………………………..22
5、Setting …………………………...………………….22
5.1 Preparation before Starting the Display………22
5.2 Start and Entry Setting ...…………………… 22
5.3 Time Setting ………………………………….22
5.4 Top-speed Setting……………………………23
5.5 Choice of Display Unit……………………… 24
5.6 Wheel Size Setting …………………….. 24
5.7 Backlight Brightness Setting………………... 25
5.8 Exit Setting…..……………………………...25
6、Normal Operation…………………………………..25
6.1 Power ON/OFF………………………………25
6.2 Speed Display (Current Speed/Average
Speed/Max Speed) …………………………...26
6.3 Assisted Power Select or Throttle Level
Select………………………….……….. 27
6.4 Power Assist Walk………… ………………...28
16
6.5 Turn On and Turn Off the backlight……28
6.6 Distance Display (Riding Distance and
Time/Total Distance Time) ……………….….28
6.7 Battery Capacity Display………………………29
6.8 Malfunction Code Display …………………...30
7、Button Battery Replacement…………….……….30
8、FAQ Answers……………………………………31
9、Quality Warranty……………………….………..31
10、Circuit Block Diagram….......................................32
11、Software Version ………………………………32
17
1、Preface
Dear users,
To ensure better performance of your e-bike, please read
through the J-LCD product introduction carefully before
using it. We will use the most concise words to inform
you of all the details (including hardware installation,
setting and normal use of the display)when using our
display. Meanwhile, the introduction will also help you
solve possible confusion and malfunctions.
18
2、Outlook and Size
2.1 Material and Color
J—LCD products are made of black PC material. Under
the temperature of -20 to 60℃, the shell material can
ensure normal usage and good mechanical performance
of the products.
2.2 Display Size and Installation Size(Unit:mm)
19
3、Function Summary and Button Definition
3.1 Brief Introduction of User Setting
J—LCD user settings include local time setting, top
riding speed setting, metric system/English system setting
(MPH and Km/H,Mile and Km),wheel size setting
(18—28inch), LCD backlight brightness setting.
3.2 Normal Display Area
J—LCD displays battery capacity, time, motor power
ratio, riding speed, riding distance, 6Km/h power assist
walk, and malfunction code of the electronic control
system.
20
21
3.3 Button Definition
J—LCD is equipped with special 30 button. The button
can be installed either on the left side or on the right side
of the handlebar. Its shape is as follows:
30 button is connected to the bottom of the display
through wire cable.
In the following introduction,
“MODE”.
is named as
is named as “UP” and
is named as “DOWN”.
22
4、Installation Instruction
Fix the display and 30 button onto the handlebar and
adjust to an appropriate visual angle. Match display
connectors with controller connectors.
5、Setting
5.1 Preparation before Starting the Display
Make sure connector linked properly to the motor
controller on the bike.
5.2 Start and Entry Setting
Press the MODE button and start the display.
After start-up, please hold both UP and DOWN at the
same time, for 3 seconds, LCD will enter into the setting
state.
5.3 Time Setting
After entering into the setting state, first set the HOUR by
using UP and DOWN. Press MODE for confirmation
and then set the MINUTE by using UP and DOWN.
Press MODE for confirmation and then set the top riding
speed.
23
Setting HOUR
Setting MINUTE
5.4 Top-speed Setting
The default figure of the top riding speed in the display is
25 Km/h.
You can change this figure and re-set a new top riding
speed. If the e-bike speed exceeds this new figure, the
controller will limit the speed and return to the max speed
to ensure the rider’s safety.
The setting range of top riding speed is from 10Km/h to
25Km/h.
The above for reference only, subject to the available
products.
After setting the top riding speed, please press MODE
for confirmation and enter into the display unit setting.
24
Speed Setting Interface
5.5 Choice of Display Unit (Metric system/ English
system)
Press UP or DOWN to choose a display unit.
The unit could be MPH and Km/h. The range unit is
changing accordingly with the speed unit.
English System
Metric System
5.6 Wheel Size Setting
Press MODE for confirmation and enter into the wheel
size setting.
Press UP or DOWN to choose a corresponding wheel
diameter to ensure the accurate display of speed and
distance. The interface is as follows:
25
Press MODE to confirm the wheel size and enter into the
LCD backlight brightness setting. The default value of
the wheel size is 26 inch.
5.7 Backlight Brightness Setting
Press UP or DOWN to modify the backlight brightness.
You can choose from level 1 to level 3. Level 1 is the
minimum brightness. Level 3 is the maximum brightness.
The default value of the backlight brightness in J—LCD
display is level 1.
5.8 Exit Setting
In the state of parameter setting, short press MODE
(within 2 seconds) to make confirmation. Hold MODE
(more than 2 seconds) , save the current setting and exit
the setting interface.
6、Normal Operation
6.1 On/Off
Press MODE and the display start to work for the
controller power supply.
26
In the Power On State, hold MODE or lay aside (the sate
is no speed and no setting) for five minutes, to cut off the
e-bike power supply. In the Power Off state, the display
and the controller don’t use the battery power supply. So
the power consumption is ZERO.
Suggestion:If you won’t use the e-bike in 4 hours,
please take the battery off the e-bike and put it away
in a proper place.
6.2 Speed Display (Current Speed/Average Speed/Max
Speed)
When the e-bike starts, the display will automatically
show the current speed.
Hold UP and the display will show the MAX speed
during this ride. Hold UP again and the display will show
the AVG speed during this ride. Hold UP again and the
display will turn to the current speed display.
27
The interface of switching speeds
6.3 Assisted Power Select or Throttle Level Select
Press UP or DOWN change motor output power of the
motor. The power ranges from level 1 to level 5. Level 1
is the minimum power. Level 5 is the maximum power.
The default value is level 1.
Motor power level
28
6.4 Power Assist Walk
Hold DOWN and enter into the mode of power assist
walk. The e-bike will go on at a uniform speed of 6
Km/h.
Interface of power assist walk
Warning:6Km/h “ assisted power walk ” function can
only be used when the user is pushing the e-bike.
Please don’t use this function during riding.
6.5Turn On and Turn Off the Backlight
Hold both UP and MODE for 3 seconds and turn on the
J—LCD backlight. When the surrounding light is not
enough or it is in the evening, you can turn on the
backlight. Hold both UP and MODE for 3 seconds again
and you can turn off the backlight.
6.6 Distance and Time Display (Riding Distance and
time/Total Distance and time)
Press MODE and change between riding distance and
total distance. Meanwhile the riding time and total time
will change with it.
29
The riding time is indicated by hours and minutes. The
total time is indicated by minutes. 10 seconds to run
before turning back to the clock interface.
Range Interface
6.7 Capacity Display
When the battery capacity is high, the five battery
segments are all right. When the battery is low voltage,
the battery display frame will flash at the frequency of 1
HZ. This indicates that the battery is severely low voltage
and needs to be recharged immediately.
Battery Voltage
Low Voltage Flash
30
6.8 Malfunction Code Display
If there is something wrong with the electronic control
system, the display will show the error code
automatically. The following are some definition of
malfunction codes.
Display Value
Definition
21
Current Abnormality
22
Throttle Abnormality
23
Motor Open- phase
24
Motor Hall signal Abnormality
25
Brake Abnormality
30
Abnormal Communication
Definition Diagram of Error Codes.
Error Code Display
7、 Button Battery Replacement
Ride your bike in a safe way. Don’t hit or knock the
display. When you replace the display battery, please
detach the display from the handlebar first. Take off the
battery cap and put in a new battery.
31
The model of the display battery is CR2032. This button
battery is used exclusively for the timer IC inside the
display. The life of the button battery is more than 2
years.
Attention: After replacement the button battery,
please set the time of the display.
8、 FAQ Answers
Q:Why can’t turn on the display?
A:Please check if the cable is well connected with the
controller.
Q:Why the timer error?
A:Please replace the button battery. The battery model is
CR2032.
Q:How to deal with the error code display?
A:Contact the e-bike maintenance station in time.
9、 Quality Warranty
We are not responsible for the scratched or broken shell
after the products are delivered out of the factory.
We don’t repair scratched or broken lead wires.
The LCD display function warranty: 18 months starting
from the first usage of the user.
The button battery warranty: 18 months from the delivery
time of the display out of the factory.
32
10、Circuit Block Diagram
Red: 24V/36V, Blue: lock wire, Black: GND,
Green/Yellow: RX/TX wire.
If using the water proof connector, Users cannot see the
leads color of the internal wiring.
11、Software Version
This operating instruction is a general-purpose software
(version V2.0). Some of the version of the e-bike LCD
may have slightly different, all with actual use version.
33