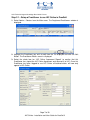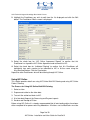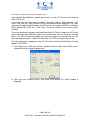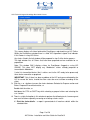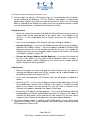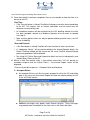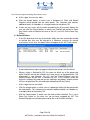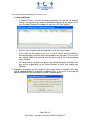
1
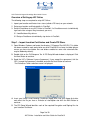
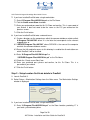
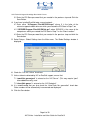
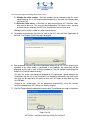
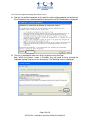
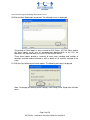
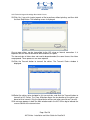
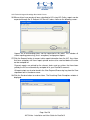
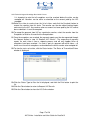
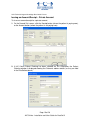
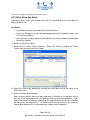
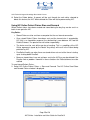
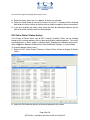
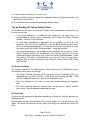
HCN Technical Support Knowledge Base Article: PS3-25
HCN Technical Support KBA:
HIC Online - Installation and User Guide for PracSoft 3
This article applies to Product(s):
PracSoft 3.x
Before you Begin:
•
Enrol all practitioners wishing to use HIC Online with HIC using the application
facility at www.hesa.com.au/HIC_online.htm
•
Apply and receive from HeSA the necessary PKI Certificates and associated
Personal Identification codes.
•
Practices can use either:
o A location certificate only, or
o A location certificate plus individual certificates (iKeys/smartcards) for each
practitioner.
•
Ensure you have performed the standard PracSoft installation.
•
Pre-printed DB4 forms are not supported by HIC Online. Once you have setup
PracSoft to use HIC Online, you will not be able to print on pre-printed DB4 forms.
•
If using an ISA Firewall, please contact the HIC for specific setup instructions.
Related Documents:
•
PS3-45 HIC Online - TS Installation and User Guide for PracSoft 3
•
PS3-46 Checklist for Installing HIC Online
Page 1 of 28
HIC Online - Installation and User Guide for PracSoft 3
HCN Technical Support Knowledge Base Article: PS3-25
Table of Contents
Overview of Setting up HIC Online ................................................................................................................ 3
Step 1 – Import Location Certificates and Create PSI Store. ...................................................................... 3
Step 2 – Setup Location Certificate details in PracSoft............................................................................... 5
Step 3.1 – Setup a Practitioner to use HIC Online in PracSoft ................................................................... 7
Step 3.2 – Load Rainbow iKey Drivers .......................................................................................................... 8
Step 3.3 - Setup a Practitioner to Individually Sign Claims in PracSoft .................................................... 8
Using HIC Online ............................................................................................................................................. 9
The Process for Using HIC Online Bulk Bill Claiming. .................................................................................. 9
Using HIC Online Patient Claiming ............................................................................................................. 18
Issuing an Account/Receipt – Private Account .......................................................................................... 19
Unpaid Accounts ......................................................................................................................................... 20
Paid Accounts ............................................................................................................................................. 20
Real-Time .................................................................................................................................................... 21
HIC Online Same Day Delete ........................................................................................................................ 24
Key Points. .................................................................................................................................................. 24
Using HIC Online Patient Claims Store and Forward ................................................................................ 25
Key Points. .................................................................................................................................................. 25
HIC Online Patient Claims History ............................................................................................................... 26
Tips on Sending HIC Online Patient Claims ............................................................................................... 27
HIC Online Availability................................................................................................................................. 27
HIC Safety Net ............................................................................................................................................ 27
Page 2 of 28
HIC Online - Installation and User Guide for PracSoft 3
HCN Technical Support Knowledge Base Article: PS3-25
Overview of Setting up HIC Online
The following steps are required to setup HIC Online:
1. Import your location certificates into a store (called a PSI store) on your network.
2. Setup your location certificate details in PracSoft.
3. Setup a Practitioner to use HIC Online in PracSoft. If a Practitioner wants to individually
sign each claim using an iKey/smartcard, you must,
3.1. Load Rainbow iKey drivers.
3.2. Setup a Practitioner to individually sign claims in PracSoft.
Step 1 – Import Location Certificates and Create PSI Store.
1. Open Windows Explorer and locate the directory C:\Program Files\HIC\PKI. This folder
has been created on each workstation on which PracSoft 3 has been installed (please
ensure you have view hidden files and folders enabled as some vital extensions/files
may be hidden by default).
2. Double click on the 'PsiSetup.exe' file. A PSI Setup Wizard window is displayed. Click
the Next Button to continue.
3. Read the HIC’s Software License Agreement. If you accept the agreement, tick the
YES, I accept the Agreement” checkbox and click the Next Button to continue.
The Diskette or Token selection screen is displayed.
4. Insert your HeSA-issued Location Certificate (floppy disk) into your floppy disk drive
and select the Do you have a Diskette to Load option and click the Next Button to
continue.
5. The PSI Setup Wizard identifies each of the required Encryption and Signing files for
your Location Certificate.
Page 3 of 28
HIC Online - Installation and User Guide for PracSoft 3
HCN Technical Support Knowledge Base Article: PS3-25
6. Enter the PIC (pass phrase) associated with the Location Certificate (issued by HeSA)
and click the Next button to continue.
Notes:
•
The PIC for the location certificate will have been provided to your practice by HeSA
over the telephone after you faxed to them confirmation of receipt of your floppy
disk containing the location certificate, (there is a four hour delay between faxing
and retrieving the PIC).
•
Please ensure that you retain the original pass phrase (HeSA-issued PIC) in a safe
place in case of a system failure and/or a need to reinstall the certificate at a later
date.
•
PracSoft 3 will allow you to change the original pass phrase upon install. However
this only changes it for the PSI Store within your PC – not on the floppy disk itself.
The PSI setup screen is displayed.
Page 4 of 28
HIC Online - Installation and User Guide for PracSoft 3
HCN Technical Support Knowledge Base Article: PS3-25
7. If you have installed PracSoft onto a single workstation:
7.1. Enter C:\Program Files\HIC\PKI\hic.psi as the File Name.
7.2. Tick the Create a new Store checkbox.
7.3. Enter your preferred password for this Psi Store and confirm. This is a password of
your choice. It does not need to be the same as the PIC you entered on the
previous screen.
7.4. Click the Finish button.
8. If you have installed PracSoft onto a network/server.
8.1. Create a directory on the computer on which the common database resides called:
X:\Program Files\HIC\PKI where X is the letter that corresponds to the relevant
mapped drive; or
8.2. \\SERVER\Program Files\HIC\PKI” where SERVER is the name of the computer
on which the common database resides.
8.3. Ensure that full read/write access to this directory is enabled for all workstations on
which PracSoft 3 will be installed.
8.4. Enter “X:\Program Files\HIC\PKI\hic.psi” or
“\\SERVER\Program Files\HIC\PKI\hic.psi” as the File Name.
8.5. Check the “Create a new Store” box.
8.6. Enter your preferred pass phrase and confirm, for this Psi Store. This is a
password of your choice.
8.7. Click the Finish button.
Step 2 – Setup Location Certificate details in PracSoft
1. Launch PracSoft 3.
2. Select Setup > Workstation Settings from the Main menu. The Workstation Settings
window is displayed.
3. If you have installed PracSoft onto a single workstation:
3.1. Enter “C:\Program Files\HIC\PKI\hic.psi” as the Store Location, providing “C” is
your local system directory/drive.
Page 5 of 28
HIC Online - Installation and User Guide for PracSoft 3
HCN Technical Support Knowledge Base Article: PS3-25
3.2. Enter the PSI Store password that you created in the previous step and Click the
Save Button.
4. If you have installed PracSoft onto a server/network:
4.1. Enter either “X:\Program Files\HIC\PKI\hic.psi” where X is the letter of the
relevant mapped network drive on which you created the PSI Store in Step 7; or
4.2. “\\SERVER\Program Files\HIC\PKI\hic.psi” where SERVER is the name of the
computer on which you created the PSI Store in Step 7 as the “Store Location”.
4.3. Enter the PSI Store password that you created in the previous step and click the
Save button.
5. Select Setup > Global Settings from the Main menu. The Global Settings window is
displayed.
6. Check the “Use HIC Online” check box.
7. Unless otherwise directed by HIC or PracSoft support, ensure that:
7.1. “www2.hic.gov.au/pext” is entered as the “HIC Server”. (This may require “/pext”
to be added manually); and
7.2. “[email protected]” is entered as the “HIC Recipient”.
8. It is recommended that you also check the “Auto-Claim No. generation” check box.
Claim numbers will be automatically incremented and displayed.
9. Click the Save button.
Page 6 of 28
HIC Online - Installation and User Guide for PracSoft 3
HCN Technical Support Knowledge Base Article: PS3-25
Step 3.1 – Setup a Practitioner to use HIC Online in PracSoft
1. Select Admin > Doctors from the Main menu. The Registered Practitioners window is
displayed.
2. Highlight the Practitioner you wish to edit from the list displayed and click the Edit
Button. The Practitioner Details screen is displayed.
3. Select the check box for “HIC Online Agreement Signed” to confirm that this
Practitioner has signed the HIC Online Agreement and returned it to HIC. Once this
Practitioner has been flagged to use HIC Online all batched claims will now only
appear in HIC Online.
Page 7 of 28
HIC Online - Installation and User Guide for PracSoft 3
HCN Technical Support Knowledge Base Article: PS3-25
4. Select the Patient Claims check box to indicate that the Practitioner will be using HIC
Online Patient Claiming. Click the Save button.
Repeat this for other Practitioners who will be claiming through HIC Online.
Note: Steps 3 & 4 are optional and only required if the Practitioner wants to individually
sign each claim using their iKeys.
Step 3.2 – Load Rainbow iKey Drivers
This step should be completed on each workstation into which Practitioners will be
inserting their iKeys/Smartcards - tokens.
1. Ensure that the PracSoft CD-ROM is in your CD-ROM drive.
2. Use Windows Explorer to find the file “setup.exe” which is contained in the “Rainbow
ikey” folder.
3. Ensure that any other applications are closed, and then double-click to run this file. The
Rainbow Technologies license agreement is displayed. If you accept the License
Agreement, click the “Yes” button. Follow the default prompts through. The installation
may take a few minutes to complete.
4. Once the installation is complete, you will be prompted to reboot the computer. Check
“Yes, I want to restart my computer now” and click the Finish button. Once the PC has
rebooted, you may wish to change the Passphrase for each iKey. If so, insert the
relevant iKey, navigate to the Start menu\Programs\Rainbow Technologies\iKey 2000
Series Software and click on Passphrase Utility. Follow the prompts.
The iKeys are used during the Preparation/Authorisation of the claims. The
Practitioners will be prompted to insert their keys into a USB port on the computer. This
will automatically register their iKeys.
Step 3.3 - Setup a Practitioner to Individually Sign Claims in PracSoft
1. Select Admin > Doctors from the Main menu. The Registered Practitioners window is
displayed.
Page 8 of 28
HIC Online - Installation and User Guide for PracSoft 3
HCN Technical Support Knowledge Base Article: PS3-25
2. Highlight the Practitioner you wish to edit from the list displayed and click the Edit
button. The Practitioner Details screen is displayed.
3. Select the check box for “HIC Online Agreement Signed” to confirm that this
Practitioner has signed the HIC Online Agreement and returned it to HIC.
4. Select the check box for “Individual Signing” to confirm that this Practitioner will
individually sign each voucher to be submitted to HIC in his/her name using the
iKey/Smartcard token. Click the Save button.
Repeat for other Practitioners who will be claiming through HIC Online.
Using HIC Online
This section provides details on using HIC Online Bulk Bill Claiming and using HIC Online
Patient Claiming.
The Process for Using HIC Online Bulk Bill Claiming.
1. Select a claim.
2. Prepare and authorise the claim data.
3. Transmit the authorised claim to HIC.
4. At a later date Request the Processing and Payment reports.
5. Resolve and Receipt off Claim.
Before using HIC Online it is strongly recommended that all outstanding claims have been
either receipted off or processed using Medclaims. All claims sent to MedClaims must be
Page 9 of 28
HIC Online - Installation and User Guide for PracSoft 3
HCN Technical Support Knowledge Base Article: PS3-25
finalised within the MedClaims module and all claims sent to HIC Online must be finalised
within HIC Online.
If the “Auto-Claim No. Generation” checkbox is checked in Setup > Global Settings > HIC
Online Tab, then the claim numbers will be auto-generated and displayed. The same
sequence will apply to both Medicare and DVA claims, for example A1234 for a Medicare
Claim followed by A1235 for a DVA claim. The claim number will be unique across
PracSoft.
One of the differences between using MedClaims and HIC Online is reports for HIC Online
need to be requested, MedClaim reports are returned from the HIC during the Transmit
phase. HIC Online Processing Report and Payment Reports are returned from the HIC
when the Request button is clicked in Processing > HIC Online > Request Results tab.
Once the practitioner is flagged as using HIC Online then all of the batched claims will only
appear in HIC Online
1. Click Processing > Batch Bulk Claims > Medicare/Veteran Affairs from the Main menu
to batch bulk claims ready for processing.
2. Once you have selected Process and Send, the PracSoft HIC Online window is
displayed.
Page 10 of 28
HIC Online - Installation and User Guide for PracSoft 3
HCN Technical Support Knowledge Base Article: PS3-25
This screen displays all claims batched for Practitioners registered to use HIC Online.
Within the Practitioners window there is a field "HIC Agreement signed" that indicates
if this Doctor is using HIC Online.
Any claims listed in the left window will be prepared in step 2 of the claims process.
The right window lists all Claims that have been prepared and are available for repreparation.
Note: This window ONLY displays claims for Practitioners flagged as using HIC
ONLINE. This does NOT display any “Medclaims” claims already prepared or
transmitted in Medclaims.
It also lists transmitted claims (that is claims sent to the HIC ready to be processed)
these claims cannot be re-prepared.
IMPORTANT: Only if there has been a problem at the HIC and you are directed by the
HIC to resend the claim, should the claim status be reset to allow resending of the
claim.
3. Click the > or < buttons to move the claims between Selected to Prepare section and
Claims Prepared/Transmitted section, or
Double-click the claim, or
Hold down the CTRL or SHIFT key while selecting a group of claims and selecting the
> or < button.
4. There is a right click option in this window to perform the following tasks, however great
care must be taken especially renaming or resetting a claims status.
4.1. Print the claim details - a report is generated of all vouchers details within the
selected claim.
Page 11 of 28
HIC Online - Installation and User Guide for PracSoft 3
HCN Technical Support Knowledge Base Article: PS3-25
4.2. Change the claim number - the claim number can be changed using this menu
option however this is not recommended especially if the claim has already been
sent to the HIC.
4.3. Reset the claim status - if the claim has been transmitted to HIC, the claim status
may need to be reset. This may only be performed by Full Access users and only
in circumstances whereby the HIC have cancelled the claim at their end.
Do not use this facility in under any other circumstances.
5. To prepare and authorise the claims to send to the HIC, click the Next Step button to
continue. The Prepare Claim Data tab is displayed.
6. Each prepared claim must be authorised before being sent to HIC. At this stage further
validation of the claim details is performed. If any problems are found they will be
displayed on this tab as well in being recorded in a log file (called hiconline.log and
found in the PracSoft home directory).
The way the claims are signed will depend on the agreement signed between the
Practitioner and the HIC. If the Practitioner has decided to individually sign each claim
then they will be required at this point to enter their HCI token or ikey (blue key) into
the USB port.
Otherwise the authorisation will be performed automatically using the location
certificate loaded when HIC Online was initially installed.
7. Click the Prepare button to prepare the claim data. The following message is displayed.
Page 12 of 28
HIC Online - Installation and User Guide for PracSoft 3
HCN Technical Support Knowledge Base Article: PS3-25
8. Click the Yes button to proceed. At this point the claim will be prepared and authorised.
If the Practitioner has selected individual signing then the DB1 Declaration is displayed:
9. The user is prompted to enter their iKey Passphrase then click Sign.
Note: Within the Doctors screen in PracSoft, they will need to have selected the
“Individual signing" flag to use this functionality. The following screen is displayed:
Page 13 of 28
HIC Online - Installation and User Guide for PracSoft 3
HCN Technical Support Knowledge Base Article: PS3-25
10. Click the Next Step button to proceed. The following screen is displayed.
The printing of Claim reports is only essential for DVA Claims. All DVA Claims require
the claim reports to be sent as accompanying documentation to the HIC. No
documents are required to be sent to the HIC for Bulk Bill claims.
These claim reports provide a summary of each claim including total number of
vouchers and total amount claimed as well as details of all vouchers included in the
claim.
11. Click the Print button to print claim reports. The following message is displayed.
Note: To change your default printer settings, click Setup Printer Setup from the Main
menu.
Page 14 of 28
HIC Online - Installation and User Guide for PracSoft 3
HCN Technical Support Knowledge Base Article: PS3-25
12. Click Yes if you wish to print reports or No to continue without printing, and then click
the Next Step Button. The following screen is displayed.
One or more claims can be transmitted to the HIC using an Internet connection. It is
important that an Internet connection be available at this point.
The transmission of claims does not need to be performed at the same time as the claims
are prepared. These processes are now separate.
13. Click the Transmit button to transmit the claims. The Transmit Claims window is
displayed.
14. Select the claims to be included in this transmission, and click the Transmit button to
transmit to HIC Online. The Clear All button allows the de-selection of the claims you
do not wish to transmit. Only the ticked claims will be sent when you click on Transmit.
15. A message appears in both the Main window and in the HIC Online log to indicate the
success/failure of the transmissions.
Page 15 of 28
HIC Online - Installation and User Guide for PracSoft 3
HCN Technical Support Knowledge Base Article: PS3-25
16. Where claims have previously been submitted to HIC using HIC Online, reports can be
requested through the “5. Request HIC Results” tab as shown on the following screen:
Reports for all outstanding claims can be requested at this point. This includes all
claims requiring processing, (that is exceptions) and payment reports.
17. Click the Request button to request claim report information from the HIC. Any claims
that have exceptions will have reports printed and must be resolved before the claim
can be receipted off.
Payment reports are printed for the relevant claims and any claims that have been
paid by the HIC are automatically receipted off in your PracSoft 3 accounts.
All report output can also be found in the View Payment/Processing Log from the View
drop down box in the above screen.
18. Click the Resolve button to resolve claims. The Resolving Claim Exceptions window is
displayed.
Page 16 of 28
HIC Online - Installation and User Guide for PracSoft 3
HCN Technical Support Knowledge Base Article: PS3-25
It is important to note that all exceptions must be resolved before the claim can be
receipted off. Vouchers can be either re-submitted or the amount paid by the HIC
accepted.
19. Select the claim to resolve from the list of claims and click the Resubmit button to
remove the voucher from this claim. The voucher can then be edited, batched again
and resent to the HIC. Any voucher when an amount has been paid by the HIC cannot
be re-submitted – it must be accepted.
20. To accept the payment from HIC on a particular voucher, select the voucher from the
Exceptions to Resolve list and click the Accept button.
21. Once the exceptions are resolved, the payment reports can then be requested through
the Request button in step 18 “Request HIC Results”. The requesting of payment
reports for each claim is now a separate process and will only happen when all
exceptions have been resolved. If a claim is part of a payment with other claims – all
claims must have their exceptions resolved before the claims can be auto-receipted off.
22. To view the status of a claim, click the Status button. The Status of Transmitted Claims
window is displayed.
23. Click the Status Type to filter the list displayed, and click the Print button to print the
list.
24. Click the Close button to return to Request HIC Results.
25. Click the Close button to close the HIC Online window.
Page 17 of 28
HIC Online - Installation and User Guide for PracSoft 3
HCN Technical Support Knowledge Base Article: PS3-25
Using HIC Online Patient Claiming
A HIC Online Patient Claim is sent to the HIC during the recording of a Visit and is part of
the processing involved in issuing a Private account or Private receipt.
Patient Claiming will add an additional step into your workflow, but it provides numerous
benefits in confirming both the patient’s and service details are correct.
Key Points.
•
Patient Claiming is turned on or off for each Doctor (see Admin > Doctors).
•
There are two ways to send Patient Claims – directly to HIC to receive an
immediate response (called Patient Claiming Interactive (PCI)) or store and then
send later in the day (called Patient Claiming Store and Forward (PCS)).
•
The Patient can decide whether to have the rebate paid directly into their bank
account (via EFT) or via a cheque sent to a specified address.
•
The Claimant must specify an address as they will be sent a statement of the claim
details from HIC and, if selected, a cheque.
•
The Claimant can select the address held at Medicare, the address recorded in
PracSoft or a temporary address. These details are not permanently recorded at
HIC or in PracSoft; they are only valid for this claim.
•
The bank details entered are not stored in either PracSoft or at the HIC and are only
valid for this claim. On subsequent visits the Claimant will need to present the bank
details again.
The areas of PracSoft affected by patient claiming are:
•
Issuing an Account – Private Account.
•
Issuing a Receipt – Private Receipt.
Page 18 of 28
HIC Online - Installation and User Guide for PracSoft 3
HCN Technical Support Knowledge Base Article: PS3-25
Issuing an Account/Receipt – Private Account
To issue an account/receipt for a private account:
1. On the Record Visit screen, click the Receipt button (where the patient is paying now),
or the Account button (where the patient is not paying now).
2. If HIC Online Patient Claiming has been selected for this Practitioner the Patient
Claiming window is displayed showing the Claimants address details (as they are held
in the PracSoft database).
Page 19 of 28
HIC Online - Installation and User Guide for PracSoft 3
HCN Technical Support Knowledge Base Article: PS3-25
3. The next step is to select the HIC Payment Type (i.e. the method by which the patient
will be reimbursed by Medicare). The HIC Payment Type options to choose from
depend upon whether the patient has paid the practice (in which case the Receipt
button is selected on the Record Visit screen) or has not yet paid the practice (in which
case the Account button is selected on the Record Visit screen).
Unpaid Accounts
•
Where the account has not been fully paid the Patient/Claimant can only receive a
cheque which will be made payable to the Doctor (that is the Provider of the
services). It is the responsibility of the Claimant to present this cheque to the
Practice.
•
In this case, the drop down “HIC Payment Type” box will display 2 options:
•
Payment by Cheque – in this case the Medicare cheque will be sent to the address
specified in the ‘Address Details’. The current address recorded in PracSoft will be
displayed, however this can be changed manually by the user, if for example the
cheque needs to be sent to a temporary address because the Patient is not at their
usual address (holiday, visiting); OR
•
Payment by Cheque (Address held by Medicare) – in this case the cheque will
be sent to the address for the patient held by Medicare. When this option is
selected the address details displayed on the screen will be cleared and the
Address Details box will be greyed out.
Paid Accounts
•
Where the account has been fully paid the Patient/Claimant has the choice of
receiving the Medicare rebate from HIC by a cheque sent to a specified address or
paid directly into their bank account via EFT.
•
In this case, the drop-down “HIC Payment Type” box will display an additional 2
options:
•
Payment by EFT – in this case the Medicare rebate will be deposited by HIC into
the specified bank account of the Claimant. If this option is selected, the bank
details of the claimant must be entered. HIC will also send a statement to the
Claimant at the address specified in the Address Details box.
•
Payment by EFT (address held by Medicare) – in this case the Medicare rebate will
be deposited by HIC into the specified bank account of the Claimant. If this option is
selected, the bank details of the claimant must be entered. HIC will also send a
statement to the Claimant at the address for that patient held by Medicare.
4. The Contact phone number is optional and PracSoft defaults to the current Home
number of the Patient. This may be required if the Patient needs to be contacted by
HIC regarding this Patient Claim.
Page 20 of 28
HIC Online - Installation and User Guide for PracSoft 3
HCN Technical Support Knowledge Base Article: PS3-25
5. Once these details have been completed, the user must decide on how the claim is to
be sent to the HIC.
Real-Time
•
If the Transmit button is clicked, PracSoft will attempt to send the claim immediately
to the HIC. This requires that an internet connection must be active from the
computer currently being used.
•
An immediate response will be returned from the HIC detailing whether the claim
has been accepted, referred to a Medicare Operator for assessment or rejected
(see step 6).
•
Note: real-time patient claims can only be performed during certain hours (see HIC
Online Availability).
Store and Forward
•
If the Store button is clicked, PracSoft will store the claim for later transmission.
•
A “Lodgement Advice” will be printed detailing the Account/Receipt details, the
Patient Claiming window will be closed and the usual PracSoft Account/Receipt
processing procedures will be followed.
•
See Using HIC Online Store and Forward for details on how to subsequently send
stored Patient Claims to the HIC.
6. Where a Real-Time patient claim is transmitted successfully, HIC will provide an
immediate response and the Patient Claims – Assessment Report screen will be
displayed.
There are 3 possible responses – Accepted, Refer and Rejected.
6.1. Accepted Claims
•
An Accepted Claim is one that has been accepted in full by the HIC and will be
paid. In this case, the Assessment Report will show the amount paid by the HIC
in the “HIC Paid” column:
•
Additional messages may appear under Reason columns. These messages
may provide more information on the claim such as the Safety Net totals.
Page 21 of 28
HIC Online - Installation and User Guide for PracSoft 3
HCN Technical Support Knowledge Base Article: PS3-25
•
At this stage, the user can either:
•
Click the Accept button, in which case a Statement of Claim and Benefit
Payment will be printed with the claim details. This statement also contains
additional details so it doubles as a receipt/invoice for the patient; OR
•
If there are any issues with the claim revealed by the Assessment Report, the
user can click the Cancel button, in which case PracSoft will perform a Same
Day Delete, which will delete the claim at the HIC (see HIC Online Same Day
Delete).
6.2. Referred Claims
•
If the HIC determines that any of the details within the claim need to be clarified
or verified then they can be referred to a Medicare assessor for manual
assessment. In this case, the word “Refer” will appear in the “HIC Paid” column.
•
A more detailed message may appear indicating the reasons for the referral.
•
Where a claim is Referred by HIC, this does not affect any of the processing
within PracSoft and can be treated in the same way as an accepted claim. The
relationship is now between the HIC and the Patient/Claimant and the
Patient/Claimant will be sent a statement by HIC. In the situation where the
claim has not been fully paid and you are awaiting a ‘pay doctor’ cheque and the
HIC has not paid then this will need to be followed up with the Patient
•
At this stage the user can either:
•
Click the Accept button, in which case a Lodgement Advice will be printed with
the claim details. This statement also contains additional details so it doubles as
a receipt/invoice for the patient; OR
•
click the Cancel button, in which case the claim will be cancelled. This is not a
Same Day Delete as the claim has not yet been accepted by HIC. The
Account/Receipt must then be processed by the usual PracSoft functions.
Page 22 of 28
HIC Online - Installation and User Guide for PracSoft 3
HCN Technical Support Knowledge Base Article: PS3-25
6.3. Rejected Claims
•
A Rejected Claim is one that has been rejected by HIC and will not be paid.
Reasons for rejection may include invalid Medicare details for the patient. In this
case, the word “Rejected” will appear in red in the “HIC Paid” column.
•
Reasons for the rejection will be displayed in the Assessment Report.
•
At this stage the only option for the user is to click Cancel, which will display a
warning message saying that there were problems with the claim. The user must
then decide whether to continue with the processing of the Account/Receipt
within PracSoft.
•
If the user chooses to continue to process the Account/Receipt in PracSoft, it will
then be the responsibility of the Patient/Claimant to claim their rebate from
Medicare.
7. Regardless of whether the HIC responds with Accept, Refer or Rejected, there may
also be updated Medicare Card details supplied by HIC. In this case, a message will
appear allowing the user to change the Patient’s recorded details.
Page 23 of 28
HIC Online - Installation and User Guide for PracSoft 3
HCN Technical Support Knowledge Base Article: PS3-25
HIC Online Same Day Delete
Real-time Patient Claims sent through to the HIC can be deleted on the same day that
they have been sent.
Key Points.
•
Any deletion must be authorised by the Patient/Claimant.
•
Same Day Deletions can only be performed during the HIC supported hours (see
HIC Online Availability).
•
Any claim that has been referred to an operator may not be available for immediate
Same Day Deletion.
To perform a Same Day Delete:
1. Select the HIC Online Patient Claiming > Same Day Delete to display the Patient
Claims that have been sent to HIC today.
2. Select the claim to be deleted by selecting the check box next to the name of the
Patient/Claimant.
3. Select a Reason for the deletion.
Note: in cases where a claim has been registered in PracSoft as having been sent to
HIC, but is not registered by the HIC (perhaps due to transmission problems), select
999 as the reason for deletion. Selection of this code will delete the claim in PracSoft,
but not send a message to HIC. This option should also be chosen if the claim has
already been deleted at HIC (for example, by a request over the phone).
Page 24 of 28
HIC Online - Installation and User Guide for PracSoft 3
HCN Technical Support Knowledge Base Article: PS3-25
4. Select the Delete button. A request will be sent through for each claim selected to
delete this claim at the HIC. When deleted the Claim will not be processed by HIC.
Using HIC Online Patient Claims Store and Forward
Where Patient claims have been created and stored during the day they can be sent in a
batch in one go to the HIC.
Key Points.
•
Stored Claims must be sent from a computer that has an internet connection.
•
Once stored Patient Claims have been sent and the transmission is accepted by
HIC (this is an immediate response) the relationship is now between HIC and the
Patient/Claimant. The practice has no further responsibility.
•
The claims must be sent within one day of creating. This is a condition of the HIC
Online agreement signed by the Doctor. Any delays will result in the Patient being
paid later by HIC.
•
PracSoft will notify you when there are stored claims not sent at the time of startingup or shutting-down PracSoft.
•
Because stored claims have not yet been sent to the HIC they can be deleted if the
Practice finds a problem. However in these situations the Patient/claimant must be
notified.
To send stored Patient Claims:
1. Select HIC Online Patient Claims > Store and Forward. The HIC Online Send Store
and Forward Claims window is displayed.
Page 25 of 28
HIC Online - Installation and User Guide for PracSoft 3
HCN Technical Support Knowledge Base Article: PS3-25
2. Select the claims to be sent. As a default, all claims are selected.
3. Select the Send button to transmit the claims to the HIC. A response will be returned
indicating the success/failure of the transmission and the number of claims transmitted.
4. If you wish to delete any claim(s) then select the claim by checking the box on the line
next to the claim and then select the Delete button.
HIC Online Patient Claims History
A full history of Patient claims sent to HIC is kept by PracSoft. Claims can be selected
based on the servicing provider, within a date range and for individual patients. The results
are displayed on a screen and/or in printed format. Reprinting of Individual claim forms,
either Lodgement Advice or Statement of Claim and Benefit Payment, is also available.
To show the patient claims history:
1. Select the HIC Online Patient Claiming > Patient Claims History to display all Patient
Claims.
2. Select the Print button to print out all claims displayed on the screen.
Page 26 of 28
HIC Online - Installation and User Guide for PracSoft 3
HCN Technical Support Knowledge Base Article: PS3-25
3. Select the RePrint button to reprint the Lodgement Advice or Statement of claim and
Benefit form for that claim.
4. The selection criteria can be changed display different claims.
Tips on Sending HIC Online Patient Claims
The Practice has the choice of sending the Patient claims immediately or storing them up
for later transmission.
•
If an internet connection is available on each computer in the surgery then it is
recommended to send all claims immediately (that is within the Patient Claiming
window – select the Transmit button).
•
To send claims immediately is dependent on the availability at HIC of the HIC
computers (see HIC Online Availability). If you are billing outside of these hours
then the recommended approach is to store these claims and send them at a later
time (that is within the Patient Claiming window – select Store button).
•
If an internet connection is not available on each computer and you wish to use the
Patient Claiming functions on all computers then it will be necessary to use the
‘Store and Forward’ functionality (that is within the Patient Claiming window – select
Store button). The claim is stored and then sent to the HIC later in the day from a
computer with an internet connection (see Using HIC Online Patient Claims Store
and Forward).
HIC Online Availability
HIC Online is available at the following times. Please consult the HIC Website for further
clarification as these times may change.
•
For Patient Claiming Interactive (PCI) and Online Patient Verification (OPV) the
supported hours are Mon-Fri 07:00 – 21:00. At the time of writing Sat 9:00 – 17:00
was also supported however this was not a guaranteed service.
•
Same Day Deletion of PCI claims can only be performed during the supported
hours.
•
For Patient Claiming Store and Forward claims can be sent in 7 days a week/24
hours a day. They will be processed during the week.
HIC Safety Net
To meet the new government legislation regarding the Safety Net PracSoft provides the
following features:
When sending through a Patient Claim (PCI) a reason (code is 517) will be returned in the
report. This reason will indicate that the Patient (and family) has reached their Safety Net
Limit.
Page 27 of 28
HIC Online - Installation and User Guide for PracSoft 3
HCN Technical Support Knowledge Base Article: PS3-25
A report can be printed for individual patients detailing their out-of-hospital receipts for a
calendar year.
To do this, go to the View Patient Details screen, click Print, and select “Safety net
Report”:
The user will then be prompted to choose a start and end date for the report and the type
of letterhead to use.
Page 28 of 28
HIC Online - Installation and User Guide for PracSoft 3