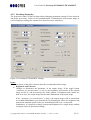
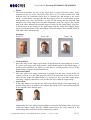
1
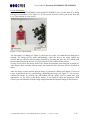
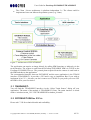
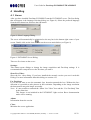
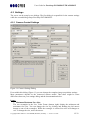
User Guide
C-VIS
FaceSnap FOTOSHOT / TWAINSHOT
Version 1.1
Copyright 2003-2004 © C-VIS GmbH, All rights reserved
User Guide for FaceSnap FOTOSHOT/TWAINSHOT
Copyright Notice
Copyright 2003-2004 © C-VIS GmbH, All rights reserved
This software is being provided by the copyright holder under the following terms and
conditions. By obtaining this software, you agree that you have read, understood, and will
comply with the following terms and conditions:
This software and its documentation may not be used, copied, modified, reverse-engineered,
resold or distributed for any purpose and without the prior written consent of C-VIS
Computer Vision und Automation GmbH.
THIS SOFTWARE AND ITS DOCUMENTATION IS PROVIDED ``AS IS,'' AND THE
COPYRIGHT HOLDER MAKES NO REPRESENTATIONS OR WARRANTIES,
EXPRESS OR IMPLIED. BY WAY OF EXAMPLE, BUT NOT LIMITATION, THE
COPYRIGHT HOLDER MAKES NO REPRESENTATIONS OR WARRANTIES OF
MERCHANTABILITY OR FITNESS FOR ANY PARTICULAR PURPOSE OR FOR THE
USE OF THE SOFTWARE. THE COPYRIGHT HOLDER WILL BEAR NO LIABILITY
FOR ANY USE OF THIS SOFTWARE, HARDWARE OR DOCUMENTATION.
The name and trademarks of copyright holders may NOT be used in advertising or publicity
pertaining to the software without specific, written prior permission. Title to copyright in this
software and hardware and any associated documentation will at all times remain with the
copyright holder.
Trademarks
, FaceSnap and ISOSHOT are registered trademarks of C-VIS Computer
Vision und Automation GmbH
Copyright 2003-2004 © C-VIS GmbH, Bochum, Germnay • www.c-vis.com
2/ 22
User Guide for FaceSnap FOTOSHOT/TWAINSHOT
Table of Contents:
1
ABOUT FACESNAP FOTOSHOT: ..................................................................... 4
1.1
Network capabilities................................................................................................................................ 4
1.2
System Requirements.............................................................................................................................. 5
1.3
Installation ............................................................................................................................................... 5
2
GETTING STARTED........................................................................................... 6
3
IMPLEMENTATION ............................................................................................ 9
3.1
TWAINSHOT: ...................................................................................................................................... 10
3.2
FOTOSHOT SDK for C/C++: ............................................................................................................. 10
4
4.1
HANDLING........................................................................................................ 11
Server ..................................................................................................................................................... 11
4.2
Settings ................................................................................................................................................... 13
4.2.1
Camera Control Settings .................................................................................................................... 13
4.2.2
FaceSnap Properties ........................................................................................................................... 16
4.2.3
Image Acquisition .............................................................................................................................. 19
5
USEFUL NOTES ON ACQUIRING IMAGES .................................................... 22
Copyright 2003-2004 © C-VIS GmbH, Bochum, Germnay • www.c-vis.com
3/ 22
User Guide for FaceSnap FOTOSHOT/TWAINSHOT
1 About FaceSnap FOTOSHOT:
FaceSnap is a fully automatic tool to produce portrait photos. It just needs an image and all
further image processing is done automatically: face cropping, color correction, size
standardization, and quality checks.
FOTOSHOT enlarges these features by incorporating the image acquisition with the
FaceSnap technology. It fully exploits the excellent image quality of modern digital still
cameras. And with FaceSnap FOTOSHOT the camera becomes also an intelligent portrait
photographer. The image is taken automatically, when the face detection software sees a
person that poses correctly for an ID photo. This altogether leads to a superior quality, is
highly accurate and of course it is most convenient for customers.
FaceSnap FOTOSHOT is an indispensable production tool for:
Visas
Passports
Driver Licenses
National ID cards
National medical cards
Corporate ID cards
The biometric quality of an ID photo will be or already is a crucial concern in advanced
governmental and corporate ID solutions, because for a successful access-control /
identification based on face recognition a high quality face image is most important.
Therefore the optional extension ISOSHOT has a built-in biometric portrait enhancement,
which is capable to produce upcoming ISO standard compliant digital portrait images.
As part of the FaceSnap FOTOSHOT Software Developer Kit (SDK) we developed a
TWAIN source, which allows you to use FOTOSHOT from most applications over the
TWAIN interface. It is compatible with all major ID card software, e.g. CardFive, Episuit, ID
Works, Asure ID. The FaceSnap FOTOSHOT TWAIN driver product is referred to as
FaceSnap TWAINSHOT.
1.1 Network capabilities
FaceSnap FOTOSHOT is based on a Client / Server architecture. The server is connected to
the camera and is responsible for the automated image acquisition and processing. The clients
can remotely start the image acquisition over the network (TCP/IP). It is possible to connect
several clients to one server. The network capability is optional. Normally, the client and the
server reside on the same PC.
Copyright 2003-2004 © C-VIS GmbH, Bochum, Germnay • www.c-vis.com
4/ 22
User Guide for FaceSnap FOTOSHOT/TWAINSHOT
1.2 System Requirements
Minimum System Requirements:
Windows ME/2000/XP, Pentium III,
128 MB RAM, 80 MB Disk, USB or IEEE1394.
800 x 600 pixels, 256 color (8 bit) or higher video adapter and monitor
A Canon PowerShot or IXUS camera.
Recommended System Requirements:
Windows 2000/XP, Pentium IV,
256 MB RAM, 160 MB Disk, USB or IEEE1394.
1024 x 786 pixels, 16.7 million color (24 bit) video adapter and monitor
A (Canon PowerShot) digital camera or IXUS camera.
The list below shows the cameras that are supported by Canon. C-VIS recommends the
cameras printed in bold:
PowerShot A60, PowerShot A70, PowerShot A75, PowerShot A80
PowerShot A100, PowerShot A200, PowerShot A300, PowerShot A310
PowerShot S10, PowerShot S20, PowerShot S30, PowerShot S40, PowerShot S45,
PowerShot S50, PowerShot S60
PowerShot S200, IXY DIGITAL 200a, DIGITAL IXUS v2
PowerShot S230, IXY DIGITAL 320, DIGITAL IXUS v3
PowerShot S300, IXY DIGITAL 300, DIGITAL IXUS 300
PowerShot S330, IXY DIGITAL 300a, DIGITAL IXUS 330
PowerShot SD100, IXY DIGITAL 30, DIGITAL IXUS II
PowerShot S400, IXY DIGITAL 400, DIGITAL IXUS 400
PowerShot SD10, IXY DIGITAL L, DIGITAL IXUS I
PowerShot SD110, IXY DIGITAL 30a, DIGITAL IXUS IIs
PowerShot S410, IXY DIGITAL 450, DIGITAL IXUS 430
PowerShot S500, IXY DIGITAL 500, DIGITAL IXUS 500
PowerShot G3, PowerShot G5
PowerShot Pro90 IS
PowerShot S1 IS, PowerShot Pro1
Support for digital cameras from other vendors only on request.
1.3 Installation
First of all connect the camera with your computer, and install the camera drivers.
Therefore you should follow the installation manual of your Canon Camera.
To install the FOTOSHOT Software on your system:
1. Execute Setup.exe.
2. Follow the on-screen instructions.
Copyright 2003-2004 © C-VIS GmbH, Bochum, Germnay • www.c-vis.com
5/ 22
User Guide for FaceSnap FOTOSHOT/TWAINSHOT
2 Getting Started
You should first mount the camera on a tripod or somewhere else. The camera orientation can
be landscape or portrait.
Connect the camera to the computer and turn the camera on. Some cameras might turn on by
itself automatically after you plugged the USB cable into the camera.
Start the FOTOSHOT server over the start menu or the icon on the desktop.
The first dialog that will appear is the language selection dialog (see Figure 1). Select the
preferred language from the drop down box and press the OK button.
Figure 1: Select language
The server window will automatically be minimized to the tray bar in the bottom right corner
of your screen. The leftmost icon on the tray bar is the icon of the server (
). You should
check the settings of the camera, especially the orientation of the camera. The orientation
must be the same as the actual camera orientation. You can find a detailed description how to
change the settings in section 4.2.1(Camera Control Settings).
The server is now ready to take portrait photos and waits for a request of a client to acquire it.
The most convenient and fastest way to use FaceSnap FOTOSHOT is the TWAINSHOT
module. It is a twain interface that encapsulates the FOTOSHOT SDK. All you need is an
application which can import images from a twain source. Most photo/image edit application
like Paint Shop Pro / Canvas / Photoshop / Corel Draw can do this. You can also use MS
Office to import images over the twain source. If you have already installed other twain
sources (e.g. scanner or camera driver) you may first need to select the TWAINSHOT source.
Therefore click on the “Select Source” item and choose TWAINSHOT Client from a drop
down box. Unfortunately the name of the items may vary between different applications, thus
you might have to try until it works, or read the documentation of the application (Key words:
import image, camera, and scanner).
Now click on the “import from source” item to start the image acquisition.
If you have problems to start the TWAINSHOT image source with your application, you can
try it with the application Twack_32.exe in the installation directory.
Copyright 2003-2004 © C-VIS GmbH, Bochum, Germnay • www.c-vis.com
6/ 22
User Guide for FaceSnap FOTOSHOT/TWAINSHOT
Locale Installation:
If you use both the TWAINSHOT client and the FOTOSHOT server on the same PC a dialog
will appear immediately (see Figure 2). If you use the network version you do not have the
Live Video Dialog on your screen.
Figure 2: Live Video Dialog
The FaceSnap Live dialog (see Figure 2) shows the live video, on which the face detection is
running. The image will be taken automatically, when the face in the image fulfills the
criteria. But you can also take an image manually by pressing the space bar, by clicking with
the left mouse button on the face or by pressing the release button on the camera.
As long as you move the mouse in the video frame the automatic face detection is turned off.
After approx. three seconds without mouse movement the face detection will be switched on
again.
After the image is taken and the portrait image is generated, a dialog will appear (If Confirm
Image is checked in the live video dialog), displaying the image (see Figure 3). You can now
confirm the image by clicking the OK button and the image will be pasted into your
application. Or you click on the Retry button, if you want to repeat the procedure. With
Cancel you can withdraw from the image acquisition and the captured image will be deleted.
Copyright 2003-2004 © C-VIS GmbH, Bochum, Germnay • www.c-vis.com
7/ 22
User Guide for FaceSnap FOTOSHOT/TWAINSHOT
Figure 3: Confirm Dialog
Network Installation:
The following section only applies if you use the network version of the TWAINSHOT client.
In the network version, the first time you start the TWAINSHOT client or the FOTOSHOT
SDK the language selection dialog (see Figure 1) will appear. Select the language of your
choice and proceed.
Since the FOTOSHOT server is not on the same PC, the client needs the IP address of the
server.
Figure 4: Connect to server dialog
A dialog will open and asks you for the IP address of the server (see Figure 4). Let the Port
UNCHANGED, until it is not really necessary. Now press the OK button.
You can find out the server IP address via the server application. Double click on the icon in
the tray bar. The server’s main dialog will open and at the (blue) frame at the top, you will
find the IP address (see Figure 5).
Figure 5: The IP address of this example is 172.16.33.72
Copyright 2003-2004 © C-VIS GmbH, Bochum, Germnay • www.c-vis.com
8/ 22
User Guide for FaceSnap FOTOSHOT/TWAINSHOT
After you have entered the correct IP address, the client interface will open immediately (see
Figure 6). The interface gives the user full control over the server. To manually take a picture,
press the Take Picture button, press the space bar or click with the mouse on the image. To
stop the image acquisition, press the Close button. The video frame on the button of the dialog
is only refreshed every second.
Figure 6: FOTOSHOT (Network) Client
After the image is taken and the portrait image is generated, a dialog will appear (If Confirm
Image is checked in the FOTOSHOT Client dialog), displaying the image (see Figure 3). You
can now confirm the image by clicking the OK button and the image will be pasted into your
application. Or you click on the Retry button, if you want to repeat the procedure. With
Cancel you can withdraw from the image acquisition and the captured image will be deleted.
3 Implementation
FaceSnap FOTOSHOT is based on Client / Server architecture. Figure 7 illustrates the
architecture and the data processing. There are several advantages why this architecture has
been chosen:
The camera is only initialized once and not every time an image is acquired.
Several clients can use one camera.
The network clients do not require high computation power.
The application is protected against hardware errors from the camera.
Copyright 2003-2004 © C-VIS GmbH, Bochum, Germnay • www.c-vis.com
9/ 22
User Guide for FaceSnap FOTOSHOT/TWAINSHOT
The Client / Server architecture is platform independent. I.e. The clients could be
implemented on a non Microsoft operation system (e.g. Linux)
Figure 7: Architecture of FS FOTOSHOT
The application can acquire an image directly by calling SDK functions or indirectly via the
twain interface. The request is send from the FaceSnap FOTOSHOT SDK via TCP/IP to the
FaceSnap FOTOSHOT Server. The portrait photo acquired from the camera is send back to
the SDK and then to the application.
The recommended interface between FOTOSHOT and the users application is the TWAIN
interface (TWAINSHOT). It provides a GUI and is easy to implement. But if you wish to
implement it in C/C++ because you don’t want to use TWAIN or you prefer your own GUI
the SDK will be your first choice.
3.1 TWAINSHOT:
You will find the TWAINSHOT interface via the “Select Twain Source” dialog off your
application. The name of the module is TWAINSHOT Client. The twain interface is stored
under c:/windows/twain_32/C-VIS/TWAINSHOT/twainshot_client.dll
3.2 FOTOSHOT SDK for C/C++:
Please ask C-VIS for technical details and availability.
Copyright 2003-2004 © C-VIS GmbH, Bochum, Germnay • www.c-vis.com
10/ 22
User Guide for FaceSnap FOTOSHOT/TWAINSHOT
4 Handling
4.1 Server
After you have installed FaceSnap FOTOSHOT start the FOTOSHOT server. The first dialog
that will appear is the language selection dialog (see Figure 8). Select the preferred language
from the drop down box and press the OK button.
Figure 8: Select Language Dialog
The server will automatically be minimized to the tray bar in the bottom right corner of your
screen. Double click on the Icon (
) to get the servers main dialog (see Figure 9)
Figure 9: FOTOSHOT Server Dialog
There are five items on the server:
Settings:
This button opens dialogs to change the image acquisition and FaceSnap settings. It is
recommended to setup the server the first time you start it.
Show Live Video:
Show the live video dialog. If you have installed the network version you won’t need this
Dialog. For more information about this dialog see section 4.2.3
Use FaceSnap:
If you do not want to use the automatic face detection unmark the box. Without the face
detection it is possible to take pictures in full resolution. Depending on the image resolution
the data transfer may take longer as usually.
Note: It’s not possible to unmark the “Show Live Video” box and the “Use FaceSnap” Box
at the same time.
This feature is not included in the FOTOSHOT Light version. But a demonstration
mode will be running.
About:
Information about the version
Close:
Minimize the server application.
Copyright 2003-2004 © C-VIS GmbH, Bochum, Germnay • www.c-vis.com
11/ 22
User Guide for FaceSnap FOTOSHOT/TWAINSHOT
To open the tray-menu, click with the right mouse button on the Icon (
). In this menu you
can also open the settings dialogs, close the server application, or reset the server. The last
point may be necessary if there is a malfunction.
Figure 10: Tray Menu
Copyright 2003-2004 © C-VIS GmbH, Bochum, Germnay • www.c-vis.com
12/ 22
User Guide for FaceSnap FOTOSHOT/TWAINSHOT
4.2 Settings
The server can be setup by two dialogs. The first dialog is responsible for the camera settings
while the second dialog setups FaceSnap FOTOMODUL.
4.2.1 Camera Control Settings
Figure 11: Camera Settings Dialog
From within this dialog (Figure 11) you can change the complete image acquisition settings.
Most parameters depend on the connected camera model. Thus there might be some
differences between your settings dialog and the documentation below.
Items:
Minimum/Maximum Face Size:
The two rectangles in the Live Video Frame (bottom right) display the minimum and
maximum face size. You can change the size by clicking and holding the left mouse
button on one of the rectangles. While the rectangle is selected its color will changes to
red. To change the size, move the mouse.
Copyright 2003-2004 © C-VIS GmbH, Bochum, Germnay • www.c-vis.com
13/ 22
User Guide for FaceSnap FOTOSHOT/TWAINSHOT
To move both rectangles to a certain place on the live video (e.g. on a persons face in
front of the camera), press and hold the right mouse button within the rectangles and move
the mouse to this position. The position of the rectangle is not taken into account for face
detection, at runtime the face detection will always search for faces on the whole video
frame.
Image Resolution:
The image resolution can at least always be changed between Large, Medium and
Small. The Image resolution - e.g. 1600x12000 - behind each setting depends on the
camera. If the Server can not find the resolution “unknown resolution” will be
displayed behind each setting.
Image Quality:
The Image quality should only be changed between Super Fine, Fine, and Normal.
Due to long data transfer times, it is not recommended to select the RAW image
format.
Rotation:
If the camera has a built-in rotation sensor you can use it to automatically turn the
image to the current camera orientation. Nevertheless you can manually select the
image rotation (0, 90, 180 and 270).
Viewfinder Camera Output:
The viewfinder can be additionally displayed on the LCD display of the camera or on
a PAL/ NTSC screen.
ISO:
The ISO sensitivity can be usually changed between 50/100/200/400. With an
increasing number the Camera will get more sensitive the light, but the pixel noise will
increase while the real resolution of the image will decrease.
Flash:
The flash can be turned on/off. Be aware of unwanted reflections on glasses or skin.
Flash Quantity:
The quantity of the flash can only be changed in the Manual Mode.
Focus Settings:
Autofocus Light:
Autofocus Point:
Autofocus: Chose
Toggle between off and automatic (on)
Chose between different focus points (usually Auto or Center)
between different auto focus distances. It is recommended to
select Auto.
Show Live Video:
Starts the live video and displays it on the frame below this check box.
Auto Focus & Exposure:
The auto focus and exposure computation will be executed again. This is only working
while the live video is running.
Modes:
Copyright 2003-2004 © C-VIS GmbH, Bochum, Germnay • www.c-vis.com
14/ 22
User Guide for FaceSnap FOTOSHOT/TWAINSHOT
There are four major camera modes Program/Manual /Tv/Av:
The Program mode is the recommended because it is fully automated. The Manual
mode allows you to change every parameter, like exposure time and aperture size, but
you need a sound knowledge about cameras. Tv mode allows you to change the
aperture size while the exposure time is automatically set. In the Av mode the exposure
can be set to a certain value.
White Balance:
If your office illumination has a big impact on the colors of the image, you can change
the white balance of your camera. In most cases the automated white balance will
compensate these problems.
Zoom:
Adjust the zoom to the face size.
OK:
The settings will only be accepted while the server is running. The settings will not be
saved permanently.
Save:
Save the current settings permanently to disk. These settings are used every time the
server is started.
Load Def.:
Load the default settings.
Cancel :
Ignore all changes, previously made in the dialog.
Copyright 2003-2004 © C-VIS GmbH, Bochum, Germnay • www.c-vis.com
15/ 22
User Guide for FaceSnap FOTOSHOT/TWAINSHOT
4.2.2 FaceSnap Properties
The properties window of the FaceSnap allows changing permanent settings for face detection
and image processing. Values for the standardization of illumination in the output image as
well as temporary settings for repeated face detection can be edited here.
Figure 12: FaceSnap FOTOMODUL Settings
Items:
The colored areas of the slider controls show the recommended slider ranges.
Brightness and Contrast:
Changes or determines the luminance of the output image. If the toggle button
“Automatic pre-normalization” is not set, the brightness and contrast of the original
image can be de- and increased by the slider controls. If brightness and contrast are
both set to zero, the output image has the same illumination as the input image.
If the “Automatic pre-normalization” is active, the output images will be normalized
to a standard illumination (pre-normalized). By changing the values for brightness and
contrast the standard values for the pre-normalization will be de- or increased.
Furthermore, it is possible to change contrast and brightness for a single image without
saving the values as permanent settings.
Copyright 2003-2004 © C-VIS GmbH, Bochum, Germnay • www.c-vis.com
16/ 22
User Guide for FaceSnap FOTOSHOT/TWAINSHOT
Zoom:
The zoom determines the size of the region that is cropped from the source image
relatively to the size of the found face (face box). So, it is achieved that faces with
different sizes or resolutions nearly have a constant size and margin in the result
image. A value about 0 just provides the face region or box as a result image (region
that includes eyes, nose and mouth). A value of 200 means, that the left and right
margins in the result image have the same dimensions as the face region. The colored
area of the slider indicates the possible range of values for the actual image. If the face
is situated near to the border of the input image and the scaled and cropped image
region exceeds the border of the input image, the result image will be padded (filled up
with white color) automatically.
Examples:
Zoom: 10
Zoom: 100
Zoom: 200
Figure 13
Vertical Offset:
Move the offset of the image region that is cropped from the input image up or down.
If a piece of the upper part of the person’s body should appear in the output image, a
positive offset should be set. However, if the hair of several persons is cut off in the
output image, a negative offset should be set.
Horizontal Offset:
Move the offset of the image region that is cropped from the source image to the left
(negative offset) or to the right (positive offset). The horizontal offset can be used to
move the face within the output image, e.g. if parts of a face exceed the output image
caused by a slightly rotated face or to decenter the face within the output image.
Auto Offset:
If this radio button is set and the crop region exceeds the border of the input image, so
that the image has to be padded, the cropped face image will be moved automatically
by the amount of the inserted space.
Figure 14
Additionally, the Auto Offset function slightly corrects the horizontal offset of the face
within the output image. Thereby, slightly rotated faces are better centered in the
output image (the whole head will be centered if possible).
Copyright 2003-2004 © C-VIS GmbH, Bochum, Germnay • www.c-vis.com
17/ 22
User Guide for FaceSnap FOTOSHOT/TWAINSHOT
Sharpness Check:
By activating the button “Sharpness Check” the image sharpness filter will be
switched on. If an image is out of focus, a warning indicates that the image is not
sharp or blurred. If a low value for the sharpness check is set, nearly all images are
accepted. Correspondingly, if a high value is set, fewer images that are blurred will be
provided. If the value is set too high, it could happen that mostly every image will be
rejected.
Margin Check:
If the region that is cropped from the source image exceeds
the border of the input image (e.g. face is near to the border
of the input image and a high value for the zoom is set) the
image will be padded (filled with white color).
If the “Margin Check” is activated, padded images can be
filtered. In interactive mode the status indicator warns the
user.
The changes of the above listed parameters will have an
effect on the result image after closing the window by
pressing the OK button.
Rotation Check
The Rotation Check can be turned on to reject all face images that are too much
rotated, i.e. that are not enough upright.
Frontal Check
The Frontal Check can be turned on to accept only faces, which are looking into the
camera.
Minimum and Maximum Face Box Size:
For an efficient detection of faces it is recommended to estimate the minimal and
maximal size of a face that could appear in an input image. By setting these values the
FaceSnap will be informed in what dimensions a face in the input image can vary. The
more precisely this value can be given, the faster and more precisely the detection of a
face in the input image works. In order to achieve a unified treatment of large and
small input images, the minimal and maximal face size is set in percent of the whole
input image. When changing this value, the value in pixels of the actual read output
image will be displayed next to the slider. If the minimal face size in pixels is
obviously too small (absolute minimum for a successful detection about 20 pixel), the
value will be adjusted to the allowed range.
Furthermore, adjusting the minimal and maximal box to the expected face size can
help to filter faces that are too small or faces that are too large to crop from the source
images with enough space.
For further information for setting up the face size see also chapter 5 “Useful Notes on
Acquiring Images“.
Quality / Detection Threshold:
With the detection threshold value the application decides if a face object has the right
quality to be accepted as a face or not. If the value is high, less faces will be accepted
Copyright 2003-2004 © C-VIS GmbH, Bochum, Germnay • www.c-vis.com
18/ 22
User Guide for FaceSnap FOTOSHOT/TWAINSHOT
by the FaceSnap. If the value is too small it could happen that an object, that has
similar characteristics as a face, is accepted as face.
The detection threshold can be used to filter facial images with bad quality.
Result Image Size:
Here the destination size of the result image is set. Every facial image that is cropped
from the input image will be scaled to the image size (in pixel) that can be set here.
Auto Correction of Face Color:
If this radio button is activated, the color of the output image (regarding the color of
the face) will be corrected automatically. Thereby, a slightly color distorted face can
achieve the original color again. If the color of the face is natural, the image color will
not be adjusted.
Permanent and Temporary Setup:
If the “OK” button is pressed, the settings will only be accepted for the actual loaded
image. The properties will not be saved permanently for further image acquisition
sessions. But the changed settings take effect after closing the window by pressing the
button “OK”. The result image will be updated if settings for cropping the face or
normalizing the image are edited. If the parameters for face detection are changed it is
required to repeat the face detection to see the effects. By pressing the “Cancel”
button the window will be closed without accepting the values.
4.2.3 Image Acquisition
Figure 15: FOTOSHOT Live Video Dialog
The FaceSnap Live dialog shows the live video, on which the face detection is running. The
image will be taken automatically when the face in the image fulfills the standards. But the
user can also take an image manually by pressing the space bar or by clicking with the left
mouse button on the face.
While moving the mouse in the video frame the automatic face detection is turned off. After
approx. 3 seconds without mouse movement the face detection will be switched on.
Copyright 2003-2004 © C-VIS GmbH, Bochum, Germnay • www.c-vis.com
19/ 22
User Guide for FaceSnap FOTOSHOT/TWAINSHOT
Items:
Arrows:
The four arrows on each side of the live video image indicate where a face was
automatically found.
White arrows: The system does not found a face in the image. The arrows are
centered.
Green arrows: The system found a face and the arrows are pointing to the detected
face.
Blue arrows: Manual mode is on. The arrows are pointing to the mouse position.
Progress Bar:
The progress bar above the Confirm Image control box shows the current progress of
the image acquisition. The whole image acquisition process can be divided into two
parts.
1. Take Picture (red)
2. Data Transfer (green)
The applicant has to stay there and look into the camera until the progress bar turns
green. This is important because the camera opens and closes the iris several times to
take the picture. This might be confusing for the user and the person in front of the
camera.
Confirm Image:
The control indicates the system that the user wishes to confirm the portrait image,
before it is send to the application. The implementation of this dialog may vary
between different clients.
Lock AF:
If this control is activated the auto focus is locked. This can be used to accelerate the
image acquisition. The focus point is stored until the server is shooting down.
Cancel:
Cancel the image acquisition.
4.2.3.1 Manual image acquisition
The FOTOSHOT module allows you to acquire an image manually by pressing the space bar
or clicking with the left mouse button on the live video. If you press the space bar the highresolution face detection is running on the whole acquired image. This might be necessary if
the system is unable to detect a face in the live video stream (low-resolution). Using the
mouse for image acquisition you have to click with the mouse on a face. This pre-selection is
necessary, if more than one person is in front of the camera. All other face on the image will
be blacked. Thus it is important to click on a face and not “blind” into the frame because then
all faces will be blacked.
In most cases the face will be found in the high resolution image, if not an interactive user
interface will appear (see Figure 14).
Copyright 2003-2004 © C-VIS GmbH, Bochum, Germnay • www.c-vis.com
20/ 22
User Guide for FaceSnap FOTOSHOT/TWAINSHOT
Figure 16: Interactive User Interface.
In this interface it is possible to choose between three different
modes to crop a facial image from the original input image (on the
left side). Depending on the mode, the cursor changes within the
original image. If the user presses the right mouse button within
the original image, the popup menu (right hand side) appears that
allows determining the mode for cropping the face. Furthermore, it is possible to rotate the
input image here.
Auto Crop with Preselection
If this mode is selected it is possible to selected a region
within the input image where to search for a face. The
region and its size can be determined by pressing and
holding down the left mouse button within the original
image.
If a face has been encircled as displayed and the mouse
button is released again, a new intensive search starts and
the found face will be extracted automatically. This
interactive cropping mode can be used to retry face
detection if no face has been found in automatic mode
(Auto Crop).
If the mode “Auto Crop with Preselection” is active the
cursor within the original image appears as follows:
Manual Crop
If a face was not found automatically and it is not
possible to find a face in the “Auto Crop with
Preselection” mode, the face or the box of the face
(region that includes eyes, nose and mouth) can be set
manually. By pressing the left mouse button within the
input image the face rectangle can be drawn in at any
position. By holding down the left mouse button and
moving the mouse the size of the face box can be
changed.
If a face has been marked as displayed and the mouse
button is released again, the manually set face will be
extracted automatically. Thereby, the outer rectangle
Copyright 2003-2004 © C-VIS GmbH, Bochum, Germnay • www.c-vis.com
21/ 22
User Guide for FaceSnap FOTOSHOT/TWAINSHOT
represents the region that will be cropped from the input image.
If the “Manual Crop” mode is active the cursor within the original image appears as follows:
5 Useful Notes on Acquiring Images
The following points or quality characteristics for the acquisition of portrait images should be
taken into consideration. These points are important for achieving best results at face
detection and output image quality:
The viewfinder (live image) of the camera should show the person you want to
photograph.
The background should be homogeneous (although this is not a requirement).
The lighting should be well arranged, i.e. the face should be illuminated from the
front.
There should be sufficient contrast in the input image.
There should be sufficient space around the face in the image. This is required to crop
the face without padding artificial margins, see the following illustration.
Figure 16
The image must be focused and not blurred.
Copyright 2003-2004 © C-VIS GmbH, Bochum, Germnay • www.c-vis.com
22/ 22