1
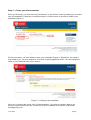
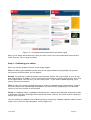
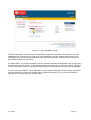
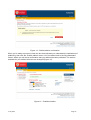
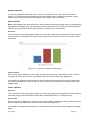
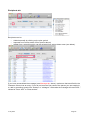
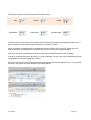
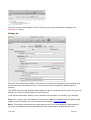
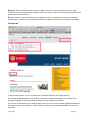
WEB AND DIGITAL DEVELOPMENT WORDVINE USER GUIDE Please submit feedback on this user guide to [email protected] 3 July 2015 TABLE OF CONTENTS Table of contents ........................................................................................................................... 2 What is WordVine? ............................................................................................................................ 3 What it does, and doesn’t do.............................................................................................................. 3 How to use WordVine ........................................................................................................................ 3 Newsletters, editions, and templates ........................................................................................... 3 Creating your first newsletter edition ............................................................................................ 4 Step 1 – Gather your content .................................................................................................................. 4 Step 2 – Login to WordVine .................................................................................................................... 4 Step 3 – Create your first newsletter ....................................................................................................... 5 Step 4 – Create your first edition ............................................................................................................. 7 Step 5 – Publishing your edition ............................................................................................................ 12 Step 6 – Emailing out your edition ........................................................................................................ 16 Step 7 – Statistics ................................................................................................................................. 16 FAQs ............................................................................................................................................. 18 General ...................................................................................................................................... 18 Troubleshooting .......................................................................................................................... 18 Recommended reading ............................................................................................................... 19 Using MaxBulk Mailer with WordVine ........................................................................................ 20 Tips for using MaxBulk Mailer .................................................................................................... 20 After completing your newsletter in WordVine ........................................................................... 20 MaxBulk Mailer application ........................................................................................................ 21 Tabs ........................................................................................................................................... 22 Message tab .......................................................................................................................................... 22 Recipients tab ....................................................................................................................................... 24 Settings tab ........................................................................................................................................... 26 Preview tab ........................................................................................................................................... 27 Delivery tab ........................................................................................................................................... 28 Buttons ....................................................................................................................................... 29 Sending lawful e-communications ............................................................................................. 30 Simplified statement of the legal requirements of the Spam Act................................................ 30 Commercial e-communication.................................................................................................... 30 Consent ...................................................................................................................................... 30 Authorisation .............................................................................................................................. 30 Unsubscribe ............................................................................................................................... 30 Terms and Conditions for using the University of Sydney’s e-communications tool .......... 31 3 July 2015 Page 2 WHAT IS WORDVINE? WordVine is an online tool that helps you build professional-looking electronic newsletters. It lets you enter content into a simple online form to generate complex HTML newsletters from predefined templates. Several generic ‘branded’ templates are provided, and customised templates can be produced on request. WordVine simplifies many of the technical aspects required to produce high-quality e-newsletters by offering features such as: • • • • • A simple interface to enter content Visual formatting (WYSIWYG) tools Automatic image resizing/cropping Hosting for online newsletters and images An accurate preview function. WHAT IT DOES, AND DOESN’T DO While WordVine does greatly simplify the process of creating e-newsletters, it doesn’t do everything required to successfully manage an e-newsletter campaign. It is important that you understand, and are comfortable with WordVine’s limitations before you start using it. WordVine focuses on the production of e-newsletters, not their distribution. Based on the content you provide, WordVine generates HTML code which you can then download. WordVine will also host a web-based version of your e-newsletter along with any images it incorporates. WordVine will not help you manage your recipients, by either subscribing or unsubscribing them, nor will it perform the actual mail-out to your recipients. You need to manage these aspects yourself using third-party software. Some software recommendations and examples are given later in this document. If that all sounds good, then keep reading to learn how to use WordVine. HOW TO USE WORDVINE Newsletters, editions, and templates Each of these terms: newsletters, editions and templates, have specific meanings in WordVine, and it’s important to understand these. Newsletters are logical groups used to organise the various emails you produce, for example: ‘Allstaff newsletter’, or ‘Alumni news’. How you organise your newsletters is up to you – it will not directly affect your recipients. Think of newsletters as a kind of internal filing system for you to organise your editions. Editions are the individual emails you generate and send to your recipients. Each edition belongs to a newsletter, or to put it another way, each newsletter has many editions. Examples might be the ‘November 2011’ edition of the ‘All-staff newsletter’, or ‘Edition 12’ of ‘Alumni news’. Most of your time using WordVine will be spent building editions. Once your edition has been built, it is ‘published’, which means a web-based copy is made available online, and you’ll be able to download the HTML to send it to your recipients. We’ll cover publishing in more detail later. 3 July 2015 Page 3 Templates control what your editions look like. You choose which template you want to use for each edition you create. The template dictates what fields are available to populate, and how the enewsletter looks when it’s previewed or published. Generally, editions from the same newsletter use the same template, but there can be exceptions. For example, you may want to let your ‘Alumni news’ readers know about an upcoming alumni event, so you could create a one-off edition using the e-Invite template. Several generic templates are available, such as a basic newsletter, e-Invite and e-Direct mail (EDM). Now that you understand the difference between newsletters, editions, and templates, let’s move on to how you create your first newsletter edition. Creating your first newsletter edition Step 1 – Gather your content The first step is to collate the content for your edition. Typically this is the text and images for the articles you plan to include. If you don’t have everything ready, you can still start building your edition, then save it and come back later with the remaining content – you don’t have to enter everything in one go. While you can build your edition directly in WordVine, you may find it more convenient to type it up in Word first. This makes it easier to send to other people to review and edit, and also gives you a backup in the event that your internet connection drops out, or your browser crashes while using WordVine. Once you have enough content ready, it’s time to login and start building. Step 2 – Login to WordVine Open WordVine in your browser1, and login using your Unikey ID: http://wordvine.sydney.edu.au If you haven’t requested access to WordVine yet, you won’t be able to do much once you login. If this is the case, you will be greeted by a message advising you to request access. Follow the onscreen prompts to submit a request, or email [email protected] and explain what you want to use WordVine for. You can use your personal UniKey to login to WordVine and build your newsletters, but these editions will only ever be available to you. Your UniKey is personal and can access your personal information so you must never give anyone your password. If you want to share the creation of newsletters with your colleagues, request access using a role-based UniKey (ICT can help you create one if your department does not have one already). 1 Supported browsers are Safari 5+, Chrome, Firefox 3.5+, Internet Explorer 7+ 3 July 2015 Page 4 Step 3 – Create your first newsletter When you first login, you won’t have any newsletters, so you’ll see a screen prompting you to create your first newsletter. Follow the on-screen prompts, or use the menu on the left to create a new newsletter (Figure 1). Figure 1 – Links to create a new newsletter On the next screen, you’ll be asked to name your newsletter (Figure 2). Remember, this name is only visible to you, not your recipients, so choose something you find useful. You can change the name of your newsletter later if you need to. Figure 2 – Creating a new newsletter Once you’ve entered the name, click ‘Create newsletter’. You will then be taken back to the previous screen where you’ll see a new entry for your newsletter, along with a confirmation message (Figure 3). 3 July 2015 Page 5 Figure 3 – Newsletter created Congratulations, you’ve created your first newsletter. Now you can create and populate your first edition. 3 July 2015 Page 6 Step 4 – Create your first edition The quickest way to create a new edition of a newsletter is to click the ‘New Edition’ button below the newsletter entry (Figure 4). Figure 4 – New edition button You will then be presented with a screen asking you to name the edition, and choose which template it will use (Figure 5). Once you are done, click ‘Save & Build’. The templates on offer will depends on the level of access you’ve been given. If none of the available templates are suitable for the edition you want to create, contact Web and Digital Development to arrange access to other options. Figure 5 – Creating a new edition 3 July 2015 Page 7 Once you click ‘Save & Build’, a blank edition will be created with the name and template you specified, and you will be taken to the ‘Build’ screen (Figure 6). Figure 6 – Example build screen Exactly what you see on the Build screen will depend on which template you chose, as they have different fields and options. However, they all work in the same way, and have the same basic controls. Each template is divided into various areas. Inside each area there are one or more sections, containing fields (blank cells) for you to fill in. Some fields are grouped into repeatable sets known as ‘replicants’. Within a set you can add, remove, and rearrange replicants. Depending on the template you’re using, the sets may have a minimum or maximum numbers of replicants. 3 July 2015 Page 8 Areas are denoted by a heading. In the example above, ‘Header’ and ‘Body’ are areas, which relate to areas of content in the finished edition. Sections are identified by a light grey box with a black key line. These can also be seen in Figure 6 above. In the ‘Header’ area there is a section called ‘Masthead’ and in the ‘Body’ area you can see the sections ‘A-feature’ and ‘B-features’. Some sections are optional – if you see the words ‘Include this section in this newsletter’ along with a checkbox in the top-right corner, you can tick or un-tick the checkbox to enable or disable that section. If you do not see the checkbox, it means the section is mandatory. Replicants look similar to sections, but have a red key line, and an additional set of controls in their top-right corner (Figure 7). Figure 7 – Replicant controls The ‘Add’ button inserts a new replicant after the current replicant, and the ‘Remove’ button removes the current replicant. If the Add button is grey, it means you have reached the maximum limit for that replicant set. If the Remove button is grey, you have reached the minimum limit. The ‘Up’ and ‘Down’ buttons move the current replicant up or down within the set. If either the Up or Down buttons are greyed out, it is because the replicant is already at the top or bottom of its set. Some replicants don’t have a minimum limit. If you click the Remove button on the last replicant of a set with no minimum, it will disappear and be replaced by an ‘Add Replicant Name’ link (Figure 8). If you change your mind later, and want to restore this replicant, just click this link. Figure 8 – Restore replicant link Fields come in various types, including plain text boxes, rich text boxes (which allow formatting), drop-down menus, file uploads, and more. All fields have a label to describe them, and many also have an extended description saying what the field is for, and how best to use it. If you see the icon next to a field you can hover your mouse over the icon for more information. Where the appears next to an image field, hovering over it will specify the required dimensions for the image in that particular location. 3 July 2015 Page 9 In some article sections of the e-newsletter template there are two fields call ‘Short blurb’ and ‘Extended blurb’ (Figure 9). Depending on which area you are working in, a short blurb is either mandatory (marked by a red asterisk) or optional (no asterisk). Where it is mandatory, only the text in the ‘Short blurb’ field will be initially visible. If an extended blurb is given, a ‘Read more’ will appear after the short blurb which when clicked on will cause the item to expand and show the extended blurb. As the ‘Extended blurb’ text replaces the short blurb it is necessary to include the short blurb text in the ‘Extended blurb’ field if you want it to be displayed. In cases where the short blurb is optional, filling in only the extended blurb will mean only the headline will be initially visible. Clicking on the headline will cause the item to expand and show the extended blurb. Figure 9 – A replicant with short blurb, extended blurb and URL fields. In this case only the headline is mandatory, marked by the red asterisk. In other articles of the e-newsletter template there is only one field named ‘Blurb’. In these sections only the headline is will be initially displayed as part of a dot point list. If a blurb is given, clicking on the headline while will cause the item to expand and show the blurb. In sections where a URL field is available, filling in the URL will turn the headline into a clickable link which will open that URL in a new browser tab. Note that both the URL and blurb fields cannot be filled in simultaneously. The last thing we need to cover before we start putting content into our edition, are the edition controls (Figure 10). Figure 10 – Edition controls 3 July 2015 Page 10 The edition controls ‘float’ at the bottom of your screen so they are always accessible. They are mostly self-explanatory. ‘Save’ will save any changes you’ve made to the edition. Be sure to save often, in case your computer crashes, or you lose your internet connection. When you click save, you’ll see a confirmation to the left of the edition controls. If you get an error message see the Troubleshooting section of this document for possible solutions. ‘Save & preview’ will first save the edition, then open a preview window so you can see your progress so far. You can preview at any time, even if you have invalid or incomplete fields. This is very useful if you’re not sure what a field does, or if you want to try different content variations. Make sure you have any pop-up blockers disabled, or an exception added for WordVine, otherwise the preview window won’t appear. At the top of the preview window you’ll see a toolbar (Figure 11), which contains the name of the edition you’re previewing, and the newsletter it belongs to. You’ll also have a drop-down menu called ‘View’ which lets you toggle the preview between the email version of your edition, and the online version. The email version is what you’ll be emailing to recipients. The online version is what people will see if they click the link ‘View an online version’ from the e-newsletter. The difference between the email and online versions depends on which template you are using. Some templates only show certain fields in one version or the other. Toggle between both previews to see what your edition will look like. Figure 11 – Preview controls ‘Validate’ will check all the fields in the edition to make sure you’ve completed them properly. If any of your fields are invalid, they will be highlighted in red for you to review. ‘Validate & publish’ will first validate the edition, and if successful, will then take you to the Publish screen. Publishing locks the edition from further editing, and puts a public copy online, where you can download the HTML you need to create and then email the edition to your readers. You should only use the publish function once you’re sure your edition is complete. Publishing is covered in more detail later in this document. Ok, we’ve covered the basics. Now it’s time to start populating your empty edition with some content! Whether you’re planning to create your edition directly in WordVine, or have collated it in Word first, let’s assume you have enough content for your first edition, and you’re looking at a Build screen similar to what’s shown in Figure 6. Work your way through the Build screen, filling in fields with your content. If you’re not sure what a particular field is for, try it. Enter something, and click ‘Save & preview’ to see the results. If you enter the wrong thing, just go back and remove it. In Figure 12 you can see what part of a completed edition might look like, alongside a preview the same edition. 3 July 2015 Page 11 Figure 12 – Completed build screen (left) and preview (right) When you’re happy that everything is how you want it, and you’ve previewed both the email and online versions, you’re ready to publish. Step 5 – Publishing your edition When you use the ‘publish’ function, a few things happen. First, the edition gets validated to make sure all the required fields are completed. If they aren’t, you’ll have to fix them before you can publish. Second, if everything is valid, the edition is permanently locked. Once you publish it, you can’t go back and change it or delete it. This is to prevent email and online versions getting out of sync. Just like a regular email, once it’s sent, you can’t take it back – if you need to update anything, you’ll have to send out a correction. Third, a copy of the email is published online so it can be viewed through a web browser. Links to this online version are automatically embedded in the email version (depending on the template used), so you don’t need to do this yourself. Finally, the edition’s status is updated in WordVine so it’s marked as ‘Published’, and you’ll be able to download a ZIP file containing both the email and online versions. The email version is what you send to your recipients. You can publish your edition from the Build screen by clicking the ‘Validate & publish’ edition control (Figure 10), or from the ‘My newsletters’ screen (Figure 13). 3 July 2015 Page 12 Figure 13 – My newsletters screen The ‘My newsletters’ screen can be accessed from anywhere in WordVine by clicking on the ‘My newsletters’ tab. It gives an overview of all your newsletters, and the editions within them. In the example above you can see the newsletter titled ‘My first newsletter’, and below it the edition we just created, called ‘January 2012’. For each edition, you’ll see a thumbnail preview, its status and last-modified date, and on the right a list of actions you can perform. In the example above the options are to ‘Preview’, ‘Build’, ‘Delete’ or ‘Publish’ the edition. When it is published, these options will change and the status will be updated. For now, just click ‘Publish’. You will be taken to the publish confirmation screen (Figure 14) where you’ll be asked to confirm that you really want to publish the edition. This is your last chance to change your mind and edit your edition further. 3 July 2015 Page 13 Figure 14 – Publish edition confirmation When you’re ready to proceed, check the box that indicates you understand the implications of publishing, then click the ‘Publish edition’ button. You’ll be taken back to the ‘My newsletters’ screen, where you will see a confirmation that your edition has been published. The actions available for your edition will also have changed (Figure 15). Figure 15 – Published edition 3 July 2015 Page 14 From here you can view the online version of your edition by clicking on the link: ‘View in browser’, and download a ZIP file containing the email version by clicking ‘Download’. You can also find data about how people view your newsletter by clicking ‘Statistics’. See more about statistics in step 7 below. You also have a new option: ‘Copy edition’, which lets you make a copy to use as a starting point for another edition. 3 July 2015 Page 15 Step 6 – Emailing out your edition Now that you have finished building and publishing your first edition, it’s time to email it to your readers. This part is up to you. There are plenty of third-party products, both free and commercial, that will help you send mass-emails. We can’t explain how to use all of them, but we can recommend a couple of products. Bear in mind the email method you use may vary depending on the requirements of your newsletter. Thunderbird Thunderbird is a cross-platform, open-source email client developed by Mozilla, the creators of Firefox. It can be used to send mass emails using a freely available plugin called ‘Mail Merge’. MaxBulk Mailer MaxBulk Mailer (MBM) is a commercial mass email application available for Mac and Windows. It is easier to use, and has more features for large-scale email campaigns, compared with Thunderbird, but costs a modest amount of money (US$50-60 per licence). See below for detailed instructions about using MaxBulk Mailer with WordVine. Step 7 – Statistics Statistics for your newsletters are categorised as email or online statistics, separating details on the email version you send to recipients via a bulk mailer and the online version that sits on the website. To view statistics, go to the left-hand menu and click on ‘My newsletters’. This will bring up a list of your newsletters. You’ll see basic statistics for visits and views in the information under your newsletter’s name. Only published newsletters have statistics, so statistics will only be available if your newsletter has been published. Figure 16 – Published edition details Views and visits • Visits are the number of individuals looking at your newsletter. • Views are the number of times your newsletter is looked at. If a recipient reads the newsletter three times this counts as three views but one visit. 3 July 2015 Page 16 Detailed statistics To get more details on visits and views, click on the ‘Statistics’ link in the right-hand ‘Actions’ column. You’ll be taken to the statistics for the most recent edition, displayed as graphs and pie charts. Each section contains an explanation of the statistics you are viewing. Email statistics: Note: email statistics are less reliable than online statistics because tracking relies on images being downloaded and displayed in the email client. Some email clients like Yahoo and Gmail may block statistics so you should consider email statistics as indicative but not absolute. Overview The overview summary (bar graph) shows you how many people have opened your email (visitors), how many times (views) and how many click-throughs from the email version to the online version there were. Figure 17 – Overview summary as bar graph Feature articles When a user clicks ‘Read more’ on a story and links through to the online edition, those clicks are reported here in pie chart format, grouped by the section of the edition they appeared in. If the edition or template doesn’t make use of this feature (for example if all content is contained in the edition and there is no need to click for further information), then the click-through section will appear blank. Online statistics Overview The overview summary (bar graph) shows you how many people have opened your email (visitors), how many times (views) and which articles they clicked ‘Read more’ on (articles views). Article views When a user clicks ‘Read more’ on a story in the online edition, those clicks will be reported here in pie chart format, grouped by the section of the edition they appeared in. If the edition or template doesn’t make use of this feature then the click-through section will appear blank. 3 July 2015 Page 17 FAQS General Can I rename an edition? At this point in time, editions can’t be renamed (but newsletters can). Why can’t I delete a newsletter? If your newsletter includes any editions that have been published, it can’t be deleted. This is to avoid accidental deletions that would see a recipient unable to access the online version. If there are serious reputational issues that arise from a published newsletter, contact Web and Digital Development to have the newsletter removed. How can I let my manager see my newsletter/invitation/EDM so they can approve it? Copy the URL from the preview window and send it to your approver. As long as they have a Unikey they will be able to login to see the document. TROUBLESHOOTING Error messages 1 Click on the blue underlined text ‘login again’ before you enter any more text into your newsletter or you will not be able to save it. When you are logged in again the message changes to: 2 Each edition of a newsletter must have a unique name. Rename the edition. 3 Some fields are mandatory and must contain some content in order to be published. 3 July 2015 Page 18 Problems My images are cropped or blurry Trying to upload a very large file may cause WordVine to freeze. If you upload an image that is too large for the space allocated, it will be scaled down and/or cropped to fit. In most cases this produces adequate results. However, the results achieved by using dedicated software such as Adobe Photoshop will usually be superior. For best results, resize the images yourself prior to uploading them. All images should be RGB and 72 dpi. In the e-newsletter, the A-feature image is 590 pixels wide x 220 pixels high, the B-feature image is 240 pixels wide (height variable) and remaining images are 178 pixels wide (height variable). The EDM image is 336 pixels wide x 176 pixels high. The e-invitation image is 600 pixels wide x 260 pixels high. Hovering over the tool tip icon ( ) next to the image field will also show you these dimensions. When I click on ‘Read more’ the first paragraph disappears If you want the text in the ‘Short blurb’ to show when ‘Read more’ is clicked, it needs to be included at the beginning of the ‘Extended blurb’ field. When I click on the ‘Preview’ button nothing happens Make sure that pop-up windows are not blocked in your browser. When a recipient views the online version it doesn’t show their name, even though I’ve personalised the email Personalisation only works within the email as a result of mail merging. The online version is static so if you are personalising your email you should create the WordVine version with a generic salutation – for example, Dear student. You can replace the generic ‘student’ with the personalisation tag in the downloaded versions of the text and HTML files created by WordVine once you place them in your email application. I want to change the template design OR I want to add an image to a section that doesn’t have an image field OR I don’t want to use a section but there’s no option to delete it The templates have been designed to meet branding and Marketing and Communications Division requirements. Unfortunately we are not currently resourced to build customised templates. If you require a customised template, and it is approved by the Brand team as appropriate, we can employ a web developer at your cost to do so. Please email us at [email protected] if you require this work to be done. RECOMMENDED READING Nielsen Norman Group e-newsletter usability report summary http://www.nngroup.com/reports/newsletters/summary.html 3 July 2015 Page 19 USING MAXBULK MAILER WITH WORDVINE This guide is not meant to replace the user guide produced by MaxBulk Mailer. This guide only highlights how you can use MaxBulk Mailer at the University with WordVine. You can download and buy MaxBulk Mailer for Macintosh or Windows from http://www.maxprog.com/site/software/internet-marketing/mass-bulk-emailer_sheet_us.php It costs US$60. This application helps you to send your branded e-communication that you have created in WordVine. It allows you to: – – – – – – – Send your messages to a large number of people automatically Personalise your messages Manage your mailing list(s) Identify ‘bounces’ and incorrect addresses Send multi-format emails (HTML and plain text) Set the ‘from’ and ‘reply to’ email addresses Preview your message before sending Tips for using MaxBulk Mailer Before you send a message to a large group of people make sure you send yourself a test email first. If it’s in multi-format (plain text and HTML) check the test email in both plain text and HTML. You can use a free cross-platform email application called Thunderbird to see a plain text version. MaxBulk Mailer will only send your message to the recipients that are checked, subscribed, not blacklisted and marked as ‘unsent’. MaxBulk Mailer has a Test mode that can be set in the Delivery tab. Once selected, MaxBulk Mailer will send the message only to the email address in the From field of the settings tab. It is also possible in Test mode to send a message to all your recipients or a selection of recipients exactly like a real delivery but messages will not be sent to the recipient addresses but to an address of your choice. That means you can simulate a real delivery with real data redirecting all the messages to yourself. Deactivate the Test mode when you are ready to send to your recipients. After completing your newsletter in WordVine When you have published your newsletter to the website using WordVine you can download it to your computer. Once downloaded, open the folder to see its contents. The folder contains four items: a folder called images and three files called ‘email.html’, ‘index.html’ and ‘text.txt’. 3 July 2015 Page 20 MaxBulk Mailer application As you work through MaxBulk Mailer remember to save regularly. Note: If you find you cannot send emails to recipients outside of the University network, contact the ICT Help Desk on 16000 or [email protected] to let them know about the problem and ask them to add your computer’s IP and/or MAC address to their known list of University computers. When you open MaxBulk Mailer it looks like the screenshot below: The five tabs – Message, Recipients, Settings, Preview and Delivery are used for setting up, testing and analysing the email delivery. 3 July 2015 Page 21 Tabs Message tab In this section you set up your message. 1. Enter the subject for your email: 2. Make sure the format selected is Text|HTML: 3. The plain text of your email/newsletter/invitation needs to be entered first. Go to the folder you downloaded from WordVine and find the file called ‘text.txt’. If you are using a Macintosh drag it to the main window and drop it in, if you are using Windows open the file, copy and paste it into the main message window: è Place a couple of returns after the text and then: 3 July 2015 Page 22 4. Either drag the file called “email.html” to the window to place the HTML code underneath the plain text or open the file in an HTML editor and copy and paste the contents of the file. 5. If you want to personalise your message use the tags: For example, replace “Dear student” with “Dear [Firstname]”. This can be done both in the plain text and the HTML code. The tags come from the Recipients list (see below). You can type the tags in WordVine if you wish as long as you place them between square brackets. 3 July 2015 Page 23 Recipients tab Recipients can be: – – – Added manually by clicking on the plus symbol Imported from various kinds of files (see list above) Added from a saved list which can be selected from a drop down menu (see below). If you have personalised the message (see Message tab, above), make sure that each field in the Firstname column has an entry. If you do not know the first name of the person you are sending it to, add in something generic like “student” or “colleague”. Otherwise the message will read “Dear ,” instead of “Dear John” or “Dear student”. 3 July 2015 Page 24 The delivery column on the left shows the following icons: Sent Unsent Failed Blacklisted Subscribed Unsubscribed The first three of these are the most useful. When delivery shows that a message has been sent, it will not resend to that recipient until the status is changed to unsent. When a recipient is blacklisted no messages will be sent to them (from any list). When they are unsubscribed no messages will be sent to them from the list they are unsubscribed in. The other columns in the Recipients list are used to personalise and deliver the message. In order to successfully deliver an email, it is only necessary to have a list of email addresses (which must appear in the ‘E-mail Address’ column). If there is text in those fields, the Firstname and Surname contents also appear in the “To” header of the email, along with the email address (see image below). 3 July 2015 Page 25 There are several other available columns which can be used to personalise messages (see Message tab, above). Settings tab Once you have entered your details in this area, you can save the settings for future mailouts, and access them from the drop-down menu. You can save different settings for different types of mailouts. The ‘SMTP server access’ settings should appear as above, except that you’ll need to use your own Unikey in the ‘Account ID’ field and your own password. In the ‘Sender information’ fields you can customise the information you need for your message. From: You can type any email address in here and the address will appear in the recipient’s email header. Use this for good, not evil, and follow the University’s Code of Conduct. Name: This should correspond to the email address used, if the email address is personalised. If you use a role-based account email address then the name could be a department’s name. 3 July 2015 Page 26 Reply To: Enter the address that you want replies to be sent to if the recipient uses the reply function of their email application. (Some people may reply by manually entering the address of the person the email came from.) Errors: If there is a problem delivering a message an error message will be sent to the address entered here. Therefore, this address should be the address of the person sending the message. Preview tab In the preview section you can see what your email will look like (see image above). The header (highlighted with a red outline) contains the sender information you entered in the Settings tab page as well as the date and time and the recipient information. If you have personalised your message (Dear John) you can use the arrows (highlighted above at top right) to preview the email for each recipient to ensure that the personalisation is working as expected. 3 July 2015 Page 27 If (in the Message tab) you have selected the Format ‘Text|HTML’ the preview only shows the HTML version. To preview the text version go back to the Message tab and select ‘Plain text’ to see what the message will look like in an email application that is not HTML enabled. Don’t forget to go back and change the setting before you send or you will only send the plain text version! Delivery tab You can set up test mode from this page. In test mode the message will only be sent to yourself. You can also put MaxBulk Mailer in test mode by selecting it from the Delivery menu. You can schedule sending from the Delivery menu as well. Once you have sent your email you can read the delivery report here. 3 July 2015 Page 28 Buttons The send button will send the message to your recipients – you can pause and stop the process if necessary. You can import a list or export a list. You can reset delivery so that all recipients are marked as unsent. The SpamCheck will check your message for common features that are likely to be marked as spam by a recipient’s server. The find button unsurprisingly opens the find feature. The statistics button can be ignored unless you know how to securely set up MaxBulk Mailer’s PHP script on your server. If you do, please refer to the University’s Privacy policy about accessing the kind of statistical data that this script collects. The preferences button allows you set various preferences, read the MaxBulk Mailer user guide for more information. 3 July 2015 Page 29 SENDING LAWFUL E-COMMUNICATIONS Staff sending e-communications on behalf of the University are governed by the Spam Act 2003 (Cth) and must ensure that all such communications are lawful. For more details you can visit http://sydney.edu.au/antispam but the following is a quick guide to its requirements. Simplified statement of the legal requirements of the Spam Act All commercial e-communications must: – have the consent of the recipient – clearly and accurately identify which individual or organisation has authorised the sending of the message – contain a functional unsubscribe facility. Commercial e-communication The Spam Act covers all commercial e-communications (even if it’s only sent to one recipient). A commercial e-communication is any electronic message that references a commercial offer or opportunity. That is, an offer or opportunity to obtain goods or services. This includes courses and events. There is no requirement under the Spam Act that they have a cost attached to them. Consent A person must either give express consent to receive commercial e-communications or their consent can be inferred from their conduct and their business or other relationship that they have with the University. Authorisation Every commercial e-communication must contain clear information about the individual or organisation that has sent and authorised the message, and provide accurate, current contact information. Unsubscribe Every commercial e-communication must have a functional facility whereby a recipient can inform the sender that they do not wish to receive any more e-communications from them. The sender must then remove that person from any email list and must not send them any further commercial ecommunications. By using the unsubscribe facility a person expressly removes their consent. 3 July 2015 Page 30 TERMS AND CONDITIONS FOR USING THE UNIVERSITY OF SYDNEY’S E-COMMUNICATIONS TOOL 1. Only staff who have been trained and authorised by the Marketing and Communications Division can use the University’s e-communications tool (the tool). 2. The Marketing and Communications Division does not offer support in using the tool beyond the initial training session and the provision of user guides. 3. The Marketing and Communications Division takes no responsibility for the content of any ecommunication created with the tool. It is the user’s responsibility to check that the message appears in the way that it should. 4. The tool is supplied as is and there is no express or implied warranty as to its operation or suitability for use. 5. All e-communications sent using the tool must comply with the provisions of the Spam Act 2003 (Cth) irrespective of whether they are classified as commercial electronic messages. 6. No more than twelve editions of each e-newsletter can be sent per year without the approval of the Director, Marketing and Communications. 7. All e-communications must be approved by the relevant local brand approver before being distributed. 8. A copy of each message sent using the tool must be sent to [email protected] to be stored in the Brand asset register. 9. The University Code of Conduct applies to all e-communications. 3 July 2015 Page 31