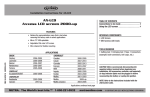
1
WARRANTY
USER’S GUIDE
ONE YEAR LIMITED WARRANTY
The PH-200, manufactured by HM Digital, Inc. ("the Company") is warranted to the purchaser
against defective materials and workmanship for one (1) year from the date of purchase.
What is covered: Repair parts and labor, or replacement at the Company's option.
Transportation charges for repaired or new product to be returned to the purchaser.
What is not covered: Transportation charges for the defective product to be sent to the
Company. Any consequential damages, incidental damages, or incidental expenses, including
damages to property. This includes damages from abuse or improper maintenance such as
tampering, wear and tear, water damage, or any other physical damage. The PH-200 is
watertight and completely submersible. Please ensure that the battery compartment and probe
gasket ring are firmly tightened before submersing in water. The warranty does not cover water
damage to the PH-200 due to parts not securely closed. Products with any evidence of such
damage will not be repaired or replaced.
How to obtain warranty performance: Attach to the product your name, address, description
of problem, phone number, and proof of date of purchase, package and return to:
HM Digital, Inc.
ATTN: Returns
5819 Uplander Way
Culver City, CA 90230
U.S.A.
Implied Warranties: Any implied warranties, including implied warranties of merchantability and
fitness for a particular purpose, are limited in duration to five years from date of purchase. Some
states do not allow limitations on how long an implied warranty lasts, so the above limitation may
not apply to you. To the extent any provision of this warranty is prohibited by federal and state
law and cannot be preempted, it shall not be applicable. This warranty gives you specific legal
rights, and you may also have other rights, which vary from state to state.
NOTE: Warranties are product-specific. Third-party products and products deemed by HM
Digital as "accessories" are not covered under warranty. Third-party products include, but are
not limited to, batteries and fittings. Accessories include, but are not limited to, precipitator rods,
fuses, lanyards and product cases.
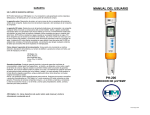
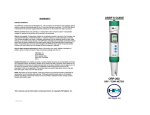
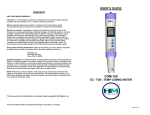
PH-200
pH / TEMP METER
This manual and all information contained herein is copyright HM Digital, Inc.
PH-200 1/08
Changing the batteries:
CONTENTS
Overview……………………………………………………………. 1
Contact Information………………………………………………...1
Specifications………………………………………………………. 1
Housing and Screen Description………………………………… 2
Taking Measurements…………………………………………….. 3
Calibration………………………………………………………….. 4
Care, Maintenance & Techniques………………………...…….. 5
Warranty……………………………………………………………. 7
When the meter displays a flashing battery symbol, your batteries
are getting weak and should be replaced soon. To change the
batteries:
1. Twist open the battery compartment on the top of the meter.
2. Remove the three batteries.
3. Insert new batteries in the direction as depicted inside the
compartment. The meter uses 357A batteries.
4. Close the battery compartment. Make sure it is tightly closed to
retain waterproofness.
OVERVIEW
NOTE: Do not reverse the polarity of the batteries. This will short circuit the meter.
Thank you for purchasing HM Digital’s PH-200 Meter. The PH-200 is an advanced, microprocessor-based handheld, watertight pH meter with superior accuracy. It can be used for
testing the acidity or alkaline levels of almost any liquid, in a wide variety of applications,
provided the liquid contains less than 50% alcohol and a conductivity of at least 10 µS (5 ppm in
TDS). (It will not work in pure, distilled or de-ionized water.) It also measures temperature in
both Celsius and Fahrenheit. The meter incorporates automatic temperature compensation
(ATC) to accommodate for discrepancies in temperature that would naturally occur. The meter
also features digital calibration for easy and precise calibration that will yield better results.
CONTACT INFORMATION
If you have any problems or questions regarding your meter, please contact HM Digital, Inc.
HM Digital, Inc.
5819 Uplander Way
Culver City, CA 90230
[email protected]
www.hmdigital.com
1-800-383-2777
SPECIFICATIONS
pH Range: 0.00 – 14.0 pH
Temperature Range: 0-80 °C; 32-176 °F
Resolution:
pH: 0.01 pH
Temperature: 0.1 °C/F
Accuracy: +/- 0.02 pH
Temperature Compensation: Automatic (ATC) to 25 °C
Calibration: Auto-calibration to 4, 7 or 10 pH with fine tune digital calibration by push button.
Auto Shut-Off: After 5 minutes
Probe: Glass sensor and glass reference tube (single junction)
Safe Operating Temperature: 0-80 °C; 32-176 °F (measuring in extreme temperatures is not
recommended)
Minimum Conductivity: For accurate and stable readings, the liquid to be tested must have a
conductivity of at least 10 µS (approx. 5 ppm in TDS).
Display: LCD panel
Housing: Waterproof (submersible); floats
Power source: 3 x 1.5V button cell batteries (included), model 357A
Dimensions: 18.5 x 3.4 x 3.4 cm (7.3 x 1.3 x 1.3 inches)
Weight: 95 grams (3.35 ounces)
1
Cleaning and sensor care:
1. Never touch the sensor!
2. To clean the unit, use a soft rag or towel. Wipe with water and a mild soap or rubbing alcohol.
3. To clean the sensor, rinse in distilled water or a pH 7 buffer solution. If cleaning with a pH 7
buffer solution, lightly dab (touch) the sensor on a soft tissue. Never rub the sensor with a tissue
or anything else, as this may scratch the glass.
4. If it is found that the glass sensor is scratched, it needs to be replaced.
5. If the sensor is dried up (or the gel within it), you can attempt to re-moisten the sensor by
keeping it in distilled water or a pH 7 solution for at least two hours. If the meter still does not
function properly or accuracy is not at optimum performance, the sensor may be irreparably
damaged and must be replaced.
6. For best results, clean the sensor after each use, especially if used in very low or very high pH
liquids, or liquids other than water.
7. PROBE STORAGE: Storing the probe in a 4 pH KCl buffer solution is preferred (the meter is
shipped with this solution in the cap). It is okay to rinse the probe in distilled water, but never
store the probe in distilled water. Storing the probe in a higher pH buffer solution will not
damage it.
Sensor Replacement:
If your sensor has been damaged, you can purchase a new one without having to purchase a
new meter. To replace the sensor:
1. Remove the sensor gasket ring by twisting it counter-clockwise.
2. Gently pull the sensor off the unit.
3. Gently insert the new sensor into the unit. Be sure to align the grooves properly. Never force
the sensor into the unit!
4. Make sure the rubber ring is properly positioned on the sensor.
5. Screw the gasket ring back onto the unit by twisting it clockwise. Tighten.
Sponge Care:
1. Never add distilled or tap water to the sponge/cotton ball, as mildew or mold may form.
2. Rewet with HM Digital’s bottling solution or a professionally made KCl solution with
bactericide.
6
PH-200 1/08
TAKING MEASUREMENTS
The PH-200 can take measurements of pH levels and temperature.
pH Measurements
1.
2.
3.
4.
5.
6.
7.
8.
Remove the cap.
Press the ‘ON/OFF’ button. The display will become active.
Dip the meter into the water sample, liquid or solution to be tested.
Lightly swirl the meter to ensure the removal of trapped air bubbles or electric
charges. Do not tap it against the glass.
The meter will display a reading almost immediately. Keep the
meter in the liquid until the reading stabilizes (approx. 30
seconds) for an accurate reading. NOTE – It is a normal
function of pH for the reading to fluctuate slightly and not
fully stabilize in certain situations.
To view the reading out of the liquid, quickly press the ‘HOLD’
button while the meter is in the liquid. This will hold the reading
on the screen. Quickly pressing the ‘HOLD’ button again will
release it.
Press the ‘ON/OFF’ button to turn the meter off.
Shake any excess water off the meter and rinse with distilled or
de-ionized water. Put the cap back on.
NOTE – The PH-200 is extremely sensitive in low conductivity water (below 50 µS). It is not
recommended to use this meter in water below 10 µS. If you do use the meter in such water, it
is better to test in flowing water, or swirling the meter continuously while obtaining the reading.
The reading should stabilize in 10-15 seconds.
Temperature Measurements
The temperature reading is always displayed on the LCD panel during measurement mode, and
is shown simultaneously for pH readings. It is not shown when the meter is in calibration mode.
The default temperature reading for the meter is in Celsius.
1.
2.
3.
4.
5.
6.
7.
8.
Remove the cap.
Press the ‘ON/OFF’ button. The display will become active.
The temperature reading is always displayed on the LCD panel (except in calibration
mode), and is shown simultaneously for pH readings.
The default mode for temperature is Celsius. To change the temp mode, quickly
press the ‘TEMP/CAL’ button to switch from Celsius to Fahrenheit or vice-versa.
Dip the meter into the water sample or solution to be measured.
The temperature reading will change immediately (unless the solution is at room
temp). For very hot or cold liquids, the reading may take slightly longer to stabilize.
Press the ‘ON/OFF’ button to turn the meter off.
Shake any excess water off the meter and rinse with distilled or de-ionized water. Put
the cap back on.
NOTE – Because of the sensitivity of the pH sensor and reference tube, it is not recommended
to use your meter as a thermometer in very hot or very cold liquids.
Switching Temperature Modes:
The default temperature reading for the meter is in Celsius. To change the temperature mode,
quickly press the ‘TEMP/CAL’ button to switch from Celsius to Fahrenheit or from Fahrenheit to
Celsius.
3
CALIBRATION
Your PH-200 meter has been factory-calibrated to a 7.0 pH buffer solution. While this is suitable
for many applications, it is recommended to recalibrate the meter as close as possible to the
range that will be tested, and recalibrating prior to every test will provide superior results (though
this is not required). If tests are conducted between wide ranges, recalibration should be done
more frequently. Additionally, it should be noted that pH buffers may vary amongst
manufacturers. For best results, the PH-200 should be recalibrated using HM Digital’s pH
calibration buffers (model PH-BUF).
The PH-200 features auto-calibration to pH 4.0, 7.0 or 10.0 and manual calibration to any value.
Manual calibration can also be used as “fine tuning.” For example, if a buffer solution is a value
such as pH 10.01,then auto calibration should be used to calibrate the meter to 10.00, and then
manual calibration should be used to bring it to 10.01.
Automatic Calibration
1. Turn the meter on by pressing the ‘ON/OFF’ button.
Note that the reading will fluctuate if the meter is not
submersed in a liquid. (It will stabilize in liquid.)
2. Insert the meter into a pH buffer solution of 4, 7, or 10
pH. Press and hold the ‘CAL’ button. The display
will flash and the temperature reading will change to
a flashing ‘CAL’ image.
3. The meter will automatically recognize which pH level
it is in (or the closest to it). This number will flash.
Also, the letters of ‘CAL’ will flash as ‘C…CA…CAL’
indicating progress. Allow 5-60 seconds during this
stage. Do not press any buttons, and if possible,
don’t move the meter.
4. When then meter is calibrated, ‘END’ will flash briefly and the screen will revert to the
measurement mode. Your meter is now re-calibrated.
Manual Calibration (Fine Tuning)
1. Turn the meter on. Insert the meter into any buffer solution and press the ‘CAL’
button. The display will flash, and the temperature reading will switch to a flashing
‘CAL’ image (for five seconds before switching to
automatic calibration).
2. The meter will automatically recognize the value of
the buffer and display a reading fairly close to that
value. Change the reading so that it matches the
value of the calibration solution. To increase the
reading, press the ‘UP’ button (TEMP/CAL). To
decrease the reading, press the ‘DOWN’ button
(HOLD). For example, if your calibration solution is
pH 3.0, decrease the reading until it reads ‘3.00’.
- If the calibration reading reaches the minimum
or maximum offset from the buffer value (+/- 1.5
pH), the screen will display the ‘minimum
calibration reached’ icon or ‘maximum
calibration reached’ icon, respectively. (e.g., if
the meter is in a 4.0 solution, the lowest it can
be calibrated to is 2.5.)
3. To set the calibration, press and hold the ‘TEMP/CAL’ button until the screen reverts
back to the measurement mode. Your meter is now re-calibrated.
NOTE – The sensor is very sensitive. It is normal for the reading to shift by .01 or .02.
4
PH-200 1/08
HOUSING AND SCREEN DESCRIPTION
CARE, MAINTENANCE & TECHNIQUES
As with all pH meters, the PH-200 requires proper maintenance to ensure a healthy lifespan for
the meter.
General techniques:
Housing
1. Store the meter upright (standing on the cap, so that you can read the text).
2. Do not store the unit in high temperature or direct sunlight.
3. Never touch the sensor! Skin oils may adversely affect the reading. If you do touch the
sensor, clean immediately with distilled water or a pH 7 buffer solution (see cleaning
instructions).
4. Always immediately replace the cap when the meter is not in use. The PH-200 cap contains a
small wetted sponge or cotton ball to ensure that the gel within the glass sensor does not dry up.
NOTE – A tightened cap will ensure a longer lifespan for your sensor!
5. It is normal for salt deposits to form on the outside of the cap or rim of the cap. This is the
bottling solution from within the cap, having dried up. If salt deposits appear, simply wipe off
with a soft tissue and rubbing alcohol.
6. Using the PH-200 in high temperature liquid, such as hot coffee, will shorten the lifespan of
the sensor. If testing in hot liquid is essential, be sure to not keep the meter in the hot liquid very
long. (Room temperature coffee will not adversely affect the sensor.)
7. After repeated usage in high TDS liquids, it is advised to clean the sensor to prevent residue
build-up.
8. If testing two samples over a wide range (e.g., pH 3 and pH 10), make sure to rinse the
sensor in distilled water or a pH 7 buffer solution between and after tests.
9. For optimum performance, it is best to use the meter at least once per month.
1.
2.
3.
4.
5.
6.
7.
8.
9.
Lanyard hook
Battery compartment
LCD display
Button panel
Power button
Calibration mode, temperature
mode, calibration-up button
Hold, calibration-down button
Sensor gasket ring
Detachable sensor (electrode)
LCD Display
For best measurement accuracy:
1. Though it is not necessary, the PH-200 will be more accurate if calibrated before each use.
This is the case with all digital pH meters.
2. Clean with distilled water or a pH 7 buffer solution after each use, even if checking the same
sample.
3. If an air bubble is lodged in the sensor, dip the meter in distilled water and stir. Remove the
meter and shake excess water off.
4. If the sensor is scratched, it must be replaced.
5. If the readings seem to slow down and continue to get slower, or the meter seems to have
become unresponsive or sluggish, you may need to change the batteries or replace the sensor.
Lifespans of sensors are limited. Lifespans vary depending upon usage. It is normal for a
sensor to wear out.
FOR ADVANCED USERS ONLY: If the meter is continuously used to check widely varying pH
levels and is also continuously recalibrated at different levels, performance may be affected. If
you find your meter is not be working at optimum performance, press and hold the ‘TEMP/CAL’
button. Once ‘CAL’ is flashing on the screen, press and hold both the ‘TEMP/CAL’ and ‘HOLD’
buttons at the same time for two seconds. This will reset the calibration. It is then necessary to
recalibrate the meter (see the Calibration chapter for more information).
5
1.
2.
3.
4.
5.
Low battery indicator
pH measurement
Temperature measurement
Celsius/Fahrenheit mode
Hold mode
BEFORE YOU START!
1. The meter is shipped with the cap on tight to ensure proper condition of the electrode, which
must remain wet. You will notice that there is liquid in the cap (a 4 pH KCl buffer solution).
Be careful not to spill it. To remove the cap, hold the meter and twist off.
2. For new meters, allow a longer response time for measurement readings. The response time
of your meter will quicken with usage. For your first few tests, lightly swirl the meter in the
water/solution 3 times and allow the meter to sit while adjusting to the reading.
3. If you need to test the pH of low conductivity water (below 50 µS), you should do so only after
using the meter a few times in a pH buffer solution or higher conductivity water.
4. Never touch the electrode or reference tube. Be sure not to touch the glass electrode or
reference tube to the side of a glass or beaker.
5. Always make sure that the cap is on tight after usage.
2
PH-200 1/08