1
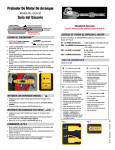
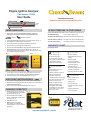
Engine Ignition Analyser
Part Number: TE064
User Guide
CheckSpark Operation
Read these instructions completely before use
Gripper lever
Gripper
hook
Engine Selector
Engine-type
slide switch
USING CHECKSPARK
AFTER ATTEMPTING TO START ENGINE
1. IMPORTANT - For correct CheckSpark operation, always set
engine-type slide switch to the proper engine type being tested
Vehicles
LED on CHECKSPARK tester will now show condition of the spark (see Fig. 2)
OK – GREEN (flashing)
Proper voltage, ignition is OK
Too HIGH – YELLOW (flashing) High voltage (see chart for possible causes)
Small petrol engines
2. Connect CHECKSPARK to plug wire of a non-running engine (see Fig. 1)
Too LOW – RED (not flashing) No voltage (see chart for possible causes)
Too LOW – RED (flashing)
3. Push gripper lever forward to open plug wire hook
Low voltage (see chart for possible causes)
4. Place open gripper hook on plug wire and release gripper lever
DIAGNOSTIC CHART
5. Red LED will stay lit indicating unit is ready for test
6. Disconnecting CHECKSPARK from plug wire will reset the internal circuit
7. CHECKSPARK may also be reset (if a second test is desired) by
momentarily pressing the reset button without the need to remove the
tester from the plug wire (see Fig. 2)
Fig. 1
LED STATUS LIGHTS
Flashing GREEN (OK)
Solid RED (Too LOW)
• Spark voltage is OK
• No spark detected
• Compression is good
• Engine kill switch not in run
position
Fig. 2
RESET
Too
LOW
OK
Too
HIGH
• No start problem could be:
Lack of fuel, bad fuel, improper
choke setting, defective
carburetor or fuel injector
Flashing YELLOW (Too HIGH)
• Spark voltage is too high
PULL START ENGINES
• Broken spark plug
1. Insure engine is ready for starting (see owners manual if necessary)
2. Firmly pull the recoil starter one time, if engine starts turn off engine
3. Observe LED status on the CHECKSPARK tester (see Fig. 2)
ELECTRONIC IGNITION ENGINES
1. Insure engine is ready for starting (see owners manual if necessary)
• Plug wire not properly
connected/seated on spark plug
• Plug wire resistance too high
(resistor type plug wire)
• Broken or open plug wire
3. Observe LED status on the CHECKSPARK tester (see Fig. 2)
• Check slide switch setting CheckSpark may flash yellow
if slide switch not on correct
engine type setting
1. Remove battery cover by pushing in
on rear tab of battery cover and pulling
up at same time (see Fig. 3)
2. Observe polarity when installing
battery, + terminal is toward the rear of
the unit (see Fig. 4)
• Defective trigger switch
(electronic ignition)
• Defective spark coil
• No primary voltage at coil
(electric start engines)
• Open plug wire at coil output
• Internal resistance of plug too
high (resistor type plug)
2. Energize electric start only long enough to turn engine over several times, if
engine starts turn off engine
CHANGING THE BATTERY
• Defective points
(mechanical ignition)
• Improper spark plug gap
Fig. 3
Flashing RED (Too LOW)
• Spark voltage too low
• Flooded engine
• Shorted plug
• Improper plug gap
• Plug wire shorted or arcing to
chassis
• Defective ignition coil
• Low compression
Push In
Fig. 4
3. Reinstall battery cover
4. Battery check: Push gripper
lever forward, red LED will light
indicating battery is good and unit is
operational
Open
200 N. Milwaukee Avenue
Suite 215
Libertyville, IL 60048-2250
[email protected]
www.trillww.com
www.dat-equipment.com.au