1
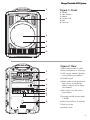
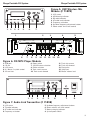
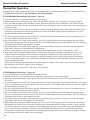
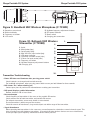
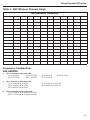
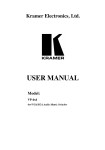
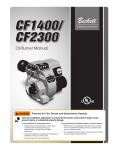
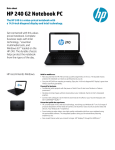
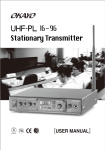
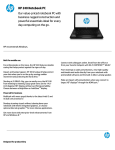
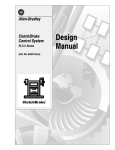
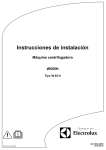
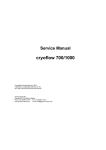
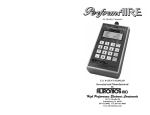
Okayo Portable PA System
Operating Instructions
C 7180
C 7182B
C 7184B
C 7185B
C 7192B
C 7193B
C 7195B
Basic PA
PA with UHF Wireless Mic Receiver
PA with UHF Wireless Mic Receiver &
CD Player
PA with UHF Wireless Mic Receiver,
CD Player & VOX Muting
Wireless Handheld Mic
Wireless Handheld Condenser Mic
Beltpack Transmitter
This operating guide also includes instructions for the following portable PA accessories:
C 7187B: Additional UHF wireless microphone receiver module
C 7189B: Wireless link transmitter module
C 7196A: Beltpack charging pod
C 7197A: Lapel microphone to suit beltpack transmitter
C 7198A: Headset microphone to suit beltpack transmitter
C 7188: Bluetooth module
S 5078: Replacement battery 2.9Ah.
Manufactured for Altronic Distributors Pty Ltd.
Okayo Portable PA System
This compact portable PA system features a sturdy, lightweight injection moulded cabinet. The system includes a high
power 50W (RMS) amplifier and can be supplied with an MP3 compatible anti-skip CD player and up to two wireless
microphone receivers. The in-built amplifier has balanced or unbalanced wired microphone inputs, plus line in and
line out RCA connections. The radio microphone receivers are 96 channel, allowing easy selection of non-interfering
frequencies. Each receiver includes individual frequency adjustment and volume control. The system is supplied with
in-built batteries and a charging facility to provide 3-4 hours continuous use. The two way speaker system comprising
an 8 inch woofer and high frequency horn, ensures excellent sound quality for both music and speech reproduction.
Weighing only 12kg it is truly portable and allows a wide range of uses in schools, places of worship, clubs, auctions
etc. Sets up in just seconds for instantaneous use.
C 7189B Optional wireless link transmitter: For larger venues or audiences, the addition of this module allows several units to be used in the same area without the need for speaker or signal wiring. In this application you have a master
and as many slave units as required for the venue. The wireless link module is fitted to the master unit which then
transmits any audio signal (including wireless mic, CD player or wired mic) to the slave units, which are fitted with a
UHF wireless microphone receiver adjusted to receive the signal from the wireless link.
C 7187B Optional UHF wireless microphone receiver: Installation of this module adds a second wireless microphone to the Portable PA.
Operation
Power & Charging Functions
The portable PA system is powered by 240V AC mains via IEC socket (see figure 2 for location) or via the internal battery pack. When operating for the first time the internal battery will require charging for up to 8 hours. Charging will
occur whenever the unit is plugged into the 240VAC mains supply. The charge status indicator (shown in figure 2) will
illuminate red when charging. Once charging is complete the indicator will illuminate green.
When in use without mains power the LED built into the power switch provides indication of battery status:
100% to 20% capacity: red illumination
<20% capacity: flashing red illumination
2
Okayo Portable PA System
1.
2.
Figure 1: Front
1. Handle
2. Horn Tweeter
3. Woofer
4. Speaker Grill
5. Port
6. Heatsink
3.
4.
5.
6.
Figure 2: Rear
1.
(shown configured with 2 x UHF
wireless microphones & CD player)
1. UHF receiver modules (blanking
panels fitted in base models)
2.
2. CD/MP3 player
3.
3. Power switch & charge indicator
(this panel is replaced when
adding a wireless link or digital
echo module)
4.
5.
6.
7.
8.
4. Mic, treble, bass and master
level controls
5. Speaker out (8Ω) (except model
C 7185B)
6. Mic input (6.35mm / 3 pin XLR)
7. RCA line in/out
8. 240V AC input
3
Okayo Portable PA System
1.
2.
Okayo Portable PA System
3.
4.
5.
6.
7.
8.
Figure 3: Level Adjustment & Input/Output Module
(Models C 7180, C 7182B and C 7184B)
1. Master volume level
2. Treble level
3. Bass level
4. Wired mic volume level
1.
2.
5. RCA stereo line input
6. RCA stereo line output
7. XLR / 6.35mm TRS wired mic input
8. Speaker out (8 Ohm)
3.
4.
5.
6.
7.
8.
9.
10.
Figure 4: Level Adjustment & Input/Output Module (Models C 7185B)
1. Master volume level
2. Treble level
3. Bass level
4. Wired mic volume level
5. RCA stereo line output
6. RCA stereo line input
7. Line input volume control
8. XLR / 6.35mm TRS wired mic input
9. Voice priority (VOX) indicator LED
10. Voice priority (VOX) button
Level Adjustments and Input/Output Connection - Figures 3 and Figure 4
System inputs, outputs and levels can be controlled via this module. Master volume adjusts overall system level from
all inputs (ie: UHF, CD/MP3 player, RCA stereo input and wired microphones). Treble and bass controls effect all system inputs, when set to half way sound output will be flat.
RCA stereo jacks are provided for an external audio source. This allows connection of a CD player, iPod or other
audio source.
An RCA output is provided for use with external zone amplifiers or other PA systems if required. This output signal is
combined from all inputs (ie: UHF, CD/MP3 player, RCA stereo input and wired microphones).
If an external speaker is required, it can be connected to the portable PA system via 6.35mm jack (Figure 3 only).
Note: this feature is designed for 8 ohm minimum impedance speakers. Overall amplifier output will be split between
both speakers when in use.
Pressing the voice prioritory (VOX) button (Figure 4 only) turns the voice priority on. The red LED will illuminate. This
will mute music output automatically when any microphones are in use.
4
Okayo Portable PA System
Okayo Portable PA System
Figure 5: UHF Wireless Mic
Module (C 7187B)
1. LCD screen
2. A/B diversity indicator
3. RX audio indicator
4. AF audio level indicator
5. Frequency set button
6. Up/down frequency adjustment buttons
7. Power switch & mic level control
1.
2.
3. 4.
5.
6.
7.
1.
2.
6.
7.
8.
9.
3.
5.
4.
10. 11. 12. 13. 14.
15.
Figure 6: CD/MP3 Player Module
11. Track skip reverse
12. Track skip forward
13. Play/pause
14. Stop/eject
15. Master volume level
6. Power switch
7. SD/USB source selection
8. Folder selection
9. Track search reverse
10. Track search forward
1. USB port
2. CD slot
3. LCD screen
4. Hi / Norm / Lo pitch control
5. SD card slot
1.
2.
3.
4.
5.
6.
7.
8.
Figure 7: Audio Link Transmitter (C 7189B)
1. LCD screen
2. TX audio indicator
3. AF audio level indicator
4. Frequency set button
5. Up/down frequency adjustment buttons
6. Power switch & mic level control
7. Battery charging indicator
8. System power switch
5
Okayo Portable PA System
Okayo Portable PA System
Wireless Microphone Module - Figure 5.
The portable PA system can be equipped with one or two UHF microphone modules. Each module features 96
selectable channels for interference free operation with multiple microphones or PA systems.
(See page 9 Fitting additional modules for installation guidelines)
1. Turn the power switch/volume knob clockwise to turn the receiver unit on.
2. The LCD screen will display ‘ON’ then revert to the factory default channel (or the channel last selected).
3. To select a channel press the SET button. Using the UP/DOWN frequency adjustment buttons you can set the
receiver to match the channel used by the transmitter.
4. Adjust the volume level to the desired position.
5. The module is now ready to receive signal from either a handheld of beltpack transmitter. When receiving signal the
A/B diversity indicator will illuminate red or green to show the diversity status. The RX indicator will illuminate when
signal from the transmitters is being received. The AF indicator displays audio level when users are speaking into
the microphone.
CD/MP3 Player (C 7184B Model Only) - Figure 6.
1. Turn the rocker switch on and press power button to turn on.
2. Press the SD / USB / CD switch to change between CD, USB or SD/MMC source.
3. To playback or pause, press PLAY/PAUSE on the front panel or 4; on the remote control.
4. Press REV, F.WD on the front panel or 9 : on the remote control for desired next or previous track number. The
player will continue to play while displaying selected tracks. When the desired selected track is displayed, press
play/pause button again to begin playing the selected track.
5. To stop playback press STOP/EJECT on the front panel or press <
once on the remote control.
6. Press FB, FF on the front panel or 7 8 on the remote to scan forward or backward within a track.
Audio Link Transmitter (C 7189B) - Figure 7.
For larger venues or audiences, the addition of this module allows several units to be used in the same area without the
need for speaker or signal wiring. In this application you have a master and as many slave units as required for the
venue. The wireless link module is fitted to the master unit which then transmits any audio signal (including wireless
mic, CD player or wired mic) to the slave units, which are fitted with a UHF wireless microphone receiver.
1. On the master unit turn the power switch / volume level control clockwise to turn the transmitter on.
2. The LCD screen will display “On” then revert to the factory default channel (or the channel last selected).
3. To select a channel press the SET button. Using the UP/DOWN frequency adjustment buttons you can select the
desired channel.
4. On the slave unit turn the UHF receiver module on. Press SET and use the UP/DOWN frequency adjustment
buttons to set the unit to the same channel as the master unit.
5. When transmitting audio from the master to slave unit the TX indicator will light green. The AF indicator displays
audio level when users are speaking into the microphone or music is playing.
Pitch Controls (operates with all music file types):
LO - PITCH: Pressing this button on the front panel or the remote control reduces the speed (pitch) by 2% increments.
Press once, and the screen will indicate PITCH: -1. Press again for up to 10 steps of speed variation.
HI – PITCH: Pressing this button on the front panel or the remote control increases the speed (pitch) by 2%. Press
once, the screen will indicate PITCH: 1. Press again for up to 10 steps of speed variation.
NOR – PITCH: Pressing this button on the front panel or the remote control resets the pitch to zero (ie normal speed).
6
Okayo Portable PA System
Okayo Portable PA System
CD Playback:
• Insert a disc into the slot with the data side facing down, and playback starts automatically. Track number and
playing time will be displayed on display panel.
• When inserting a disk into the CD player or taking a disc out, it is necessary to let the CD player insert the disk and
return automatically. Do not force the disc in or out of the disc slot as this may cause serious damage to the unit.
• The LCD DISPLAY shows CD status including track number and playing time.
• Press STOP/EJECT on the front panel once to stop playback.
• Press STOP/EJECT again and the display will show total track numbers and total time.
• Press STOP/EJECT for the 3rd time and the disc will eject.
• Press STOP/EJECT a fourth time and the disc will be inserted again.
• For CD with MP3/WMA files. Press FOLDER on the front panel or remote to select the desired folder (directory).
SD/MMC Card:
Insert SD Card or MMC Card into the SD/MMC CARD slot on the front panel. Push the card into the slot until it
clicks into the slot.
• When taking the card out, ensure that you hear it click that releases the card and then remove.
• Do not use force to pull the card out as this may cause damage to the card or the unit.
• Press SD / USB / CD or SD / USB / CD on the remote control to select the SD/MMC function, then press PLAY /
PAUSE or4;on the remote control to start playing.
• Press FOLDER on the front panel or remote control to select the desired folder (directory).
USB flash:
• Insert USB into the USB slot on the front panel.
• Press SD/USB/CD or SD/USB/CD on the remote control until USB is selected.
• Press PLAY / PAUSE or4;on the remote control to start playing.
• Press FOLDER on the front panel or remote control to select the desired folder (directory).
Figure 8: CD/MP3/USB
Player Remote Control
1. HIGH / NOR / LOW pitch controls
2. 0-9 Track programming and selection
3. FOLDER Choose track directory (MP3 only)
4. 78Track search reverse / forward
5. CD / USB / SD source selection
6. A>B (replays a section of track)
7. ENTER Track programming enter button
8. Muting
9. 9:Track skip reverse / forward
;Play/pause
10. 4
11. < Stop playback
12. REP Repeat / repeat all function
13. RAN Random or shuffle playback mode
14. PROG Track programming mode
15. EJECT CD player eject
1.
15.
14.
3.
13.
12.
11.
10.
4.
9.
5.
8.
6.
7.
2.
7
Okayo Portable PA System
Okayo Portable PA System
Remote Functions (C 7184B Model Only) - Figure 8:
RANDOM (RAN): A random selection is played from available tracks. Press RAN and LCD will show SHUFFLE. Press
9 : to select next or previous random track.
REPEAT (CD mode): Press REP once to repeat play all tracks. The LCD will show REPEAT ALL. Press REP again to
repeat playing the current track only. The display will show REPEAT 1. Press REP again to cancel.
REPEAT (MP3/WMA mode): Press REP once to repeat play all tracks. The LCD will show REPEAT ALL. Press REP
again to repeat all songs in the current folder. The display will show REPEAT FOLDER. Press REP again to repeat playing the current track only. The display will show REPEAT 1. Press REP again to cancel.
NUMBERS 0-9: Enables track selection via number entered.
PLAY / PAUSE: Press once to pause. The LCD displays ;. Press again to play and LCD displays4 .
PREVIOUS TRACK: Press 9 to select previous track.
NEXT TRACK: Press : To select next track.
TRACK SEARCH: Press 78 to search through individual tracks. Press once to activate. Press again to cancel.
Press4; to return to normal playback.
CD/USB/SD: Selects USB, SD or CD source for playback. Then press4;to start playing.
A-B: This selects a portion of music to be played. Whilst in play mode, press once for the start point for memorizing
music selection. Press again for the end point. The unit will now begin playing from the start point to the end point.
The unit will then continually repeat the selection. Press again to cancel A-B Function.
MUTE: Mutes the music output when pressed. Press again to cancel.
PITCH ADJUSTMENT: To adjust slow-speed, high-speed or normal play. HIGH To adjust high speed play. LOW to
adjust slow-speed play. Each have 10 levels of speed variation. Press NOR to return to normal play.
PROG: Can be used to program a selection of songs:
CD PLAYBACK MODE
To play an ordinary CD, press PROG key. Select the track numbers. For 2 digit tracks, eg track 23, press keypad
numbers 2 and 3, The LCD will display "23", then press ENTER to add to memory. The LCD will then display
"23:01", meaning track 23, program 1. For track 5 press 5 then ENTER. The LCD will display "05:02". Repeat this to
program other songs into memory. Press4; play key and the unit will play all of the memorized songs.
The LCD indicator will display "MEMORY" and the song numbers it is playing. To cancel the memorized songs,
press PROG key twice.
MP3/WMA PLAYBACK MODE:
To select MP3 format, press PROG key once, select the folder number, then press ENTER to confirm, then enter the
track number, and then press ENTER to confirm. The display will now show the folder number, track number and
number of the song programmed. For example: press 2 for folder 2, then ENTER, press 23 for track 23, then
ENTER. The LCD will display ‘02 23:01’. 01 is the first memorized song. Repeat this to program other songs into
memory. Press4; play key and the unit will play all of the memorized songs.
The LCD indicator will display "MEMORY" and the song number it is playing. To cancel the memorized songs, press
PROG key.
CD/MP3 Player Display:
MP3: The display panel shows MP3 when in MP3 mode.
CD: When in CD mode, the display panel shows CD.
PLAY: When playing the display panel shows 4.
PAUSE: When paused the display panel shows ;.
REPEAT (SINGLE TRACK): When repeat is selected the display panel shows REPEAT 1.
REPEAT (ALL TRACKS): When all songs on a CD are playing repeatedly, the display panel shows REPEAT ALL .
REPEAT (FOLDER): When all songs in a folder are playing repeatedly, the display panel shows REPEAT FOLDER .
8
Okayo Portable PA System
Okayo Portable PA System
SHUFFLE: Selects tracks randomly.
PROGRAM: Will play programmed tracks.
MEMORY: Will play tracks stored in memory.
A-B: Repeat playing between A and B.
88: In MP3 mode the display will appear with the folder number.
888: Displays the current playing track number.
88:88 Displays the time for the current track playing.
Fitting Additional Modules
Fitting C 7187B UHF Wireless Microphone Receiver Module
1. Ensure portable PA is NOT connected to mains power. Disconnect all input cables.
2. Unscrew the ‘half width’ blanking panel at the top of the rear panel (see figure 2).
3. Slide the UHF wireless microphone module in, ensuring the board slots into the connector at the rear of the empty
expansion bay.
4. Screw the module into the rear panel.
Internal Layout Of Portable PA Input/Output Board
All PA models feature a blanking panel with the system power switch mounted on it (see figure 2). This panel is
replaced by the C 7189B module.
Fitting C 7189B Audio Link Transmitter
J204
CON204
Effect
SW200
Normal
J201
1. Ensure portable PA is NOT connected to mains power. Disconnect all input cables.
2. Unscrew the blanking panel and disconnect the power cables from the main board.
3. Locate switch SW200 on the main board inside and ensure it is set to NORMAL (factory default).
4. Locate jumpers J201 and J204 on the main board inside. Connect the power cable for the wireless link transmitter
to J201 and the signal cable to J204.
5. Screw unit back together.
9
Okayo Portable PA System
Okayo Portable PA System
Transmitter Operation
All portable PA’s equipped with a UHF wireless microphone module are compatable with the C 7192B handheld and
C 7195B beltpack transmitters. All transmitters are sold separately.
C 7192B Handheld Microphone Transmitter - Figure 9.
1. Ensure microphone is switched off before inserting batteries.
2. Remove lower housing and battery clip. Insert two AA batteries (alkaline or rechargeable’s are recommended).
3. Press and hold the power switch for three seconds (located on the base of the microphone). The power LED will
illuminate red and “ON” will be displayed on the LCD screen. Note: power switch is more easily accessed with lower
housing removed.
4. A selection switch on the rear of the microphone provides three level settings (mute, mid & high) depending on the
application or environment in which the portable PA is to be used. Mute setting allows microphone to be put on
standby without switching the power off.
5. The LCD screen will display the channel selected. To determine which frequency this channel is operating on, press
the UP or DOWN frequency adjustment buttons.
6. Press the frequency set button for two seconds. The LCD screen will flash the currently selected channel number.
You can cycle through the channels by pressing the UP or DOWN frequency adjustment buttons. Press the frequency
set button again to lock in your channel selection.
7. The battery status is displayed on the left of the screen. When battery capacity is critical the icon will flash three
times before switching the microphone off automatically.
8. To turn the microphone off press the power switch for three seconds until the LCD screen displays “OFF”
9. When using with rechargeable NiMH batteries, connect a DC 5V plugpack (Altronics M 8909A plus M 9187 tip
adaptor) to the charging port on the base of the microphone. Charging time is dependant on the capacity of
batteries used, typically 10-12 hours charging is required. If battery icon is flashing when charger is connected,
ensure rechargeable batteries are inserted in the microphone. If batteries have failed both the battery icon and
screen backlight will flash.
During normal charging the battery icon will cycle through the charge “block” icons. Once full capacity is reached
the full battery icon and all “blocks” will be displayed.
Note: microphone is unable to be used during charge process.
C 7195B Beltpack Transmitter - Figure 10.
1. Ensure microphone is switched off before inserting batteries.
2. Remove battery clip. Insert two AA batteries (alkaline or rechargeable’s are recommended).
3. Switch the top mounted power switch to ON. The power LED will illuminate red and “ON” will be displayed on the
LCD screen.
4. A selection switch on the side of the beltpack provides three level settings (low, mid & high) depending on the application or environment in which the portable PA is to be used. The mute button allows beltpack to be put on standby
without switching the power off.
5. The LCD screen will display the channel selected. To determine which frequency this channel is operating on, press
the UP or DOWN frequency adjustment buttons.
6. Press the frequency set button for two seconds. The LCD screen will flash the currently selected channel number.
You can cycle through the channels by pressing the UP or DOWN frequency adjustment buttons. Press the frequency
set button again to lock in your channel selection.
7. The battery status is displayed on the left of the screen. When battery capacity is critical the icon will flash three
times before switching the microphone off automatically.
8. When using with rechargeable NiMH batteries, you can use the C 7196 charging pod. This allows you to put up to
two beltpacks on charge at the same time. Charging time is dependant on the capacity of batteries used, typically
10-12 hours charging is required. If battery icon is flashing when charger is connected, ensure rechargeable batteries are inserted in the microphone. If batteries have failed both the battery icon and screen backlight will flash.
During normal charging the battery icon will cycle through the charge “block” icons. Once full capacity is reached
the full battery icon and all “blocks” will be displayed.
10
Okayo Portable PA System
1.
Okayo Portable PA System
2.
3.
5. 6.
4.
7.
8.
Figure 9: Handheld UHF Wireless Microphone (C 7192B)
1. Protective screen head
2. Rubberised body
3. Frequency set button
4. LCD screen
5. Up/down frequency adjustment buttons
6. LED power indicator
7. Power switch
8. Charging port connection
Figure 10: Beltpack UHF Wireless
Transmitter (C 7195B)
2.
1. Aerial
2. Mute button (top)
3. On/off switch (top)
4. Mini XLR 3 Pin input socket (top)
5. LED power indicator
6. Sensitivity selection switch (side)
7. 3.5mm aux input socket (side)
8. Frequency set button
9. Up/down frequency adjustment buttons
10. Charging jack
Transmitter Troubleshooting
1.
3.
4.
5.
6.
7.
8.
9.
10.
• Power LED does not illuminate after pressing power switch
Check batteries are charged and inserted correctly.
For handheld microphone, when pressing power switch ensure you hold it down for three seconds
• LCD shows “Err” when switching off
Contact your place of purchase for information on resetting your transmitter.
• LCD panel displays garbled information
Remove batteries and re-insert them.
• No sound output
Check frequency of transmitter is the same as the portable PA receiver.
Check volume level of both transmitter and portable PA receiver.
For beltpack transmitter, ensure mute button is not activated.
Ensure transmitter is within range of the receiver.
Check for sources of interference, large metal objects etc within range of the transmitter.
• Signal disturbance
When operating two transmitters in the same area, ensure frequencies selected are several channels apart. This
helps to reduce crosstalk between transmitters. Also note that other wireless devices can cause interference,
ensure you adjust your frequency around these devices where possible.
11
Okayo Portable PA System
Okayo Portable PA System
Specfications
Portable PA Amplifier
Sensitivity ..........................................................95dB 1W @ 1m
Maximum SPL ..................................................................112dB
Frequency Response ............................................20Hz to 20kHz
Output Power ..............................................................50W RMS
Signal to Noise Ratio ........................................................<70dB
Inputs..................................XLR 3 pin, 6.35mm TRS, stereo RCA
Outputs ........Stereo RCA line out, Speaker out 6.35mm (8 ohm)
Controls ......................Master volume, bass, treble, line volume,
........................................................................wired mic volume
Power ....................96-264V AC/32V DC switching power supply
Battery ....................................12V, 2.9Ah x 2 (sealed lead acid)
Operating Life (fully charged) ............................................3-4hrs
Charging Time ..................................................................4-6hrs
Dimensions ..................................................300 x 230 x 470mm
Weight ................................................................................12kg
Portable PA Amplifier with UHF Wireless Mic Reciever and
CD Player(C 7185B)
Vox Priority Attack Time......................................................<1ms
Vox Priority Release Time ....................................................3 sec
Vox Priority Attenuation ..................................................<-26dB
Audio Link Transmitter Module (C 7189B)
RF Output ..........................................................................10mW
Spurious Emission ........................................................<250mW
Antenna ..........................................................................Internal
Dimensions ........................................................88 x 64 x 24mm
Weight ................................................................................170g
UHF Wireless Receiver Module (C 7187B)
Antenna Mode ..............................................................Diversity
Spurious Rejection ..............................................................70dB
Adjacent Channel Performance..........................68dB @ 250kHz
Antenna ..........................................................................Internal
Dimensions ......................................................128 x 88 x 37mm
Weight ................................................................................110g
Overall System
Frequency Range ............PLL synthesised control, 640-664MHz
(96 channels)
Switching Bandwidth ................................................Max 12MHz
Dynamic Range ................................................................110dB
THD ....................................................................Less than 0.5%
Frequency Response (wireless) ................................70Hz-16kHz
Operating Range ........................................50-70m (line of sight)
Beltpack Transmitter (C 7195B)
Mic Insert ..................................................................Condenser
RF Output ..........................................................................10mW
Spurious Emission ........................................................<250mW
Audio Input ............................................................Mic in, Aux in
AF Controls ..................................Mute switch, hi/mid/lo switch
Battery ............1.2V NiMH rechargeable x 2 or 1.5V Alkaline x 2
Operating Life (fully charged) 11 hrs (NiMH) or 14 hrs (Alkaline)
Dimensions ........................................................88 x 64 x 24mm
Weight (with batteries) ........................................................170g
Handheld Transmitter (C 7192B)
Mic Insert ......................................................................Dynamic
RF Output ..........................................................................10mW
Spurious Emission ........................................................<250mW
AF Controls ....................................................Hi/lo/mute switch
Battery ............1.2V NiMH rechargeable x 2 or 1.5V Alkaline x 2
Operating Life (fully charged) 11 hrs (NiMH) or 14 hrs (Alkaline)
Dimensions ..........................................................46Ø x 264mm
Weight (with batteries) ........................................................280g
IMPORTANT
Maintenance / Operation Guidelines
Avoid excessive heat: Do not leave transmitters or portable PA receiver in direct sun for extended periods, in front
of heaters or any source of high temperature.
Avoid rough handling: Transmitter or portable PA receiver may be damaged if dropped.
Fully charge portable PA battery: Ensure battery is fully charged before placing into storage for long periods.
Ensure battery is charged once per month thereafter to ensure long life and optimum battery reliability.
Remove batteries: Remove batteries from transmitters when not in use.
Replace batteries: Ensure replacement batteries are the same or equivalent to existing. Batteries may explode
under charge or unit may malfunction if incorrect batteries are used.
Battery terminals: Ensure battery contacts are clean and free of corrosion before operation. If corrosion occurs it
could be a sign of faulty batteries. Return to your place of purchase if service is required.
12
Okayo Portable PA System
Table 1: UHF Wireless Channel Guide
640-664MHz Frequency
1
640.1
17
640.9
33
640.4
49
641.1
65
640.6
81
641.4
2
641.6
18
642.4
34
641.9
50
642.6
66
642.1
82
642.9
3
643.1
19
643.8
35
643.3
51
644
67
643.5
83
644.3
4
644.5
20
645.3
36
644.8
52
645.5
68
645
84
645.8
5
646.1
21
646.9
37
646.4
53
647.1
69
646.6
85
647.4
6
647.6
22
648.4
38
647.9
54
648.6
70
648.1
86
648.9
7
649.1
23
649.8
39
649.3
55
650
71
649.5
87
650.3
8
650.5
24
651.3
40
650.8
56
651.5
72
651
88
651.9
9
651.7
25
652.6
41
652.1
57
652.8
73
652.3
89
653.1
10
653.3
26
654.1
42
653.6
58
654.3
74
653.8
90
654.6
11
655.2
27
656
43
655.5
59
656.2
75
655.7
91
656.5
12
656.7
28
657.5
44
657
60
657.7
76
657.2
92
658
13
658.2
29
658.9
45
658.4
61
659.1
77
658.6
93
659.4
14
659.6
30
660.4
46
659.9
62
660.6
78
660.1
94
660.9
15
661.2
31
662
47
661.5
63
662.2
79
661.7
95
662.5
16
662.7
32
663.4
48
662.9
64
663.6
80
663.1
96
663.9
Frequency Combinations
640-664MHz
1.
2.
3.
Use 4 channels at the same time
(1) 19 20 35 36
(2) 10 57 58 59
(5) 59 75 77 90
(6) 11 44 45 57
Use 8 channels at the same time
(1) 06 39 42 45 55 70 89 90
(3) 01 02 06 37 49 50 70 84
(5) 34 40 52 57 68 69 81 82
(3) 19 34 36 39
(7) 07 53 84 87
(4) 20 35 39 69
(2) 17 18 20 33 34 36 37 89
(4) 02 49 50 52 68 69 71 87
Use 12 channels at the same time
(1) 05 21 49 50 52 58 65 66 75 85 87 91
(2) 02 17 22 25 26 36 41 42 67 82 86 92
13
Okayo Portable PA System
Figure 11: Bluetooth® receiver module C 7188
1. Power indicator
2. Bluetooth connectivity indicator
3. Audio frequency indicator
4. ON/OFF Volume switch
Operation of C 7188 Bluetooth Receiver
1. Turn the knob clockwise to switch on the Bluetooth module. Set a mid-range volume level to begin.
2. You will hear a tone and the PWR indicator (LED) will light blue. The LINK indicator will also flash blue to indicate
that the module is ready to pair with another Bluetooth device.
3.When in pairing mode, activate a Bluetooth connection scan on your smartphone or tablet or similar device that will
serve as a source of audio. When the search is complete, select a device named “Portable PA” from the pairing list.
You device will attempt to connect with the Bluetooth module.
4. When the devices have successfully paired, the module will sound a prompt tone again. The LINK will light steady
blue.
5. You are now ready to stream audio via the Bluetooth connection from your smartphone or tablet. You can adjust
the audio volume on your device or using the volume knob on the Bluetooth receiver module.
6. The AF indicator will light when an audio signal is streamed from your playback device and received by the
Bluetooth module.
7. If a phone call is incoming during playback, the audio stream will be interrupted for the user to take the call. When
the call is finished, the Bluetooth module will be automatically relinked and audio files will recommence playback
from where they were interrupted.
8. When a user moves out of range for the Bluetooth connection, the audio stream will be severed until the user
returns to a location within range of the module. The range is about 10 metres. However, it depends on what kind of
operating system is installed on the smartphone or tablet. Sometimes it will be necessary to manually reconnect to
the Bluetooth following the steps above.
14
Distributed by Altronic Distributors Pty. Ltd.
• Perth • Sydney • Melbourne
Phone: 1300 780 999 Fax: 1300 790 999
Internet: www.altronics.com.au