1
404781806
TM-C100 User’s Manual
Copyright © 2005 by Seiko Epson Corporation
Printed in China 2005.07
All rights reserved. No part of this publication may be reproduced, stored in a retrieval system, or transmitted in
any form or by any means, electronic, mechanical, photocopying, recording, or otherwise, without the prior
written permission of Seiko Epson Corporation. No patent liability is assumed with respect to the use of the
information contained herein. While every precaution has been taken in the preparation of this book, Seiko Epson
Corporation assumes no responsibility for errors or omissions. Neither is any liability assumed for damages
resulting from the use of the information contained herein.
Neither Seiko Epson Corporation nor its affiliates shall be liable to the purchaser of this product or third parties
for damages, losses, costs, or expenses incurred by purchaser or third parties as a result of: accident, misuse, or
abuse of this product or unauthorized modifications, repairs, or alterations to this product, or (excluding the U.S.)
failure to strictly comply with Seiko Epson Corporation’s operating and maintenance instructions.
Seiko Epson Corporation shall not be liable against any damages or problems arising from the use of any options
or any consumable products other than those designated as Original EPSON Products or EPSON Approved
Products by Seiko Epson Corporation.
EPSON is a registered trademark of Seiko Epson Corporation in the U.S. and other countries.
NOTICE: The contents of this manual are subject to change without notice.
EMC and Safety Standards Applied
Product Name:
TM-C100
Model Name:
M194A
The following standards are applied only to the printers
that are so labeled. (EMC is tested using EPSON power
supplies.)
Europe:
CE marking
Safety: TÜV (EN 60950)
North America:
EMI:
FCC/ICES-003 Class A
Safety: UL 60950/CSA C22.2
No. 60950
Japan:
EMI:
VCCI Class A
Oceania:
EMC:
AS/NZS 3548/CISPR22
Class B
IEC 61000-4-3
IEC 61000-4-4
IEC 61000-4-5
IEC 61000-4-6
IEC 61000-4-11
FCC Compliance Statement For
American Users
This equipment has been tested and found to comply with
the limits for a Class A digital device, pursuant to Part 15
of the FCC Rules. These limits are designed to provide
reasonable protection against harmful interference when
the equipment is operated in a commercial environment.
This equipment generates, uses, and can radiate radio
frequency energy and, if not installed and used in
accordance with the instruction manual, may cause
harmful interference to radio communications.
Operation of this equipment in a residential area is likely
to cause harmful interference, in which case the user will
be required to correct the interference at his own expense.
WARNING
The connection of a non-shielded printer interface cable to
this printer will invalidate the EMC standards of this
device.
You are cautioned that changes or modifications not
expressly approved by Seiko Epson Corporation could
void your authority to operate the equipment.
CE Marking
For Canadian Users
The printer conforms to the following Directives and
Norms:
Directive 89/336/EEC
EN 55022 Class B
EN 55024
IEC 61000-4-2
This Class A digital apparatus complies with Canadian
ICES-003.
Cet appareil numérique de la classe A est conforme à la
norme NMB-003 du Canada.
Important Safety Information
This section presents important information intended to ensure safe and effective use of this product.
Read this section carefully and store it in an accessible location.
Key to Symbols
The symbols in this manual are identified by their level of importance, as defined below. Read the
following carefully before handling the product.
WARNING:
Warnings must be followed carefully to avoid serious bodily injury.
CAUTION:
Cautions must be observed to avoid minor injury to yourself or damage to your equipment.
1
English
Safety
Precautions
illustrations may be slightly different from your
printer; however, the instructions cover all models,
except as noted. Illustrations are provided at the end
of this manual.)
WARNING:
Shut down your equipment immediately if it
produces smoke, a strange odor, or unusual
noise. Continued use may lead to fire.
Immediately unplug the equipment and
contact your dealer or a Seiko Epson service
center for advice.
Never attempt to repair this product yourself.
Improper repair work can be dangerous.
Never disassemble or modify this product.
Tampering with this product may result in
injury or fire.
Be sure to use the specified power source.
Connection to an improper power source
may cause fire.
Do not allow foreign matter to fall into the
equipment. Penetration by foreign objects
may lead to fire.
If water or other liquid spills into this equipment, do not continue to use it. Continued
use may lead to fire. Unplug the power cord
immediately and contact your dealer or a
Seiko Epson service center for advice.
Notes on Usage–Illustrations A, D, E
❏ Be sure to use the POWER switch to turn the
printer on and off.
❏ When turning off the AC adapter directly, be
sure to wait for more than 10 seconds after all
printer operations have finished and then
turn off the power of the AC adapter.
❏ Connect the AC adapter to the power
connector of the printer and then plug the
AC adapter into the outlet.
❏ When opening the printer cover, be sure not
to touch the flat cable or the ink tube inside
the open area and avoid damage to the parts
by not applying force.
❏ When closing the printer cover, push the top
of the cover gently until it is closed firmly.
❏ Be sure not to open the printer cover when
the printer is operating.
❏ During printing, be sure not to touch the
release lever. If the paper entrance is opened
during printing (the release lever will stay in
the open position if you open it), a paper end
is detected and printing is not performed
correctly.
❏ Protect the printer from impact.
❏ Do not apply excessive force to the printer
case.
❏ Do not place food or beverages such as coffee
on the case of the printer.
❏ If the power is cut during printing for any
reason, such as a blackout, restore the power
as soon as possible. If the power is not
restored to the printer for about 2 weeks, the
printing nozzles may become permanently
clogged.
CAUTION:
Do not connect cables in ways other than
those mentioned in this manual. Different
connections may cause equipment damage
and burning.
Be sure to set this equipment on a firm,
stable, horizontal surface. The product may
break or cause injury if it falls.
Do not use in locations subject to high
humidity or dust levels. Excessive humidity
and dust may cause equipment damage or
fire.
Do not place heavy objects on top of this
product. Never stand or lean on this product.
Equipment may fall or collapse, causing
breakage and possible injury.
To ensure safety, unplug this product before
leaving it unused for an extended period.
Before moving the product, unplug it and
unplug all cables connected to it.
If ink leaks out of the printer, wipe up the ink
with a cloth or similar material immediately
and contact your dealer or a Seiko Epson
service center for advice.
Notes on Installation
❏ Be sure that the printer is installed
horizontally.
❏ Do not install the printer in a dusty place.
❏ Cords or other foreign objects must not be
caught on the printer.
Notes on Transportation
❏ Be sure to remove the ink cartridge.
❏ Be sure the printer is packed and shipped
right side up.
❏ Be sure not to transport any ink cartridge that
has been removed from its packing.
Otherwise the ink might leak.
To transport this printer, follow these steps:
1. Turn off the power supply.
2. Check that the POWER LED is off.
3. Remove the paper and ink cartridge if they
are installed.
4. Remove the power supply connector and
other connectors.
5. Remove the paper supply device.
Restriction of Use
When this product is used for applications requiring
high reliability/safety such as transportation
devices related to aviation, rail, marine, automotive
etc.; disaster prevention devices; various safety
device etc; or functional/ precision device etc., you
should use this product only after giving
consideration to inclusion of fail-safes and
redundancies into your design to maintain safety
and total system reliability.
Purpose of This Manual
This manual provides information to operators of
the TM-C100 printer to describe basic operations to
enable safe and correct use of the printer.
(Depending on printer models, some of the
2
English
Unpacking
The following items are included for the standard specification printer. If any item is damaged, contact
your dealer.
❏ Printer
❏ Paper tray
❏ AC adapter (The power cord may be
❏ Cable hook (Used to keep cables in place.
provided in the package.)
See illustration N.)
❏ Exclusive ink cartridge
❏ Paper supply device
❏ User’s Manual (this manual)
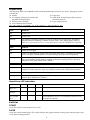
Control Panel (LEDs and Switches–Illustration D)
State
POWER LED
On
Power is on.
Off
Power is off.
Flashing
The printer is operating (cleaning, power-on and power-off operations, discarding
remaining data for printing), or when an error occurs. (See "About Errors" below.)
Note: Never open the printer cover or turn off the printer when the POWER LED is flashing.
State
PAPER LED
On
Printer cover is open.
Off
Printer is in the following states at the same time: the printer is not offline, the printer
cover is not open, and the printer is not performing any paper control operation.
Flashing
Printer is performing any paper control operation, such as slip paper insertion waiting
state, paper feeding, paper ejection, feeding to the print starting position. Also may
indicate an error. (See "About Errors" below.)
State
INK LED
On
Ink cartridge is not installed or it is time to replace the ink cartridge. Install a cartridge
or replace it with a new one. Also may indicate an error. (See "About Errors" below.)
Off
Ink cartridge is installed and ink is adequate.
Flashing
Ink is low. Be prepared to replace the ink cartridge with a new one. Also may indicate
an error. (See "About Errors" below.)
About Errors–LED Indications
State
POWER
PAPER
INK
Countermeasure
Unrecoverable error
Flashing
Flashing
On
Ask for repair and report LED indications.
Maintenance
request
Flashing
Flashing
Flashing
Ask for repair and report LED indications.
Auto
recoverable
error
Flashing
Flashing
Off
The temperature of the print head or motor is high. Wait until
the temperature returns to normal and the printer resumes
printing automatically.
Switches
POWER
Press the switch to turn the power on or off.
PAPER
Press the switch to feed paper. This switch releases the paper insertion waiting state and the paper is fed
to the print starting position.
3
English
CLEANING
When printing becomes faint, press and hold the switch for more than three seconds to start cleaning.
Note: Do not use the CLEANING switch unless there is a problem with print quality.
Installing or Replacing an Ink Cartridge
Note:
For notes on the ink cartridge usage, see the instruction manual for the ink cartridge.
There is one ink cartridge for the single color model and a different one for the four-color model. If the
printer model does not match the ink cartridge type, the printer will not operate.
When the INK LED flashes, it is almost time to change the ink cartridge. Change the cartridge as soon as it
is convenient. When the INK LED is on, it is time to change the ink cartridge or an incorrect ink cartridge
is inserted. You must install a new ink cartridge or a correct ink cartridge.
1. Make sure the printer is on.
2. Open the printer cover using the tab. See illustration A.
3. Lift up the used ink cartridge by using the tab. See illustration E.
CAUTION:
4.
5.
6.
7.
There are plastic projections that supply ink inside the ink cartridge compartment covered
with ink. Do not put your fingers inside; otherwise, your fingers may get dirty.
Do not apply excessive force to the projections. Otherwise they might be broken.
When removing an ink cartridge, be aware that the convex parts at the bottom of the ink
cartridge that supply ink to the printer are covered with ink; therefore, to keep your hands
clean do not touch them. Also be careful where you put the removed ink cartridge.
Note:
Cartridge yields vary based on such factors as type of item printed, print settings, paper type, frequency of use
and temperature.
To insure print quality, some ink remains in the cartridge after the INK LED comes on.
Do not remove an ink cartridge unless you are replacing it.
Take a new ink cartridge out of its packaging and open the transparent plastic bag.
Note: If an ink cartridge that has been out of the transparent plastic bag for a long time is used,
printing quality might not be satisfactory.
Carefully insert a new ink cartridge from the top. Be sure the inserting direction is correct. See the
instruction label attached to the back of the printer cover.
Push the ink cartridge firmly but gently until it clicks into place.
Close the printer cover completely. (The INK LED will now be off.)
The POWER LED flashes for approximately 1 minute during the ink replacing sequence. When the
POWER LED quits flashing and stays on, the printer is ready for printing.
Note: Do not turn off the power while the POWER LED is flashing. This will waste ink because the
printer has to re-start the ink replacing sequence. Also be sure not to open the printer cover while the
POWER LED is flashing.
Initial Ink Charging
When the ink cartridge is installed for the first time, the printer takes approximately 1 minute for ink charging
(the POWER LED flashes). Be sure not to turn off the power until the POWER LED stops flashing and stays on.
Note: When the ink cartridge is installed for the first time, the printer uses ink to prepare for printing.
Disposal of Used Cartridges
Dispose of used ink cartridges as industrial waste products. Obey the laws and regulations of your
country and district.
Cleaning
If printing becomes faint, press the CLEANING switch and hold it for more than 3 seconds. Print head
cleaning will start. The POWER LED flashes during cleaning. When the cleaning stops, the POWER LED
stays on.
Note: Cleaning is performed by drawing clogged substances through nozzles (in this operation, ink is
also drawn); therefore, do not use the CLEANING switch unless there is a print quality problem. Do not
turn off the power or open the printer cover while the POWER LED is flashing.
Ink Cartridge Life
To make your ink cartridges last as long as possible, follow these simple rules:
❏ Do not turn the printer on and off unnecessarily.
❏ Do not press the CLEANING switch unless there is a problem with print quality.
4
English
When Using Roll Paper
Attaching the Roll Paper Holder
1.
2.
3.
4.
Be sure that the printer power is turned off and then remove the AC adapter.
If the auto sheet feeder (ASF) is attached, remove it.
Slide the printer so that the hooks of the roll paper holder are inserted into the slots of the printer and
place the printer on the chassis of the roll paper holder. See illustration F.
Attach the AC adapter and then turn on the printer power.
When the power is turned on, the printer recognizes the roll paper holder, which enables printing on
roll paper.
Installing or Replacing Roll Paper
CAUTION:
Be sure to use roll paper that meets the specifications.
Read the instruction label attached to the roll paper holder. See illustration C for part names.
1. Be sure that the printer power is turned on.
2. Press the release lever to open the paper entrance.
3. If the roll paper edge guide is attached to the roll paper holder, squeezing the locking clip of the roll
paper edge guide and remove the edge guide. Be sure not to lose the removed roll paper edge guide.
4. Remove the used roll paper core if there is one. If there is roll paper inside the printer, remove it also.
5. Pull up the edge of the new roll paper approximately 10 cm {4 "}. Check the label instructions for the
proper direction for the paper to come off of the roll.
6. Slide the roll paper onto the shaft of the roll paper holder while inserting the end of the roll paper into
the slot in the middle of the printer.
7. Insert the roll paper as far as it will go.
8. Insert the roll paper edge guide onto the roll paper holder while squeezing the locking clip of the
edge guide.
Note: Adjust the edge guide so that there is no space at either edge of the roll paper.
9. Check that the installed roll paper is straight.
10. Press the release lever again to close the paper entrance; then the paper is cut and fed to the print
starting position.
Using Slip Paper
When Inserting by Hand
Read the instruction label attached to the top of the printer.
1. Be sure that the printer power is turned off and then remove the AC adapter.
2. If the roll paper holder is attached, remove it.
3. Attach the AC adapter and then turn on the printer power.
4. Press the release lever to open the paper entrance.
5. With the printer front toward you, insert the paper into the slot from the right and align the left edge
of the inserted paper with the edge of the slot.
6. Check that the paper is inserted straight.
7. Press the release lever again to close the paper entrance.
If printing data has been sent, the paper is fed automatically to the print starting position.
Note: Paper is fed backward when it is fed to the print starting position; therefore, if there are any
obstacles, the paper may not be fed to the print starting position correctly. Be sure to have enough room
behind the printer.
Using the Auto Sheet Feeder (ASF–Illustration B)
Attaching the ASF
1.
2.
3.
4.
5.
6.
7.
8.
Be sure that the printer power is turned off and then remove the AC adapter.
If the roll paper holder is attached, remove it.
Be sure that the release lever is in the closed position (the release lever is up.)
Place the ASF cable in the groove on the ASF. See illustration G.
Insert the hooks of the ASF into the slots on the back of the printer. See illustration H.
Push down the ASF until the triangle marks on the ASF and the printer are aligned. See illustration I.
Note: Be sure that the ASF cable is not caught between the printer and the ASF.
Insert the connector of the ASF cable into the connector indicated in illustration J.
Attach the paper support, if necessary. See illustration K.
5
English
9.
Attach the AC adapter and then turn on the printer power.
When the power is turned on, the printer recognizes the ASF, which enables printing on slip paper.
Inserting Slip Paper
Note:
Be sure that the slips are flat, without curls, folds, or wrinkles.
Do not print on a medicine or other paper bag that is glued together in the middle of the back side.
When the ASF is attached, if you insert paper by hand using the release lever to open the paper entrance,
any paper already in the printer is ejected. If you want to insert paper by hand with the ASF attached,
wait until the printer is in the paper waiting status (the PAPER LED flashes) and then insert the paper
by hand.
When the ASF is used to insert paper, the paper is fed backward; therefore, if there are any obstacles, the
paper may not be inserted correctly. Be sure to have enough room behind the printer.
1. Be sure that the printer power is turned on.
2. Handle paper carefully and align the edges. Be sure that the paper is not curved. See illustration O.
3. Insert the paper vertically with the printable surface face up, aligning the paper with the left edge of
the ASF.
4. Squeeze the edge guide and move the edge guide to the right or left to align it with the edge of the set
paper. See illustration B.
Note: If you insert paper less than 80 mm {3.1"} long by mistake, you might not be able to remove the
paper from the top of the ASF. In this case, remove the ASF from the printer and then remove the
paper.
Attaching the Paper Tray
Note:
The paper tray is used to support smooth paper ejection and to keep printed paper in place temporarily.
When printing, be sure the paper tray is attached.
When printing on roll paper continuously, depending on the roll paper length, printed paper that is
allowed to accumlate on the paper tray might impede paper ejection, printed paper might fall from the
tray, or the order of the printed paper might be changed. Therefore, it is recommended to remove each
printed paper before the next is printed.
Insert the hooks of the paper tray into the slots on the lower part of the printer. Pull the concave part of
the paper tray to extend it. See illustrations L and M.
Troubleshooting
❏ See "About Errors" under "Control Panel (LEDs and Switches)" mentioned previously.
❏ If the printer cover is open, close the cover.
❏ If a paper jam occurs, see "Removing Jammed Paper" below.
Removing Jammed Paper
1.
2.
3.
4.
5.
Turn off the power.
Press the release lever.
Remove the jammed paper slowly.
Open the printer cover by using the tab to check if jammed paper remains.
If there is any jammed paper in the printer, use a tool such as tweezers to remove it. Be careful not to
touch the flat cable or the ink tube when removing the paper.
Note: If it is difficult to remove the jammed paper, contact a qualified service person. If you try to
remove it by force, you may damage the printer.
EPSON Ecology Label
This product is in compliance with the EPSON ecology label requirements.
Please see the following link for detailed information on label criteria.
(http://www.epson.co.jp/e/)
Download
The driver and the TM-C100 Technical Reference Guide can be downloaded from the appropriate web
site below:
For customers from North America, go to the following web site: http://pos.epson.com/
For customers from other countries, go to the following web site: http://www.epson-pos.com/
Select the product name from the “Select any product” pull down menu.
6
English
Specifications
Print method
Serial inkjet dot matrix method
Print density
180 dpi ~ 360 dpi (4 different printing modes for each color) [dpi:
dots per 25.4 mm (dots per inch)]
Paper type
Roll paper model: Normal paper, exclusive paper (fine/mat),
normal continuous label paper with 1 mm cut-off edges
ASF model/Insertion by hand: Normal paper, exclusive paper
(fine/mat), normal continuous label paper
Paper dimensions
Roll paper model: 45 ~ 105 mm
ASF model: 55 ~135 (W) × 85 ~ 210 (L) mm
Insertion by hand: 49 ~ 210 (W) × 120 ~ 297 (L) mm
Paper thickness
Roll paper model: 0.06 ~ 0.23 mm
ASF model: 0.08 ~ 0.25 mm
Insertion by hand: 0.06 ~ 0.25 mm
Print speed
35 mm/s (printing width: 60 mm, 180 dpi × 180 dpi, bi-directional
printing) dpi: dots per 25.4 mm (dots per inch)
Interface
USB
Ink cartridge
Color: Black; Number of sheets that can be printed: 2500 pages
(using a printing pattern specified by EPSON)
Color: Cyan, magenta, yellow, black
Number of sheets that can be printed: 660 pages (using a
printing pattern specified by EPSON)
Power
Operating
consumption
Standby
Mean: Approx. 11 W, Peak: Approx. 13 W
Reliability/
Life
Mechanism
12,000,000 passes (carriage movement: 6,000,000 round-trips)
Print head
1,600,000,000 shots/nozzle
Autocutter
350,000 cuts (normal, exclusive fine paper)
200,000 cuts (exclusive mat, normal continuous label paper)
ASF
Temperature/ Printing
humidity
Storage
Mean: Approx. 1 W
200,000 sheets
10~35°C {50~95°F} 20~80% RH
Must be no condensation
Ink filled: –20~40°C {–4~104°F} 20~85% RH
Ink not filled: –20~60°C {–4~140°F} 5~85% RH
Must be no condensation
Overall dimensions (with tray)
Roll paper model: 210 × 345 × 152 mm (W × D × H)
ASF model: 210 × 367 × 245 mm (W × D × H)
Mass (with ink cartridge, without
paper)
Roll paper model: approx. 2.0 kg
ASF model: approx. 1.9 kg
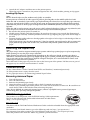
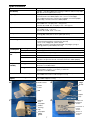
A
release lever
B
edge
guide
printer
cover
tab
ASF
paper
tray
Roll Paper Model
C
ASF Model
release
lever
D
POWER LED
& POWER
switch
roll paper
holder
PAPER LED &
PAPER
locking
clip
switch
roll paper
edge
guide
INK LED &
CLEANING
switch
7
English
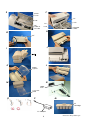
E
F
printer
cover
slot
tab
hook
slot
flat
cable &
ink tube
hook
roll paper
holder
H
G
ASF
J
I
L
K
paper
support
M
N
cable
hook
concave
area
O
Q
P
ink
cartridge
AC adapter
8
Printed on Recycled Paper