1
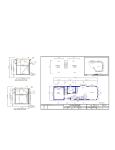
Model #5LGZ1027-1
USE AND CARE GUIDE
10 FT. X 10 FT. PORTABLE PATIO GAZEBO
Questions, problems, missing parts? Before returning to the store,
call Hampton Bay Customer Service
8.00 a.m. - 6.00 p.m., EST, Monday - Friday
1-855-HD-HAMPTON
HAMPTONBAY.COM
THANK YOU
o continually create
quality products designed to enhance your home. Visit us online to see our full line of products available for your home improvement needs.
Thank you for choosing Hampton Bay!
Table of Contents
Hardware Included................................................................3
Package Contents .................................................................3
Assembly ..................................................................4
Take-down................................................................. 7
Operation ..................................................................8
Care and Instrucitons ......................... ................................. 8
Spare Parts .................................................................. 9
Table of Contents........................................................2
Safety Information.......................................................2
Warranty ......................................................................2
1 Year Frame and Fabric Limited Warranty................................2
What Is Covered .. .. .. ................................................................2
What Is Not Covered ..................................................................2
Pre-Assembly .............................................................. 3
Planning Assembly .... .............................................................. 3
Safety Information
□ WARNING: KEEP ALL FLAME AND HEAT SOURCES AWAY FROM THIS TENT FABRIC
The Fabric Will Burn If Left In Continuous Contact With Any Flame Source.
□ Always read and follow the instructions before use.
□ The gazebo is designed to provide shade only. Do not use this gazebo in strong wind and rain.
Wind and rain can damage the gazebo and could result in injury to you and others.
Always stake or weight down your gazebo at any time once set up.
This gazebo is NOT a permanent structure. Do not leave the gazebo unattended.
Do not permanently anchor the unit to a wood deck or concrete surface.
DANGER:
Water may accumlate on the roof of the gazebo.
Warranty
1 YEAR FRAME / FABRIC LIMITED WARRANTY
WHAT IS COVERED
We warrant the frame and the fabric to be free of manufacturing defects to the original purchaser for one year.
WHAT IS NOT COVERED
It remains the customer’s responsibility for freight and packaging charges to and from our service center. This warranty does not cover
s warranty.
We reserve the right to make substitutions with similar merchandise, if the model in question is no longer in production.
You may contact our customer service department with any questions by phone at 1-855-HD-HAMPTON or visit www.hamptonbay.com.
2
Pre-Assembly
PLANNING ASSEMBLY
It will take a minimum of two persons about 30 minutes to complete the assembly process.
HARDWARE INCLUDED
NOTE: Hardware not shown to actual size.
AA
Part
AA
Description
Small anchor
BB
CC
Big anchor
Guy rope
BB
CC
Quan tity
4
4
4
PACKAGE CONTENTS
B
A
Part
Description
C
Quantity
A
Frame
1
B
C
Canopy
Screen with corner curtain
1
4
3
HAMPTONBAY.COM
Please contact 1-855-HD-HAMPTON for further assistance.
Assembly
1 Setting up the frame
2 Attaching the canopy
IMPORTANT: Please do not use too much force during
set-up.
□ Unfold the canopy (B). Place the canopy (B) over the top of the
frame (A). Use the hook and loop straps to secure each corner of
the canopy (B) to the frame (A) .
NOTE: The canopy and frame are shipped unattached to
avoid damage. First time set-up requires that the canopy be
attached to the frame. Once the canopy is permanently attached,
set up and take down are easily accomplished within seconds.
B
□ Stand the frame (A) upright. Starting at the corners, with a partner
standing on the opposite side, grasp the two outer legs and
slightly lift the frame (A) off of the ground and step backward
stopping at full arm’s length.
A
A
3
4
Expanding the frame
Extending the corner rib
□ Engage the slider at each corner of the frame (A) by pushing up the
slider with one hand while holding down the top of the leg with the
other hand. Repeat this step at the remaining corners.
WARNING:
backward to hard as this may result in the bending of cross
beams.
□ Each partner should then grasp the bottom rails of the middle
frame section (cross beam) where it forms a diamond. Lift the
frame (A) slightly off the ground and slowly walk backward until
the frame (A) is fully extended.
A
A
Grab here to open
4
Assembly (continued)
5 Securing the canopy
6
□ To secure the canopy (B) to the frame (A), wrap the
hook and loop straps around the corner ribs and cross beams.
□
Securing the valance
Pull down the inside valances of the canopy (B) until they cover the
cross beams of the frame (A). Secure the adjacent valances together
for a clean look.
A
B
7
8
Raising the legs
□
Lift two of the outer legs (1) on the same side of the gazebo and
pull out the inner legs (2) gently until the spring loaded snap
button pops into position. Repeat this step on the remaining two
legs.
□
The gazebo offers three height levels. To adjust, lift the leg up,
carefully press the snap button on the leg and slowly pull out
the inner leg (2) until the snap button pops into the next position.
Adjust until the desired height level is reached. Repeat on the
other legs.
Anchoring the gazebo
□ Stake down the gazebo by driving the four small anchors (AA)
through the hole on each base of the frame (A). This will stabilize the
frame (A) in mild weather conditons.
□ Measure out from the leg to a proper distance and secure
the four big anchors (BB) to ground at a 45 degree angle. Tie
up one end of each guy rope (CC) to the triangular shaped rope
holder located on the outside corners of the canopy (B). Tie the other
end of each rope (CC) to the anchor (BB) on the ground.
Adjust the guy ropes (CC) so that they have the proper tension.
B
CC
1
AA
2
A
5
BB
HAMPTONBAY.COM
Please contact 1-855-HD-HAMPTON for further assistance.
Assembly (continued)
9
10
Attaching the screen
and corner curtain
□ Unpack the screen and corner curtain combo kit (C). Locate the
zipper end of the screen panel, position it in the midde of
two of the frame (A) legs. Place the corner curtain (C) on the
outside of the frame (A) at each leg.
□
Securing the screen
and corner curtain
From inside the gazebo, lift the valance portion of the canopy (B)
to expose the side beams of the frame (A). Secure each screen
panel (C) to cross beams of the frame (A) with the hook and
loop straps.
A
C
11
12
Securing the screen and
corner curtain to the legs
Tying back the screen
and corner curtain
□ You may zip up the screen all the way around to keep insects out,
or leave one side unzipped to use as an entrance by adjusting
the attachment location of the screen panels at the cross beams.
You may tie back the screen and corner curtain panels with the
tiebacks for a drapery look.
□ Tuck the upper corner of the screen (C) under each corner of the
outside valance portion of the canopy (B). Secure to the upper
corner frame with hook and loop straps.
□ Secure the corner curtain (C) to each leg of the frame (A) with the
hook and loop straps.
6
Take-down
1
2
Removing the screen
IMPORTANT: Please do not use too much force during any
any part of take-down. Please remove guy ropes and anchors
before take-down.
Lowering the gazebo
□
With a partner, lift two adjacent outer legs slightly off the ground,
press the snap buttons and telescope the inner legs up into the
outer legs. Undo the hook and loop straps of the canopy from around
the corner ribs and cross beams. Failure to do so may results in the
tearing of the canopy during the take-down.
□
CRITICAL STEP TO AVOID FRAME DAMAGE!
Release the sliders at all four corners by gently pressing the push
button and pushing the sliders down a bit.
□ Reverse the screen assembly procedures to remove
the screen (C). To keep the crotchets on the hook and loop
straps from catching to the screen, press the hook and loop
straps from the tubes.
3
4
Closing the gazebo
Folding the gazebo
□ Grasp the adjacent outer legs and push the unit together until
fully closed.
□ With a partner on the opposite side, grasp the upper portion of
the middle of the cross beams and slightly lift off the ground.
Shake the frame slightly to release tension and step toward
your partner until the canopy is 3/4 closed.
Please do not use force!
□ Make sure the canopy is completely dry and then return
the folded pop-up gazebo to the carry bag for storage.
Grab here to close
7
HAMPTONBAY.COM
Please contact 1-855-HD-HAMPTON for further assistance.
Operation
SUGGESTED SCREEN USAGES
Care Instructions
Wash the frame and canopy with a mild solution of soap and water, rinse thoroughly. Dry completely. Do not use bleach or solvents.
Inspect the frame periodically to ensure all bolts and nuts are tight.
Always return the gazebo to the carry bag after use. Be sure the gazebo is completely dry before storing it.
8
SPARE PARTS
A3
A4
A1
A2
A3
A2
A1
C
B
Part
A4
Description
A1
Outer leg and inner leg with sliders
A2
A3
A4
Cross beam
Corner rib
Roof hub
B
C
Canopy
Screen with corner curtain
9
HAMPTONBAY.COM
Please contact 1-855-HD-HAMPTON for further assistance.
Questions, problems, missing parts? Before returning to the store,
call Hampton Bay Customer Service
8.00 a.m. – 6.00 p.m., EST, Monday-Friday
1-855-HD-HAMPTON
HAMPTONBAY.COM
Retain this manual for future use.