Transcript
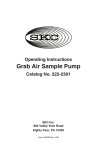
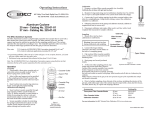
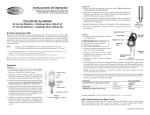
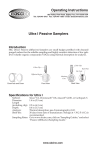
Operating Instructions
5.
Press the left or right arrow to toggle to SKC.
863 Valley View Road, Eighty Four PA 15330 USA
Tel: 724-941-9701 Fax: 724-941-1369 e-mail: [email protected]
6.
Press the down arrow to highlight Confirm; press Enter.
The display will return to the Setup menu.
Entering Defender Calibration Mode
CalChek with the Defender
The CalChek Communication Cable provides direct communication between a
CalChek-compatible SKC AirChek 2000 or Leland Legacy sample pump and a
Defender primary standard flowmeter.
Sample media
in-line
Pump
inlet
Defender
suction port
1.
Press the right arrow and then the down arrow to highlight Measure; press
Enter.
2.
Press the right arrow to highlight Cont.; press Enter.
Using the CalChek Communication Cable
1.
Attach the female end of the CalChek Communication Cable to the serial
port (RS-232) on the back of the Defender flowmeter.
2.
Insert the male end of the CalChek Communication Cable into the data port
on the sample pump.
3.
Set sample pump to CalChek mode and select single-point or full (multiplepoint) calibration (see individual pump operating instructions).
Pump
data port
Defender
data port
CalChek Communication Cable
AirChek 2000 Pump and Defender Flowmeter in a CalChek calibration train.
Note: The Defender flowmeter will begin to automatically calibrate the pump. The
initial flow measurements are taken without flow from the pump and the pump flow
rate is adjusted automatically.
4.
When calibration is complete, the pump will return to normal operation.
5.
Disconnect the CalChek Communication Cable and tubing.
Connecting Defender and Pump Pneumatically
See individual pump operating instructions for details.
1.
Use ¼-inch tubing to connect the Defender suction port to the CalChekcompatible pump inlet. Calibration may require sample media in-line. See
individual pump operating instructions for details.
2.
Run the sample pump for ≥ 2 minutes for stabilization.
Selecting Defender Data Port
1.
Press and hold the Defender power button to turn on the flowmeter.
2.
Press the right arrow to highlight Setup; press Enter.
3.
Press the right arrow to highlight Preferences; press Enter.
4.
Press the down arrow to navigate to Data Port.
Notice: This operating instruction may not address all safety concerns (if any) associated
with this product and its use. The user is responsible for determining and following the
appropriate safety and health practices and regulatory limitations (if any) before using
the product. The information contained in this document should not be construed as legal
advice, opinion, or as a final authority on legal or regulatory procedures.
Form # 38046 Rev 0902