1
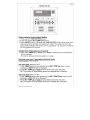
Page 1
Operating Instructions
Models BM2-24H & 7D-4Z
Congratulations on your purchase of a quality air conditioning control system.
Please read the following pages carefully for complete and satisfactory control of
your air conditioning system. Additional technical details are available in the
Installation Instructions.
Subject to change without notice
Page 3
Add Zones, BM2-24H-4Z & BM2-7D-4Z
Factory default: two zones. Maximum: Four Zones.
Add zone 3 or 4.
1.
Press and hold FAN CONTROL button.
2.
Press TIMER Down arrow, and release both buttons.
3.
Press ZONE 3 button. 3-1 will be displayed. OR to add zone 3 & 4, Press ZONE 4
button. 4-1 will be displayed on the screen.
4.
Press FAN CONTROL button to accept and exit the menu. NB. 3-1 means ZONE
3 temperature is controlled from SENSOR 1. 4-1 means ZONE 4 temperature is
controlled by SENSOR 1.
Removing Zones, BM2-24H-4Z & BM2-7D-4Z
Remove ZONE 3 and 4 (back to minimum settings 2 zones).
1.
Press and hold FAN CONTROL button.
2.
Press TIMER Down arrow, and release both buttons.
3.
Press ZONE 2 button. 2-1 or 2-2 displayed on screen. OR to remove ZONE 4
only. Press ZONE 3 button. 3-1 or 3-2 displayed on screen.
4.
Press FAN CONTROL button to accept and exit the menu.
Assigning The Zones To The Sensor
Maximum number of sensors allowed on the standard wall control:
1.
Wall Control sensor plus the optional remote sensor.
2.
Wall Control sensor plus the optional second Wall Control sensor.
3.
Wall Control plus two Optional remote sensors (Wall control sensor is not used).
NB: a) Optional sensors can be programmed to Zone 2, 3 or 4. b)
Zone 1 is always Sensor 1.
Assign zone 2 to sensor 2
1.
Press and hold FAN CONTROL button.
2.
Press TIMER Down arrow, and release both buttons. 2-1 will be displayed.
3.
Press SET TEMP Up arrow. 2-2 will be displayed on screen. Zone 2 is now
controlled from SENSOR 2.
4.
Press FAN CONTROL button to accept and exit the menu. Use the same
method to assign zone 3 and 4 to Sensor 2. 3-2 or 4-2 will be displayed on
screen; i.e. 3-2 means ZONE 3 temperature is controlled from SENSOR 2. 4-2
means ZONE 4 temperature is controlled by SENSOR 2
Fan Operating Selection from Wall Control
This can be achieved by pressing fan control button
Auto: The supply fan will cycle with the temperature demand.
Continuous: The supply fan will continue to run while the temperature demands
cycles On or Off.
These two different modes are selected from the Wall Control Pad.
Subject to change without notice