1
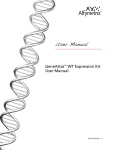
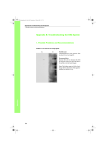
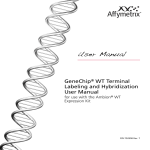
User Manual GeneAtlas™ 3’ IVT Express Kit P/N 702833 Rev. 4 For research use only. Not for use in diagnostic procedures. Trademarks Affymetrix®, GeneChip®, NetAffx®, Command Console®, Powered by Affymetrix™, GeneChipcompatible™, Genotyping Console™, DMET™, GeneTitan®, Axiom™, and GeneAtlas™ are trademarks or registered trademarks of Affymetrix, Inc. All other trademarks are the property of their respective owners. Limited License Subject to the Affymetrix terms and conditions that govern your use of Affymetrix products, Affymetrix grants you a non-exclusive, non-transferable, non-sublicensable license to use this Affymetrix product only in accordance with the manual and written instructions provided by Affymetrix. You understand and agree that except as expressly set forth in the Affymetrix terms and conditions, that no right or license to any patent or other intellectual property owned or licensable by Affymetrix is conveyed or implied by this Affymetrix product. In particular, no right or license is conveyed or implied to use this Affymetrix product in combination with a product not provided, licensed or specifically recommended by Affymetrix for such use. Patents Reagents: Products may be protected by one or more of the following patents: U.S. Patent Nos. 6,864,059; 7,468,243; 7,491,818. Arrays: Products may be covered by one or more of the following patents: U.S. Patent Nos. 5,445,934; 5,744,305; 6,261,776; 6,291,183; 6,346,413; 6,399,365; 6,610,482; 6,733,977; and other U.S. or foreign patents. Products are manufactured and sold under license from OGT under 5,700,637 and 6,054,270. Scanner: Products may be covered by one or more of the following patents: U.S. Patent Nos. 6,141,096, 6,262,838; 6,294,327; 6,403,320; 6,407,858; 6,597,000; 7,406,391 and other U.S. or foreign patents. Software: Products may be covered by one or more of the following patents: Products may be protected by one or more of the following patents: U.S. Patent Nos. 6,090,555; 6,611,767; 6,687,692; 6,829,376; 7,130,458; 7,451,047 and other U.S. or foreign patents. Copyright © 2009-2010 Affymetrix Inc. All rights reserved. Contents Chapter 1 Overview . . . . . . . . . . . . . . . . . . . . . . . . . . . . . . . . . . . . . . . . . . .1 Control RNA . . . . . . . . . . . . . . . . . . . . . . . . . . . . . . . . . . . . . . . . . . . . . . . . 1 Assay Overview . . . . . . . . . . . . . . . . . . . . . . . . . . . . . . . . . . . . . . . . . . . . . . 2 Important Parameters for Successful Amplification . . . . . . . . . . . . . . . . . . . 4 Other Important Parameters . . . . . . . . . . . . . . . . . . . . . . . . . . . . . . . . . . 6 Kit Contents and Storage Conditions . . . . . . . . . . . . . . . . . . . . . . . . . . . . . 8 Materials . . . . . . . . . . . . . . . . . . . . . . . . . . . . . . . . . . . . . . . . . . . . . . . . . 10 Required Reagents . . . . . . . . . . . . . . . . . . . . . . . . . . . . . . . . . . . . . . . . 10 Instruments . . . . . . . . . . . . . . . . . . . . . . . . . . . . . . . . . . . . . . . . . . . . . . 10 Lab Equipment and Supplies . . . . . . . . . . . . . . . . . . . . . . . . . . . . . . . . . 11 Chapter 2 aRNA Amplification Protocol . . . . . . . . . . . . . . . . . . . . . . . . . .13 Equipment and Reagent Preparation . . . . . . . . . . . . . . . . . . . . . . . . . . . . . Prepare aRNA Wash Solution . . . . . . . . . . . . . . . . . . . . . . . . . . . . . . . . Program the Thermal Cycler . . . . . . . . . . . . . . . . . . . . . . . . . . . . . . . . . Prepare Poly-A RNA Controls . . . . . . . . . . . . . . . . . . . . . . . . . . . . . . . . . Reverse Transcription to Synthesize First-Strand cDNA . . . . . . . . . . . . . . . . Second-Strand cDNA Synthesis . . . . . . . . . . . . . . . . . . . . . . . . . . . . . . . . . In Vitro Transcription to Synthesize Labeled aRNA . . . . . . . . . . . . . . . . . . . aRNA Purification . . . . . . . . . . . . . . . . . . . . . . . . . . . . . . . . . . . . . . . . . . . Chapter 3 13 13 13 14 17 18 20 22 Evaluation and Fragmentation of aRNA . . . . . . . . . . . . . . . . .27 aRNA Quantitation and Expected Yield . . . . . . . . . . . . . . . . . . . . . . . . . . . 27 Analysis of aRNA Size (Optional) . . . . . . . . . . . . . . . . . . . . . . . . . . . . . . . . 29 Fragmentation of Labeled aRNA . . . . . . . . . . . . . . . . . . . . . . . . . . . . . . . . 30 ii GeneAtlas™ 3’ IVT Express Kit User Manual Chapter 4 Hybridization . . . . . . . . . . . . . . . . . . . . . . . . . . . . . . . . . . . . . . .33 GeneAtlas™ Software Setup . . . . . . . . . . . . . . . . . . . . . . . . . . . . . . . . . . . Sample Registration . . . . . . . . . . . . . . . . . . . . . . . . . . . . . . . . . . . . . . . Hybridization Software Setup . . . . . . . . . . . . . . . . . . . . . . . . . . . . . . . . Target Hybridization Setup for Affymetrix® Array Strips . . . . . . . . . . . . . . . Hybridization of Array Strips on the GeneAtlas™ System . . . . . . . . . . . . . . Rehybridizing Used Cocktails . . . . . . . . . . . . . . . . . . . . . . . . . . . . . . . . . Appendix A 33 34 37 38 46 48 Troubleshooting . . . . . . . . . . . . . . . . . . . . . . . . . . . . . . . . . . . .49 Positive Control Reaction . . . . . . . . . . . . . . . . . . . . . . . . . . . . . . . . . . . . . Control RNA Amplification Instructions . . . . . . . . . . . . . . . . . . . . . . . . . Expected Results . . . . . . . . . . . . . . . . . . . . . . . . . . . . . . . . . . . . . . . . . . Factors that Affect Both Positive Control and Experimental Samples . . . . . Troubleshooting Low Yield and Small Average aRNA Size . . . . . . . . . . . . . 49 49 49 49 50 Appendix B aRNA Purification Photos . . . . . . . . . . . . . . . . . . . . . . . . . . . . .51 Appendix C Shaker Speeds . . . . . . . . . . . . . . . . . . . . . . . . . . . . . . . . . . . . . .53 1 Overview The GeneAtlas™ 3’ IVT Express Kit is the latest technology in RNA target preparation for microarray expression analysis. This kit features: Low RNA input requirements- from as little as 50 ng of total RNA for a single round of amplification Streamlined workflow, with the option to decrease target labeling time to a single day with appropriate inputs of total RNA Master mixes, consumables included and a simple protocol for ease of use, convenience and a high rate of success A complete kit that includes Poly-A RNA controls and hybridization controls Magnetic-bead aRNA purification for high recovery and ease of use. The kit is based upon linear RNA amplification and employs T7 in vitro transcription technology. Also known as the Eberwine or reverse transcription-IVT (RT-IVT) method, this process is considered the gold standard for target preparation for gene expression analysis. RT-IVT was experimentally validated using TaqMan ® RT-PCR (MAQC Consortium et. al, 2006). In the GeneAtlas™ 3’ IVT Express Protocol total RNA undergoes reverse transcription to synthesize first-strand cDNA. This cDNA is then converted into a double-stranded DNA template for transcription. In vitro transcription synthesizes aRNA and incorporates a biotin-congugated nucleotide (cRNA is also known as amplified RNA or aRNA). The aRNA is then purified to remove unincorporated NTPs, salts, enzymes, and inorganic phosphate. Fragmentation of the biotin-labeled aRNA prepares the sample for hybridization onto Affymetrix® 3’ expression array strips. If you are using the GeneAtlas 3’ IVT Express Kit for the first time it is recommended to use the control RNA to ensure that you get sufficient RNA yields for your array experiments. Control RNA Use the included Control RNA to familiarize yourself with the GeneAtlas 3’ IVT Express Kit RNA Amplification procedure. Instructions for the positive control reaction are provided in Appendix A, Troubleshooting on page 49. 2 GeneAtlas™ 3’ IVT Express Kit User Manual Assay Overview The GeneAtlas 3’ IVT Express Kit aRNA amplification procedure is depicted in Figure 1.1. Reverse Transcription to Synthesize First-Strand cDNA is primed with T7 oligo(dT) primer to synthesize cDNA containing a T7 promoter sequence. Second-Strand cDNA Synthesis converts the single-stranded cDNA into a doublestranded DNA (dsDNA) template for transcription. The reaction employs DNA polymerase and RNase H to simultaneously degrade the RNA and synthesize secondstrand cDNA. Optional stopping point. Samples can be stored overnight at –20°C at this point if desired. In Vitro Transcription to Synthesize Biotin-Modified aRNA with IVT Labeling Master Mix generates multiple copies of biotin-modified aRNA from the doublestranded cDNA templates; this is the amplification step. Optional stopping point. The aRNA can be stored overnight at –20°C at this point, if desired. aRNA Purification removes unincorporated NTPs, salts, enzymes, and inorganic phosphate to improve the stability of the biotin-modified aRNA. Fragmentation of the labeled aRNA prepares the target for hybridization to Affymetrix 3’ expression array strips. Contents Figure 1.1 Overview of the GeneAtlas™ 3’ IVT Express Kit Labeling Assay 3 4 GeneAtlas™ 3’ IVT Express Kit User Manual Important Parameters for Successful Amplification Input RNA Quantity and IVT Reaction Incubation Time Consider both the type and amount of sample RNA available and the amount of aRNA needed for your analysis when planning experiments using the GeneAtlas™ 3’ IVT Express Kit. Because mRNA content varies significantly with tissue type, the optimal amount of total RNA input and IVT incubation time should be determined empirically for each experimental system. The recommended input RNA amounts listed in Table 1.1 are based on using total RNA from HeLa cells; use these recommendations as a starting point. Table 1.2 shows the corresponding recommended IVT incubation times. IMPORTANT: Optimal RNA input amount and IVT incubation time are sampletype dependent and should be determined empirically. It is recommended to keep input amount and IVT incubation time consistent within a given experiment. Table 1.1 Input RNA Limits Recommendations Amount Recommended 100 ng Minimum 50 ng Maximum 500 ng NOTE: The RNA needs to be diluted to an appropriate concentration such that the desired input amount is present in a 1 μL volume. For example, for 100 ng input, RNA concentration should be 100 ng/μL. Table 1.2 Recommended IVT Incubation Times Recommendations RNA Amount IVT Incubation Time Recommended 50–250 ng 16 hours Optional 250–500 ng 4 hours RNA Purity RNA quality is the single most important factor affecting how efficiently an RNA sample will be amplified using GeneAtlas 3’ IVT Express Kit. RNA samples should be free of contaminating proteins, DNA, and other cellular material as well as phenol, ethanol, and salts associated with RNA isolation procedures. Impurities can lower the Contents 5 efficiency of reverse transcription and subsequently reduce the level of amplification. An effective measure of RNA purity is the ratio of absorbance readings at 260 and 280 nm. The ratio of A260 to A280 values should fall in the range of 1.7–2.1. RNA must be suspended in high quality water, TE (10 mM Tris-HCl, 1 mM EDTA). RNA Integrity The integrity of the RNA sample, or the proportion that is full length, is another important component of RNA quality. Reverse transcribing partially degraded mRNAs will generate cDNAs that may lack portions of the transcripts that are interrogated by probes on the array. RNA integrity can be evaluated by microfluidic analysis using the Agilent 2100 bioanalyzer with an RNA LabChip® Kit. Primarily full-length RNA will exhibit a ratio of 28S to 18S rRNA bands that approaches 2:1. Using a bioanalyzer, the RIN (RNA Integrity Number) can be calculated to further evaluate RNA integrity. The RIN, a metric developed by Agilent, includes information from both the rRNA bands and outside the rRNA peaks (potential degradation products) to provide a picture of RNA degradation states. Search for “RIN” at the following web site for further information: www.chem.agilent.com. Figure 1.2 Example Agilent Bioanalyzer Electropherograms from three different total RNAs of varying integrity. Panel [A] represents a highly intact total RNA (RIN = 9.2), panel [B] represents a moderately intact total RNA (RIN = 6.2), and panel [C] represents a degraded total RNA sample (RIN = 3.2). NOTE: Total RNAs with lower RIN values may require increased input amounts to generate enough aRNA for hybridization to an array. Denaturing agarose gel electrophoresis and nucleic acid staining can also be used to separate and visualize the major rRNA species. After purification, RNA concentration is determined by absorbance at 260 nm on a spectrophotometer (1 absorbance unit = 40 µg/ mL RNA). The A260/A280 ratio should be approximately 2.0, with ranges between 1.8 to 2.1 considered acceptable. We recommend checking the quality of RNA by running it on an agarose gel prior to starting the assay. When the RNA resolves into discrete rRNA bands (i.e., no significant smearing below each band), with the 28S rRNA band appearing approximately twice as intense as the 18S rRNA band, then the mRNA in the sample is likely to be mostly full-length. The primary drawback to gel electrophoresis is that it requires microgram amounts of RNA. 6 GeneAtlas™ 3’ IVT Express Kit User Manual Other Important Parameters Keep reaction incubation times precise and consistent: The incubation times for the enzymatic reactions in the protocol were optimized in conjunction with the kit reagents for maximum yield in each step—adhere to them closely. Use master mixes: We strongly recommend preparing master mixes for each step of the GeneAtlas 3’ IVT Express procedure. This reduces the effects of pipetting error, saves time, and improves reproducibility. The fill volumes in the kit allow for a ~5% overage when making master mixes. Mix each kit component before use: Mix enzyme solutions by gently flicking the tube a few times before adding them to master mixes. Thaw frozen reagents completely at room temperature, then mix thoroughly by vortexing, and place on ice. Incubate reactions in a calibrated thermal cycler: We do not recommend using ordinary laboratory heat blocks, water baths, or hybridization ovens for any of the reaction incubations. The procedure is very sensitive to temperature; therefore use a thermal cycler that has been calibrated according to the manufacturer’s recommended schedule. Variable or inaccurate incubation temperatures can negatively impact aRNA synthesis. Heated lids: It is important that condensation does not form in the tubes during any of the incubations, because it would change the reaction composition and can greatly reduce yield. If possible, set the lid temperature to match the block temperature. Otherwise, incubate all reactions with the heated lid on (~100°C). Maintain procedural consistency: Procedural consistency is very important for amplification experiments. Consider implementing a detailed procedural plan that will be used by everyone in the lab to maintain consistency. This type of plan will minimize variation due to subtle procedural differences that can influence RNA amplification and may complicate gene expression studies. The plan should include basic information such as the method of RNA isolation, the amount of RNA to use in the procedure, and how long to incubate the IVT reaction. It should also address specifics that are not often included in protocols such as which tubes and thermal cycler to use for each step in the process. Finally, develop a consistent work flow. For example standardize stopping points in the method. The idea is to standardize all of the variables discussed in this section of the manual and carefully follow all the protocol steps in order to maximize amplification consistency among samples. Contents 7 Use Poly-A RNA Controls to monitor the target labeling process: The use of Poly-A RNA Controls allows you to evaluate assay sensitivity, consistency, and dynamic range. The kit contains four exogenous, pre-mixed, poly-adenylated prokaryotic controls that are spiked directly into RNA samples before target labeling. Their resultant signal intensities on Affymetrix® brand array strips serve as sensitive indicators of the labeling reaction efficiency, independent from starting sample quality. 8 GeneAtlas™ 3’ IVT Express Kit User Manual Kit Contents and Storage Conditions Table 1.3 GeneAtlas™ 3’ IVT Express Kit Components and Storage Conditions Component Vol/Qnty 20 Rxn Storage aRNA Binding Buffer Concentrate 600 μL room temp RNA Binding Beads 120 μL 2-8°C* aRNA Wash Solution Concentrate (Add 8 mL 100% ethanol before use, as shown on the label) 10 mL room temp aRNA Elution Solution 5 mL room temp Nuclease-free Water 10 mL room temp 5X Array Fragmentation Buffer 1 mL room temp 8-Strip PCR Tubes & Caps (0.2 mL) 10 ea. room temp U-Bottom Plate 1 ea. room temp Reservoir 1 ea. room temp First-Strand Enzyme Mix 11 μL –20°C First-Strand Buffer Mix 44 μL –20°C Second-Strand Enzyme Mix 22 μL –20°C Second-Strand Buffer Mix 55 μL –20°C IVT Enzyme Mix 66 μL –20°C IVT Labeling Buffer 220 μL –20°C IVT Biotin Label 44 μL –20°C Control RNA (1 mg/mL HeLa total RNA) 10 μL –20°C Nuclease-free Water 1.75 mL –20°C Poly-A Control Stock 16 μL –20°C Poly-A Control Dilution Buffer 3.8 mL –20°C 20X Hybridization Controls 450 μL –20°C Control Oligo B2 150 μL –20°C BOX 1 of 2 BOX 2 of 2 * Do not freeze. Contents Table 1.4 GeneAtlas™ Hybridization, Wash, and Stain Kit for 3’ IVT Arrays (P/N 901531 Component Volume Storage 1X Pre-Hybridization Mix 9.0 mL 2°C to 8°C 1.3X Hybridization Mix Solution A 3.0 mL 2°C to 8°C 1.3X Hybridization Mix Solution B 5.6 mL 2°C to 8°C Nuclease-free Water 2.0 mL 2°C to 8°C Stain Cocktail 1 52.5 mL 2°C to 8°C Stain Cocktail 2 26.3 mL 2°C to 8°C 15 mL 2°C to 8°C Wash Buffer A 519 mL 2°C to 8°C Wash Buffer B 64 mL 2°C to 8°C BOX 1 of 2 Hybridization and Stain Components Array Holding Buffer BOX 2 of 2 Wash Buffers A and B 9 10 GeneAtlas™ 3’ IVT Express Kit User Manual Materials Required Reagents Table 1.5 Reagents Material Source P/N GeneAtlas™ 3’ IVT Express Kit (See Table 1.3 for detailed kit information) Affymetrix 901649 (20 Rxn) GeneAtlas™ Hybridization, Wash, and Stain Kit for 3’ IVT Arrays (See Table 1.4 for detailed kit information) Affymetrix 901531 (60 Rxn) 100% ethanol (ACS reagent grade)* multiple Agilent RNA 6000 Nano Kit† * Or equivalent. † For optional analysis of aRNA size. Agilent Technologies 5067-1511 Instruments Table 1.6 Instruments Instruments Manufacturer P/N GeneAtlas™ Fluidics Station Affymetrix 00-0377 GeneAtlas™ Imaging Station Affymetrix 00-0376 GeneAtlas™ Hybridization Station Affymetrix 00-0380 (115VAC) 00-0381 (230VAC) GeneAtlas™ Workstation Affymetrix 00-0894 GeneAtlas™ Barcode Scanner Affymetrix 00-0379 Contents Lab Equipment and Supplies Table 1.7 Lab Equipment and Supplies Material Source P/N Lab Equipment and Supplies Thermal Cycler with heated Lid (with appropriate adapters to accommodate strip tubes) (capable of holding 0.2 mL tubes for reaction incubations) multiple Vortex Mixer (with flat top adapter for strip tubes) multiple Microcentrifuge (with an adapter for the PCR strip-tubes or plates supplied with the kit) multiple Magnetic Stand for 96-well plates Ambion Orbital shaker for 96-well plates (e.g., Barnstead/Lab-Line Titer Plate Shaker) multiple #AM10050 (96-well Magnetic Stand) or #AM10027 (Magnetic Stand - 96) Vacuum Centrifuge Concentrator (Optional) NanoDrop Technologies ND-8000 Pipette for 0.1 to 2 μL* Rainin L-2 Pipette for 2 to 20 μL* Rainin L-20 Pipette for 20 to 200 μL* Rainin L-200 Pipette for 100 to 1000 μL* Rainin L-1000 Sterile-barrier, RNase-free Pipette Tips multiple Bioanalyzer Agilent Non-stick RNase-free microfuge tubes, 0.5 mL Ambion N12350 Non-stick RNase-free microfuge tubes, 1.5 mL Ambion 12450 Spectrophotometer (e.g., NanoDrop® ND-8000 UV-Vis Spectrophotometer) Reagents and apparatus for preparation and electrophoresis of agarose gels (Optional) Miscellaneous Supplies * Or equivalent. 11 12 GeneAtlas™ 3’ IVT Express Kit User Manual 2 aRNA Amplification Protocol Equipment and Reagent Preparation Prepare aRNA Wash Solution Add 100% ethanol (ACS reagent grade or equivalent) to the bottle labeled aRNA Wash Solution Concentrate. The volume of ethanol required is listed on the bottle label of aRNA Wash Solution Concentrate. Mix well and mark the label to indicate that the ethanol was added. This solution will be referred to as aRNA Wash Solution in these instructions. Store at room temperature. Program the Thermal Cycler Incubate all reactions in a thermal cycler. We find it convenient to set up the thermal cycler programs for each incubation before starting the procedure. The specifications for each incubation are shown in Table 2.1. Table 2.1 Thermal Cycler Programs for RNA Amplification Program (or Method) First-Strand cDNA Synthesis 42°C for 2 hrs 4°C indefinite hold Second-Strand cDNA Synthesis 16°C for 1 hr 65°C for 10 min IVT 40°C for 4 or 16 hrs 4°C indefinite hold Fragmentation 94°C for 35 min 4°C indefinite hold Pre-Hybridization 96°C for 10 min 45°C for 2 min 4°C indefinite hold 45°C indefinite hold 14 GeneAtlas™ 3’ IVT Express Kit User Manual Prepare Poly-A RNA Controls Reagents and Materials Required Table 2.2 Reagents and Materials Required Item Needed GeneAtlas 3’ IVT Express Kit, Box 1 8-Strip PCR Tubes and Caps (0.2 mL) GeneAtlas 3’ IVT Express Kit, Box 2 Poly-A RNA Control Stock Poly-A RNA Control Dil Buffer* User-supplied Reagents and Materials RNA Sample (diluted to appropriate concentration) Non-stick RNase-free Microfuge Tubes (for Poly-A Control RNA dilution) * See “Note” below. NOTE: If frozen, the Poly-A Control Dil Buffer may take 15 to 20 minutes to thaw at room temperature. Designed specifically to provide exogenous positive controls to monitor the entire eukaryotic target labeling process, a set of poly-A RNA controls is supplied in the GeneAtlas 3’ IVT Express Kit. Each eukaryotic Affymetrix probe array contains probe sets for several B. subtilis genes that are absent in eukaryotic samples (lys, phe, thr, and dap). These poly-A RNA controls are in vitro synthesized, and the polyadenylated transcripts for the B. subtilis genes are premixed at staggered concentrations. The concentrated Poly-A Control Stock can be diluted with the Poly-A Control Dil Buffer and spiked directly into RNA samples to achieve the final concentrations (referred to as a ratio of copy number) summarized below in Table 2.3. Table 2.3 Final Concentrations of Poly-A RNA Controls when added to total RNA Samples Poly-A RNA Spike Final Concentration (ratio of copy number) lys 1:100,000 phe 1:50,000 thr 1:25,000 dap 1:6,667 Contents 15 The controls are then amplified and labeled together with the total RNA samples. Examining the hybridization intensities of these controls on Affymetrix array strips helps to monitor the labeling process independently from the quality of the starting RNA samples. The Poly-A RNA Control Stock and Poly-A Control Dil Buffer are provided in the GeneAtlas IVT Express Kit to prepare the appropriate serial dilutions based on Table 2.4. This is a guideline when 50, 100, 250 or 500 ng of total RNA is used as starting material. For starting sample amounts other than those listed here, calculations are needed in order to perform the appropriate dilutions to arrive at the same proportionate final concentration of the spike-in controls in the samples. IMPORTANT: Use non-stick RNase-free microfuge tubes to prepare all of the dilutions (not included). Table 2.4 Serial Dilution of Poly-A RNA Control Stock Total RNA Input Amount Serial Dilutions Volume of 4th dilution to add to total RNA First Dilution Second Dilution Third Dilution Fourth Dilution 50 ng 1:10 1:50 1:75 1:20 1.5 μL 100 ng 1:10 1:50 1:75 1:10 1.5 μL 250 ng 1:10 1:50 1:75 1:4 1.5 μL 500 ng 1:10 1:50 1:75 1:2 1.5 μL Recommendation: Avoid pipetting solutions less than 2 µL in volume when making dilutions to maintain precision and consistency when preparing the dilutions. For example, to prepare the poly-A RNA dilutions for 100 ng of total RNA: 1. Add 2 µL of the Poly-A Control Stock to 18 µL of Poly-A Control Dil Buffer for the first dilution (1:10). 2. Mix thoroughly and spin down to collect the liquid at the bottom of the tube. 3. Add 2 µL of the First Dilution to 98 µL of Poly-A Control Dil Buffer to prepare the Second Dilution (1:50) 4. Mix thoroughly and spin down to collect the liquid at the bottom of the tube. 5. Add 2 µL of the Second Dilution to 148 µL of Poly-A Control Dil Buffer to prepare the Third Dilution (1:75) 6. Mix thoroughly and spin down to collect the liquid at the bottom of the tube. 7. Add 2 µL of the Third Dilution to 18 µL of Poly-A Control Dil Buffer to prepare the Fourth Dilution (1:10) 16 GeneAtlas™ 3’ IVT Express Kit User Manual 8. Mix thoroughly and spin down to collect the liquid at the bottom of the tube. 9. Add 1.5 µL of this Fourth Dilution to 100 ng of total RNA at a concentration of 100 ng/µL. NOTE: The first dilution of the poly-A RNA controls can be stored up to six weeks in a non-frost-free freezer at –20ºC and frozen-thawed up to eight times. Label the storage tube with the expiration date for future reference. Table 2.5 Total RNA/Poly-A RNA Control Mixture Component Total RNA Sample (50-500 ng) Volume 1 μL Diluted Poly-A RNA Controls (Fourth Dilution) 1.5 μL Total Volume 2.5 μL Contents 17 Reverse Transcription to Synthesize First-Strand cDNA Reagents and Materials Required Table 2.6 Reagents and Materials Required Item Needed GeneAtlas 3’ IVT Express Kit, Box 1 8-Strip PCR Tubes and Caps (0.2 mL) GeneAtlas 3’ IVT Express Kit, Box 2 First-Strand Buffer Mix First-Strand Enzyme Mix Poly-A Controls User-supplied Reagents and Materials RNA Sample RNase-free Microfuge Tubes (for making master mix) 1. Assembly of First-Strand Master Mix. A. Thaw first-strand synthesis reagents and place on ice. B. On ice, assemble First-Strand Master Mix in a nuclease-free tube in the order listed in Table 2.7. Include ~ 5% overage to cover pipetting error. Table 2.7 First-Strand Master Mix Component Amount Used for 1 Sample Master Mix for 4 Samples (Includes 5% Overage) 2 μL 8.4 μL First-Strand Enzyme Mix 0.5 μL 2.1 μL Total Volume 2.5 μL 10.5 μL First-Strand Buffer Mix C. Mix well by gently vortexing. Centrifuge briefly (~5 seconds) to collect the mix at the bottom of the tube. D. Place the supplied PCR Tubes or Plate on ice and transfer 2.5 µL First-Strand Master Mix to individual tubes or wells. 2. Addition of Total RNA/poly-A Control Mixture. A. Add 2.5 µL of the Total RNA/poly-A Control Mixture (Table 2.5) to each aliquot of First-Strand Master Mix for a final volume of 5 µL. B. Mix thoroughly by gently vortexing. Centrifuge briefly to collect the reaction at the bottom of the tube/plate and place on ice. 18 GeneAtlas™ 3’ IVT Express Kit User Manual 3. Incubation. A. Incubate for 2 hours at 42°C in a thermal cycler using the program for “First- Strand cDNA Synthesis” (Table 2.1 on page 13). TIP: When there is approximately 15 minutes left on the thermal cycler you may start reagent preparation for Second-Strand cDNA Synthesis. B. After the incubation, centrifuge briefly (~5 seconds) to collect the first-strand cDNA at the bottom of the tube/plate. Place the sample on ice and immediately proceed to Second-Strand cDNA Synthesis on page 18. Second-Strand cDNA Synthesis Reagents and Materials Required Table 2.8 Reagents and Materials Required Item Needed GeneAtlas 3’ IVT Express Kit, Box 2 Nuclease-free Water Second-Strand Buffer Mix Second-Strand Enzyme Mix User-supplied Reagents and Materials RNase-free Microfuge Tubes (for making master mix) 1. Pre-cool thermal cycler block to 16°C. 2. Assembly of Second-Strand Master Mix. A. On ice, prepare a Second-Strand Master Mix in a nuclease-free tube in the order listed in Table 2.9. Prepare master mix for all the samples in the experiment, including ~ 5% overage to cover pipetting error. Table 2.9 Second-Strand Master Mix Component Amount Used for 1 Sample Master Mix for 4 Samples (Includes 5% Overage) Nuclease-free Water 6.5 μL 27.3 μL Second-Strand Buffer Mix 2.5 μL 10.5 μL 1 μL 4.2 μL 10 μL 42.0 μL Second-Strand Enzyme Mix Total Volume Contents 19 B. Mix well by gently vortexing. Centrifuge briefly (~5 seconds) to collect the mix at the bottom of the tube and place on ice. C. Transfer 10 µL Second-Strand Master Mix to each (5 µL) cDNA sample. Mix thoroughly by gently vortexing or flicking the tube 3–4 times. Centrifuge briefly to collect the reaction at the bottom of the tube/plate and place on ice. D. Place the reaction in a 16°C thermal cycler block. It is important to pre-cool the thermal cycler block to 16°C because subjecting the reaction to temperatures >16° C will compromise aRNA yield. 3. Incubation. A. Incubate for 1 hour at 16°C followed by 10 minutes at 65°C in a thermal cycler using the program for “Second-Strand cDNA Synthesis” (Table 2.1 on page 13). NOTE: Cover reactions with the heated lid of the thermal cycler even if its temperature cannot be adjusted to match the block temperature. B. After the incubation, centrifuge briefly (~5 seconds) to collect the double- stranded cDNA at the bottom of the tube/plate. C. Place on ice and immediately proceed to the IVT (below) or freeze at –20°C. TIP: STOPPING POINT Samples can be stored overnight at –20°C at this point if desired. 20 GeneAtlas™ 3’ IVT Express Kit User Manual In Vitro Transcription to Synthesize Labeled aRNA Reagents and Materials Required Table 2.10 Reagents and Materials Required Item Needed GeneAtlas 3’ IVT Express Kit, Box 2 IVT Biotin Label IVT Labeling Buffer IVT Enzyme Mix User-supplied Reagents and Materials RNase-free Microfuge Tubes (for making master mix) 1. Assembly of IVT Master Mix. NOTE: This step is performed at room temperature. A. Prepare an IVT Master Mix in a nuclease-free tube in the order listed in Table 2.11. Prepare master mix for all the samples in the experiment, including ~ 5% overage to cover pipetting error. Table 2.11 IVT Master Mix Component Amount Used for 1 Sample Master Mix for 4 Samples (Includes 5% Overage) IVT Biotin Label 2 μL 8.4 μL IVT Labeling Buffer 10 μL 42.0 μL IVT Enzyme Mix 3 μL 12.6 μL Total Volume 15 μL 63.0 μL B. Mix well by gently vortexing. Centrifuge briefly (~5 seconds) to collect the mix at the bottom of the tube and place on ice. C. Transfer 15 µL of IVT Master Mix to each (15 µL) double-stranded cDNA sample. Mix thoroughly by gently vortexing, and centrifuge briefly to collect the reaction at the bottom of the tube/plate. D. Once assembled, place the reaction in the thermal cycler block. Contents 21 2. Incubation. Incubate the IVT reaction for 4 or 16 hours at 40°C in a thermal cycler using the program for “IVT” (Table 2.1 on page 13). The recommended incubation time is based on the amount of input RNA and is shown in Table 2.12. Table 2.12 Recommended IVT Incubation Times Recommendations RNA Amount IVT Incubation Time Recommended 50–250 ng 16 hours Optional 250–500 ng 4 hours IMPORTANT: Optimal RNA input amount and IVT incubation time are sampletype dependent and should be determined empirically. It is recommended to keep input amount and IVT incubation time consistent within a given experiment. 3. Place the aRNA on ice briefly or freeze immediately. Place the reaction on ice and proceed to the aRNA purification step (below) or immediately freeze at –20°C for overnight storage. TIP: STOPPING POINT. The aRNA can be stored overnight at –20°C at this point, if desired. 22 GeneAtlas™ 3’ IVT Express Kit User Manual aRNA Purification Reagents and Materials Required Table 2.13 Reagents and Materials Required Item Needed GeneAtlas 3’ IVT Express Kit, Box 1 RNA Binding Beads aRNA Binding Buffer Concentrate aRNA Wash Solution* aRNA Elution Solution U-bottom Plate 8-Strip PCR Tubes and Caps (for storage of purified aRNA) User-supplied Reagents and Materials 1.5 mL RNase-free Tube (for pre-heating Elution Solution) RNase-free Microfuge Tubes (for making master mix) * See Important note below. IMPORTANT: Make sure that the appropriate volume of ethanol has been added to the bottle of aRNA Wash Solution before use. After synthesis, the aRNA is purified to remove enzymes, salts, and unincorporated nucleotides. Photos of the aRNA purification process can be found in Appendix B on page 51. If a plate shaker other than the recommended Lab-Line Titer Plate Shaker will be used, approximate shaking speeds for each step can be found in Appendix C, Shaker Speeds on page 53. Before Beginning the aRNA Purification: Preheat the aRNA Elution Solution to 60°C for at least 10 minutes. NOTE: Aliquot the appropriate amount of aRNA Elution Solution (30 μL per sample plus ~10% overage) to a separate 1.5 mL RNase-Free Tube (not included) to insure thorough pre-heating of the Elution Solution. Contents 23 Table 2.14 Preparation of aRNA Elution Solution Component Amount Used for 1 Sample Amount for 4 Samples (Includes 10% Overage) 30 μL 132 μL aRNA Elution Solution 1. Preparation of aRNA Binding Mix. NOTE: This entire procedure is performed at room temperature. IMPORTANT: Prepare only the amount needed for all samples in the experiment plus ~10% overage to cover pipetting error. At room temperature, assemble aRNA Binding Mix in a nuclease-free tube for all the samples in the experiment following the instructions in Table 2.15. Table 2.15 aRNA Binding Mix Preparation Instructions (for a single reaction) Component Amount Used for 1 Sample Master Mix for 4 Samples (Includes 10% Overage) RNA Binding Beads* 5 μL 22 μL aRNA Binding Buffer Concentrate† 25 μL 110 μL Total Volume 30 μL 132 μL * Do not put beads on ice. Ensure that the beads are fully suspended by gently flicking the tube. † If there is a precipitate present, vortex until precipitate dissipates. 2. Addition of aRNA Binding Mix. A. Add 30 µL aRNA Binding Mix to each sample. B. Transfer each sample to a well of a U-Bottom Plate. C. Mix by pipetting up and down several times. 3. aRNA binding. A. Add 60 µL 100% ethanol to each sample. B. Mix by pipetting up and down several times. 24 GeneAtlas™ 3’ IVT Express Kit User Manual C. Gently shake for 2 to 5 minutes to thoroughly mix (setting 4 on the Lab-Line Titer Plate Shaker). The aRNA in the sample will bind to the RNA Binding Beads during this incubation. Refer to Appendix C on page 53 for appropriate shaker speeds. TIP: Any unused wells should be covered with a plate sealer so that the plate can safely be reused. 4. RNA Binding Beads capture. A. Move the plate to the magnetic stand and capture the magnetic beads, for ~5 minutes. When capture is complete, the mixture becomes transparent and the RNA Binding Beads will form aggregate against the magnets in the magnetic stand. The exact capture time depends on the magnetic stand used and the amount of aRNA in your sample. NOTE: For maximum aRNA recovery, mix well and ensure that the mixture is transparent (all of the beads have been captured) before proceeding. B. Carefully remove and discard the supernatant without disturbing the magnetic beads. C. Remove the plate from the magnetic stand. 5. Bead Washing IMPORTANT: Make sure that ethanol has been added to the bottle of aRNA Wash Solution Concentrate before using it. A. Add 80 µL aRNA Wash Solution to each sample, and shake at moderate speed for 1 minute (setting 7 on the Lab-Line Titer Plate Shaker). NOTE: The RNA Binding Beads may not fully disperse during this step; this is expected and will not affect RNA purity or yield. B. Move the plate to a magnetic stand and capture the RNA Binding Beads for 5 minutes as in the previous step. Beads may have a clumpy appearance. Please refer to Appendix B, aRNA Purification Photos on page 51. C. Carefully aspirate and discard the supernatant without disturbing the RNA Binding Beads and remove the plate from the magnetic stand. D. Repeat Step A through Step C to wash a second time with 80 µL of aRNA Wash Solution. E. Move the plate to a shaker and shake the plate dry vigorously for 1 minute to evaporate residual ethanol from the beads (setting 10 on the Lab-Line Titer Plate Shaker). Refer to Appendix C on page 53 for appropriate shaker speeds. Contents 25 6. aRNA Elution A. Elute the purified aRNA from the RNA Binding Beads by adding 30 µL preheated (50–60°C) aRNA Elution Solution to each sample. B. Vigorously shake the plate for 3 minutes (setting 10 on the Lab-Line Titer Plate Shaker). Then check to make sure the RNA Binding Beads are fully dispersed. If they are not, continue shaking until the beads are dispersed. C. Move the plate to a magnetic stand, and capture the RNA Binding Beads for approximately 5 minutes. D. Transfer the supernatant, which contains the eluted aRNA, to a nuclease-free PCR tube. 7. Store aRNA at ≤ –20°C or place on ice and proceed with quantitation and fragmentation. Purified aRNA can be stored at ≤ –20°C for up to 1 year. As with any RNA preparation, the number of freeze-thaw cycles should be minimized to maintain aRNA integrity. 26 GeneAtlas™ 3’ IVT Express Kit User Manual 3 Evaluation and Fragmentation of aRNA aRNA Quantitation and Expected Yield Assessing aRNA Yield by UV Absorbance The concentration of an aRNA solution can be determined by measuring its absorbance at 260 nm. We recommend using NanoDrop Spectrophotometers for convenience. No dilutions or cuvettes are needed; just measure 2 µL of the aRNA sample directly. Alternatively, the aRNA concentration can be determined by diluting an aliquot of the preparation in TE (10 mM Tris-HCl pH 8, 1 mM EDTA) and reading the absorbance in a traditional spectrophotometer at 260 nm. Find the concentration in µg/mL using the equation shown below. (1 A 260 = 40 µg RNA/mL) Expected Yield The aRNA yield will depend on the amount and quality of poly(A) RNA in the input total RNA. Since the proportion of poly(A) RNA in total RNA is affected by influences such as health of the organism and the organ from which it is isolated, aRNA yield from equal amounts of total RNA may vary considerably. Figure 3.1 shows yield data for aRNA produced with the kit from several different types of input RNA. 28 GeneAtlas™ 3’ IVT Express Kit User Manual Figure 3.1 Average aRNA Yield from a variety of total RNA samples 90.0 16 hour IVT 4 hour IVT 80.0 Average aRNA Yield (ug) RNA Sample Key Thyroid Pancreas MAQC B (Brain) Heart HeLa (Cell Line) 70.0 60.0 50.0 40.0 30.0 20.0 10.0 0.0 1 2 4 253 ng 5 6 7 8 9 10 50 ng 11 12 13 14 15 16 17 18 19 20 21 22 23 24 25 26 27 28 29 30 31 32 33 34 35 100 ng 100 ng 250 ng 500 ng Total RNA Input Concentrate the purified aRNA (Optional) If necessary, concentrate the aRNA by vacuum centrifugation. If the heater on the vacuum centrifuge has different settings, use medium or low. Check the progress of drying every 5–10 minutes, and remove the sample from the concentrator when it reaches the desired volume. Avoid drying aRNA samples to completion. Contents 29 Analysis of aRNA Size (Optional) The size distribution of aRNA can be evaluated using an Agilent 2100 Bioanalyzer with the Agilent RNA 6000 Nano Kit (P/N 5067-1511), or by conventional denaturing agarose gel analysis. The bioanalyzer can provide a fast and accurate size distribution profile of aRNA samples, but aRNA yield should be determined by UV absorbance or RiboGreen analysis. To analyze aRNA size using a bioanalyzer, follow the manufacturer’s instructions for running the assay using purified aRNA. Expected aRNA Size We recommend analyzing aRNA size distribution using an Agilent Bioanalyzer and RNA 6000 Nano Kit loaded with 300 ng of aRNA per well. The expected aRNA profile is a distribution of sizes from 250–5500 nt with most of the aRNA between 600–1200 nt. Average aRNA size may vary slightly depending on RNA quality and total RNA input amount. Figure 3.2 Example Agilent Bioanalyzer Electropherogram of un-fragmented aRNA generated from 50 ng of HeLa total RNA. 30 GeneAtlas™ 3’ IVT Express Kit User Manual Fragmentation of Labeled aRNA Reagents and Materials Required Table 3.1 Reagents and Materials Required Location Item Needed GeneAtlas 3’ IVT Express Kit, Box 1 Nuclease-free Water 5X Array Fragmentation Buffer 8-Strip PCR Tubes and Caps Fragmentation of aRNA target before hybridization onto Affymetrix probe arrays has been shown to be critical in obtaining optimal assay sensitivity. Affymetrix recommends that the aRNA used in the fragmentation procedure be sufficiently concentrated to maintain a small volume during the procedure. This will minimize the amount of magnesium in the final hybridization cocktail. Fragment an appropriate amount of aRNA for hybridization cocktail preparation and gel analysis (aRNA amount depends on the format of the Affymetrix probe array you are using). 1. Assemble the aRNA fragmentation mixture. Table 3.2 Fragmentation Reaction Setup * Component Amount per Array aRNA 10 μg (1 to 20 μL)* 5x Array Fragmentation Buffer 5 μL Nuclease-free Water Variable (up to 25 μL final volume) Total Volume 25 μL Exact volume will depend on aRNA concentration. 2. Fragmentation Reaction. A. Incubate the fragmentation reaction at 94ºC for 35 minutes. B. Place the reaction on ice immediately after the incubation. 3. (Optional) Evaluate a sample of the reaction on a Bioanalyzer. Analyze the size of the fragmentation reaction products by running a 300 ng sample of the reaction on an Agilent bioanalyzer using an Agilent RNA 6000 Nano Kit. Figure 3.3 shows a typical result of such analysis. (Follow the manufacturer’s instructions for this analysis.) The reaction should produce a distribution of 35–200 nt aRNA fragments with a peak at approximately 100-120 nt. Contents Figure 3.3 Example Agilent Bioanalyzer Electropherogram of fragmented aRNA. 4. Use fragmented aRNA immediately or store frozen. Use the fragmented aRNA immediately or store undiluted, fragmented aRNA at –20°C (or –70°C for longer-term storage). 31 32 GeneAtlas™ 3’ IVT Express Kit User Manual 4 Hybridization This chapter outlines the basic steps involved in hybridizing your array strip(s) on the GeneAtlas System. The three major steps involved in array strip hybridization are: GeneAtlas™ Software Setup on page 33 Target Hybridization Setup for Affymetrix® Array Strips on page 38 Hybridization of Array Strips on the GeneAtlas™ System on page 46 NOTE: If you are using a hybridization-ready sample, or re-hybridizing previously made hybridization cocktail start at the beginning of this chapter but skip Step 2 of Target Hybridization Setup for Affymetrix® Array Strips on page 38. GeneAtlas™ Software Setup Prior to setting up the target hybridization and processing the Affymetrix Array Strips on the GeneAtlas System, each array strip must be registered and hybridizations setup in the GeneAtlas Software. Sample Registration: Sample registration enters array strip data into the GeneAtlas Software and saves and stores the Sample File on your computer. The array strip barcode is scanned, or entered, and a Sample Name is input for each of the four samples on the array strip. Additional information includes Probe Array Type and Probe Array position. Hybridization Software Setup: During the Hybridization Software Setup the array strip to be processed is scanned, and the GeneAtlas Hybridization Station is identified with hybridization time and temperature settings determined from installed library files. 34 GeneAtlas™ 3’ IVT Express Kit User Manual Sample Registration The following information provides general instructions for registering Affymetrix Array Strips in the GeneAtlas Software. For detailed information on Sample Registration, importing data from Excel and information on the wash, stain and scan steps, please refer to the GeneAtlas™ System User’s Guide (P/N 08-0246). 1. Click Start → Programs → Affymetrix → GeneAtlas to launch the GeneAtlas Software. 2. Click the Registration tab. Figure 4.1 appears. Figure 4.1 Registration Tab of GeneAtlas™ Software 3. Click the + Strip button: . The Add Strip Window appears (Figure 4.2). Figure 4.2 Add Strip Window 4. Enter or scan the array strip Bar Code and enter a Strip Name, then click Add. The array strip is added and appears in the Registration window (Figure 4.3) Contents 35 Figure 4.3 Array Strip added to Registration window 5. Under the Sample File Name column, click in the box and enter a sample name and press Enter. Enter a unique name for each of the four samples on the array strip. 6. When complete click the Save and Proceed button: The Save dialog box appears (Figure 4.4). . Figure 4.4 Save Dialog 7. In the Save dialog box, click to select a folder in which to save your data. Click OK. Your files are saved to the selected folder and a confirmation message appears (Figure 4.5). 36 GeneAtlas™ 3’ IVT Express Kit User Manual Figure 4.5 8. Click OK. NOTE: You may enter a total of four array strips during the registration process. To add additional strips please repeat Step 3 through Step 8. 9. Proceed to Hybridization Software Setup on page 37. Contents 37 Hybridization Software Setup All Affymetrix Array Strips to be processed must first be registered prior to setting up the hybridizations in the GeneAtlas Software. Refer to Sample Registration on page 34 for instruction on registering array strips. IMPORTANT: When hybridizing more than one array strip per day, it is recommended to keep the hybridization time consistent. Set up hybridizations for one array strip at a time, staggered by 1 to 1.5 hours so that washing and staining can occur immediately after completion of hybridization for each array strip the next day. 1. Click the Hybridization tab on the GeneAtlas Software interface. Figure 4.6 Hybridization window 2. Click the + Strip button: . The Add Strip Window appears (Figure 4.7). Figure 4.7 38 GeneAtlas™ 3’ IVT Express Kit User Manual 3. Scan or enter the Bar Code (required) of an array strip you have registered. The Strip Name field is automatically populated. 4. From the Instrument drop-down box, select the correct hybridization station. 5. The Time and Temperature settings are automatically populated and are read from the installed library files. 6. DO NOT click Start. Proceed to Target Hybridization Setup for Affymetrix® Array Strips on page 38. Target Hybridization Setup for Affymetrix® Array Strips This section provides instruction for setting up array hybridizations using the GeneAtlas™ Hybridization, Wash, and Stain Kit for 3’IVT Arrays, (60 rxns). For ordering information please refer to Table 1.5 on page 10 Table 4.1 lists the necessary amount of aRNA required a single array. These preparations take into account that it is necessary to make extra hybridization cocktail due to a small loss of volume (10-20 µL) during each hybridization. 1. In preparation of the hybridization step, prepare the following: A. Pull the array strip from storage at 4°C so that it can begin to equilibrate to room temperature. B. Gather two (2) hybridization trays per array strip. C. Set the temperature of the GeneAtlas Hybridization Station to 45°C. D. Warm the pre-hybridization buffer to room temperature. NOTE: Aliquot ~500 μL of pre-hybridization buffer per array strip to be hybridized into an Eppendorf tube to accelerate the equilibration to room temperature. Contents 39 2. Prepare the hybridization cocktail for each sample in an Eppendorf tube. A. Prepare sufficient hybridization cocktail Master Mix for all samples (Table 4.1). Table 4.1 Hybridization Cocktail Setup Component Amount for 1 Array Control Oligonucleotide B2 (3 nM) 2.5 μL 11 μL 50 pM 20X Hybridization Controls (bioB, bioC, bioD, cre)* 7.5 μL 33 μL 1.5, 5, 25, and 100 pM respectively 1.3X Hybridization Solution A 40 μL 176 μL 1X 1.3X Hybridization Solution B 75 μL 330 μL 1X Nuclease-free Water 6.2 μL 27.3 μL 131.2 μL 577.3 μL 18.8 μL (7.5 μg) ---- 150 μL ---- Total Master Mix Volume Fragmented and Labeled aRNA Total Volume * Master Mix for Final Dilution with 4 Arrays Fragmented and (Includes 5% Overage) Labeled aRNA 0.05 μg/ μL See “Important” note on page 39. IMPORTANT: It is imperative that frozen stocks of 20X GeneChip Eukaryotic Hybridization Controls are heated to 65°C for 5 minutes to completely resuspend the aRNA before aliquoting. B. Add 131.2 µL of the hybridization cocktail Master Mix to 7.5 µg (18.8 µL) of fragmented and labeled aRNA. C. Mix thoroughly by gently vortexing. Centrifuge briefly to collect hybridization mix at the bottom of the tube. Place tube on ice, or store at –20°C for longer term storage. D. Optional: the remainder of the hybridization cocktail Master Mix can be stored at –20°C to supplement Hybridization Cocktail volume should a rehybridization be necessary. (Refer to Rehybridizing Used Cocktails on page 48 for additional information.) 40 GeneAtlas™ 3’ IVT Express Kit User Manual 3. Pre-Hybridization of the Array Strip. A. Gently pipette 120 µL of Pre-Hybridization Buffer into the appropriate wells of the hybridization tray (see Figure 4.8). Avoid generating air bubbles. CAUTION: The center of the hybridization tray is not a sample well. It is important that you do not add anything to this area (Figure 4.8). Figure 4.8 Location of sample wells on the hybridization tray Add sample to these four wells only. A C E G DO NOT add sample to the space in the center of the hybridization tray. B. Remove the array strip from its foil pouch and carefully place into the hybridization tray (see Figure 4.9) making sure that there are no bubbles beneath the array strip. CAUTION: Be very careful not to scratch/damage the array surface. TIP: To avoid any possible mix-ups, the hybridization tray and array strip should be labeled on the white label if more than 1 array strip is processed overnight. Contents 41 Figure 4.9 Proper Orientation of the Array Strip in the Hybridization Tray Thin Thick Rift Thin Thick A C. Bring the hybridization tray to just above eye level and look at the underside of the hybridization tray to check for bubbles. CAUTION: Be careful not to tip the hybridization tray to avoid spilling. D. If an air bubble is observed, separate the array strip from the hybridization tray and remove air bubbles. Place array strip back into hybridization tray and recheck for air bubbles. E. Place the array strip / hybridization tray into the Hybridization Station at 45°C for 15 minutes. WARNING: Do not force the GeneAtlas Hybridization clamps up. To open, press down on the top of the clamp and simultaneously slightly lift the protruding lever to unlock. The clamp should open effortlessly. Refer to Figure 4.10. 42 GeneAtlas™ 3’ IVT Express Kit User Manual Figure 4.10 Opening the clamps on the GeneAtlas™ Hybridization Station 1 - Push Down 2 - Lift Lever 4. Array Strip Sample Preparation – To be carried out during array strip prehybridization. A. For each sample to by hybridized, pipette 120 µL of the hybridization cocktail (from Step 2) into a 0.2 mL PCR Strip Tube. B. Incubate at 96°C for 10 minutes in a thermal cycler, followed by at least 2 minutes at 45°C using the program for “Pre-Hybridization” (Table 2.1 on page 13). 5. Array Strip Sample Hybridization. A. After 10-15 minutes of pre-hybridization, remove the array strip from the Hybridization Station and place on bench top keeping the arrays immersed in the pre-hybridization solution. B. Apply the 120 µL of pre-heated hybridization cocktail to the middle of the appropriate wells of a new clean hybridization tray (see Figure 4.11). IMPORTANT: Do not add more than 120 μL of hybridization cocktail to the wells as that could result in cross-contamination of the samples. Contents 43 Figure 4.11 Location of the sample wells on the hybridization tray Add sample to these four wells only. A C E G DO NOT add sample to the space in the center of the hybridization tray. C. Carefully remove the array strip from the hybridization tray containing the pre- hybridization buffer and place it into the hybridization tray containing the hybridization cocktail samples. D. Check for and remove any bubbles that were introduced. Refer to Figure 4.12 for proper orientation of the array strip in the hybridization tray. IMPORTANT: Insertion of the array strip and air bubble removal should be performed quickly to avoid drying of the array surface. 44 GeneAtlas™ 3’ IVT Express Kit User Manual Figure 4.12 Proper Orientation of the Array Strip in the Hybridization Tray Thin Thick Rift Thin Thick A E. Place the hybridization tray with the array strip into a clamp inside the Hybridization Station and close the clamp as shown in Figure 4.13. Contents Figure 4.13 Laterally inserting an array strip and closing the clamp of the GeneAtlas™ Hybridization Station 6. Proceed to Hybridization of Array Strips on the GeneAtlas™ System on page 46. 45 46 GeneAtlas™ 3’ IVT Express Kit User Manual Hybridization of Array Strips on the GeneAtlas™ System After the array strip are registered in the GeneAtlas Software and the target hybridization steps are complete, processing on the GeneAtlas System may begin. 1. Return to the GeneAtlas Software interface. Figure 4.14 should be visible. Figure 4.14 2. With the hybridization tray and array strip already in the GeneAtlas Hybridization Station, click Start in Figure 4.14. The software displays the hybridization time countdown. This time is displayed with a white background (Figure 4.15). When the countdown has completed the display turns yellow and the time begins to count up. Figure 4.15 Hybridization Countdown Contents 47 Figure 4.16 Hybridization Count up 3. When hybridization has completed, click the Stop button in the upper right corner. A confirmation message box appears (Figure 4.17). Figure 4.17 Confirmation Message 4. Click Yes to complete hybridization. 5. It is important to remove the hybridization tray from the Hybridization Station after the timer has completed the countdown as the Hybridization Station does not shut down when the hybridization is complete. 6. Save the remaining hybridization cocktail in –20°C for future use (refer to Rehybridizing Used Cocktails on page 48 for additional information). 7. Immediately proceed to the GeneAtlas Wash, Stain and Scan protocol. Please refer to GeneAtlas™ System User’s Guide (P/N 08-0246) for further detail. 48 GeneAtlas™ 3’ IVT Express Kit User Manual Rehybridizing Used Cocktails A used hybridization cocktail can be rehybridized to a new array if necessary. Collect the used hybridization cocktail immediately after the Fluidics run is completed, add to the remainder of the hybridization cocktail master mix from Step 2D on page 39 and store at –20°C. For rehybridization, continue the protocol from Step 3 on page 40. The hybridization cocktail needs to be denatured again prior to reapplication to a new array. IMPORTANT: Rehybridization of hybridization cocktails should only be necessary in case of serious array problems. The performance of rehybridized samples has not been thoroughly tested and is recommended only when absolutely necessary. A Troubleshooting Positive Control Reaction Control RNA Amplification Instructions To verify that the process is working as expected, a Control RNA sample isolated from HeLa cells is provided with the kit. 1. Dilute 2 µL of the Control RNA into 18 µL of Nuclease-free Water. 2. Use 1 µL of the diluted Control RNA (100 ng); follow the protocol starting at Reverse Transcription to Synthesize First-Strand cDNA on page 17. 3. At In Vitro Transcription to Synthesize Labeled aRNA on page 20, use a 16 hour incubation for the IVT reaction. 4. Continue with the procedure for making biotin-modified aRNA through aRNA Purification on page 22. Expected Results The positive control reaction should produce ≥ 40 µg of aRNA. The average size of the aRNA should be ~800 nucleotides. Factors that Affect Both Positive Control and Experimental Samples If the positive control reaction yield or amplification product size does not meet expectations, consider the following possible causes and troubleshooting suggestions. These suggestions also apply to problems with amplification of experimental RNA. Incubation Temperature(s) Were Incorrect The incubation temperatures are critical for effective RNA amplification. Use only properly calibrated thermal cyclers for the procedure. Condensation formed in the tube during the reaction incubation(s) Condensation occurs when the cap of the reaction vessel is cooler (e.g., room temperature) than the bottom of the tube. As little as 1–2 µL of condensate in an IVT reaction tube throws off the concentrations of the nucleotides and magnesium, which are crucial for good yield. If you see condensation, check to make sure that the heated lid feature of the thermal cycler is working properly. 50 GeneAtlas™ 3’ IVT Express Kit User Manual Nuclease Contamination Using pipettes, tubes, or equipment that are contaminated with nucleases can cleave the RNA or DNA being generated at each step in the procedure. This will reduce the size of the aRNA products and decrease aRNA yield. Both RNases and DNases can be removed from surfaces using a RNase decontamination solution such as RNaseZap®. Troubleshooting Low Yield and Small Average aRNA Size Consider the following troubleshooting suggestions if the positive control reaction produced the expected results, but amplification of your experimental samples results in less or smaller (average <500 nt) aRNA than expected. Lower Than Expected Input RNA Concentration Take another A260 reading of your RNA sample or, if it is available, try using 100–250 ng of RNA in the amplification procedure. impure RNA Samples RNA samples with significant amounts of contaminating DNA, protein, phenol, ethanol, or salts are reverse transcribed poorly and subsequently generate less aRNA than pure RNA samples. Phenol extract and ethanol precipitate your RNA, or use a commercially available RNA cleanup kit to further purify your RNA before reverse transcription. RNA Integrity is Compromised RNA that is partially degraded generates cDNA that is relatively short. This will reduce the average size of the aRNA population and subsequently reduce the yield of aRNA. You can assess the integrity of an RNA sample by determining the size of the 18S and 28S rRNA bands and the relative abundance of 28S to 18S rRNA (See RNA Integrity on page 5 for more information). The mRNA Content of Your total RNA Sample is Lower Than Expected Different RNA samples contain different amounts of mRNA. In healthy cells, mRNA constitutes 1–10% of total cellular RNA (Johnson 1974, Sambrook and Russell 2001). The actual amount of mRNA depends on the cell type and the physiological state of the sample. When calculating the amount of amplification, the starting mass of mRNA in a total RNA prep should always be considered within a range of 10–30 ng per µg of total RNA (assuming good RNA quality). B aRNA Purification Photos Figure B.1 Photos of aRNA Purification Step - figure 1 of 2 52 GeneAtlas™ 3’ IVT Express Kit User Manual Figure B.2 Photos of aRNA Purification Step - figure 2 of 2 C Shaker Speeds Table C.1 Plate Shaking Speeds Recommended Speed Setting aRNA Purification Protocol Step Shaking Speed Approximate Barnstead/Lab-Line RPM Range Titer Plate Shaker (Model # 4625) Boekel "Jitterbug" Plate Shaker (Model #130000 aRNA Binding Gentle 300-500 4 1 Bead Washing Moderate 700-900 7 4 Ethanol Removal Vigorous 1000-1200 10 7 aRNA Elution Vigorous 1000-1200 10 7 Figure C.1 Approximate Shaking Speed (RPM) for the Barnstead / Lab-Line Titer Shaker (Model # 4625) 54 GeneAtlas™ 3’ IVT Express Kit User Manual