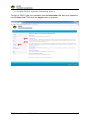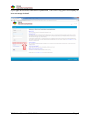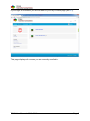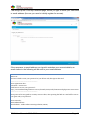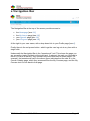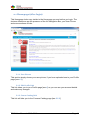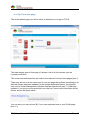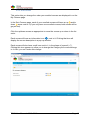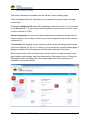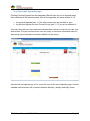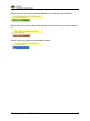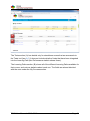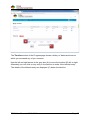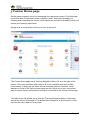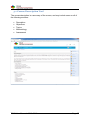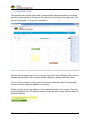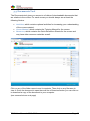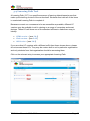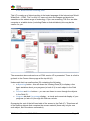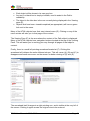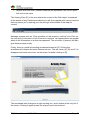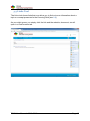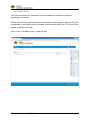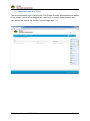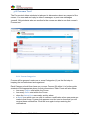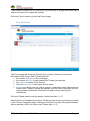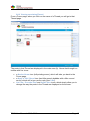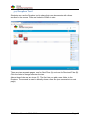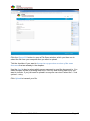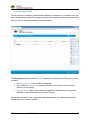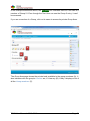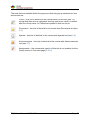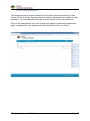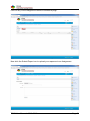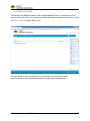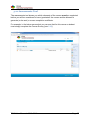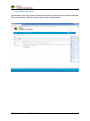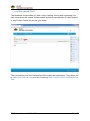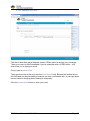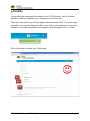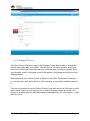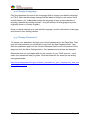
1
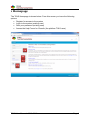
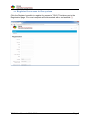
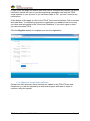
TOLS User Manual Table of Contents 1 Homepage ............................................................................................................... 4 1.1 Register for access to the system ..................................................................... 5 1.1.1 Updates to Terms and Conditions .............................................................. 6 1.2 Login to the system (existing user) ................................................................... 7 1.3 Reset your password (existing user)............................................................... 10 1.4 Access the Help Forum for Chamilo ............................................................... 12 2 Navigation Bar ....................................................................................................... 13 2.1 Homepage (after login) ................................................................................... 14 2.1.1 User Picture ............................................................................................. 14 2.1.2 Edit Profile link ......................................................................................... 14 2.1.3 Course Catalog link .................................................................................. 14 2.1.4 Forum link ................................................................................................ 15 2.1.5 Profile link................................................................................................. 15 2.2 My Courses page............................................................................................ 16 2.2.1 Sort Courses ............................................................................................ 18 2.2.2 Course Catalog ........................................................................................ 19 2.2.3 Courses Sessions History ........................................................................ 20 2.3 Personal Agenda page ................................................................................... 21 2.4 Progress page ................................................................................................ 23 3 Course Home page ............................................................................................... 26 3.1 Course Description Tool ................................................................................. 27 3.2 Agenda Tool ................................................................................................... 28 3.3 Documents Tool.............................................................................................. 30 3.4 Learning Path Tool ......................................................................................... 32 3.4.1 HTML version Learning Path.................................................................... 33 3.4.2 Flash version Learning Path..................................................................... 36 3.4.3 iOS version Learning Path ...................................................................... 39 3.5 Links Tool ....................................................................................................... 40 3.6 Tests Tool ....................................................................................................... 41 3.7 Announcements Tool ...................................................................................... 42 TOLS User Manual v 2013.09.12 Page 1 3.8 Forums Tool.................................................................................................... 43 3.8.1 Forum Categories .................................................................................... 43 3.8.2 The Forum................................................................................................ 44 3.8.3 Viewing an existing Thread ...................................................................... 45 3.8.4 Replying to a Thread ................................................................................ 46 3.8.5 Starting a new Thread .............................................................................. 47 3.9 Dropbox Tool .................................................................................................. 48 3.10 Groups Tool .................................................................................................. 50 3.10.1 Group Assignments ................................................................................ 53 3.11 Surveys Tool ................................................................................................. 56 3.12 Assessments Tool ........................................................................................ 57 3.13 Glossary Tool................................................................................................ 58 3.14 Notebook Tool .............................................................................................. 59 3.14.1 Adding a new Note ................................................................................. 60 4 Profile .................................................................................................................... 61 4.1 Change Picture ............................................................................................... 62 4.2 Change Language .......................................................................................... 63 4.3 Change Password .......................................................................................... 63 4.4 Email Notifications .......................................................................................... 64 TOLS User Manual v 2013.09.12 Page 2 Notes There are a number of internal links in this manual to assist readers in crossreferencing the material. Anywhere in the text that you see a numeric reference in square brackets, e.g. [3.1] or [see 2.2.3], it refers to that section of the manual. If you are reading an electronic version of this manual, clicking on the number part of that reference will take you straight to that section. TOLS User Manual v 2013.09.12 Page 3 1 Homepage The TOLS Homepage is shown below. From this screen you have the following options: • Register for access to the system • Login to the system (existing user) • Rest your password (existing user) • Access the Help Forum for Chamilo (the platform TOLS uses) 1.2 1.1 1.3 1.4 TOLS User Manual v 2013.09.12 Page 4 1.1 Register for access to the system Click the Register hyperlink to register for access to TOLS. This takes you to the Registration page. You must complete all fields marked with a red asterisk (*). TOLS User Manual v 2013.09.12 Page 5 Further down the page are options that allow you to configure the frequency at which notification emails are sent to you about personal messages sent from the TOLS social network to your account. If you set these fields to ‘No’, you won’t receive any notifications. At the bottom of the page is a link to the TOLS Terms and conditions. Click to access and read them. To complete your account registration you must tick the box to say you have read and agree to the Terms and Conditions. If you don’t agree to them, you cannot access TOLS. Click the Register button to complete your account registration. 1.1.1 Updates to Terms and Conditions Please note that whenever there has been an update to the TOLS Terms and Conditions, you will be required to re-read and re-agree with them in order to continue using the system. TOLS User Manual v 2013.09.12 Page 6 1.2 Login to the system (existing user) To login to TOLS, type your username into the Username field, and your password into the Pass field. Then click the Login button to proceed. TOLS User Manual v 2013.09.12 Page 7 If you type an incorrect username or password, TOLS won’t log you in but display an error message instead. TOLS User Manual v 2013.09.12 Page 8 If your login is successful you will be taken to your My Courses page [see 2.2]. This page displays all courses you are currently enrolled in. TOLS User Manual v 2013.09.12 Page 9 1.3 Reset your password (existing user) If you cannot remember you password, you can click the I lost my password link on the Homepage: TOLS User Manual v 2013.09.12 Page 10 This brings up the I Lost My Password page, where you type in either your username or email address (the one you used to initially register for access). If the username or email address you typed in matches your account details, an email similar to the following will be sent to your email address. Dear user : You have asked to reset your password. If you did not ask, then ignore this mail. ----------------------------------------------Your registration data : Username : xxxxxxxxxx Click here to recover your password : http://www.tindatrainingsolutions.com.au/chamilo/main/auth/lostPassword.php?reset=xxxxxxxxxx ----------------------------------------------Your password is encrypted for security reasons. Thus, after pressing the link an e-mail will be sent to you again with your password. Yours sincerely, TOLS Administrator Portal Admin - Tinda Online Learning Solution (TOLS) TOLS User Manual v 2013.09.12 Page 11 When you click the link given in your email you will be taken to the I lost my password Screen; however this time it will have a different message: At the same time another email will have been sent to your email address notifying you of your new password. This is your information to connect to http://www.tindatrainingsolutions.com.au/chamilo/ Your registration data : Username : xxxxxxx Pass : yyyyyyyyyy Use your username and the new password to login to TOLS. 1.4 Access the Help Forum for Chamilo This link leads to the Forum pages for the Chamilo Learning Management System (LMS), the platform that powers TOLS. It is not particularly relevant to TOLS students. TOLS User Manual v 2013.09.12 Page 12 2 Navigation Bar The Navigation Bar at the top of the screen provide access to: • • • • the Homepage [see 2.1] the My Course page [see 2.2] your Agenda page [see 2.3] your Progress page [see 2.4] At the right is your user name, with a drop-down link to your Profile page [see 4]. Finally there is the red power button which logs the user log out at any time with a single click. Underneath the Navigation Bar is the “breadcrumb” trail. This shows the page you are currently viewing (in black at the right) and, if relevant, the path you followed to reach it (in blue at the left). Any entries in blue are links back to those pages. For example, the breadcrumb trail in the above figure indicates that the user is in the Course Catalog page, which they accessed from the My Courses page, and the My Courses text is a link back to that page. TOLS User Manual v 2013.09.12 Page 13 2.1 Homepage (after login) This Homepage looks very similar to the Homepage you see before you login. The obvious differences are the presence of the full Navigation Bar, your User Picture and some sections of links. 2.1.1 2.1.2 2.1.3 2.1.4 2.1.5 2.1.1 User Picture This section simply shows your user picture, if you have uploaded one to your Profile page [see 4.1]. 2.1.2 Edit Profile link This link takes you to your Profile page [see 4] so you can see your account details and make any changes. 2.1.3 Course Catalog link This link will take you to the Courses Catalog page [see 2.2.2]. TOLS User Manual v 2013.09.12 Page 14 2.1.4 Forum link As with the pre-login Homepage, this Forum link only leads to the Forum pages for the Chamilo LMS, and is not particularly relevant to TOLS students [see 1.4]. 2.1.5 Profile link This link also takes you to your Profile page [see 4] so you can see your account details and make any changes. TOLS User Manual v 2013.09.12 Page 15 2.2 My Courses page This is the default page you will be taken to whenever you login to TOLS. B A C D C The main display area of this page (A) shows a list of all the courses you are currently enrolled in. The course names themselves are links to the relevant Course Home pages [see 3]. There may be one or more icons next to a course page that indicate something to do with that course has been updated. In the sample screenshot above, the Agenda icon next to Stress Management indicates that the Agenda tool [see 3.2] has been updated. If you put your mouse pointer over the icon, some more information will be shown, as per the figure below: You can see your user picture (B), if you have uploaded one to your Profile page [see 4.1]. TOLS User Manual v 2013.09.12 Page 16 Links to your Profile page [see 4] are visible on this page as well (C). The last section (D) contains links to various tools related to courses: • • • Sort courses [see 2.2.1] Course catalog [see 2.2.2] Current session history [see 2.2.3] TOLS User Manual v 2013.09.12 Page 17 2.2.1 Sort Courses This option lets you change the order your enrolled courses are displayed in on the My Courses page. In the Sort Courses page, each of your enrolled courses will have an up and/or down arrow next to it (if you only have one enrolled courses, both arrows will be greyed-out). Click the up/down arrows as appropriate to move the course up or down in the list order. Each course will have an information icon i next to it. Clicking that icon will display the course description in a pop-up window. Each course will also have a edit icon next to it, in the shape of a pencil (). Clicking this icon appears to allow you to change the Category the course belongs to. In fact, you can’t make this change. TOLS User Manual v 2013.09.12 Page 18 2.2.2 Course Catalog This option displays the available courses via the Course Catalog page. There is a Search field (A) that allows you to conduct a keyword search through course titles. Clicking the Random Pick button (B) will display a selection of from 1 to 10 courses in the List Area (D). These courses will be randomly selected from the entire roster of active courses in TOLS. Course Categories (C) are used to help organise the courses into smaller lists for easier viewing in the List Area. Click on any of the categories to see all the courses contained in it. The List Area (D) displays a list of courses; with the exact list being determined by your use of options (A), (B) or (C). When you first access the Course Catalog page, it displays a random list as though you had clicked the Random Pick button. Each course shown in the List Area has a course icon (if one has been set) some basic statistics and ratings, and most importantly a Description button. Clicking the Description button will display the course description and other information (if available) in a pop-up window. A B D C TOLS User Manual v 2013.09.12 Page 19 2.2.3 Courses Sessions History This option changes your Enrolled Courses List to a display of information about your Sessions, which is a function not currently in use in TOLS. This page will therefore be blank. The Courses Sessions History link changes to a Display Courses List link, which will change the main display area back to your Enrolled Courses List. TOLS User Manual v 2013.09.12 Page 20 2.3 Personal Agenda page Clicking Personal Agenda on the Navigation Bar will take you to an Agenda page that combines all the entries/events from all the agendas you have access to, i.e. • • the general Agenda [see 3.2] for each course you are enrolled in; plus the private Agenda for each Course Group [see 3.10] you are a member of. You may also add your own personal entries/events, which no-one but you can view and access. Put your mouse cursor over any entry to see more information about it (assuming more information has been added into the entry). A B Use the left and right arrows (A) to move the view to the next calendar page. Use the calendar period buttons (B) to switch between Monthly, Weekly and Daily views. TOLS User Manual v 2013.09.12 Page 21 Entries in green are from the general Agenda of a course you are enrolled in. Entries in brown are from the private Agenda of a Course Group you are a member of. Entries in blue are ones you have added yourself. TOLS User Manual v 2013.09.12 Page 22 2.4 Progress page The Progress page gives you some statistics on each course you are enrolled in. In the My Courses section: • • • • • Time spent in the course should be self-explanatory - the total time spent in the actual course. Progress is the percentage of steps in the learning Path that have been viewed or completed (as appropriate). Performance is the average of all the test scores in the Learning Path. Latest Login is the last date the user accessed the course. Details allows you to see even more statistics about a particular course: TOLS User Manual v 2013.09.12 Page 23 A B The Tests section (A) has details only for standalone exams that are accessed via the Tests tool [see 3.6]. It does not include details of tests that have been integrated into the Learning Path (the Performance statistic shows those). The Learning Paths section (B) shows all of the different Learning Paths available for that course, and various statistics about each one. The fields are almost identical with the ones under the My Courses section. TOLS User Manual v 2013.09.12 Page 24 A B C The Timeline section of the Progress page shows a history of dates and times at which you accessed any of your courses. Use the left and right arrows in the grey box (A) to move the timeline (B) left or right. Alternately you can click on any entry in the timeline to make it the leftmost entry. The details of the leftmost entry are displayed (C) below the timeline. TOLS User Manual v 2013.09.12 Page 25 3 Course Home page As the name suggests, this is the homepage for a particular course. From this page you will be able to view and access a variety of tools. Some are necessary for studying and completing the course, while others are provided to possibly enrich and extend your learning experience. Simply click on a particular tool’s text or icon to access it. B A The Course Home page has a Training Navigation Menu (A) at to the right of the screen. This menu provides quick links to all of the available tools and is really unnecessary on this page (as those links are already present). However it also appears on most of the various tools pages as well, giving you a very convenient way to access various tools without having to come back to the Course Home page. The Hide button (B) allows you to hide the Training Navigation Menu in this page and all the various tools pages. The button then changes to a Show button, so you can turn the menu back on at any time. TOLS User Manual v 2013.09.12 Page 26 3.1 Course Description Tool The course description is a summary of the course, and may include some or all of the following sections: • • • • • Description Objectives Topics Methodology Assessment TOLS User Manual v 2013.09.12 Page 27 3.2 Agenda Tool The Agenda tool provides users with a comprehensive diary/calendar tool showing relevant entries/events for the course as a whole, as well as any that apply only to a Course Group [see 3.10] you are a member of. Use the left and right arrows (A) to move the view to the next calendar page. Use the calendar period buttons (B) to switch between Monthly, Weekly and Daily views. Put your mouse cursor over any entry to see more information about it (assuming more information has been added into the entry). Entries in green are for the attention of all students enrolled in the course. They are typically posted by the TOLS Administrator and will be about things that will affect all enrolled students. TOLS User Manual v 2013.09.12 Page 28 Entries in brown are for the attention of members of a particular Course Group, and are not visible to anyone who is not a member of that group. They are typically posted by the group’s Course Coach (if one has been assigned to the group). All entries from this Agenda are also posted to your Personal Agenda [see 2.3]. TOLS User Manual v 2013.09.12 Page 29 3.3 Documents Tool The Documents tool gives you access to a folders of downloadable documents that are relative to the course. For each course you should always see at least the following folders: • • • Activities, which contains optional activities for increasing your understanding of the course material. Course Manual, which contains the Training Manual for the course. Resources, which contains the Quick Reference Sheets for the course and may have other resource materials as well. Click on any of the folder name to see its contents. Then click on any filename to view it. Once the document is open there will be a Download button you can click on to download a copy of the document to your computer. (see screenshots on next page) TOLS User Manual v 2013.09.12 Page 30 TOLS User Manual v 2013.09.12 Page 31 3.4 Learning Path Tool A Learning Path (“LP”) is a specific sequence of learning objects/experiences that make up the training content of the course itself. Students must view all of the items in a selected Learning Path to complete it. Because we want our courseware to be as accessible as possible, different LP versions may be available to aid in viewing on a range of computers and smart devices. These LPs will have one of the standard suffixes to make them easy to identify: • • • HTML version – [see 3.4.1] Flash version – [see 3.4.2] iOS Version – [see 3.4.3] If you see other LP versions with a different suffix than those shown above, please do not access those LPs. They may be custom-built to suit a particular organisation and only students from that organisation should be accessing them. Click on the relevant entry to access your appropriate Learning Path. TOLS User Manual v 2013.09.12 Page 32 3.4.1 HTML version Learning Path This LP is made up of objects written in the basic language of the Internet and World Wide Web – HTML. This ‘no-frills’ LP uses only text and images and should be viewable on the widest range of technology. If you are accessing TOLS on an older computer or a tablet device (including iPads or Android tablets) this may be the version for you. A B D C F E The screenshot above shows how a HTML version LP is presented. There is a link to go back to the Course Home page at the top-left (A). Underneath that is a small section (B) containing the following: • a Reporting button - this will cause the Viewing Pane (E) to display a few basic statistics about your progress (or lack of it) in each object in the Path (C). • Previous and Next buttons – you can use these to move through the objects in the Path (C). • Progress bar and Percentage display – a visual and numerical display of your progress (or lack of it) through the Path as a whole. Occupying the rest of the left-hand side of the screen is the Path (C). This shows all of the learning objects that comprise the course material (there may only be one such object, as in the above screenshot). TOLS User Manual v 2013.09.12 Page 33 . • • • • Each object will be shown in its own grey box. Any text in a black box is simply a header, used to assist in the Path’s readability. The object in the blue box is the one currently being displayed in the Viewing pane (E). Objects that have been viewed/completed (as appropriate) will have a green tick next to the name. Many of the HTML objects have their own internal menu (D). Clicking on any of the menu entries will take you to that page of the content. The Viewing Pane (E) is the area where the content of the Path object is displayed. Many of the HTML objects have navigation buttons located at the top of the Viewing Pane. This will assist you in working your way through all pages of that object’s content. Finally, there is a small left-pointing arrowhead located at (F). Clicking this arrowhead will collapse the entire leftmost column. This will cause (A), (B) and (C) to disappear and leave more room on the screen for better viewing of (D) and (E). The arrowhead itself changes to a right-pointing one, and is visible at the very left of the screen. Clicking it again causes the original view to be restored. TOLS User Manual v 2013.09.12 Page 34 Please note: If an object in the Path is not assessable (i.e. it is not graded in any way) any Progress or Percentage score indicates only that the object was accessed. It doesn’t mean you have read or viewed everything in that object. It is up to you to track or remember your own progress through each object. This is most obvious in courses that have only a single object in their Path, like our example screenshot. As soon as you have accessed the LP, it displays the first page of the content of the first (and only) object in the Path. Your progress then becomes 100%, because you have viewed the one and only object, all without reading a word! TOLS courses are all presented as self-directed, so you are responsible for ensuring your read all the available LP content. TOLS User Manual v 2013.09.12 Page 35 3.4.2 Flash version Learning Path This LP uses Flash-based animations to present the learning material in a more fun and interactive way. Some of them even include a voiceover to cater students who learn better when they can hear the material being presented. You must have Flash Player version 10 or better to be able to view this LP version. When a Flash-based object has to be loaded, you will see the following screen. Note the small ‘loading’ indicator in the centre of the viewing pane – this is to let you know that the content must be loaded and how it is progressing. When the indicator reaches 100% the content will automatically load. You will see this screen whenever you first access a Flash version LP, as the first object is always Flash-based content. TOLS User Manual v 2013.09.12 Page 36 The screenshot below shows how a Flash version LP is presented. A B D C E There is a link to go back to the Course Home page at the top-left (A). Underneath that is a small section (B) containing the following: • a Reporting button - this will cause the Viewing Pane (E) to display a few basic statistics about your progress (or lack of it) in each object in the Path (C). • Previous and Next buttons – you can use these to move through the objects in the Path (C). • Progress bar and Percentage display – a visual and numerical display of your progress (or lack of it) through the Path as a whole. Occupying the rest of the left-hand side of the screen is the Path (C). This shows all of the learning objects that comprise the course material (there may only be one such object, as in the above screenshot). . • Each object will be shown in its own grey box. • Any text in a black box is simply a header, used to assist in the Path’s readability. • The object in the blue box is the one currently being displayed in the Viewing pane (E). TOLS User Manual v 2013.09.12 Page 37 • Objects that have been viewed/completed (as appropriate) will have a green tick next to the name. The Viewing Pane (D) is the area where the content of the Path object is displayed. At the bottom of any Flash-based objects you will find a playbar with various controls that may assist you in working your way through all the slides of that object’s content. Message prompts such as “Click anywhere on the screen to continue” and “Click on the next entry in the menu at left of screen to continue” will appear above the playbar when all the information on a slide has appeared. The voiceover (if present) will also give these prompts aurally. Finally, there is a small left-pointing arrowhead located at (E). Clicking this arrowhead will collapse the entire leftmost column. This will cause (A), (B) and (C) to disappear and leave more room on the screen for better viewing of (D). The arrowhead itself changes to a right-pointing one, and is visible at the very left of the screen. Clicking it again causes the original view to be restored. TOLS User Manual v 2013.09.12 Page 38 3.4.3 iOS version Learning Path This LP also uses animations to present the material, but has been specifically built to work on Apple devices (which can’t normally play Flash-based content). There are currently no iOS LPS available, so there are no screenshots. TOLS User Manual v 2013.09.12 Page 39 3.5 Links Tool The Links tool shows links that may allow you to find out more information about a topic or concept presented in the Learning Path [see 3.4]. As you might guess, you simply click the link and the website, document, etc will open in a new browser tab. TOLS User Manual v 2013.09.12 Page 40 3.6 Tests Tool The Test tool shows any tests that may be available for students to test their knowledge or learning. Please note that any tests in this tool are standalone and normally optional. They will be separate to any tests that are included in the Learning Path [see 3.4], even if they appear to be the same test. Click on the Test Name entry to take the test. TOLS User Manual v 2013.09.12 Page 41 3.7 Announcements Tool The Announcements tool is used by the TOLS team to make announcements related to the course, which will be flagged (by a bell icon) to course students when they next access the course via the My Courses page [see 2.2]. TOLS User Manual v 2013.09.12 Page 42 3.8 Forums Tool The Forums tool allows students to take part in discussions about any aspect of the course. You can read and reply to others’ messages, or post new messages yourself. Only students who are enrolled in the course are able to see that course’s Forums tool. A C B 3.8.1 Forum Categories Forums will be grouped under one or more Categories (A), as the first step in keeping the tool structured and organised. Each Category should then have one or more Forums (B) within it, to further guide students to the appropriate place for their discussions. Each Forum will also show: • how many Topics exist within the Forum • how many Posts exist within the Forum • when the Latest Post was made, and by whom • a Detail icon which you can click to receive a notification when new posts are made to that forum. A green tick appears over the icon to show that you will receive these notifications. Click the icon again to stop receiving the notifications. TOLS User Manual v 2013.09.12 Page 43 There is also a Search icon (C) which you can click to go to a page that allows you to search the forums for a particular word(s). Click any Forum name to go into that Forum page. 3.8.2 The Forum B A The Forum page will show the Threads (A) (or topics), that are or have been discussed in that forum. Each Thread will show: • the number of Replies to the initial post • the number of Views (times viewed) the Thread has received • the Author or creator of the Thread • when the Latest Post was made, and by whom • a Detail icon which you can click to receive a notification when new posts are made to that Thread. A green tick appears over the icon to show that you will receive these notifications. Click the icon again to stop receiving the notifications. Click the Thread name to see the posts in that thread [see 3.8.3]. Above the list of Threads are two icons. Clicking on the arrow icon will take you back to the Forums Categories page. Clicking on the other icon (two little speech bubbles with an asterisk) will let you start a new Thread [see 3.8.5]. TOLS User Manual v 2013.09.12 Page 44 3.8.3 Viewing an existing Thread From a Forum page, when you click on the name of a Thread you will go to that Thread page. B A The posts in that Thread are displayed in the main area (A). Above that though is a toolbar with five icons: • • • a Back to Forum icon (left-pointing arrow), which will take you back to the Forum page. a Reply to This Thread icon (two little speech bubbles with a little curved arrow), which will let you post a reply [see 3.8.4]. List View, Threaded View and Nested View icons, which simply allow you to change the way the posts in the Thread are displayed on the screen. TOLS User Manual v 2013.09.12 Page 45 3.8.4 Replying to a Thread A B C D E When you choose to reply to a post in a Thread, you will be taken to a basic HTML editor for writing your message. There is no need to feel intimidated if you’re unfamiliar with a HTML editor – just treat it like you’re typing an email. Enter a Title (A) for your reply. Type your message in the Text field (B). Browse the toolbar above it and use any formatting functions you feel comfortable with, or just type plain old text without worrying about making it look pretty. If you click the Advanced Settings link you get two further options. TOLS User Manual v 2013.09.12 Page 46 There is a checkbox you can tick to receive a notification when someone replies to your post (which is a good idea that saves you having to keep checking manually for replies). There is also a section for attaching a file to your post (maximum size 200 Kb). Click the Choose File button to open a File Open window, which you then use to select the file from your computer that you want to upload. You can (and should) add a description of the file in the File Comment field. When your reply is ready click the Reply to This Thread button (D) to post your reply. The Thread (E) box at the bottom of the screen simply shows the posts to date, in case while composing your reply you need to refer to any of the details or information in previous posts. 3.8.5 Starting a new Thread In a Forum page, if you click the Create Thread button you will see the Create Thread page. The use of this page is virtually identical to that of the Reply to This Thread page, so please refer to that section of the manual [3.8.4] for more information. The only difference is that, in this page, there is no Thread box showing the posts to date as there won’t be any yet. TOLS User Manual v 2013.09.12 Page 47 3.9 Dropbox Tool Students can use the Dropbox tool to share their own documents with others enrolled in the course. Files are limited to 200Kb in size. C B A There are two separate pages, one for Sent Files (A) and one for Received Files (B). Click the links to change between the two. Above those links are two icons (C). The first lets you add a new folder to the Dropbox. The second is used to actually share a new file (see screenshot on next page). TOLS User Manual v 2013.09.12 Page 48 Click the Choose File button to open a File Open window, which you then use to select the file from your computer that you want to upload. Tick the checkbox if you want to Overwrite any previous versions of the same document that are already in the dropbox. Use the Send to box to select which person you want to send the document to. You select multiple entries by holding down the CTRL key and clicking each entry you want to include. If you just want to upload it so anyone can view it select the ---Just upload--- entry. Click Upload to transmit your file. TOLS User Manual v 2013.09.12 Page 49 3.10 Groups Tool The Groups tool is used to create private subsets of students (e.g. students from the same Organisation) within the course and give them access to some private facilities that can only be seen and used by Group members. The Groups page shows all the Groups registered for that course. Each group entry includes: • the Group Tutor, if one has been assigned • the number of Registered members (the second number is the maximum capacity of the group) • a Registration option, which has been disabled. Students are not typically allowed to add themselves to a Course Group. Any student enrolled in the course can see these groups, but cannot access them unless they are a Group member. TOLS User Manual v 2013.09.12 Page 50 In the example screenshot above, the my group box indicates that our Test User is a member of Group 01. Even though the Test User can see the Group 2 entry, it can’t be accessed. If you are a member of a Group, click on its name to access its private Group Area. A B C The Group Area page shows the private tools available to the group members (A). It also indicates who the group’s Coaches are, if it has any (B). Lastly it displays a list of all the Group members (C). TOLS User Manual v 2013.09.12 Page 51 The tools that are available within the group and that only group members can see and access are: Forum – this tool is identical to the course-wide Forums tool [see 3.8], except that there are no categories and only one forum, which is named after the Group name. All Threads are posted in that one forum. Documents - this tool is identical to the course-wide Documents tool [see 3.3]. Agenda - this tool is identical to the course-wide Agenda tool [see 3.2]. Announcements - this tool is identical to the course-wide Announcements tool [see 3.7]. Assignments – the course-wide version of this tool is not enabled, but the Group version is. See next page [3.10.1]. TOLS User Manual v 2013.09.12 Page 52 3.10.1 Group Assignments The Assignments tool allows members of a Group to upload documents for their Course Coach to review. Assignments are usually configured to be invisible to other members – only the submitting member and the Course Coach can view them. Click on the Assignments tool in the Group Area page to access the Assignments page. It displays all of the Assignments that have been set for the Group. TOLS User Manual v 2013.09.12 Page 53 Click on any of the Assignment names to access its page. Now click the Submit Paper icon to upload your response to an Assignment. TOLS User Manual v 2013.09.12 Page 54 Click the Choose File button to open a File Open window, which you then use to select the file from your computer that you want to upload. Use this option if your response to the Assignment is in a document on your computer. If the Assignment is not a separate document, then complete the Title and Description fields as your assessable response. For either of the above cases, click the Send button to submit your response for assessment. TOLS User Manual v 2013.09.12 Page 55 3.11 Surveys Tool The Survey tool allows access to the course feedback Survey. However you can only see the entry after you have been invited by email to complete the Survey. Click the Survey name to begin filling it out. Your feedback is very important to us, so that we can continue to make improvements to our courseware and the overall course experience. TOLS User Manual v 2013.09.12 Page 56 3.12 Assessments Tool The assessments tool shows you which elements of the course must be completed before you will be considered to have ‘graduated’ the course and be allowed to generate (or be sent) a course completion certificate. For example, in the below screenshot you can see that for this course a student must simply complete the Course Survey [see 3.11]. TOLS User Manual v 2013.09.12 Page 57 3.13 Glossary Tool The Glossary tool may contain terms and definitions relevant to the course materials. This can serve as a reference aid to study and understanding. TOLS User Manual v 2013.09.12 Page 58 3.14 Notebook Tool The Notebook tool provides you with a way of writing, storing and organising your own notes about the course. Notes created by this tool are private: no other student or any Course Coach can access your notes. The icons above your list of notes should be mostly self-explanatory. They allow you to Add a New Note, or Sort your list of notes by Date Created, Date Last Modified, or Title. TOLS User Manual v 2013.09.12 Page 59 3.14.1 Adding a new Note The Add a New Note page displays a basic HTML editor for writing your message. There is no need to feel intimidated if you’re unfamiliar with a HTML editor – just treat it like you’re typing an email. Firstly, type in a Note Title. Then type the body of the note into the Note Details field. Browse the toolbar above this field and use any formatting functions you feel comfortable with, or just type plain old text without worrying about making it look pretty. Click the Create Note button to save your note. TOLS User Manual v 2013.09.12 Page 60 4 Profile Your profile page contains all the details of your TOLS Account. Not all of these details are able to be edited by you, however some of them are. There are many links to your Profile page scattered around TOLS. The most easilyaccessible one is on the Navigation Bar. If you click on your username on the righthand side of the Bar a dropdown menu appears, with a single link on it – Profile. Click on that link to access your Profile page. 4.1 4.2 4.3 TOLS User Manual v 2013.09.12 Page 61 4.4 4.1 Change Picture Click the Choose File button next to the Change Picture field to add or change the picture associated with your profile. This will open a File Open window, which you then use to select the image file from your computer that you want to upload. Once you are back in the Profile page, scroll to the bottom of the page and click the Save Settings button. Remember that your Profile Picture is subject to the TOLS Terms and Conditions, i.e. it must not be one that is likely to offend anyone, or you will be asked to remove it. You are not required to have a Profile Picture if you don’t want one. But keep in mind that it doesn’t have to be a photo of you. It can be a clipart image, an avatar, or a picture of anything that you feel represents something about you. Be creative – it can be a bit of fun. TOLS User Manual v 2013.09.12 Page 62 4.2 Change Language Click the dropdown box next to the Language field to change your default language on TOLS. Note that this simply changes all the labels of things on the screen, such as field names, etc. It does not change the language of any course materials or anything uploaded by another student – they all remain in the language they were originally written in (usually English). Once you have selected your new default Language, scroll to the bottom of the page and click the Save Settings button. 4.3 Change Password To change your password, first type your current password into the Pass field. Then type the new password you would like to have into the New Password field. Type that new password again into the Confirm Password field, scroll to the bottom of the page and click the Save Settings button. Your password should now be changed. Remember that you are responsible for the security of your TOLS account – don’t make your passwords easy to guess. Click the below link for some tips on setting strong passwords: http://www.staysmartonline.gov.au/home_users/secure_your_computer/set_and_use _strong_passwords TOLS User Manual v 2013.09.12 Page 63 4.4 Email Notifications There are three fields where you can change the frequency at which you are sent emails to notify you of certain messages being sent to your account. Use the dropdown arrows to control when you get these emails: • • • Upon reception means that as soon the message is received, you are sent an email to let you know. Once a day means that you are only sent one email each day to let you know that one or more messages have been received. No email means no messages. This is a good option if your account email address is a work or business address. No means that you never get sent an email, no matter how many messages are received. You will only know you have messages if you check manually. Once you have made your selection(s), scroll to the bottom of the page and click the Save Settings button. Please note: as of the publication date of this version of the TOLS User Manual, the message types referred to in this section are currently turned off. TOLS User Manual v 2013.09.12 Page 64