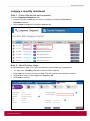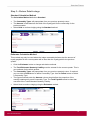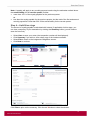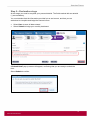
1
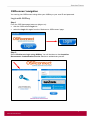
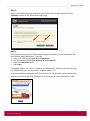
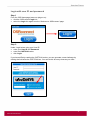
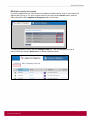
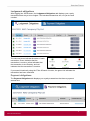
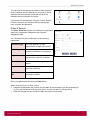
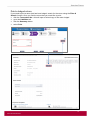
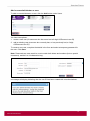
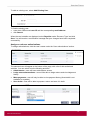
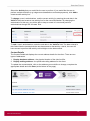
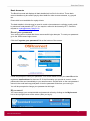
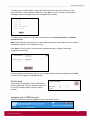
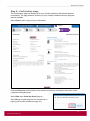
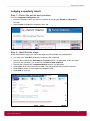
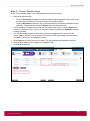
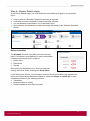
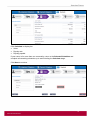
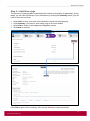
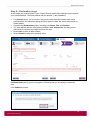
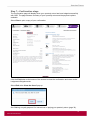
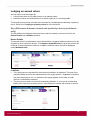
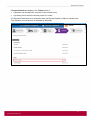
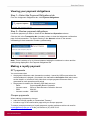
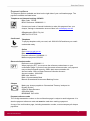
Mining and petroleum royalties OSRconnect user guide Version 7 September 2015 Contents Introduction ........................................................................................................................... 1 Terms and definitions .......................................................................................................................... 1 Online security ...................................................................................................................... 2 Getting started ...................................................................................................................... 2 OSRconnect roles ............................................................................................................................... 2 Registering for OSRconnect ............................................................................................................... 3 User ID and password ......................................................................................................................... 3 Automatic timeout periods and password lockout .............................................................................. 3 OSRconnect navigation ........................................................................................................ 4 Login with AUSkey .............................................................................................................................. 4 Login with user ID and password ........................................................................................................ 6 Multiple royalty accounts ..................................................................................................................... 7 Lodgement obligations ........................................................................................................................ 8 Payment obligations ............................................................................................................................ 8 Filter & Search .................................................................................................................................... 9 Print a lodged return .......................................................................................................................... 10 Administrator tab ............................................................................................................................... 11 Reset your password ........................................................................................................................ 15 My account ........................................................................................................................................ 15 Online help ........................................................................................................................................ 16 Logging out of OSRconnect .............................................................................................................. 16 Lodging a monthly instalment.............................................................................................. 17 Lodging a quarterly return ................................................................................................... 22 Lodging an annual return .................................................................................................... 30 Key differences between annual and quarterly returns (petroleum only) ......................................... 30 Viewing your payment obligations ....................................................................................... 32 Making a royalty payment ................................................................................................... 32 EFT payments ................................................................................................................................... 32 Cheque payments ............................................................................................................................. 32 Payment options ............................................................................................................................... 33 Privacy ................................................................................................................................ 34 Record keeping ................................................................................................................... 34 Help with OSRconnect ........................................................................................................ 34 System requirements .......................................................................................................... 35 Operating system and browsers ....................................................................................................... 35 Recommended computer requirements ............................................................................................ 35 Enable Javascript .............................................................................................................................. 36 Security settings ................................................................................................................................ 37 Enable cookies .................................................................................................................................. 38 Introduction Mining and petroleum royalties represent payments to the owners of resources for the rights to extract them. As the State owns all petroleum, gas and most minerals, royalties on these commodities are ordinarily paid to the State Government. Royalty is payable under the Mineral Resources Act 1989 (for minerals) and the Petroleum and Gas (Production and Safety) Act 2004 (for petroleum). The royalty payable is determined by the rate of royalty that applies to each commodity. OSRconnect is the online lodgement facility for mining and petroleum instalments, returns and payments. The system is available 24 hours a day, 7 days a week, and allows users to lodge and manage their royalty returns in an authenticated and secure online environment. Contact details for the Office of State Revenue: Post: GPO Box 5806 Brisbane QLD 4001 Phone: 1300 300 734 Website: www.qld.gov.au/osr Email: [email protected] Terms and definitions Term Definition AUSkey A common authentication solution for business-to-government online services Cookie Small piece of data sent from a website and stored in a user’s web browser—for example, an authentication cookie tells a web server if a user is logged in or not Javascript Programming scripting language used to create enhanced user interfaces and dynamic websites PRC Payment reference code—this is the same as the transaction number in OSRconnect SSL Secure sockets layer—a protocol for encrypting information sent over the internet URL Uniform resource locator—a specific character string that forms a reference to an internet site or resource © State of Queensland, Queensland Treasury, August 2015 1 Online security The security of your royalty information is important to us. OSRconnect provides a secure and easy-to-use environment that protects your privacy at all times. Information is secured using minimum 512-bit encryption provided your browser supports it and is correctly configured. The URL that precedes the OSRconnect web address is ‘https’. The ‘s’ denotes that the page is encrypted using the SSL encryption protocol before it is transmitted. This ensures that data transferred between your browser and our server cannot be read if intercepted. You can confirm your internet session is encrypted by ensuring the lock icon appears at the foot of the browser. To use the internet safely you first need to make sure your computer is secure. Protecting your computer saves you time and trouble if something goes wrong, and ensures you get the best online experience. There are many different types of scams—online, phone, mail and face-to-face. Online scams such as email ‘phishing’ try to trick the recipient into disclosing user ID and password information. From time to time, we will send you emails or post information updates on our website alerting you to key changes or due dates. However, we will never send you an email requesting you to disclose your login details. The following sites contain more information about protecting your online security and recognising scams: Stay Smart Online—an Australian Government initiative www.staysmartonline.gov.au Scam Watch—an Australian Competition & Consumer Commissioner Initiative www.scamwatch.gov.au. Getting started OSRconnect roles There are two types of OSRconnect roles for royalties—administrator and user. The descriptions below will assist you in selecting which role is most appropriate for you. Administrator Each royalty client must have at least one administrator at all times. The administrator can: add, edit or remove royalty administrators and users view and lodge returns view payments view and change client address and bank details. User The user is a person who has been nominated by an administrator to access OSRconnect to perform one or more of the following activities: save a return in draft view and lodge returns view payments. 2 Registering for OSRconnect Administrator An existing administrator can add additional administrators. See ‘Add a new administrator or user’ and ‘Assign or end user authorisations’ on pages 12–13. The existing administrator will provide the new administrator or user with a user ID and temporary password. If you do not have an administrator, you will need to complete a Form R03.1 and email it to [email protected] to set one up. User A new user can be added by an existing administrator. See ‘Add a new administrator or user’ and ‘Assign or end user authorisations’ on pages 12–13. User ID and password To access OSRconnect, you need a 6-digit user ID and password. If you already use a 7digit user ID to access OSRconnect for another revenue stream (e.g. payroll tax), you will be issued with a separate user ID and password for your royalty obligations. If your user ID has been created by OSR, you will be issued with your user ID and temporary password by email, each sent separately for security reasons. If your user ID has been created by an existing administrator, they will provide you with a temporary password. You will be prompted to change your temporary password at your first login. If you are registered to access OSRconnect for multiple royalty clients, you will still only have one 6-digit user ID and password. You can access multiple royalty clients from a single login. You are responsible for maintaining the confidentiality of your user ID and password and are fully responsible for all activities that occur under your user ID. As an OSRconnect user, you must: immediately notify us of any unauthorised use of a user ID and/or password ensure that user IDs and passwords are not disclosed to any unauthorised person. Automatic timeout periods and password lockout If you are logged into OSRconnect and the system detects no activity, you will be automatically logged out after 30 minutes. This reduces the risk of anyone accessing your details if you leave your computer unattended. Your account will be locked after three unsuccessful login attempts. See ‘Reset your password’ (page 15) to generate a new password for your account. 3 OSRconnect navigation You can log into OSRconnect using either your AUSkey or your user ID and password. Login with AUSkey Step 1 From the OSR homepage (www.osr.qld.gov.au): click the OSRconnect Login link select the Login link again from the ‘Welcome to OSRconnect’ page. Step 2 Select Click here to login using AUSkey. You will be taken to the Australian Government—Authentication Service website to authenticate yourself. 4 Step 3 Select your AUSkey from the drop-down list and enter your AUSkey password. Click Continue to return to the OSRconnect login page. Step 4 The first time that you log into OSRconnect using your AUSkey, you will be asked to link your AUSkey with OSRconnect. To do this: enter your OSRconnect User ID and Password tick the checkbox to link your AUSkey to your Client ID enter the CAPTCHA codes click Login. Completing steps 1 to 4 links your AUSkey to OSRconnect—after that, each time you log into OSRconnect, you will only need to complete steps 1 to 3. If you have difficulty reading the CAPTCHA codes, you can generate a new challenge by clicking the link below the CAPTCHA box. You can do this as many times as you need. 5 Login with user ID and password Step 1 From the OSR homepage (www.osr.qld.gov.au): click the OSRconnect Login link select the Login link again from the ‘Welcome to OSRconnect’ page. Step 2 Under ‘Login below using your User ID’: enter your User ID and Password enter the CAPTCHA codes click Login. If you have difficulty reading the CAPTCHA codes, you can generate a new challenge by clicking the link below the CAPTCHA box. You can do this as many times as you need. 6 Multiple royalty accounts If you are registered to use OSRconnect on behalf of multiple clients, a list of your clients will appear after you log in. To open a client account, click the relevant Select button, and you will be directed to the Lodgement Obligations tab for that client. To change between clients, click the Change Client link. This will redisplay your list of clients. Click the relevant Select button to select a different client. 7 Lodgement obligations After logging into OSRconnect, the Lodgement Obligations tab displays your royalty transactions that are yet to be lodged. This includes transactions due, not yet due and overdue. The coloured icons indicate the status of each transaction. Green indicates that the transaction is not due; yellow indicates that the transaction is due that day; and red indicates that the transaction is overdue. If you search historically using the ‘Filter & Search’ function, the green tick indicates the transaction has been submitted. Payment obligations The Payment Obligations tab displays your royalty transactions that have a payment amount due. 8 The coloured icons indicate the status of each payment. Green indicates that the payment is not yet due, yellow indicates that the payment is due that day and red indicates that the payment is overdue. If you search for transactions using the ‘Filter & Search’ function, the green tick indicates that a payment has been received and allocated. Filter & Search The Filter & Search function is located on the right-hand side of the Lodgement Obligations and Payment Obligations tabs. You can search by any combination of the following parameters. Revenue Type This only applies if you are registered for multiple tax streams. Period Type You can filter by monthly or quarterly transactions or payments. Operation You can filter transactions or payments by a specific operation. From–To You can set a date range for your search. Your Ref You can filter by a specific customer reference. Transaction No You can filter by a specific transaction number. Enter your parameters and click the Filter button. When using the From–To filter, on the: Lodgement Obligations tab, include the due date of the transaction you are searching for (e.g. for the December 2013 quarterly return, include the date 31 January 2014) Payment Obligations tab, include the date the payment was made. 9 Print a lodged return If you need to print a return that has been lodged, search for the return using the Filter & Search function. Once you find the return that you would like to print: click the Transaction No.—this will open a locked copy of the return lodged go to the Liabilities tab click the Summary button select Print. 10 Administrator tab OSRconnect royalty administrators have access to the Administrator tab. There are three sections within this tab: User Accounts Contact Details Bank Accounts. User Accounts There are two sections of the User Accounts tab: 1. Users—displays all of the current administrators (other than yourself) and users with access to OSRconnect for the client 2. User authorisations—the default list displays a list of current administrators/users and the functions that they are authorised to perform in OSRconnect (e.g. lodge returns/transactions). The view can be changed to view all users (previous and current). 11 Add a new administrator or user To add a new administrator or user, click the Add button under Users. You have two options: 1. create a new user (for someone who has never had a 6-digit OSRconnect user ID) 2. add an existing user (someone who currently has, or has previously had, a 6-digit OSRconnect user ID). To create a new user, complete the details in the form and select a temporary password for the user. Click Save. Note: Passwords are case sensitive, must contain both letters and numbers (but no special characters), and be 8 to 14 characters long. A message will display indicating that the user ID has been created with no authorisations. 12 To add an existing user, select Add Existing User. To find the existing user: enter their OSRconnect user ID and the corresponding email address click Search. When the user’s details are displayed, select Royalties under ‘Revenue Type’ and click Save. You will receive a confirmation message that your changes have been completed successfully. Assign or end user authorisations To assign authorisations, click the user’s name under the ‘User authorisations’ section. The selected user will appear at the bottom of the page, with a list of their authorised activities. You can select from the following activities: Administrator—user will have administrator access Lodge returns/transactions—user will be able to lodge returns and view lodgement history Make payments—user will only be able to view payment history (direct debit is not available for royalties) Save drafts—user will be able to prepare a return and save it in draft. 13 Select the Activity that you would like the user to perform. If you would like the user to perform multiple activities (e.g. lodge returns/transaction and make payments), click Add to create another activity line. To change a user’s authorisations, end the current activity (by entering the end date in the Valid To field) and create a new activity line for the new authorisation. By changing the authorisation in this way, you will be able to keep a record of current and previous authorisations through the ‘All users’ filter. To end a user’s authorisations, enter the end date in the Valid To field. The date entered in this field will be the last day that the user has access to that activity—that is, the user will have access to perform that activity until midnight on the date entered. Contact Details The Contact Details tab displays the current address details for the client. There are two types of addresses: 1. Royalty business address—the physical location of the client’s office 2. Royalty mailing address—the preferred mailing address for the client. To update the contact details, click on the address you would like to change, complete the appropriate details and click Save (at the bottom of the page). 14 Bank Accounts The Bank Accounts tab displays all bank details held on file for the client. These bank account details may be used to pay by direct debit for other revenue streams, e.g. payroll tax. Direct debit is not available for royalty clients. The bank details in this tab may be used in certain circumstances to refund a royalty credit by electronic funds transfer (EFT). If you require a refund to be issued by EFT, send this request to [email protected]. Reset your password Your account will be locked after three unsuccessful login attempts. To reset your password go to the OSRconnect login screen. Click the Forgotten your password? link at the bottom of the screen. Follow the prompts to reset your password. You will be asked to enter your user ID and the registered email address for that user ID. If the information you provide is correct, a new password will be sent immediately to your email account. Double-click on the new password issued in the email and copy and paste it into the password field when you next log in. You will be prompted to change your password at this login. My account You can manage your contact details and password online by clicking on the My Account link in the top-right corner of the screen (after you log in). 15 To change your contact details, update the fields on the left side of the screen (i.e. first name, last name, email address, telephone). Click Save. You will receive a confirmation message that your changes have been completed successfully. To change your password, enter your new password in the New password and Confirm password fields. Note: Passwords are case sensitive, must contain both letters and numbers (and no special characters), and be 8 to 14 characters long. Click Save. You will receive a confirmation message that your changes have been completed successfully. Once all changes have been made (or you no longer wish to make any changes), click Exit to return to the Lodgement Obligations tab. Online help Online help is available for many OSRconnect screens and fields. Click the question mark icon for more information about a screen, field or function. Logging out of OSRconnect Close your session using the Logout link at the top of the screen. 16 Lodging a monthly instalment Step 1—Select the period and operation From the Lodgement Obligations tab: locate the monthly instalment you wish to complete by viewing the Period and Operation columns select Create to display the monthly instalment tab. Step 2—Identification stage At the Identification stage, your client and payment period details are prepopulated. You may enter Your Ref (reference); however, this is optional. Select Save at any time to save your data. This will generate the transaction number. Select Exit to return to the Lodgement Obligations tab. Click Next to continue. 17 Step 3—Return Details stage Standard Calculation Method The Calculation Method defaults to Standard. The Commodity Types will prepopulate from your previous quarterly return. The Amount is calculated as one-third of the royalty paid for the commodity for the previous quarter. Select Next to continue lodging using the Standard method. Estimates Calculation Method This method may only be used where the lodger reasonably believes that the amount of royalty payable for the current quarter will be less than the royalty paid for the previous quarter. Click the Estimates button to change calculation methods. The Total Estimated Quarterly Liability must be entered for the current quarter. This is your estimate for the whole quarter. The Commodity Types will prepopulate from your previous quarterly return. If required, you can click the Add button to add a Commodity Type. Use the Delete button to delete a Commodity Type. The figures entered under the Amount column should reflect the proportion of the monthly instalment for each Commodity Type. The Total Payable cannot be less than one-third of the Total Estimated Quarterly Liability. Select Next to continue lodging using the Estimates method. 18 Note: A penalty will apply to any monthly payment made using the estimates method where the actual liability for the current quarter is either: more than 115% of the royalty payable for the previous quarter or less than the royalty payable for the previous quarter, but the total of the first and second monthly payments is less than 50% of the actual liability for the current quarter. Step 4—Liabilities stage The amount of royalty payable is calculated with interest (if applicable). At this stage, you can view a summary of your transaction by clicking the Summary button (you will need to save the form first). Select Save to save your return (the transaction number will be displayed). Click Summary if you wish to view a draft copy of the instalment details. Select Exit to return to the Lodgement Obligations screen. Click Next to continue. Click Print to print out the summary. Click the red X button to close the window. 19 Step 5—Declaration stage At this stage you need to complete your personal details. The fields marked with an asterisk (*) are mandatory. You must declare that the information provided is true and correct, and that you are authorised to complete and lodge the electronic form. Select Save to save all data entered. Select Submit to lodge your monthly instalment. A Submit Now? pop-up screen will appear, confirming that you are ready to submit the form. Select Submit to confirm. 20 Step 6—Confirmation stage The Confirmation page will display when your monthly instalment has been submitted successfully. The page shows a summary of your monthly instalment and the payment options available. Select Print to print a copy of your confirmation. Click the Exit button at the bottom of the screen to close the confirmation and return to the Lodgement Obligations tab. Select Exit at the Close the form? pop-up. See ‘Making a royalty payment’ for instructions on paying your monthly instalment (page 32). 21 Lodging a quarterly return Step 1—Select the period and operation From the Lodgement Obligations tab: locate the quarterly return you wish to complete by viewing the Period and Operation columns select Create to display the quarterly return tab. Step 2—Identification stage At the Identification stage, your client and payment period details are prepopulated. You may enter Your Ref (reference); however, this is optional. Review and complete the Surrender or Transfer section, as applicable. If this is the last return for this operation, you must note the Date of State approval. Review and complete the Lodgement Advice section, as applicable. Select Save at any time to save your data. This will generate the transaction number. Select Exit to return to the Lodgement Obligations tab. Click Next to continue. 22 Step 3—Tenure Details stage At the Tenure Details stage, your mining/petroleum tenures are listed. Review all listed tenures. – Click the Producing checkbox to note the tenures that produced for this period. If the tenure did not produce for this period, leave the checkbox blank. – Click the Excluded checkbox if any of the listed tenures should be excluded from the operation. Then select an exclusion Reason from the drop-down list. If your operation includes tenures that are not listed in this screen, click the Add button to insert. If adding a tenure, you must complete all fields including the Reason the tenure is being included. Use the Yes or No buttons to state if the return percentage noted is correct for this return. If No is selected, you must advise the correct return percentage, and the parties on behalf of whom you are lodging the return. Select Save at any time to save your data. This will generate the transaction number. Select Exit to return to the Lodgement Obligations tab. Click Next to continue. 23 Step 4—Return Details stage At the Return Details stage, you must select the commodities that apply to your quarterly return. Click to select a commodity. Repeat the process as required. A schedule must be completed for each commodity selected. You can deselect commodities if one is selected in error. Once selected, the schedules for each commodity will display in the Selected Schedules section. Return schedules The Schedule for each commodity consists of several parts. For example, the schedules for many commodities including coal and petroleum consist of: Gross Value Deductions Royalty. Each section is completed in turn. Select a section by clicking the link as shown, starting with Gross Value. In the Gross Value section, you will need to note (for some commodities only) whether the return is for Export and/or Domestic production. Enter the Volume and Value ($) for each commodity selected, in the following sections: Transaction Disposal subject to royalty Petroleum/Mineral not subject to royalty. 24 Proceed to the next section—for example, Deductions or Exemption. Enter the applicable amounts in whole dollars, and proceed to the Royalty section. The action you need to take in the Royalty section depends on what commodities have been selected. For example, if completing a return for petroleum, no data needs to be entered in this section; if completing a return for coal you will need to enter: Revenue billed (in whole dollars) Invoiced tonnes (net of penalties). 25 Click Calculate to display the: Value Royalty rate Royalty payable. If your return is for more than one commodity, return to the Selected Schedules and complete all remaining schedules up to and including the Calculate stage. Click Next to continue. 26 Step 5—Liabilities stage The amount of royalty payable is calculated with interest and penalties (if applicable). At this stage, you can view a summary of your transaction by clicking the Summary button (you will need to save the form first). Select Save to save your return (the transaction number will be displayed). Click Summary if you wish to view a draft copy of the return details. Select Exit to return to the Lodgement Obligations screen. Click Next to continue. Click Print to print out the summary. Click the red X button to close the window. 27 Step 6—Declaration stage At this stage you need to advise if your Contact Person details have changed, and complete your personal details. The fields marked with an asterisk (*) are mandatory. For mineral returns, you must note if any person other than the holders have mined minerals within this operation during the return period. If Yes, the screen will prompt for further details. Complete the Declaration section, including your Name, Title and Position. You must declare that the information provided is true and correct, and that you are authorised to complete and lodge the electronic form. Select Save to save all data entered. Select Submit to lodge your quarterly return. A Submit Now? pop-up screen will appear, confirming that you are ready to submit the form. Click Submit to confirm. 28 Step 7—Confirmation stage The Confirmation page will display when your quarterly return has been lodged successfully with OSR. The page shows a summary of your quarterly return and the payment options available. Select Print to print a copy of your confirmation. Click the Exit button at the bottom of the screen to close the confirmation and return to the Lodgement Obligations tab. Select Exit at the Close the form? pop-up. See ‘Making a royalty payment’ for instructions on paying your quarterly return (page 32). 29 Lodging an annual return Annual returns must be lodged by: mining clients who do not lodge returns on a quarterly basis petroleum clients who hold petroleum for which royalty is or could be payable. The annual return process is similar to the process for completing and submitting a quarterly return. Refer to the Lodging a quarterly return for full instructions. Key differences between annual and quarterly returns (petroleum only) The key differences between the annual return and the quarterly return are found in the Return Details and Liabilities sections. Return Details The annual return is a stand-alone return and therefore a negative wellhead value will not be carried over from a previous quarter. The Negative wellhead value for all annual returns will be $0.00. If the annual return results in a negative wellhead value, this will be displayed under Wellhead value. Liabilities The royalty amount calculated for the annual reconciliation is displayed. The total of the quarterly liability amounts are subtracted from the royalty amount—regardless of whether they have been paid or not—to determine the royalty payable to the state (a credit amount is indicated by brackets). The annual return does not reconcile outstanding liabilities. If you have an outstanding liability from a previous quarterly return it must be paid or interest will continue to accrue. 30 A Payment/Credit will display in the Totals section if: a payment has already been received for this annual return a quarterly return within the annual period is in credit. The Payment/Credit amount is subtracted from the Royalty Payable to State to calculate the Total Payable (a credit amount is indicated by brackets). 31 Viewing your payment obligations Step 1—Select the Payment Obligations tab From the Lodgement Obligations tab, click Payment Obligations. Step 2—Review payment obligations Locate the payment you wish to view from the Period and Operation columns. Click the link in the Transaction No. (number) column to view the lodgement confirmation page for that transaction. The figure showing in the Amount column is the amount outstanding for that transaction number (updated daily). Note: There is a delay of up to 4 hours between lodging the instalment or return and the liability being displayed in the Payment Obligations tab. Making a royalty payment EFT payments You must ensure that: the payment reference code (transaction number)—issued by OSRconnect when the return/instalment is lodged—is entered in the transaction description field (also known as the ‘details’ or ‘reference’ field). Note that a unique payment reference code is generated for each operation each period the payment is made to the following OSR bank account: – Bank: Commonwealth Bank of Australia – Account name: Office of State Revenue Collection Account – BSB: 064-013 – Account number: 1000 0935 Cheque payments When making a payment by cheque: make the cheque payable to ‘Queensland Treasury’ include a copy of the confirmation page with your cheque payment. To ensure prompt processing of royalty payments, send a remittance advice via email to [email protected] or fax your advice to (07) 3035 3119. 32 Payment options The payment options available are listed on the right side of your confirmation page. The payment methods are listed below. Telephone and internet banking—BPAY® Biller Code: 737593 BPAY Reference: 60000000***** Contact your bank or financial institution to make this payment from your cheque, savings or transaction account. More info: www.bpay.com.au. ®Registered to BPAY Pty Ltd ABN 69 079 137 518 Credit card Telephone To pay by telephone with your card, call 1300 803 545 and have your credit card details ready. Online Go to www.osr.qld.gov.au. Biller code: 737593 Payment reference: 60000000***** Maximum payment: $50,000. Electronic funds transfer Reference code: 6000000***** When paying by EFT you must use the reference code shown on your confirmation page. If you don't use the correct reference code, your payment may not be processed correctly. OSR's bank account details are: Account name: Office of State Revenue Collection Account Account number: 1000 0935 BSB code: 064-013 Bank: Commonwealth Bank Branch: Queensland Government Banking Centre Cheque Make your cheque payable to ‘Queensland Treasury’ and post to: Royalty Division Office Of State Revenue GPO BOX 5806 BRISBANE QLD 4001 Payment reference code The 12-digit transaction number on the confirmation page is unique to each lodgement. It is also the payment reference code and must be used when making a payment. A copy of the confirmation page, including transaction number, must accompany all cheque payments. 33 Privacy The protection of your information is something we take very seriously. We understand that you may have concerns about your privacy and confidentiality while online. We are committed to ensuring your privacy at all times when using OSRconnect. Your information is protected in accordance with the Queensland Treasury privacy policy available at www.treasury.qld.gov.au/privacy.php. We will not use any information that your supply for any purpose other than for what it is intended. We will not disclose your information to any other person or entity unless required to do so by law. Record keeping As all royalty returns are subject to audit, proper accounting methods must be used and accurate records must be retained to support royalty returns lodged for all operations. Help with OSRconnect Website In the first instance, refer to the Royalty lodger essentials page on the OSR website. Royalty lodger essentials includes: general information, important dates, royalty rates toolkits legislation/ministerial determinations online forms. Phone Call 1300 300 734. Email Send email enquiries to [email protected]. 34 System requirements To use OSRconnect you must: have access to the internet meet the minimum system requirements as shown below have a user ID and password. See Online lodgement essentials on our website for more information on system requirements, helpful hints and troubleshooting, including instructions on enabling compatibility view settings and allowing pop-ups. Operating system and browsers Operating system Browsers Windows Vista Internet Explorer 7 or 8 Google Chrome Mozilla Firefox Safari Windows 7 or 8 Internet Explorer 8 to 10 Google Chrome Mozilla Firefox Safari Apple Mac Safari Recommended computer requirements We recommend that your computer meets the following requirements for you to use OSRconnect. Component Requirements Computer processor 2.4GHz or higher Computer memory 4GB RAM Operating system Windows Vista, 7 or 8; Mac OS X Browser Internet Explorer 7 to 10, Google Chrome, Mozilla Firefox, Safari Other Pop-ups enabled OSRconnect works with firewalls and uses a VeriSign SSL digital certificate to secure your communications with us via the standard SSL port. If you are a system administrator, you must configure your firewall to allow access to the osr.qld.gov.au domain. 35 Enable Javascript OSRconnect needs Javascript to be enabled to operate correctly. Follow these steps to enable Javascript. Browser Internet Explorer (7, 8, 9 or 10) Instructions (You may need to close and re-open all browser windows to save changes.) 1. 2. 3. 4. 5. 6. Select Tools from the top menu. Choose Internet Options. Click on the Security tab. Click on Custom Level. Scroll down until you see the section labelled Scripting. Under Active Scripting, select Enable and click OK. Google Chrome 1. 2. 3. 4. Click the spanner icon from the browser toolbar Select Options Choose Under the Bonnet then Content Settings Select the button Allow all sites to run Javascript (recommended) and close the tab. Mozilla Firefox 1. 2. 3. 4. Select Tools from the top menu. Choose Options. Choose Content from the top navigation. Select the checkbox next to Enable Javascript and click OK. Safari (Mac and Windows) 1. 2. 3. 4. Select Safari (Mac) or Edit (Windows) from the top menu. Choose Preferences. Choose Security. Select the checkbox next to Enable Javascript. 36 Security settings Your browser should be set to the standard default setting for the best OSRconnect experience. Browser Internet Explorer (7, 8, 9 or 10) Instructions (You may need to close and re-open all browser windows to save changes.) 1. 2. 3. 4. 5. Select the Tools/Gear wheel icon from the top right of the toolbar. Select Internet Options. Select the Security tab. Select the Internet icon (Globe) and click the Custom Level button. Select Medium (IE7/IE8) or Medium-High (IE9) from the Reset custom settings box. Google Chrome 1. Follow the procedure to Enable Javascript. 2. Follow the procedure to Enable cookies. Mozilla Firefox 1. Select Tools from the top menu, and choose Options. 2. Click the Privacy panel, then check Accept cookies from sites 3. Check Accept third-party cookies and in the ‘Keep until’ box, select they expire. 4. Click the Advanced panel, and select the Encryption tab. Check Use SLL3.0 and Use TLS1.0. Safari (Mac and Windows) 1. 2. 3. 4. Select Safari (Mac) or Edit (Windows) from the top menu. Choose Preferences. Choose Security. In the Accept cookies section, check Only from sites you navigate to. 37 Enable cookies To enable cookies in your browser, complete these steps. Browser Internet Explorer (7, 8, 9 or 10) Instructions (You may need to close and re-open all browser windows to save changes.) 1. 2. 3. 4. 5. Select the Tools/Gear wheel icon from the top-right of the toolbar. Select Internet Options. Select the Privacy tab. Slide the setting to Medium. Select OK. Google Chrome 1. 2. 3. 4. Click the spanner icon from the browser toolbar Select Options Choose Under the Bonnet then Content Settings Click on the Allow local data to be set button then close the tab. Mozilla Firefox 1. 2. 3. 4. Select Tools from the top menu. Choose Options. Click the Privacy panel, then check Accept cookies from sites. Check Accept third-party cookies; and in the ‘Keep until’ combo box, select they expire. Safari (Mac and Windows) 1. 2. 3. 4. Select Safari (Mac) or Edit (Windows) from the top menu. Select Preferences. Select Security. Select Always from Accept Cookies. 38