1
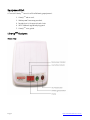
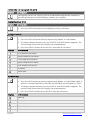
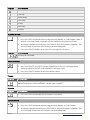
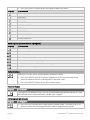
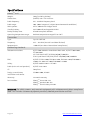
Liberty300
Installation
manual
Contents
Equipment List ....................................................................................................................... 2
Liberty300 features ................................................................................................................. 2
Front view ................................................................................................................................................................... 2
Back view .................................................................................................................................................................... 3
Standby mode......................................................................................................................... 3
Displays and warnings ........................................................................................................ 4
Cellular signal quality .......................................................................................................... 5
Setting time and date .......................................................................................................... 5
Programming .......................................................................................................................... 6
Programming rules ................................................................................................................................................. 6
Programming mode ............................................................................................................................................... 6
Main menu options ................................................................................................................................................ 6
Programming sub-menu options ..................................................................................................................... 6
Client ID ....................................................................................................................................................................... 7
Phone numbers ........................................................................................................................................................ 7
Server settings .......................................................................................................................................................... 8
Pendants ..................................................................................................................................................................... 9
Detectors.................................................................................................................................................................. 10
Hardwired inputs ................................................................................................................................................. 11
Hardwired outputs .............................................................................................................................................. 12
Preferences.............................................................................................................................................................. 12
Systems .................................................................................................................................................................... 18
Cellular (do not reprogram via unit) ............................................................................................................. 20
Daylight savings (DLS) ........................................................................................................................................ 20
Timers ....................................................................................................................................................................... 22
Reports ...................................................................................................................................................................... 22
Doorbell tunes ....................................................................................................................................................... 23
Exit programming mode ................................................................................................................................... 23
Specifications ....................................................................................................................... 24
Page | 1
Tunstall Liberty
300
installation manual v1.0
Equipment List
A Tunstall Liberty300 consists of the following equipment:
1. Liberty300 alarm unit
2. Waterproof two-way pendant
3. Pendant wrist strap and neck chain
4. 9VDC 300mA regulated plug pack
5. Liberty300 user guide
Liberty300 features
Front view
Page | 2
www.tunstallhealthcare.com.au
Back view
Standby mode
The base alarm unit has warning and status lights to clearly indicate the unit’s current status.
When functioning correctly your Liberty300 base alarm unit will normally look like this:
The ‘MAINS ON’ light
and the ‘CANCEL’
(green) button should
be on.
The MAINS ON light and the CANCEL button should be ON.
Page | 3
Tunstall Liberty
300
installation manual v1.0
Displays and warnings
Display
Warning
The alarm unit failed to send a
message.
Check the home unit is plugged into a
working electrical socket.
Check the home unit is plugged into a
working electrical socket and the battery
switch is turned on.
Check the home unit has a working
landline/GSM connection.
The cellular connection has
failed.
Check the antenna/SIM card is plugged in to
the alarm unit.
The telephone line has failed.
Check the home unit is plugged into a
working telephone socket.
AC power failure.
The alarm unit has a low
battery.
or
The red button on the alarm
unit has been pressed.
to
Pendant 1-8 has been pressed.
to
Pendant 1-8 has been pressed.
to
Pendant 1-8 has been pressed.
to
Pendant 1-8 has been pressed.
to
to
to
Page | 4
What to do
Detector 1-8 programmed as
fire ‘Fi’ option has been
activated.
Pendant 1-8 has detected a low
battery.
Detector 1-8 has detected a low
battery.
Nothing, an alarm call has been raised to
the monitoring centre.
Nothing, an alarm call has been raised to
the monitoring centre.
Nothing, an alarm call has been raised to
the monitoring centre.
Nothing, an alarm call has been raised to
the monitoring centre.
Nothing, an alarm call has been raised to
the monitoring centre.
Nothing, an alarm call has been raised to
the monitoring centre.
Contact your monitoring centre.
Contact your monitoring centre.
www.tunstallhealthcare.com.au
Cellular signal quality
IMPORTANT: When operating over the GSM mobile network, the base alarm unit requires an average
GSM signal in order to operate efficiently.
While the Liberty300 unit is in normal/operation mode, press the green cancel button on the
base alarm unit and the signal strength will be displayed for two seconds.
The base alarm unit will display the signal strength from 0 to 9
0-1 = Weak signal
to
2-5 = Average signal
6-9 = Strong signal
The base alarm unit updates the signal strength every minute.
Setting time and date
The unit has an inbuilt clock and calendar that is backed-up by the system battery. Complete
and following steps to change the time and date.
Display
Instruction
1. In standby mode, press and hold down the CANCEL button for 10 seconds, until
‘SH’ is displayed.
Set hour
2. Press the HELP button to scroll to the correct hour, then the CANCEL button to
select.
Set minute
3. Press the HELP button to scroll to the correct minute, then the CANCEL button
to select.
Set day
4. Press the HELP button to scroll to the correct day, then the CANCEL button to
select.
Set month
5. Press the HELP button to scroll to the correct month, then the CANCEL button
to select.
Set year
6. Press the HELP button to scroll to the correct year, then the CANCEL button to
select.
Page | 5
Tunstall Liberty
300
installation manual v1.0
Programming
Note: Up/download programmer software is available from your supplier and can be used to
program all unit options. This manual outlines the steps to program options via the unit.
Programming rules
To program the Liberty300 unit use the large CANCEL (green) button and the HELP (red) button
on the Liberty300 unit.
1
Press the CANCEL (green) button on the Liberty300 unit to scroll through
the main menu or sub-menu options.
2
Press the HELP (red) button on the Liberty300 unit to view the
programmed value for that option. The values will flash on the display.
To step through values, press the HELP (red) button again.
3
To store an option selected, press the CANCEL (green) and HELP (red)
buttons at the same time. The Liberty300 unit will beep three times and
display the option that has been selected.
Programming mode
To enter programming mode:
1. First switch the Liberty300 unit off at the mains and battery, then switch both back on.
2. The unit will display the version number eg. ‘1.3’ for two seconds and beep once.
3. The unit will then display ‘_A’ to indicate it is in programming mode. Note: the unit will
switch to normal operating mode if no buttons are pressed within one minute.
Note: A client ID number and at least one alarm phone number must be programmed for the
Liberty300 unit to exit programming mode and enter normal operation mode.
Main menu options
To choose a menu option, use the CANCEL (green) button to scroll through and the HELP (red)
button to select the sub-menu.
Programming sub-menu options
The sub-menu options are displayed for each particular main menu option.
Page | 6
www.tunstallhealthcare.com.au
Client ID
To program the client ID (four digits only):
Display
Instruction
1. Press the HELP button to enter sub-menu.
2. Press the HELP button again to view programmed client ID, which will flash on
the status display. To view the client ID again, press the CANCEL and then HELP
button.
3. To change the client ID, press the HELP button to step through the digits (0-9, -).
To store each digit, press the CANCEL and HELP buttons together. The unit will
beep three times and display the next digit to be programmed. Repeat this
process until all four digits are programmed.
4. Press the CANCEL button to display the programmed client ID, which will flash
on the status display.
5. Press the CANCEL button to exit the sub-menu.
Phone numbers
To program control centre or personal recipient phone numbers (30 digits maximum):
Display
Instruction
1. Press the HELP button to enter the primary control centre phone number submenu.
Display
2.
Press the HELP button again to view programmed phone number, which will
flash on the status display. To view the phone number again, press the CANCEL
and then HELP button.
3.
To change the phone number, press the HELP button to step through the digits
(0-9, t, H, -). To store each digit, press the CANCEL and HELP buttons together.
The unit will beep three times and display the next digit to be programmed.
Repeat this process until all digits (30 digits maximum) are programmed.
4.
Press the CANCEL button to display the programmed phone number, which
will flash on the status display.
5.
Press the CANCEL button to exit the primary number sub-menu.
Information
Star
Hash
Pause
1. Press the HELP button to enter the secondary control centre phone number
sub-menu and repeat steps 2-5 from the primary control centre sub-menu.
1. Press the HELP button to enter the primary personal recipient phone number
sub-menu and repeat steps 2-5 from the primary control centre sub-menu.
Page | 7
Tunstall Liberty
300
installation manual v1.0
1.
Press the HELP button to enter the secondary personal recipient phone
number sub-menu and repeat steps 2-5 from the primary control centre submenu.
Warning! This will delete all n1 to n4 programmed phone numbers.
1. Press the CANCEL and HELP buttons together and the unit will beep three
times to indicate that all phone numbers have been deleted.
2. Press the CANCEL button to exit the phone numbers menu.
Server settings
To program the server settings use the up/download programmer software. If you do not have
access to the software, complete the steps below.
Display
Instruction
1. Press the HELP button to enter the server 1 IP address (30 digits/characters
maximum) sub-menu.
2. Press the HELP button again to view programmed server 1 IP address, which
will flash on the status display. To view the server 1 IP address again, press the
CANCEL and then HELP button.
3. To change the server 1 IP address, press the HELP button to step through the
digits/characters (-, 0-9, ., A-Z, a-z). (Note: the dash programmed as the first
digit will delete the server 1 IP address). To store each digit, press the CANCEL
and HELP Buttons together. The unit will beep three times and display the
next digit to be programmed. Repeat this process until all digits/characters
(30 maximum) are programmed.
4. Press the CANCEL button to display the programmed server 1 IP address,
which will flash on the status display.
5. Press the CANCEL button to exit the server 1 IP address sub-menu.
1. Press the HELP button to enter the server 1 port number (five digits
maximum) sub-menu.
2. Press the HELP button again to view programmed server 1 port number, which
will flash on the status display. To view the server 1 port number again, press
the CANCEL and then HELP Button.
3. To change the port number, press the HELP button to step through the digits
(-, 0-9). (Note: the dash programmed as the first digit will delete the server 1
port number).To store each digit, press the CANCEL and HELP buttons
together. The unit will beep three times and display the next digit to be
programmed. Repeat this process until all digits (five maximum) are
programmed.
4. Press the CANCEL button to display the programmed server 1 port number,
which will flash on the status display.
5. Press the CANCEL button to exit the server 1 port number sub-menu.
1. Press the HELP button to enter the server 2 IP address sub-menu and repeat
steps 2-5 from the server 1 IP address sub-menu.
Page | 8
www.tunstallhealthcare.com.au
1. Press the HELP button to enter the server 2 port number sub-menu and repeat
steps 2-5 from the server 1 port address sub-menu.
Warning! This will delete all the server settings.
1. Press the CANCEL and HELP buttons together and the unit will beep three
times to indicate that all server settings have been deleted.
2. Press the CANCEL button to exit the server settings menu.
Pendants
To program new pendants (radio triggers):
Display
Instructions
1. Press the HELP button to enter the pendants sub-menu.
2. Press the HELP button to enter the pendant 1 sub-menu. The unit must display
‘- ‘ (un-programmed).
3. Press any button on a new pendant three times. The unit will once beep with
each button press and twice on the third to acknowledge the pendant is
programmed. The status display will flash ‘HP’ once programmed. Note: If the
unit sounds a long beep and shows ‘-‘ on the status display when pressing the
pendant button, this indicates that a pendant has already been programmed
into the unit. Follow ‘Erase a pendant’ steps before programming the new
pendant.
4. Press the HELP button to select a programming option for the pendant, as
listed below.
5. To store an option selected, press the CANCEL and HELP buttons together. The
unit will sound a long beep and display the selected option.
6. Press the CANCEL button to exit the pendant 1 sub-menu.
Display
Page | 9
Programming option
Information
un-programmed
No pendant has been programmed
Help
ON = Call
OFF = Call
PANIC = Call
Call
ON =
Emergency
OFF = Restore
PANIC = Emergency
Help/Call
ON = Call
OFF = Restore
PANIC = Emergency
Call/Help
ON =
Emergency
OFF = Restore
PANIC = Call
Security
ON = Arm
OFF = Disarm
PANIC = Call
Answer
Panic initiates call or if rings are detected will answer the
incoming phone call
Dementia
1 button blue pendant initiates call on inactivity.
Doorbell
1 button pendant where panic initiates doorbell tune one,
two or three.
Erase
Erase programmed pendant.
Tunstall Liberty
300
installation manual v1.0
to
1. Press the HELP button to enter the pendant 2 sub-menu or press the CANCEL
button to scroll to another pendant sub-menu and repeat steps 2-6 from the
pendant 1 sub-menu.
To erase a pendant:
1. From the pendant menu ‘_u’ press the CANCEL button to scroll to the pendant
you wish to erase (u1-u8) and press the HELP button to enter the pendant submenu.
2. Press the HELP button to scroll through the sub-menu to option ‘Er’.
3. Press the CANCEL and HELP buttons together. The unit will beep three times
and show ‘- ‘on the status display.
4. Press the CANCEL button to exit the sub-menu.
Warning! This will delete all pendants.
1. Press the CANCEL and HELP buttons together and the unit will beep three times
to indicate that all pendants have been deleted.
2. Press the CANCEL button to exit the pendant menu.
Detectors
To program detectors (environmental sensors):
Display
Instruction
1. Press the HELP button to enter the detectors sub-menu.
2. Press the HELP button to enter the detector 1 sub-menu. The unit must display
‘- ‘ (un-programmed).
3. Activate a new detector three times. The unit will beep once with each
transmission and twice on the third transmission to acknowledge the detector
is programmed. The status display will flash ‘Fi’ to indicate that the detector is
programmed. NOTE: If the unit gives a long beep on the first transmission and
displays ‘- ‘ it indicates that the detector has already been programmed into
the unit. Follow ‘Erase a detector’ steps before programming new detector.
4. Press the HELP button to select a programming option for the detector, as
listed below.
5. To store an option selected, press the CANCEL and HELP buttons together. The
unit will sound a long beep and display the selected option.
6. Press the CANCEL button to exit the detector 1 sub-menu.
Display
Page | 10
Programming option
Information
Un-programmed
No detector has been programmed.
Fire
When triggered, the detector will activate an alarm call.
Activity
When triggered during a specified timeframe, the
detector will activate an alarm call.
Inactivity
When not triggered during a specified timeframe, the
www.tunstallhealthcare.com.au
detector will activate an alarm call (on channel 7 only).
to
Doorbell
Sounds the programmed doorbell tune one, two or three
when disarmed, initiates Emergency when armed.
Erase
Erase programmed detector.
1. Press the HELP button to enter the detector 2 sub-menu or press the CANCEL
button to scroll to another detector sub-menu and repeat steps 2-6 from the
detector 1 sub-menu.
To erase a detector:
1. From the pendant menu ‘_d’ press the CANCEL button to scroll to the detector
you wish to erase (d1-d8) and press the HELP button to enter the detector submenu.
2. Press the HELP button to scroll through the sub-menu to option ‘Er’.
3. Press the CANCEL and HELP buttons together. The unit will beep three times
and show ‘- ‘on the status display to indicate that the detector has been erased.
4. Press the CANCEL button to exit the sub-menu.
Warning! This will delete all detectors.
1.
Press the CANCEL and HELP buttons together and the unit will beep three
times to indicate that all detectors have been deleted.
2.
Press the CANCEL button to exit the detector menu.
Hardwired inputs
To program hardwired inputs:
Display
Display
Instruction
1.
Press the HELP button to enter the hardwired inputs sub-menu
2.
Press the HELP button to enter the hardwired input 1 sub-menu. Note: input 1
reports to channel 5.
3.
Press the HELP button to select a programming option for the hardwired
input, as listed below.
4.
To store an option selected, press the CANCEL and HELP buttons together. The
unit will beep three times and display the selected option.
5.
Press the CANCEL button to exit the hardwired input 1 sub-menu.
Programming option
Information
Disabled
All programming options disabled
Help
Initiates call when closed
Call
Initiates emergency when closed
Answer
Answer the phone call
Doorbell
Doorbell tune 1, 2 or 3
1.
Page | 11
Press the HELP button to enter the hardwired input 2 sub-menu and repeat
steps 2-5 from the hardwired input 1 sub-menu.
Tunstall Liberty
300
installation manual v1.0
Warning! This will delete all hardwired inputs.
1.
Press the CANCEL and HELP buttons together and the unit will beep three
times to indicate that all hardwired inputs have been deleted.
2.
Press the CANCEL button to exit the hardwired inputs menu.
Note: Normally open common and inputs.
Hardwired outputs
Display
Display
to
Instruction
1.
Press the HELP button to enter the hardwired outputs sub-menu
2.
Press the HELP button to enter the hardware output 1 sub-menu.
3.
Press the HELP button to select a programming option for the hardware
output, as listed below.
4.
To store an option selected, press the CANCEL and HELP buttons together. The
unit will beep three times and display the selected option.
5.
Press the CANCEL button to exit the hardwired output 1 sub-menu.
Programming option
Information
Off
Output disabled
Length of activation
(minutes)
Activates output for 1-9 minutes. If alarm is restored then
output is switched off.
On/off toggle
Activates output alarm triggered. When alarm is
cancelled or restored the output is switched off.
1.
Press the HELP button to enter the hardwired output 2 sub-menu or press the
CANCEL button to scroll to the auxiliary output 3 sub-menu and repeat steps
2-4 from the auxiliary output 1 sub-menu.
Radio programming (default d = off)
Warning! This will delete all hardwired inputs.
1. Press the CANCEL and HELP buttons together and the unit will beep three
times to indicate that all hardwired inputs have been deleted.
2. Press the CANCEL button to exit the auxiliary outputs menu.
Note: Open collector output to ground when activated.
Preferences
Display
Instruction
1. Press the HELP button to enter the preferences sub-menu
Unit help button
1. Press the HELP button to enter the unit help button sub-menu.
2. Press the HELP button to select a programming option, as listed below.
Page | 12
www.tunstallhealthcare.com.au
3. To store an option selected, press the CANCEL and HELP buttons together. The
unit will beep three times and display the selected option.
4. Press the CANCEL button to exit the unit help button sub-menu.
Display
Programming option
Information
Call
Initiates emergency
Help
Initiates call
Unit help button channel
1. Press the HELP button to enter the unit help button channel sub-menu.
2. Press the HELP button to select a programming option, as listed below.
3. To store an option selected, press the CANCEL and HELP buttons together. The
unit will beep three times and display the selected option.
4. Press the CANCEL button to exit the unit help button channel sub-menu.
Display
to
Programming option
Information
Unit channel
Help button reporting to channel 1-8. Note: channel 6 is
the default.
Exit time
1. Press the HELP button to enter the exit time sub-menu.
2. Press the HELP button to select a programming option, as listed below.
3. To store an option selected, press the CANCEL and HELP buttons together. The
unit will beep three times and display the selected option.
4. Press the CANCEL button to exit the exit time sub-menu.
Display
to
Programming option
Information
Arm mode time (in 10
second increments)
The programmed time (10-60 seconds) between arming
and activating the alarm.
Pre-alarm time
1. Press the HELP button to enter the pre-alarm time sub-menu.
2. Press the HELP button to select a programming option, as listed below.
3. To store an option selected, press the CANCEL and HELP buttons together. The
unit will beep three times and display the selected option.
4. Press the CANCEL button to exit the pre-alarm sub-menu.
Display
to
Programming option
Information
Pre-alarm time (in 10
second increments)
The programmed time (0-60 seconds) between a pendant
or detector triggering and activating the alarm.
Lockout
1. Press the HELP button to enter the lockout sub-menu.
2. Press the HELP button to select a programming option, as listed below.
Page | 13
Tunstall Liberty
300
installation manual v1.0
3. To store an option selected, press the CANCEL and HELP buttons together. The
unit will beep three times and display the selected option.
4. Press the CANCEL button to exit the lockout sub-menu.
Display
Programming option
Information
Enabled
Alarm will lockout any detector activations (excluding
those programmed to FIRE option) that have triggered
more than twice in arm mode.
Disabled
Lockout option is disabled
Supervision of detectors
1. Press the HELP button to enter the supervision of detectors sub-menu.
2. Press the HELP button to select a programming option, as listed below.
3. To store an option selected, press the CANCEL and HELP buttons together. The
unit will beep three times and display the selected option.
4. Press the CANCEL button to exit the supervision of detectors sub-menu.
Display
to
Programming option
Information
Supervision signal (in
1 hour increments)
Programmed Interval (0-24 hours) when at least one
supervision signal is expected from each detector.
Inactivity timer
1. Press the HELP button to view programmed time, which will flash on the status
display. To view the programmed time again, press the CANCEL and then HELP
button.
2. To change the time, press the HELP button to step through the digits (0-9). To
store each digit, press the CANCEL and HELP buttons together. The unit will
beep three times and display the next digit to be programmed. Repeat this
process until all digits are programmed.
3. Press the CANCEL button to display the programmed time, which will flash on
the status display.
4. Press the CANCEL button to exit the inactivity timer sub-menu.
Display
to
Programming option
Information
0-200 = hours
Interval where at least one activity signal is expected from
each individual inactivity detector. If a number greater
than 255 is programmed, the unit will sound a long beep.
or
201-255 = minutes
Note: Inactivity timer can only be set after a detector has been programmed as inactivity.
Inactivity restore
1. Press the HELP button to enter the inactivity restore sub-menu.
2. Press the HELP button to select a programming option, as listed below.
3. To store an option selected, press the CANCEL and HELP buttons together. The
unit will beep three times and display the selected option.
Page | 14
www.tunstallhealthcare.com.au
4. Press the CANCEL button to exit the inactivity restore sub-menu.
Display
Programming option
Information
Enabled
Restores when an activity message is received from the
pendant or detector, or by the alarm CANCEL button.
Disabled
Restores only by the alarm CANCEL button.
Quiet
1. Press the HELP button to enter the quiet sub-menu.
2. Press the HELP button to select a programming option, as listed below.
3. To store an option selected, press the CANCEL and HELP buttons together. The
unit will beep three times and display the selected option.
4. Press the CANCEL button to exit the quiet sub-menu.
Display
Programming option
Information
Enabled
Alarm beeps are silent and the unit will answer in listen
only mode. Note: This does not affect the hands-free
operation.
Disabled
Quiet mode is disabled.
Phone options
1. Press the HELP button to enter the phone options sub-menu.
2. Press the HELP button to select a programming option, as listed below.
3. To store an option selected, press the CANCEL and HELP buttons together. The
unit will beep three times and display the selected option.
4. Press the CANCEL button to exit the phone options sub-menu.
Display
Programming option
Information
Dials all numbers
Dials all programmed phone numbers.
Dials control centre
numbers
Priority to programmed control centre numbers.
Answer call
1. Press the HELP button to enter the answer call sub-menu.
2. Press the HELP button to select a programming option, as listed below.
3. To store an option selected, press the CANCEL and HELP buttons together.
The unit will beep three times and display the selected option.
4. Press the CANCEL button to exit the answer call sub-menu.
Display
Page | 15
Programming option
Information
Auto-answer time
(minutes)
Time after an activation where the alarm will autoanswer any incoming call.
Tunstall Liberty
300
installation manual v1.0
Call back options
1. Press the HELP button to enter the call back unit sub-menu.
2. Press the HELP button to select a programming option, as listed below.
3. To store an option selected, press the CANCEL and HELP buttons together. The
unit will beep three times and display the selected option.
4. Press the CANCEL button to exit the call back unit sub-menu.
Display
Programming option
Information
Enabled
Alarm auto-answers an incoming call after an activation
Disabled
Alarm does not auto-answer an incoming call after an
activation
1. Press the HELP button to enter the call back pendants sub-menu or press the
CANCEL button to scroll to the call back detectors or inputs sub-menus and
repeat steps 1-4 from the call back unit sub-menu.
PABX tones
1. Press the HELP button to enter the PABX tones sub-menu.
2. Press the HELP button to select a programming option, as listed below.
3. To store an option selected, press the CANCEL and HELP buttons together. The
unit will beep three times and display the selected option.
4. Press the CANCEL button to exit the PABX tones sub-menu.
Display
Programming option
Information
Enabled
Alarm will automatically disconnect if it detects a
specific tone (e.g. short beep, long gap)
Disabled
Alarm will not detect a specific tone so call will
disconnect on time-out or can be manually terminated
by pressing the CANCEL button.
Note: If running on a PABX system, this should always
be set to disabled.
Rings detected
1. Press the HELP button to enter the rings detected sub-menu.
2. Press the HELP button to select a programming option, as listed below.
3. To store an option selected, press the CANCEL and HELP buttons together. The
unit will beep three times and display the selected option.
4. Press the CANCEL button to exit the rings detected sub-menu.
Display
to
Page | 16
Programming option
Information
Rings detected
Number of rings to detect before auto-answering after
alarm activation.
www.tunstallhealthcare.com.au
Country dialling
1. Press the HELP button to enter the country dialling sub-menu.
2. Press the HELP button to select a programming option, as listed below.
3. To store an option selected, press the CANCEL and HELP buttons together. The
unit will beep three times and display the selected option.
4. Press the CANCEL button to exit the rings detected sub-menu.
Display
Information
Australia (force DTMF)
New Zealand
Singapore, USA, Canada
UK and Europe
Programming access (via up/download software or remote DTMF control)
1. Press the HELP button to enter the programming access sub-menu.
2. Press the HELP button to select a programming option, as listed below.
3. To store an option selected, press the CANCEL and HELP buttons together. The
unit will beep three times and display the selected option.
4. Press the CANCEL button to exit the programming access sub-menu.
Display
Information
Up/download software and remote DTMF access enabled
Up/download software access enabled only in program mode and remote DTMF
access enabled
Up/download software access enabled and remote DTMF access disabled
Up/download software access enabled only in program mode and remote DTMF
access disabled
RS232 baud rate
1. Press the HELP button to enter the RS232 baud rate sub-menu.
2. Press the HELP button to select a programming option, as listed below.
3. To store an option selected, press the CANCEL and HELP buttons together. The
unit will beep three times and display the selected option.
4. Press the CANCEL button to exit the RS232 baud rate sub-menu.
Display
Information
115200
Disabled
9600
19200
Page | 17
Tunstall Liberty
300
installation manual v1.0
38400
57600
Default values
Warning! This will set all preference options to default values.
1. Press the CANCEL and HELP buttons together and the unit will beep three
times to indicate that all preference options have been reset.
2. Press the CANCEL button to exit the preferences menu.
Systems
Display
Instruction
1. Press the HELP button to enter the systems sub-menu.
System check (check signal strength of pendants and detectors)
1. Press the HELP button to enter the system check sub-menu. Note: the unit
display must be blank.
2. Press any pendant or trigger a detector. The unit will beep once and flash the
signal strength on the display, (0-99).
3. Press the CANCEL button to exit the system check sub-menu.
Unit CANCEL button brightness
1. Press the HELP button to enter the CANCEL button brightness sub-menu.
2. Press the HELP button to select a programming option, as listed below.
3. To store an option selected, press the CANCEL and HELP buttons together. The
unit will beep three times and display the selected option.
4. Press the CANCEL button to exit the CANCEL button brightness sub-menu.
Display
Information
Off
Dimmed
Bright
Listen pin
1. Press the HELP button to enter the listen pin sub-menu.
2. Press the HELP button to select a programming option, as listed below.
3. To store an option selected, press the CANCEL and HELP buttons together. The
unit will beep three times and display the selected option.
4. Press the CANCEL button to exit the listen pin sub-menu.
Display
Page | 18
Programming option
Information
Enabled
Alarm listens to monitoring centre communication.
www.tunstallhealthcare.com.au
Disabled
Alarm does not listen to monitoring centre
communication.
Microphone sensitivity
1. Press the HELP button to enter the microphone sensitivity sub-menu.
2. Press the HELP button to select a programming option, as listed below.
3. To store an option selected, press the CANCEL and HELP buttons together. The
unit will beep three times and display the selected option.
4. Press the CANCEL button to exit the microphone sensitivity sub-menu.
Display
to
Information
Microphone sensitivity
Speaker volume
1. Press the HELP button to enter the speaker volume sub-menu.
2. Press the HELP button to select a programming option, as listed below.
3. To store an option selected, press the CANCEL and HELP buttons together. The
unit will beep three times and display the selected option.
4. Press the CANCEL button to exit the speaker volume sub-menu.
Display
to
Information
Speaker volume
Other system options (do not reprogram)
Display
Information
Line balance attenuation (default 0 = 15.)
Line-in level DTMF (default 0 = normal)
Line-out level DTMF (default 0 = normal)
Report pre-time (default 10 = normal)
Report tone time (default 4 = normal)
Report quiet time (default 4 = normal)
Report between time (default 10 = normal)
Radio repeater (default d = disabled)
Default values
Warning! This will set all system options to default values.
1. Press the CANCEL and HELP buttons together and the unit will beep three
times to indicate that all system options have been reset.
2. Press the CANCEL button to exit the systems menu.
Page | 19
Tunstall Liberty
300
installation manual v1.0
Cellular (do not reprogram via unit)
Display
Instruction
To program the cellular settings use the up/download programmer software. If
you do not have access to the software, contact your supplier.
Daylight savings (DLS)
Display
Instruction
1. Press the HELP button to enter the daylight savings sub-menu.
DLS start ordinal
1. Press the HELP button to enter the DLS start ordinal sub-menu.
2. Press the HELP button to select a programming option, as listed below.
3. To store an option selected, press the CANCEL and HELP buttons together. The
unit will beep three times and display the selected option.
4. Press the CANCEL button to exit the DLS start ordinal sub-menu.
Display
Information
First week of the month
Second week of the month
Third week of the month
Fourth week of the month
Fifth week of the month
Disabled
Fixed date
DLS start day
1. Press the HELP button to enter the DLS start day sub-menu.
2. Press the HELP button to select a programming option, as listed below. Note: If
ordinal is set to 0 (fixed date), then days of the month are displayed as 1 to 31.
3. To store an option selected, press the CANCEL and HELP buttons together. The
unit will beep three times and display the selected option.
4. Press the CANCEL button to exit the DLS start day sub-menu.
Display
Information
Monday
Tuesday
Wednesday
Thursday
Friday
Page | 20
www.tunstallhealthcare.com.au
Saturday
Sunday
to
Days of the month, if ordinal is set to 0 (fixed date)
DLS start month
1. Press the HELP button to enter the DLS start month sub-menu.
2. Press the HELP button to select a programming option, as listed below. Note: If
ordinal is set to 0 (fixed), then days of the month are displayed at 0 to 31.
3. To store an option selected, press the CANCEL and HELP buttons together. The
unit will beep three times and display the selected option.
4. Press the CANCEL button to exit the DLS start month sub-menu.
Display
to
Information
January to December
DLS end ordinal
1. Press the HELP button to enter the DLS end ordinal sub-menu.
2. Press the HELP button to select a programming option, as listed below. Note: If
ordinal is set to 0 (fixed), then days of the month are displayed at 0 to 31.
3. To store an option selected, press the CANCEL and HELP buttons together. The
unit will beep three times and display the selected option.
4. Press the CANCEL button to exit the DLS end ordinal sub-menu.
Display
Information
First week of the month
Second week of the month
Third week of the month
Fourth week of the month
Fifth week of the month
Disabled
Fixed date
DLS end day
1. Press the HELP button to enter the DLS end day sub-menu.
2. Press the HELP button to select a programming option, as listed below. Note: If
ordinal is set to 0 (fixed), then days of the month are displayed at 0 to 31.
3. To store an option selected, press the CANCEL and HELP buttons together. The
unit will beep three times and display the selected option.
4. Press the CANCEL button to exit the DLS end day sub-menu.
Page | 21
Tunstall Liberty
300
installation manual v1.0
Display
Information
Monday
Tuesday
Wednesday
Thursday
Friday
Saturday
Sunday
DLS end month
1. Press the HELP button to enter the DLS end month sub-menu.
2. Press the HELP button to select a programming option, as listed below. Note: If
ordinal is set to 0 (fixed), then days of the month are displayed at 0 to 31.
3. To store an option selected, press the CANCEL and HELP buttons together. The
unit will beep three times and display the selected option.
4. Press the CANCEL button to exit the DLS end month sub-menu.
Display
to
Information
January to December
Default values
Warning! This will set all cellular options to default values.
1. Press the CANCEL and HELP buttons together and the unit will beep three
times to indicate that all system options have been reset.
2. Press the CANCEL button to exit the cellular menu.
Timers
Display
Instruction
To program the timer settings use the up/download programmer software. If you
do not have access to the software, contact your supplier.
Reports
Display
Instruction
1. Press the HELP button to enter the reports sub-menu.
Report modes
2. Press the HELP button to enter the report modes sub-menu.
3. Press the HELP button to select a programming option, as listed below.
4. To store an option selected, press the CANCEL and HELP buttons together. The
unit will beep three times and display the selected option.
Page | 22
www.tunstallhealthcare.com.au
5. Press the CANCEL button to exit the report modes sub-menu.
Display
Information
GSM only
GPRS only
GPRS/GSM
GPRS/PSTN
GPRS/GSM/PSTN
PSTN Only
PSTN/GPRS
PSTN/GPRS/GSM
PSTN/GSM/GPRS
Other report options (do not reprogram)
Display
Information
Manual test reports
Restores enabled
Mains fail delay
Mains fail repeat
Low battery main unit reporting
Low battery pendant and detector reporting
RS232 transmission type
Default values
Warning! This will set all system options to default values.
1. Press the CANCEL and HELP buttons together and the unit will beep three
times to indicate that all system options have been reset.
2. Press the CANCEL button to exit the systems menu.
Doorbell tunes
Display
Instruction
To program the doorbell tunes use the up/download programmer software. If you
do not have access to the software, contact your supplier.
Exit programming mode
Display
Instruction
1. Press the HELP button to exit programming mode. Note: The client ID and ‘n1’
phone number must be programmed in to exit programming mode.
Page | 23
Tunstall Liberty
300
installation manual v1.0
Specifications
Liberty300 unit
Weight:
590 g (including battery)
Dimensions:
(LxWxD) 286 x 174 x 38 mm
Radio frequency:
915 - 928MHz frequency band
Radio range:
100 - 300m in open air (subject to environmental conditions)
Mains power:
9V DC 300mA with integral earth
Standby battery:
4.8V 1600mAh rechargeable Ni-MH
Backup battery time:
AS4607 compliant 40 hours
Operating temperature range:
Ambient temperature range 0°C to +50°C
Transmitter
Type:
Crystal stabilised
Frequency:
915 - 928 MHz (Australia and New Zealand)
Power output:
< 100 uW (or various international compliances)
Conforming standards
Telecommunications:
AS/CA S002:2010 inc Amendment No.1 2012, AS/ACIF S004-2008,
PTC200:2006
3G: Dual-Band UMTS/HSDPA 850(800)/2100MHz
GSM: Quad-Band GSM/GPRS/EDGE 850/900/1800/1900MHz
EMC:
AS/NZS CISPR22:2009, EN55024:2010, EN55022:2010, EN61000-32:2006 +A1:2009 +A2:2009, EN61000-3-3:2008
Safety:
AS/NZS 60950.1:2011 + A1:2012
Radio (main unit and pendant):
AS/NZS 4268: 2012
CE:
Compliant
Design, manufacture,
installation and service:
ISO9001:2000, AS4607
Warranty:
24 month warranty
Part numbers:
Liberty300 alarm 106-288
Liberty300 pendant 106-183
Liberty300 alarm battery 142-031
WARNING: For safety reasons, only connect equipment with a telecommunications compliance
label. This includes customer equipment previously labelled permitted or certified.
Page | 24
www.tunstallhealthcare.com.au
Tunstall Australasia
Unit 1, 56 Lavarack Avenue, Eagle Farm, QLD, 4009, Australia
ABN: 44059 121 863
t: 1800 603 377
f: 07 3637 2255
w. www.tunstallhealthcare.com.au
e. [email protected]
Tunstall New Zealand
306 Cameron Road, Tauranga, 3110, New Zealand
Business No. 3502431
t: 0800 488 678
f: 07 571 2685
w. www.tunstall.co.nz
e. [email protected]
Our policy of continual development means that product specification and appearance may change
without notice. Tunstall does not accept any responsibility for any errors or omissions contained in this
document.
© 2015 Tunstall Australasia Pty Ltd ® TUNSTALL is registered trade mark.
TS-UG-AP-009-010