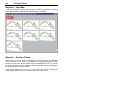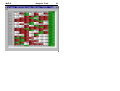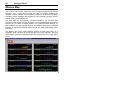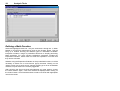
1
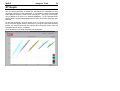
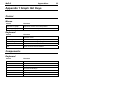
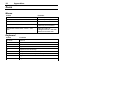
MoTeC Interpreter User’s Manual Introduction ........................................................................ 1 Welcome............................................................................................................. 1 Additional Documentation ................................................................................... 1 Overview ............................................................................. 3 System Logging Options and Accessories.......................................................... 3 Software Summary............................................................. 6 Software Navigation............................................................................................ 6 Preferences ........................................................................................................ 7 Printing................................................................................................................ 7 Acquiring Data.................................................................... 8 Dash/Logger ....................................................................................................... 8 Engine Management System M800/M880 .......................................................... 8 Engine Management System M4/48/M8 ............................................................. 9 Logging Modes ................................................................................................... 9 File Format........................................................................................................ 10 Vehicle Details .................................................................................................. 10 Channel Setup .................................................................................................. 10 Analysis Tools.................................................................. 13 Graphical Analysis ............................................................................................ 13 Track Map......................................................................................................... 17 Mixture Map ...................................................................................................... 22 Mathematics ..................................................................................................... 23 Histogram ......................................................................................................... 27 Statistics ........................................................................................................... 29 Virtual Dash ...................................................................................................... 30 XY Graph .......................................................................................................... 31 Appendix 1 Graph Hot Keys ........................................... 33 Cursor ............................................................................................................... 33 Components ..................................................................................................... 33 Zoom................................................................................................................. 34 General ............................................................................................................. 35 Copyright – Motec Pty Ltd – 1998-2002 The information in this document is subject to change without notice. While every effort is taken to ensure correctness, no responsibility will be taken for the consequences of any inaccuracies or omissions in this manual. 26 August, 2002 MoTeC Introduction 1 Introduction Welcome Thank you for purchasing a MoTeC Data Acquisition and Analysis System. MoTeC provides a range of powerful and flexible Engine Management Systems and Dash/Loggers, all of which incorporate data acquisition facilities. This manual provides an introduction to data acquisition using these systems and documents the features of the MoTeC Interpret program, which is used for data analysis and display. Throughout this manual look for this icon to find interesting tips and information. Additional Documentation Additional documentation is available in the form of User Manuals, Drawings and Tech Notes. MoTeC can supply the latest Indexes to these documents and any of these items as required. User Manuals cover the individual MoTeC products such as: Engine Management Systems Dash/Data Acquisition Systems Lap Beacons Professional Lambda Meter Drawings cover the following categories: Accessories ECUs Looms Ignition Modules Combined Module & Trigger Systems Trigger Systems Valves Sensors Miscellaneous Tech Notes cover topics such as: Traction Control Boost Control 2 Introduction Idle Speed Control Drive By Wire Wide Band Lambda Sensor MoTeC Overview 3 Overview MoTeC Interpreter is an advanced analysis tool to assist in unloading of logged data from MoTeC products and for quick, efficient data analysis and display. Data may also be retrieved from alternate file formats and converted to MoTeC log data, for users migrating from alternate data acquisition systems (contact MoTeC for details). The information contained within the log files may be viewed in a variety of formats, from a short summary of the session for a quick systems check through to many formats of graphical and text display including: Graphing against time or distance Track mapping Rainbow charts Engine Histogram XY Scatter Plot Air/Fuel mixture map Statistics Etc. Mathematical data analysis is also included to smooth data, calculate handling traits (such as understeer/oversteer) and other powerful analysis tools. The capabilities of MoTeC Interpreter are controlled by the options enabled in the MoTeC ECU or ADL Dash/Logger. System Logging Options and Accessories Basic Logging The MoTeC Dash/Logger has 384kB as standard, this can be upgraded with several options as listed below. Basic logging is optional on the MoTeC M800 or M4/48 Engine Management Systems. There is 1Mb of memory available with the M800, 4Mb with the M880 and 512kB with the M4/48. The ADL allows user defined logging rates of 1 – 1000 samples/second, and 1 – 200 samples/second on an M800/880. Several analysis techniques are provided with basic logging, including Graphical Analysis, Mixture Maps and Statistics. However the more advanced functions are available only with the Pro-Logging option. 4 Overview ADL Logging Options 1MB Upgrade Upgrades the MoTeC Dash/Loggers logging memory from 384kB to 1MB. 2MB Upgrade Upgrades the MoTeC Dash/Loggers logging memory from 1MB to 2MB. 4MB Upgrade Upgrades the MoTeC Dash/Loggers logging memory from 2MB to 4MB. Also includes Fastest Lap and Burst Logging Modes. 8MB Upgrade Upgrades the MoTeC Dash/Loggers logging memory from 4MB to 8MB. Note that this is only available with the ADL-8. Pro Logging Pro Logging is optional on both the MoTeC M800 Engine Management System and MoTeC Dash/Logger. Pro Logging adds sophisticated functionality to the capabilities offered in Basic Logging. These extra functions include Multiple Graph Overlays, extra Mathematics, Virtual Dash and others. Backlit Display Available at time of order, the ADL can be specified with an electroluminescent backlit display. Extended Inputs and Outputs Increases the number of Input and Output pins available for MoTeC Dash Loggers. See the appropriate User manual or brochure for further details. Wideband Lambda Inputs Two wideband, temperature compensated Lambda (exhaust gas mixture strength) inputs are optional on both the MoTeC M800 Engine Management System and MoTeC Dash/Logger. The M4/48 has the option for a single wideband Lambda input. MoTeC Overview 5 Telemetry Gives ‘in the pits’ viewing of real time data of a vehicle in action. Supports both continuous and ‘end of lap’ data transmission. The user can define a multiple page setup to view the data as text, warning alarms, numerics, bar charts, gauges, scrolling charts and moving track maps. Lap Beacon Transmitter/Receiver The MoTeC infrared beacon system provides 990 unique channels for lap timing. A lap beacon is essential for logging lap times, generating track maps and overlaying data. See the beacon user manual for further details. 6 Software Summary Software Summary MoTeC Interpreter is designed for the Windows95/98/ME/XP® and Windows NT/2000® operating system. Note: The log data unload feature is only available when operating in Windows®. MoTeC Interpreter requires a Pentium® (or equivalent) processor with 16Mb of RAM (recommended 32Mb). 6Mbytes of hard drive space is required for installation, however it is recommended that at least 30Mbytes of hard drive space is free at all times for new log data storage and general system reliability. Software Navigation Moving around within MoTeC Interpreter, as in any Windows® program, can be achieved via either the Keyboard or a Pointing Device (Mouse, Trackball, etc). Keyboard ‘Hot Keys’, ‘pop up’ and ‘pull down’ menus are all provided to allow the user to navigate using their preferred technique. The use of a combination of keyboard ‘Hot Keys’ keys and the pointing device is usually the fastest way to control a program, especially when using the sometimes difficult pointing device supplied with most notebook computers. The Alt key will activate the pull down menus of the application currently running, while the arrow keys allow navigation through the menu, and the Enter key activates the menu item currently highlighted. A number of more frequently used functions may have ‘Hot Keys’ to enable direct access without using the menus. These ‘Hot Keys’ will be shown against the pull down menu items, memorize the ones that may be useful to you. The screen cursor moves in response to movement of the Mouse (Pointing Device). Using the left mouse button when the cursor is on top of a menu item or command button will activate that function. Double clicking an object will usually select the object, while a right click will generally display the relevant menu items for an object in a ‘Popup Menu’. This is usually a more convenient way of accessing the menu functions. A description of specific shortcut keys is included in later sections of this manual. MoTeC Software Summary 7 Preferences MoTeC Interpreter has a variety of options for the analysis and display of logged data. The user can control the appearance and functionality of the software by adjusting the preferences. These are accessible from the File Menu of the main Interpreter screen and from the main menu of each analysis function. Printing MoTeC Interpreter has the capability to print all analysis screens on a wide range of printers. A standard Windows™ print dialog is provided for customization of the printing options such as print quality, orientation, etc. 8 Acquiring Data Acquiring Data Data for analysis may be downloaded from a number of MoTeC products if the data logging option has been enabled. The data does not have to be unloaded by the computer that is used for data analysis, however log files can be up to several megabytes in size therefore a simple computer network would be the preferred way to transfer logged data files between computers. Dash/Logger Data is downloaded from an ADL Dash/Logger via a MoTeC CAN cable attached to the parallel port of a Laptop/Desktop computer. Downloading can be initiated from either MoTeC Dash Manager or MoTeC Interpreter by selecting the "Unload Dash" function. The CAN cable can be disconnected from the vehicle when the scrolling status bar has disappeared and while the downloaded data is being converted into log file format. Should it be necessary to disconnect the CAN cable prior to the download being completed the data downloaded to that point will be available for analysis. This file will contain the most recent data as the Dash/Logger downloads the newest data first. The PC can download a 4Mbyte data set from a MoTeC ADL in approximately one minute. Engine Management System M800/M880 Data is downloaded with a MoTeC CAN cable. The download is initiated from Interpreter by clicking on the “Unload M800/M880ECU” icon in the toolbar, or from the ‘Connect’ menu. Note that Interpreter cannot unload the log data if the EMP tuning software is still running. Data from ECU’s with software version 1.1 and above are downloaded via a MoTeC CAN cable attached to the parallel port of a Laptop/Desktop computer. This can be initiated by clicking on the “Unload M800/880 ECU” icon on the toolbar, or by selecting the appropriate item from the ‘Connect’ menu. The PC can download a 4Mbyte data set from a MoTeC M880 in approximately one minute. MoTeC Acquiring Data 9 Engine Management System M4/48/M8 Data is downloaded from the ECU via a MoTeC PC Interface cable attached to the serial port of a Laptop/Desktop computer. Care must be taken to ensure that the correct (labeled) end is attached to the ECU as both ends of the cable use the same style of connector. The download is initiated from within the DOS MoTeC Interpreter program by choosing the “Get Log Data” then “Unload ECU” menu items. For the Windows MoTeC Interpreter program click on the “Unload ECU” Icon in the toolbar or use the same function from the Pull Down or Pop Up menus. Note: For M4 ECU’s with a serial number of greater than 3000 running version 6 or above software, a PCI cable is no longer needed to interface with a PC. A standard serial comms cable can be used instead. The PC can download a full 512kB data set from a MoTeC ECU in approximately two minutes. Logging Modes The MoTeC ADL data logging system provides a range of techniques for recording information about the performance of an engine and chassis. These logging modes are Normal Logging, Fastest Lap logging and Burst Logging. MoTeC ECU’s have only ‘Normal Logging’ and log whenever the engine is running. Normal Logging Normal logging mode is the most common method for recording data, and will satisfy the needs of the majority of users. Normal logging begins recording data once the Start Logging condition is TRUE and continues logging until the Stop Logging condition becomes TRUE. The Channels to be recorded are defined in the configuration of the ADL or ECU. The number of samples per second, for each channel, is defined in the device configuration. Fastest Lap Logging (4MB and 8MB Logging Option Only) Fastest Lap Logging is similar to Normal Logging, where the channels to be recorded and the number of samples per second is defined individually for each channel. Data is recorded for the time between two lap beacons, and stored if the lap time was faster then the previously recorded fastest lap. 10 Acquiring Data Fastest Lap Logging is useful for fast recording of chassis channels, such as suspension position and force without quickly consuming the logging memory of the device. Fastest lap logging uses a portion of the main logging memory, check the logging time display to see how much normal logging is available Burst Logging (4MB and 8MB Logging Option Only) Burst Logging allows a fast, short duration, event to be recorded at a high sampling rate. The channels to be recorded are selected as normal, however all channels are logged at the same rate. A burst logging buffer is recorded when the Burst logging condition is TRUE, however the trigger point in the buffer can be set between 0 and 100%, to allow data to be recorded before the trigger event happened. Burst logging uses a portion of the main logging memory, check the logging time display to see how much normal logging is available File Format Logged data unloaded from a MoTeC device is stored in the MoTeC data logging format. The file structure was designed as a fast, flexible and extendable means to store logged data and vehicle details for analysis and display. Vehicle Details The MoTeC file format also has the ability to store a wide range of vehicle details to provide a record of the vehicle settings for the session in which the data was logged. It is important that this information is updated each time data is downloaded, both for keeping accurate records, and some Interpreter math calculations. Channel Setup There are a wide range of sensors that can be used to record information about the performance of a driver, vehicle drivetrain and chassis. The following sensors are an example of the most common channels of information used in chassis analysis, and the important considerations MoTeC Acquiring Data 11 necessary for the sensor to provide accurate data for display and analysis in MoTeC interpreter: G-Force Sensor A G force sensor measures the vehicle acceleration in up to three directions. The three axes are: Lateral G: the left/right forces felt when driving around a corner. This sensor is conventionally calibrated to read positive for a left turn (right force so G sensor arrow points right) Longitudinal G: the forces felt during acceleration and braking. This sensor is calibrated to read positive for acceleration (backwards force so G sensor arrow points backwards) Vertical G: the forces felt due to gravity. This sensor is calibrated to read positive up (downwards force so G sensor arrow points down) The G sensor should be mounted as close as possible to the center of gravity of the vehicle, and carefully aligned within 2° of the vehicle axis. Angles greater than 2° reduce the accuracy of the sensor. A G sensor can be easily tested by turning the sensor so that the arrow points down. The sensor should read 1G: the force of gravity. Steered Angle The Steered angle sensor measures the angle of the road wheel where 0° is straight ahead and positive degrees is a right turn. The sensor is typically mounted to the steering column but calibrated in degrees of road wheel steering, not steering wheel angle. The sensor should be calibrated using the outside wheel, i.e. the right wheel for left turn and vice versa, especially if the vehicle has Ackerman steering. The steered angle sensor can be calibrated as follows: 1. Place the front suspension on axle stands so the front wheels are off the ground but the front suspension is loaded. 2. Using the Sensor Calibration function in the MoTeC Dash Manager calibrate the sensor according to the table below A table of the measured distance at the rim for 13” to 18” wheels is included below. The measurements are millimeters difference between the front and rear of the rim to a parallel reference line. 12 Acquiring Data 2° 4° 6° 8° 10° 13" 11.5 23.0 34.5 46.0 57.3 14" 12.4 24.8 37.2 49.5 61.7 15" 13.3 26.6 39.8 53.0 66.2 16" 14.2 28.3 42.5 56.6 70.6 17" 15.1 30.1 45.1 60.1 75.0 18" 16.0 31.9 47.8 63.6 79.4 Suspension Position The position of suspension components can be measured Suspension position: positive for bump (compression) and negative for rebound (droop). Force Force can be measured in suspension components or in aerodynamic devices, such as spoilers and air dams. Force measurement is usually achieved using load cells or strain gauges. The sensor should be calibrated to read positive for compression and negative for tension. Speed The speed of the vehicle is very important as it is the prime input for calculating distance travelled, creating track maps, allowing comparative overlaying of different laps, analysing handling, etc. As such it is critical that the sensor be solidly mounted, shielded from extreme heat and remote from high currents and that the device it is sensing (normally a toothed wheel on the back of the hub) be rigidly mounted, made from a magnetically soft material (e.g. mild steel) and have extremely accurate spacing between adjacent teeth. MoTeC Analysis Tools 13 Analysis Tools Graphical Analysis Overview Graphical Analysis is a window depicting graphs of various parameters that were logged during the session stored in the current log file. The graph options are defined in user templates to allow graphical views to be predefined and then selected as needed. Graphs can be toggled between a series of line charts (pictured) and a single, combined graph, depending on user preferences (Hotkey – G). A dialog box is also displayed that shows the value of each parameter at the point indicated by the cursor. Data can be shown as the entire session, entire lap or zoomed to show a very small segment only. Laps can be overlaid to compare performance between different drivers, configurations or track conditions. An inset track map (Hotkey – T) will show the position on the track corresponding to the current cursor position with the currently viewed section highlighted. 14 Analysis Tools Graph Templates The format in which to display the log data is stored in a Graph template. The template determines where and how many Channels are displayed, the foreground and background colors used to present the channel, and the graph size and vertical scale for the channel. Thirty templates are available and can be configured for any purpose, e.g. Engine, G force, Suspension, etc. The templates can be named, and templates 1-9 may be selected via the numeric keys. Only five templates are available in Basic Logging. Templates may be modified by pressing F5 or by Right-clicking on either the Channel Label in the graph, or the channel name in the data box. Data Viewing By default data is organized by lap, if lap beacon information was included in the log file. The fastest lap is displayed when the graph is selected. A specific lap can be selected from a list of laps logged by pressing F8, or the next or previous lap may be selected (Hotkeys P & N). The cursor, which can be moved by the pointing device or the arrow keys, allows a specific point in the data to be highlighted. The value at the cursor location, for each graphed MoTeC Analysis Tools 15 channel, is displayed in the graph title. The “Data Box” displays the value of every logged channel at the current cursor location, while the track map displays the track location for the current cursor position. Click on a point on the track map to move the cursor to that location in the data. Zooming The graph may be zoomed to enable more detailed evaluation of a specific section of the data. The same zoomed area can be viewed on different laps or different templates. Zooming can be performed using either the keyboard up/down arrows or the pointing device. Double click at the start of the desired zoom area and move the pointing device to extend the selection: click to zoom selected area. A full list of Zoom functions is given in appendix A. Statistics can be calculated on the zoom area – hold Shift while making zoom area selection Data can be re-scaled vertically while zooming – hold Alt while making zoom area selection To view the data adjoining the current zoomed section of a lap use the “jog forward” or “jog backward” Data Overlaying Data from another log file may be overlaid to examine the effect of changing the vehicle setup – or to examine differences between driving styles. Standard logging allows the overlay of a single lap, while Pro-Logging allows up to eight laps to be overlayed. The variance between the two laps can be displayed to show where time was gained or lost. Channel Units Data from most logged channels can be displayed in whatever units are preferred by the user. For example Air Pressure can be logged as PSI, displayed as kPa and analysed as mm/Hg depending on the preferences of the team members. Right mouse click on the channel in the “Data Box” or on the graph label then select Channel Units and the desired measurement unit. 16 Analysis Tools Multiple Views If the main Interpreter window is run in a reduced size mode, it is possible to have multiple views displayed simultaneously. When one is displayed it can be resized and moved around the screen. To then display a second view, click on the appropriate icon on the Interpreter shortcut bar. See the section below on User Data Selection for an example of this. MoTeC Analysis Tools 17 Track Map Overview The Track Map is a graphical representation of a circuit, upon which data recorded during a vehicle outing is displayed in a easy to understand format. This provides a useful tool to determine what is happening to the vehicle at a particular point on the circuit. The track map offers a number of reports for different analysis of session data. The Track Map shown below is a lap of Bathurst with throttle usage, gear change points, maximum and minimum speeds and braking points displayed. Calculations and Requirements The Track Map is a representation of the line that was driven around the track and not the exact shape of the track itself, although for the purposes for which they are used they are effectively the same. The Track Map can be generated from data recorded during a vehicle outing, or an existing Track Map may be used for data display. If an existing track map is used to display new data, the only requirement is that vehicle speed exists in the log file. 18 Analysis Tools However, if a new track map is to be calculated and drawn, some extra information must be logged. The necessary channels are: Speed Lateral G force Lap Beacon The Track Map is automatically generated from an analysis of vehicle speed and lateral G force. The accuracy of the track map is therefore completely dependant on the quality of the data recorded in the log file. If the track map looks distorted, the calibration of either lateral G or speed is incorrect. Longitudinal G is not required, however it is used to calculate corrected speed which eliminates the effect of wheel locking and/or lifting to improve the Track Map calculation. If Longitudinal G is not available, it is important to choose a lap which does not have any wheel locking from which to generate the track map. Wheel locking can be seen from a sudden downwards spike in wheel speed. If the track map is drawn as a mirror image of the real track, then Lateral G force calibration is incorrect. Lateral G should be positive for Left hand corners. Lateral G can be inverted using channel maths to correct this if necessary. Check the G sensor calibration by turning it onto its side – with the left side of the sensor facing up it should read +1G; with the right side of the sensor facing up it should read -1G. The sensor should be zeroed before each session for best results. Check the speed calibration by comparing the lap distance reported in interpret against the stated track length. They should be within 100M. Sensor noise is a common cause of being unable to draw a correct Track Map. In the Graphical Analysis section check the speed trace for smoothness, the data should follow consistent trends, data that jumps up and down by more than 2 km/h is and indication of poor sensor mounting or interference. Similarly the Lateral G sensor should be reasonably smooth with readings close to zero when driving on straights. MoTeC Analysis Tools 19 Reports – Rainbow Map The Rainbow map is a representation of the value of a Channel at each point of a lap. The value of the Channel is displayed as a color gradient, with a legend beside the chart indicating the corresponding Channel value. The channel to be displayed can be selected from the list of logged channels. An example of a set of rainbow maps is illustrated below. 20 Analysis Tools Reports – Lap Map A lap map provides a lap by lap summary of vehicle performance, allowing visual determination of differences between laps in a session. Reports – Section Times The section time report displays a breakup of each lap into the time between section markers on the track. The fastest time is highlighted in green, while times within 2% of the fastest section time are highlighted in red. An eclectic lap is also generated, which predicts a theoretical fastest lap time based upon the quickest time in each lap section. If the section markers are not in the correct place they can be changed by selecting the ‘Modify Sections’ menu item from the ‘Main’ menu. MoTeC Analysis Tools 21 22 Analysis Tools Mixture Map The mixture map function allows the user to analyze exhaust gas mixture strengths, over a wide range of load and rpm, to properly establish the optimum mixture strength for all operating conditions. It does this by taking individual mixture readings and providing a trend averaging function with or without filtering for all load points. The load sites are automatically calculated based on the minimum and maximum loads logged during that session. For throttle-based engines this is typically zero to 100% of throttle position. For pressure-based engines, ie: turbo-charged or super-charged engines, this tends to be minimum manifold pressure to maximum manifold pressure with ten equal graduations within that range. The display can be as either separate graphs for each load point, or a combined graph showing all load points and trend lines together. This and other display options are selected under the ‘Preferences’ item of the ‘Main’ menu. MoTeC Analysis Tools 23 Mathematics Allows for manipulation of data via a number of different functions. The main ‘Define Math Functions’ window is divided into three sections: Default Math, Current File Math and User Constants. Default Math The Default Math functions are those that are applied to all files opened in Interpreter. Any calculations that should be applied to all log files can be defined in this screen. This includes things such as the Corrected Speed and Cumulative Distance calculations. Current File Math Current File Math defines those calculations that are performed on the file that is currently open. This is where functions are set up that refer specifically to the car as it was during the current logged session. When closing Interpreter or opening another file Interpreter will ask if you wish to save changes to the current file. If there have been additions or changes to the Current File Math, then saying ‘Yes’ will save these changes with the log data file. User Constants The User Constants are fixed values that can be used in Expression Evaluator calculations of either Default Math or Current File Math. After adding a user constant, click on ‘Save’ and then reopen Maths to use the constant in an expression. 24 Analysis Tools Defining a Math Function Select and highlight a blank line – they are numbered 1 through 60 - in either Default or Current File math and then click on the ‘Change’ button. This will bring up a window showing the different types of calculations available. Interpreter includes a range of pre-defined functions to simplify performing Math operations. For more complex calculations Interpreter includes the Expression Evaluator, where users can enter the expression or function that they wish to calculate. Whether using the Expression Evaluator or the pre-defined functions, it will be necessary to select one or more Source (input) channels. Clicking on the ‘Select’ button next to each source channel will bring up a list of all available channels, not just those in the currently logged file. After choosing the Source channel and selecting any other options, choose the result channel. Again, a list of all channels is displayed after clicking on the ‘Select’ button. Care should be taken to select a channel with appropriate units for the result. MoTeC Analysis Tools 25 Next, the type of measurement: voltage, temperature, pressure etc is selected, followed by the actual units for that measurement type. Click ‘OK’ to go back to the main math window. After setting up one or more math channels, click on ‘Save’ to close the Math window and the calculations will be performed. Be sure to Save calculations before moving between the three sections. Use the Math Status View to determine if the calculations have been performed successfully. Note: when using a negative number in an expression, the value must be bracketed so that the negation is not confused with another operator. Eg: SOURCE1 < (-1.5) is true if Source1 is less than –1.5 Details on the specific functions available are given in the Interpreter Help file. Math Status This display will show the results of math channel calculations. If they have been unsuccessful, then there will be a diagnostic message indicating why the math channel could not be calculated. 26 Analysis Tools Standard and Pro Logging The following Math functions are available with Standard logging: Distance, Filter, Scale/Offset and Bike corrected Lateral G. All other Math functions require the Pro Logging option. MoTeC Analysis Tools 27 Histogram To improve the efficiency of the tuning process a RPM histogram shows the relative time spent at any one rpm point so that tuning effort may be concentrated upon the areas where the engine spends the most time. The Histogram is defined by selecting the main channel for display. This is broken into ranges on the horizontal axis, with the vertical axis showing the amount of time spent in each range. The number of bins and their sizes can be entered manually. The vertical scaling can also be automatic, or manually set to allow easier comparison between different sessions. Up to 20 different Histogram Templates can be defined. They can be viewed as a chart, individual bar graph or stacked bar graph. The duration of the Histogram can be for a single lap or the entire logged session. Otherwise, by using the User Data Selection feature, the Histogram sample period can be selected from the graph screen. User Data Selection Enabling this option allows the user to link the Histogram and X-Y plot to a section of the data selected on the graph display. When the histogram 28 Analysis Tools template has been defined, this feature can be used to examine the behaviour of channels over a certain section of the data. To enable this function, select ‘Preferences’ from the File menu on the main Interpreter window and click on the Graph tab. The shows a section for User Data Selection with options to update XY Graph and Histogram. To update a histogram or XY graph with data from a section of the graph display, hold Alt+Shift, then double click and select an area. The duration of the Histogram data and/or X-Y graph will now be over the time period highlighted in the graph screen. Note: For this feature to work effectively it is recommended that Interpreter be run in a reduced size mode, ie: not maximised on the screen. This will make it easier to display multiple types of data: graph and histogram and/or track map. In the screen capture below the three windows displayed have been resized and positioned on the screen to make best use of the screen space. MoTeC Analysis Tools 29 Statistics The statistics screen shows a summary of the logged session, selectable by the logging type (Normal, Fastest, Burst, etc.). Along with occurrences of diagnostic errors and their duration and a summary of the Engine Logs, if these have been recorded by the Dash Logger. Up to four different sets of logging conditions can be defined for the Engine Logs. Also available is the Lap Report, which shows details of a list of channels on a lap by lap basis. The channels viewed can be selected by clicking on the ‘Preferences’ button. 30 Analysis Tools Virtual Dash You can re-drive any lap in real time with all logged channels available for viewing. This can be a useful tool for viewing the inter-relationships between data. As with the MoTeC Telemetry Monitor program, multiple views can be created from a choice of many different objects. The different types can be selected from the ‘Add’ menu, and the channel to be displayed assigned, along with other properties of the display object. The properties of an object can be changed by right clicking on it and then selecting ‘Properties’ from the menu. Once a view is created it can be saved or modified for re-use. The user can open multiple views and switch between them by clicking on the name tag. Each view can display a different set of information. At the bottom of the window is a slider bar indicating the position of the car in the current lap. The cursor can be positioned by using the mouse pointer to move the slider bar or by using the control buttons. The lap chosen can be replayed in real time, or at half or quarter speed by clicking on the green buttons at the bottom of the display. MoTeC Analysis Tools 31 XY Graph The XY Graph generates a scatter plot that allows for comparison of any parameter against any other parameter. It is possible to select data that falls within defined values to further refine the analysis. The colour of the graph can be displayed in terms of a selected parameter. In the example below RPM is shown against Road Speed with the color of the trace being the gear selected. As with the Histogram, the time period of the X-Y Graph can be for a single lap or the entire logged session. Otherwise, by using the User Data Selection feature, the sample period can be selected from the graph screen. See the Histogram section above, for details. Up to 20 different X-Y Graph templates can be defined. MoTeC Appendices Appendix 1 Graph Hot Keys Cursor Mouse Action Function Left click on graph Reposition cursor to mouse position Left drag on graph Move cursor to mouse position Keyboard Action Function A Animate cursor Left or right arrow Move cursor left or right (small) Ctrl left or right arrow Move cursor left or right (large) Home Move cursor to start of window End Move cursor to end of window Components Keyboard Action Function C Cross hairs show/hide E Error & Status details show/hide L Graph label show/hide O Font size small/large S Lap Section markers show/hide T Track map show/hide V Values box show/hide 33 34 Appendices Zoom Mouse Action Function Double Click - Move - Left Click Zoom In (horizontal) Alt & Double Click - Move - Left Click Zoom In (vertical) Shift & Double Click - Move - Left Click Show zoom area statistics Ctrl & Double Click - Move - Left Click 2D zoom (vertical scale holds only for one zoom) Shift & Alt & Double Click - Move – Left Click Optional update of Histogram and X-Y Plot with data from zoomed area Keyboard Action Function Up arrow Zoom In Down arrow Zoom Out R Refocus to last zoom F2 Expand to full session W Expand to full current lap N Jump to same zoom on next lap P Jump to same zoom on previous lap F Jog zoom area forwards B Jog zoom area backwards MoTeC Appendices General Mouse Action Function Right click on parameter label Show popup menu (this parameter only) Right click elsewhere Show popup menu (general) Keyboard Action Function F3 Toggle overlay variance between none, instantaneous and cumulative F4 Hide/Show overlay Shift+F4 Select Overlay Files and Laps F5 Edit Templates F7 Select Template F8 Select Lap F9 Toggle X axis - Time or distance F11 Select Previous Template F12 Select Next Template 1 - 10 Select Templates 1 to 10 Shift + (1 – 10) Select Templates 11 to 20 Ctrl + (1 – 10) Select Templates 21 to 30 G Toggle graph format - single or multiple 35