1
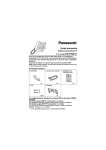
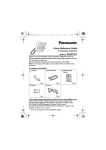
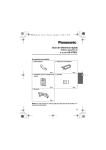
HAPI
User Manual v3.0
ADTEC Communications
__________
HAPI User Manual 3.doc
HAPI
_______________
Page 1
ADTEC Communications
HAPI
Table of Contents
INTRODUCTION ................................................................................3
CONTENTS ........................................................................................3
INSTALLATION .................................................................................4
HAPI SWITCH SETTINGS.................................................................5
CALL SCENARIOS............................................................................6
CALLING SEQUENCE FOR HAPI .........................................................6
USING DIGITAL TELEPHONE HANDSET WITH HAPI ...............................6
TERMINATING A CALL ........................................................................6
APPENDIX A......................................................................................7
SETUP PROCEDURE ..........................................................................7
NOISES ............................................................................................8
INCREASING SPEAKER VOLUME ..........................................................9
STEPS TO INCREASE THE SPEAKER VOLUME ......................................9
INCREASING MICROPHONE VOLUMES...............................................10
STEPS TO INCREASE THE MICROPHONE LEVELS ...............................11
CONTACT DETAILS........................................................................12
NOTES .............................................................................................13
APPENDIX B....................................................................................15
(TX)TRANSMIT SWITCH NUMBERS 1–5 ............................................15
(RX)RECEIVE SWITCH NUMBERS 6-10 ............................................15
__________
HAPI User Manual 3.doc
_______________
Page 2
ADTEC Communications
HAPI
Introduction
The HAPI (Hybrid Adaptor Telephone Interface) is a cost-effective
device allowing the connection of analogue conference telephones to
any digital telephone or key-telephone (such as a Commander).
HAPI gives portability of conference telephones that dedicated
analogue extensions do not, and allows the user to access the
benefits of digital telephones or key-telephones.
Contents
The following items are included with HAPI:
•
•
•
HAPI unit
18V DC Plug Pack
Interconnection cable.
Interconnection cable
ADTEC
18V DC plug pack
Power
supply
18
Volts
HAPI Unit
__________
HAPI User Manual 3.doc
_______________
Page 3
ADTEC Communications
HAPI
Installation
Steps used to connect and install HAPI.
1. Unplug handset connector from base of telephone.
2. Connect interconnection cable supplied between
HAPI socket, and handset socket on base of digital telephone.
3. Connect original handset cord to
socket on HAPI.
4. Connect conference telephone to
socket on HAPI.
5. Connect 18V DC plug pack to DC input socket on HAPI.
Step 3
Step 2
Interconnection cable
Handset
DC
Telephone
Analogue
To power
Step 4
Step 5
__________
HAPI User Manual 3.doc
_______________
Page 4
ADTEC Communications
HAPI
HAPI Switch settings
(Also See Appendix A & B.)
Telephone System
AT&T 74xx Series
AT&T 79
Commander BN
Commander E
Commander HX
Commander NT321
Ericsson
Hyundia
HKP-816
Interquartz
Nortel Meridian
Nortel NT Meridian
Nortel GDK
NEC 2400
Telecom T200
Switches on
3 & 6 ON
“
1,2,3,4 & 7 ON
3, 4, 8, & 9 ON
5 & 9 or 5 & 10 ON
3 & 8 ON
4 & 8 ON
4 & 8 ON
Cord type
Normal
Reverse
Normal
Reverse
Normal
Normal
Normal
Normal
1, 2 & 8 ON
3 & 8 ON
1, 2 & 7
3 & 8 ON
1, 2 & 8 ON
3, 9 ON
Normal
3-wire
Normal
Normal
Normal
Reversal
If your switch setting does not appear in this list, see appendix A & B
for setting up your HAPI.
__________
HAPI User Manual 3.doc
_______________
Page 5
ADTEC Communications
HAPI
Call Scenarios
Calling sequence for HAPI
1. Remove digital telephone handset, select line and dial desired
number(s)
2. When call(s) successful, press ‘off-hook’ button on conference
phone and place digital handset on table.
3. Use conference phone as normal.
4. When call is finished, press ‘on-hook’ button on the conference
phone, and hang up digital handset.
Note: Do not hang up digital handset until call has ended.
Using digital telephone handset with HAPI
When HAPI is connected following installation procedures on page 4,
digital telephone handset will be switched off when conference
telephone is ‘off hook’. To use handset, simply press the ‘on-hook’
button on conference telephone.
Call may be switched from conference telephone to handset while in
progress.
Terminating a call
To terminate a call, digital telephone handset must be replaced on
telephone.
Please note: pressing ‘on hook’ button of conference telephone will
not terminate a call.
__________
HAPI User Manual 3.doc
_______________
Page 6
ADTEC Communications
HAPI
Appendix A
Setup Procedure
1. Confirm HAPI has been
procedures on page 4.
installed
following
Installation
2. Check HAPI switch settings list. If your telephone type occurs
here, use these settings for HAPI; otherwise go to step 3.
3. Ensure that switches 5 and 10 are in the ON position and all
others are OFF.
4. Press conference telephone’s ‘off-hook’ button and remove
handset from digital telephone base. (If unusual noises are
heard see ‘Noises’ on page 8.)
5. Usual PABX dial tone should be heard on conference telephone
(let telephone adjust for about 5 seconds. If tone sounds low,
ring another telephone or use on-hold music. Ensure this call
has been made externally, then see Increasing speaker volumes
page 9.
6. Once step 5 has been completed successfully, make a call to
another person. If they cannot hear you, speak on handset of
digital telephone by placing conference telephone on hook.
Then follow procedures in Increasing Microphone volume on
page 10.
7. The levels should now be set. If you have any further problem
please contact your supplier.
__________
HAPI User Manual 3.doc
_______________
Page 7
ADTEC Communications
HAPI
Noises
Noises such as buzzing and howling are due to incorrect level
adjustments. Lowering the signal levels of HAPI should rectify this
problem.
If step 2 of setting procedure has been correctly carried out, switches
should be the same as the diagram below.
ON
1
2
3
4
5
6
7
8
9 10
ON OFF
Starting from switch 9 set switches to ON position in descending
order. When noise ceases, return to setting procedure step 4.
If noise persists after all switches are ON then contact supplier.
ON
1
2
3
4
__________
HAPI User Manual 3.doc
5
6
7
8
9 10
_______________
Page 8
ADTEC Communications
HAPI
Increasing speaker volume
Switches 6 to 10 control volume of speaker. Switches 6 to 10 turned
ON is the lowest speaker level. Switch 6 ON only is the highest
speaker level.
(Original switch configuration)
ON
1
2
3
4
5
6
7
8
9 10
ON
OFF
Speaker controls
To obtain an approximate speaker volume (while listening to music
on hold or similar), do the following.
Steps to Increase the Speaker Volume
1. Turn ON switches in descending order one at a time, leaving 5second gap between each change. Do this until preferred
speaker volume is reached, then return to Setting procedure step
6.
If unusual noises are heard, follow the procedures in next step.
ON
1
2
3
4
5
6
7
8
9 10
Eg. 9 ON 10 OFF
2. Turn ON switches in descending order starting from currently set
switch until noise ceases.
Do this until speaker stops making unusual noise, then return to
Setting procedure step 6.
__________
HAPI User Manual 3.doc
_______________
Page 9
ADTEC Communications
HAPI
If noise does not cease, set switches in previously working
position, then return to Setting procedure step 6.
ON
1
2
3
4
5
6
7
8
9 10
Eg. Turn switch 7 ON whilst leaving 8 ON
Increasing Microphone Volumes
With person called still connected, adjust microphone switches until
they hear you clearly using the following steps. Switches 1 to 5
turned ON is the lowest microphone volume. Switch 1 ON only is the
highest microphone level.
(Original switch configuration)
ON
1
2
3
4
5
6
7
8
9 10
ON
OFF
Microphone controls
__________
HAPI User Manual 3.doc
_______________
Page 10
ADTEC Communications
HAPI
Steps to Increase the Microphone Levels
1. Turn ON switches in descending order one at a time, leaving 5second gap between each change.
Do this until microphone levels are OK, then return to Setting
procedure step 7.
If unusual noises are heard, proceed to the next step.
ON
1
2
3
4
5
6
7
8
9 10
Eg switch 4 ON 5 OFF
2. Turn ON switches in descending order starting from currently set
switch until noise ceases.
Do this until speaker stops making unusual noise, then return to
Setting procedure step 7.
If noise does not cease set switches in previously working
position, then return to Setting procedure step 7.
ON
1
2
3
4
5
6
7
8
9 10
Eg. Switch 2 ON whilst leaving 3 ON
__________
HAPI User Manual 3.doc
_______________
Page 11
ADTEC Communications
HAPI
Contact Details
Head Office
Suite 16, 89-97 Jones St
Ultimo NSW 2007
Sydney, AUSTRALIA
Tel: +61 2 9281 0444
Fax: +61 2 9281 7575
E-mail: [email protected]
Melbourne Sales & Support Office
Suite 405, 343 Little Collins St
Melbourne VIC 3000
AUSTRALIA
Tel: +61 3 9670 2333
Fax: +61 3 9642 0653
E-mail: [email protected]
USA Sales & Support Office
16832 49th Ave. PL. N.
Plymouth, MN 55446
Tel: 877-827-2820
Fax: 763-383-0569
E-mail: [email protected]
Web Site: http://www.adtec.com.au
__________
HAPI User Manual 3.doc
_______________
Page 12
ADTEC Communications
HAPI
Notes
This page is intentionally left blank.
__________
HAPI User Manual 3.doc
_______________
Page 13
ADTEC Communications
HAPI
This page is intentionally left blank.
__________
HAPI User Manual 3.doc
_______________
Page 14
ADTEC Communications
HAPI
Appendix B
HAPI Level Adjustments decreasing in steps from 1 to 31.
(TX)Transmit Switch Numbers 1–5
Level
1
2
3
4
5
Setting
#
1
1
0
0
0
0
2
0
1
0
0
0
3
1
1
0
0
0
4
0
0
1
0
0
5
1
0
1
0
0
6
0
1
1
0
0
7
1
1
1
0
0
8
0
0
0
1
0
9
1
0
0
1
0
10
0
1
0
1
0
11
1
1
0
1
0
12
0
0
1
1
0
13
1
0
1
1
0
14
0
1
1
1
0
15
1
1
1
1
0
16
0
0
0
0
1
17
1
0
0
0
1
18
0
1
0
0
1
19
1
1
0
0
1
20
0
0
1
0
1
21
1
0
1
0
1
22
0
1
1
0
1
23
1
1
1
0
1
24
0
0
0
1
1
25
1
0
0
1
1
26
0
1
0
1
1
27
1
1
0
1
1
28
0
0
1
1
1
29
1
0
1
1
1
30
0
1
1
1
1
31
1
1
1
1
1
__________
HAPI User Manual 3.doc
(RX)Receive Switch Numbers 6-10
Level
6
7
8
9 10
Setting
#
1
1
0
0
0
0
2
0
1
0
0
0
3
1
1
0
0
0
4
0
0
1
0
0
5
1
0
1
0
0
6
0
1
1
0
0
7
1
1
1
0
0
8
0
0
0
1
0
9
1
0
0
1
0
10
0
1
0
1
0
11
1
1
0
1
0
12
0
0
1
1
0
13
1
0
1
1
0
14
0
1
1
1
0
15
1
1
1
1
0
16
0
0
0
0
1
17
1
0
0
0
1
18
0
1
0
0
1
19
1
1
0
0
1
20
0
0
1
0
1
21
1
0
1
0
1
22
0
1
1
0
1
23
1
1
1
0
1
24
0
0
0
1
1
25
1
0
0
1
1
26
0
1
0
1
1
27
1
1
0
1
1
28
0
0
1
1
1
29
1
0
1
1
1
30
0
1
1
1
1
31
1
1
1
1
1
_______________
Page 15