1
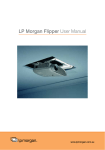
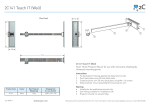
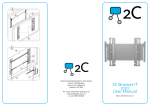
LP Morgan
Scope Anamorphic Lens user manual
www.lpmorgan.com.au
LP Morgan Anamorphic Lens Installation Instructions
To the owner
Congratulations on purchasing an LP Morgan Scope Anamorphic Lens.
Please take a moment to review this manual, as it will ensure you many years
of trouble-free service from your new Scope Anamorphic Lens.
1 | LP Morgan user manual
LP Morgan Anamorphic Lens Installation Instructions
Please read this instruction manual before installing
Please note: Take extra care when handling the lens so as not to mark the
surface, these lenses have optical coatings and are sensitive to natural oils
and other dirt on fingers and hands, which can be detrimental to the lens’
performance. Only clean with an optical lens cloth/ lint free lens wipe. The
optical coatings are fully inspected before despatch, and warranty does not
cover installation-damage due to lack of care taken.
LP Morgan Scope Anamorphic Lens Features
• Professionally designed low dispersion ground glass optical elements.
• Broadband anti-reflective coatings for 94% plus light transmission efficiency.
• Projector throw ratio compatibility: 1.4 plus.
• 1.33 x horizontal expansion factor for Constant Image Height viewing.
• Compatible with 2.35:1 up to 2.40:1 aspect ratio screens, although
geometry is optimised for 2.37:1.
LP Morgan user manual | 2
LP Morgan Anamorphic Lens Installation Instructions
After unpacking the LPM Morgan Anamorphic Lens please make sure that
you have the complete kit and accessories if applicable.
Note: If you also bought a Skyhook please follow the “Skyhook Instruction
Manual” for instruction on “Mounting the Skyhook”
Fixed Lens for Direct to Ceiling.
This is achieved by mounting the lens-hanger securely and as close as
possible to the projectors lens, into a suitable structure in ceiling and if
required, using the extension arms to lower the lens into position. You can
then adjust the lens angle and the projector accordingly.
Note: On board scaling within projector is required to watch 16:9 and
Lens slider is optional.
extension arms
Fixed mount showing extension arms
3 | LP Morgan user manual
LP Morgan Anamorphic Lens Installation Instructions
Fixed for Drop Pole Install.
This method is used where projector is on a stem or projector bracket with
a 300mm-plus drop.
• The plate is fitted directly to the Skyhook projector bracket, through the
main centre-bolt, above the projector and the lens hanger then attaches
to it.
• Attach the lens last, and make fine adjustments to achieve the desired
image size.
• If the lens-slide is being used, it’s simply attached to the front of the
plate, and lens hanger then attaches to it.
Note: We recommend using the Skyhook HD or ‘HEAVY DUTY’
accessory kit, as it is engineer rated to 35kg.
Mounting Plate
Mounting-plate method - no lens-slide.
LP Morgan user manual | 4
LP Morgan Anamorphic Lens Installation Instructions
Mounting Instructions:
Please be sure to check that the projector mount is secured well enough to
hold the extra weight of lens and plate
Step 1. Mount the LP Morgan Skyhook arms to the projector as per
normal method, leaving the centre-bolt loose.
Step 2. Slide mounting plate onto the bracket at the centre-bolt, leaving
Skyhook ‘hook’ at top of plate.
Note: The mounting plate can be used either way /upside down for
broader adjustment flexibility wherever required.
Skyhook arms
Mounting Plate
Step 3.Work out the best position for the bracket and projector so that
the anamorphic lens is positioned as close as possible to the
projector’s lens, and tighten the centre-bolt.
Step 4.If using the Lens Slide, mount it to the mounting plate.
Step 5.Mount the projector back onto the Skyhook, making sure to fully
tighten all the bolts and then attach the lens.
Step 6.Make final adjustments and sit back and take a moment to enjoy
the CineTheatre experience.
5 | LP Morgan user manual
LP Morgan Anamorphic Lens Installation Instructions
Installation of fixed for Direct to Ceiling
If installation is ‘fixed –position’ type, and mounting height is an issue, you
will need to use the supplied extension arms by attaching them the bracket
‘hanger’ arms.
extension arms
Lens
Step 1.For obvious reasons, the responsibility is on the installer to use
suitable mounting hardware, and to make sure there is sufficient
structure above ceiling to attach/mount the hanger into.
Step 2.Measure / mark off position of hanger on ceiling, making sure lens
will be situated as closely as possible to the projectors lens.
Step 3.Use supplied extension arms to achieve desired height position,
and some minor tilt if necessary.
Step 4.Make final projector adjustments, sit back and enjoy the
CineTheatre experience.
LP Morgan user manual | 6
LP Morgan Anamorphic Lens Installation Instructions
Astigmatism Correction Element
Note: This optical glass element is designed as an upgrade to the
standard lens, where astigmatism is noticeable and correction is
required.
Manufactured and designed to help where required to offset the projectors
inability to focus sharply across the entire screen, when using an add-on
anamorphic lens. This can be common with short –throw projectors used in
home theatres.
Installation instructions, assuming lens already installed:
1.Carefully and with clean hands, remove the LP Morgan Scope Lens
from the mounting bracket, and place on a suitable clean and clear
work area.
2.Undo the two silver case cover cap-screws that contain the rear prism,
using an 8mm socket or a suitable spanner.
3.Carefully unwrap and place the Astigmatism Correction Element into
the casing. Nb. Try to only handle the optical glass element by the
edges.
4.Replace the case cover and tighten the 8mm cap-screws
5.Check for fingerprints and wipe only with a lens wipe or lint free lenscloth.
6.Re-install lens and make the necessary adjustments to the projectors
alignment.
7.You will notice a marked and noticeable improvement in the focus of
text and images, mostly at the corners of the image area.
7 | LP Morgan user manual
LP Morgan Anamorphic Lens Installation Instructions
QUICK SETUP GUIDE:
How to adjust your element to achieve the sharpest picture.
Step 1. Place the element in the rear of the lens.
Step 2. Turn Projector ON and display a test pattern
Step 3. Adjust your Projector’s focus and note the degree of sharpness
onscreen. Flip the element 180° (Front to Back).
SIDE B
FLIP 180°
SIDE
SIDE
A
A
Step 4. Note which orientation gave the best results.
Step 5. Rotate the Element 90° in one direction.
ROTATE 90°
Step 6. Adjust your Projector’s focus and note the degree of sharpness.
Step 7. Note which orientation gave the best results - This is the Final orientation of the element.
Step 8 Mount the Element in the Rear of the Lens.
Step 9. You’re Done! Enjoy your upgrade.
8 | LP Morgan user manual
LP Morgan Anamorphic Lens Installation Instructions
Warranty Information
Please fill out the online warranty form, or the warranty card included with the product
and post it back to Herma at the reply paid address on the back cover.
The warranty covers defects in workmanship and materials, provided this product
has been installed in a normal environment and maintained according to the written
instructions. Herma warrants the product against loss of usefulness, discolouration or
deterioration of optical quality within the warranty period as a result of manufacturing or
material defects. This warranty applies only within Australia.
Conditions
All costs related to installation and re-installation of the Herma equipment covered by
this warranty are not the responsibility of Herma Technologies.
Herma will not be responsible for any consequential damages or costs resulting from,
during or following installation procedures.
Herma will repair or replace, with the least possible delay, any defective equipment. Any
equipment replaced pursuant to the terms of this warranty shall be retained by Herma.
The user is responsible for any freight costs relating to repair or replacement.
The Product must be returned to Herma in suitable packing to prevent damage in
transit. Herma will not accept any responsibility for damage to the equipment caused
by inadequate or unsuitable packing, or for any damage howsoever caused whilst the
goods are in transit.
Herma Technologies shall not be liable for any injury, loss or damage, direct or
consequential, arising out of the use of, misuse of, or inability to use, the equipment.
The warranty does not cover any equipment, which has been subjected to misuse,
abuse, neglect, accident or intentional damage, improper voltage or any alteration
which affects the reliability or performance of the equipment not attributable to faulty
manufacture, parts or labour and without limiting the generality of the foregoing.
This warranty does not cover any equipment where usage, adaptation or
installation (including wiring of electrical connections) are not in accordance with
our written installation and operating instructions.
Warranty Period: 1 year from date of installation, not to exceed 15 months from date of invoice.
Visit www.lpmorgan.com.au/pgs/products/warranty.html for other info
Information in this document is subject to change without notice.
© Herma Technologies. All rights reserved.
This document is protected against unauthorised copying electronic or otherwise.
Trademarks used in this text: Herma, the Herma Logo,,LP Morgan and LP
Morgan logo are registered trademarks of Herma Technologies.
Other trademarks and trade names used in this document remain the property
of the relevant owners.
9 | LP Morgan user manual
LP Morgan Anamorphic Lens Installation Instructions
BLANK PAGE
LP Morgan user manual | 10
Your LP Morgan Retailer is able to provide
more information on our products.
Or visit www.lpmorgan.com.au
Factory 4a, 6 Albert Street Preston Vic 3072
Phone: +61 3 9480 6233 Fax: +61 3 9480 6533
Email: [email protected] www.lpmorgan.com.au
May 2010 v1.0