1
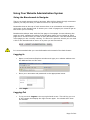
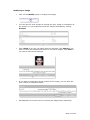
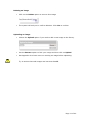
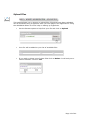
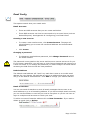
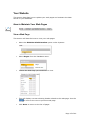
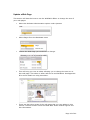
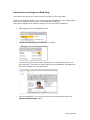
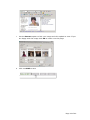
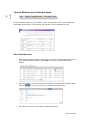
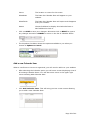
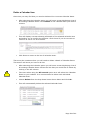
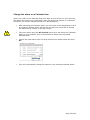
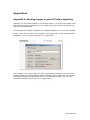
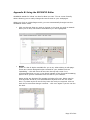
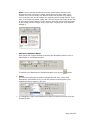
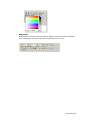
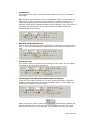
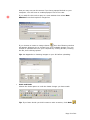
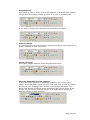
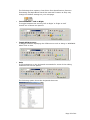
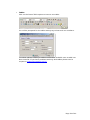
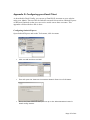
Vibrant Concepts Website Administration System User Manual Version 1.4 15th Aug 2007 Page 1 of 40 Table of Contents Introduction ............................................................................................. 3 Glossary ................................................................................................... 4 Using Your Website Administration System ............................................. 5 Using the Breadcrumb to Navigate.............................................................. 5 Logging In ............................................................................................... 5 Logging Out ............................................................................................. 5 Hints and Tips .......................................................................................... 6 Additional Features .................................................................................. 7 Website Statistics ..................................................................................... 7 Image Library .......................................................................................... 9 Upload Files ........................................................................................... 12 Email Config .......................................................................................... 13 View Site............................................................................................... 14 Your Website.......................................................................................... 15 How to Maintain Your Web Pages.............................................................. 15 View a Web Page ................................................................................ 15 Update a Web Page............................................................................. 16 How to Insert an Image on a Web Page................................................. 18 How to Maintain your Calendar Items........................................................ 20 View Calendar Item ........................................................................... 20 Change the details on a Calendar Item.................................................. 21 Add a new Calendar Item .................................................................... 22 Delete a Calendar Item ....................................................................... 24 Change the status on a Calendar Item .................................................. 25 Appendices............................................................................................. 26 Appendix A: Resizing images on your PC before uploading........................... 26 Appendix B: Using the WYSIWYG Editor .................................................... 27 Appendix C: Frequently Asked Questions ................................................... 35 Appendix D: Configuring your Email Client................................................. 37 Page 2 of 40 Introduction This Manual will guide you through the tools available in your Website Administration system. This system gives you the flexibility to easily change your website and to use information stored in your website database effectively. How to use this Manual This manual has not been designed to be read from start to finish. We have designed it as a step-by-step guide showing you how to use each of your administration features. Use the bookmarks we have supplied to find the instructions you require. Below are some symbols that you should watch out for in this manual. This will be used to highlight important information or to point out something unusual that you should be aware of. Caution – this is an important note. This will show you the breadcrumb or location of the function being described. See ‘Using the Breadcrumb to Navigate’ for more information Page 3 of 40 Glossary Admin Website Administration System Breadcrumb At the top of each screen there is an orientation and navigation aid known as the breadcrumb. It shows you a 'trail' of pages you have visited to get to the screen you're viewing. Encrypted Encrypted is when text has been converted into a non-readable format for security reasons .jpg A graphics file format which can compress graphics to a fraction of their size Hyperlink Text that a user clicks to take them to another document. A hyperlink could take the user to another page in your site, another website or an uploaded file for them to download. IP Address A unique string of numbers that identifies a computer on the internet eg 123.123.23.2 Page 4 of 40 Using Your Website Administration System Using the Breadcrumb to Navigate. There is a simple process used to navigate. After drilling down through numerous options you may find that you want to return to a previous page. Remember that at the top of each screen there is an orientation and navigation aid known as the breadcrumb. It shows you a 'trail' of pages you visited to get to the screen you're viewing. Breadcrumbs always start with the first page or homepage. Arrows showing the path you took, separate the titles of the following pages you've looked at. Each page title is a link to take you back to that particular screen. The last breadcrumb is the page you are currently viewing. To return to a previous screen you can click a link in the breadcrumb to return to a point you were at earlier. It is recommended that you use the Breadcrumb instead of the back button. Logging In Open a new Internet Explorer window and type your website address into the Address Bar and hit enter. Enter your username and password in the appropriate boxes. Click Login. Logging Out To log out click Logout in the top right hand corner. This will log you out of the system and display the login screen again. You should then close the window. Page 5 of 40 Hints and Tips Do not leave your computer when logged in, as you never know who will access it. Try to avoid using the back button by using the Breadcrumb instead. Have two Internet Explorer windows open. Use one to make changes in your administration area and one to display your website. Remember to click refresh in the website window after making an update. If something goes wrong or an error message display is displayed, try logging out and logging in again. Note: if it persists you might have to close down the window and try again. If the problem still occurs phone or email support. If there is something you don’t understand, phone or email support. If you are making changes using the WYSIWYG Editor and it just doesn’t look right, get it to the best you can (with all information there) then email [email protected] requesting our support team to help you. Page 6 of 40 Additional Features This section describes the features available in the menu found in the upper right corner of your screen when using your Web Administration system. Note: this menu will only be available when you are at the following location. Website Statistics Here you can view statistics about visitors to your website for example the number of people visiting, their browser type and how long they stayed for. Choose the month and year required by selecting it in the drop down box. There are four graphs displayed on this screen. The first graph is called Monthly History. This will show monthly totals for the year selected above (irrelevant of month selected). The next graph is called Days of Month (current month) and this will show totals for each day in the selected month. The next graph is called Days of week (current month) and will show totals broken down by the seven days of the week. The last graph shows a breakdown of the visit duration or how long each visitor spent on your website. Unique Visitor A unique visitor is an IP address that has made at least one hit on one page of your web site during the current period shown by the report. If this IP address makes several visits during this period, it is counted only once. Number of Visits The number of visits to your website made by all visitors. If a unique IP address accesses a page and then requests three other pages within an hour, all of the "pages" are included in the number of visits. Therefore you should expect multiple pages per visit and multiple visits per unique visitor Page 7 of 40 (assuming that some of the unique IPs are logged with more than an hour between requests) Pages The number of pages that have been visited. A user could go to your site once but view 10 pages. 10 pages will be logged here. Hits The number of objects downloaded from your website eg. a page, an image, a document. The number of hits may be used to promote your website eg. “Our website has over 10,000 hits a week!” but does not really reflect a true picture of your website’s usage. In the example above (10,000 hits) there may only have been 50 visitors and 20 Unique visitors. Bandwidth The total number of bytes downloaded by web browsing. These could be pages, images, .pdfs etc. The figures you see in the above graphs can be very useful in understanding your website’s usage. To work out how many people are actually viewing your website, use the unique visitor figures. To view how often people are using it, use the number of visits. Page 8 of 40 Image Library The Image Library is where you manage the images available to you on your website. These images can be used in the WYSWIYG editor when updating a web page. (See Appendix B) Click in the Image Library option in the Menu. This will bring you into a window displaying all your existing images. Copy/Renaming an image Click on the Copy/Rename option. This will give you the option of renaming the image or making a copy. Click OK when complete Page 9 of 40 Modifying an image Click on the Modify option to change this image. You can use this next window to change the size, shape or orientation of the image. You can experiment with the options available by clicking Preview. Click <Back if you are not happy with the changes. Click Cancel if you wish to cancel all changes and return to the list of images. Click Save if you wish to save these changes. If you want to keep the original version of this image, you can save the new version as a different name. See Appendix A to learn more on resizing an image before uploading Page 10 of 40 Deleting an image Click on the Delete option to remove this image The system will ask you to confirm deletion. Click Yes to confirm. Uploading an image Choose the Upload option if you wish to add a new image to the library. Use the Browse option to find your image and then click on Upload. See Appendix A to learn more on resizing an image before uploading. Try to ensure that web images are less than 200KB. Page 11 of 40 Upload Files This option allows you to import or upload files. Files that have been uploaded can be accessed using a hyperlink from you web pages. See Appendix B: Using the WYSIWYG Editor for more help on setting up hyperlinks. Use the Browse option to help find your file and click on Upload Your file will be added to your list of available files If you wish to delete one of these files click on Delete. It will ask you to confirm deletion. Click on Yes. Page 12 of 40 Email Config This option controls how your emails work. Email Accounts These are POP accounts that you can create and delete. These POP accounts can then be connected to by an email client (such as Outlook Express). See Appendix D: Configuring your Email Client Creating a new account To create a new email account, click Create Account. The page will reload allowing you to enter the new Email Address and its associated Password. Click Create. Changing a password To change an email address password, click Change Password next to the email address. The password is encrypted on the server and hence we cannot retrieve it for you. If you forget a password, you will have to click Change Password and change it to a new one. Note: if you change the password you must configure all email clients accessing the POP account with the new password. Default Address The default email address will "catch" any mail that is sent to an invalid email address for your domain. All mail that is sent to an address that does not exist will go to the default email address. Click Edit to change your default address Email Forwarders You can use email forwarders to send all email messages that are sent to an email address to go to a forwarding address. If you have multiple email accounts, you can use forwarders to send all your mail to one place so you do not have to login to multiple email accounts to check your mail. To add a new email forwarder address click on New Forwarder. If you wish to delete an email click on Delete. Page 13 of 40 View Site This option will launch your web site in a new window. Page 14 of 40 Your Website This section describes how to update your web pages and maintain the data stored on your database. How to Maintain Your Web Pages View a Web Page This section will describe how to view your web pages. Select the Website Administration option under Systems Select Pages from the Database menu. Choose the Web Page you would like to view. This will display a screen showing details related to this web page. Use the to move to the next or previous web page Click Done to return to the list of pages Page 15 of 40 Update a Web Page This section will describe how to use the WYSIWYG Editor to change the text of your web pages. Select the Website Administration option under Systems Select Pages from the Database menu Choose the Web Page you would like to change. This will bring you into an editor allowing you to change the text etc on this web page. This editor is often referred to as WYSIWYG. See Appendix B for more details on using this editor. There are also other areas of the web page that you can update in this section. These are often known as Meta data. Some search engines use this information. Page 16 of 40 You can change the keywords or description and click on SAVE to save. Otherwise click on RESET to ignore any changes entered or CANCEL to return to the list of web pages. Page 17 of 40 How to Insert an Image on a Web Page This section will show you how to insert an image on your web page. First ensure that the image is the correct size and available on your image library. Refer to the Image Library section under Additional Features. Also refer to Appendix A: Resizing images on your PC before uploading. Select Pages from the Database menu Choose the Web Page you would like to change. This will bring you into an editor allowing you to change the text etc on this web page. This editor is often referred to as WYSIWYG. See Appendix B for more details on using this editor. Click on the position you would like to insert the image and select the Insert/Modify Image option Page 18 of 40 Use the Browse option to find your image and click upload to view. If you are happy with the image click OK to insert it on this page. Click on SAVE to save Page 19 of 40 How to Maintain your Calendar Items On the Calendar page of your website, there is a dynamic list of your scheduled workshops and courses. This section will explain how to maintain this list. View Calendar Item After selecting the Calendar option you will see a screen displaying a list of all existing Calendar Items. Click View to see the full Calendar Item’s details This will display a screen showing all details of the selected Calendar Item. Use the to move to the next or previous calendar item. Click Done to return to the table of Calendar Items. Page 20 of 40 Change the details on a Calendar Item After Creating a new Calendar Item, you may find that the details have changed eg the date or time. You will need to edit the Calendar Item so that these new details can be shown on your web site. After selecting the Calendar option you will see a screen displaying a list of all existing Calendar Items. Click EDIT on the Calendar Item required. This will bring you into a new screen allowing you to change the Calendar Item’s details. Here is a brief description of what each field should contain. Date The Date the Event is happening Start Time The Event Start Time End Time The Event End Time Event Name A Short description of the Event Description This will show the full details for the Calendar Item. When you click anywhere in the Description you will be brought into an editor. This editor is often referred to as WYSIWYG. See Appendix B for more details on using the WYSIWYG editor to format this text. Cost The Price for this event. Page 21 of 40 Venue The location or venue for this event. ShowStart The Date the Calendar Item will appear on your website. ShowFinish The Date the Calendar Item will expire and disappear from your website. Status Choose Published to display this Calendar Item or Not Published to hide it. Click on SAVE to save your changes. Otherwise click on RESET to ignore any changes entered or CANCEL to return to the list of Calendar Items. The dropdown list below shows the options available to you when you choose to Update or Cancel Add a new Calendar Item When a new Event or Course is organised, you will need to add it to your website. After selecting the Calendar option you will see a screen displaying a list of all existing Calendar Items. You will also see a menu in the upper right corner showing Add Calendar Item. Click Add Calendar Item. This will bring you into a new screen allowing you to add a new Calendar Item. Page 22 of 40 Here is a brief description of what each field should contain. Date The Date the Event is happening Start Time The Event Start Time End Time The Event End Time Event Name A Short description of the Event Description This will show the full details for the Calendar Item. When you click anywhere in the Description you will be brought into an editor. This editor is often referred to as WYSIWYG. See Appendix B for more details on using the WYSIWYG editor to format this text. Cost The Price for this event. Venue The location or venue for this event. ShowStart The Date the Calendar Item will appear on your website. ShowFinish The Date the Calendar Item will expire and disappear from your website. Status Choose Published to display this Calendar Item or Not Published to hide it. Click on SAVE to save your changes. Otherwise click on RESET to ignore any changes entered or CANCEL to return to the list of Calendar Items. The dropdown list below shows the options available to you when you choose to Update or Cancel Page 23 of 40 Delete a Calendar Item Over time you may find that you need to delete old or incorrect Calendar Items. After selecting the Calendar option you will see a screen displaying a list of all existing Calendar Items. Click Delete on the Calendar Item you wish to remove. This will display a screen showing all details of the selected calendar item and asking you to confirm the deletion. Click Cancel if you do not wish to continue or Yes if it is ok to delete. Click Done to return to the list of calendar items. There may be occasions when you will need to delete a batch of Calendar Items. This section will show you how to do this. After selecting the Calendar option you will see a screen displaying a list of all existing Calendar Items. Select the line that you would like to delete by clicking in the left column. Take care when using the All records option as it will select ALL Calendar Items on your website. It is recommended to select each individual Calendar Item. Choose Delete from the drop down list as shown below and Click Go. This will automatically delete the selected Calendar Item. Page 24 of 40 Change the status on a Calendar Item When you create a new Calendar Item and want it to be shown on your web site, the status should be set to ‘Published’. After the Event has passed or it has been cancelled, you should change the status to ‘Not Published’. After selecting the Calendar option you will see a screen displaying a list of all existing Calendar Items. Select the line that you would like to change the status on by clicking in the left column. Take care when using the All records option as it will select ALL Calendar Items on your website. It is recommended to select each individual Calendar Item. Choose the new status from the drop down list as shown below and Click Go. This will automatically change the status on the selected Calendar Items. Page 25 of 40 Appendices Appendix A: Resizing images on your PC before uploading Although you can resize images in the Image Library, you need to get them there first! When importing images into your image library you should not upload any that are more than 1MB. As a general rule, images displayed on a website should be no more than 200KB. Firstly, check the file size of the image by right clicking of the file and viewing its properties. If it is a photo it should be in .jpg format. If the image is very large open it in a file manipulation program. You could use Adobe Photoshop, Microsoft Office Picture Manager, Paint, Irfanview, etc. Resize the image using this program and save it to a relevant location. You can then upload the smaller version into your image library. Page 26 of 40 Appendix B: Using the WYSIWYG Editor WYSIWYG stands for ‘What You See Is What You Get’. This is a user-friendly editor allowing you to easily change the text format on your web pages. When you click on a Web Page to edit, you are automatically brought into the WYSIWYG editor mode. Click on the text that you wish to change or the area you wish to amend. Once you do this, the buttons available to you are highlighted. Styles There is a list of Styles available for you to try when editing a web page. These are custom designed styles created for your website such as ‘topleftbkg’ – this will move all text into the top left corner. It is recommended that you try to use these instead of the font and formatting options as it gives a consistent look and feel to your website. Some styles are designed for images and others for text. Some may be used by other areas of your Administration System and are not useful here. Try these styles to see if they have the look you required. Click on each line to see what change it makes – click on it again if you do not like the look. Page 27 of 40 Note: There are two styles that are very useful when working with images and text. These are image_wrap_left and image_wrap_right. Choose one of these when you want to wrap text around your image. You must first click on the image you wish the text to wrap around. Then click on the style eg image_wrap_left. This will move the image to the left of the text as shown below. If you wish to wrap the text around the right of the image use the image_wrap_right style. Click on the style again to disable it. Maximize/Minimize Editor This option will Toggle between switching the WYSIWYG editor to be in maximised or minimised window. To switch from Maximised to Minimised again click on the button. Fonts The next few options are used to change the font size, colour and description. Remember to try to use the same font throughout your website as this is easier on the eye. To change the colour and background colour of the font choose from the dropdown lists. Page 28 of 40 Subscripts Subscripts are used to add text that is slightly lower than other standard text. Subscripts are often used for formulas eg the 2 in H20. Page 29 of 40 Justification These options are used to justify the text entered left, right, centered or no margin. Tip Because the last line of text in a paragraph is often shorter than the other lines, it may not appear to be justified. To justify the last line in a justified paragraph, place the insertion point at the end of the last line, and then press SHIFT+ENTER. Be aware that justifying a very short line of text may look odd because of the large amount of space that will be created between the words. Bulleted and Numbered Lists Choose these options to quickly add bullets or numbers to existing lines of text, or you can automatically create bulleted and numbered lists as you type. Horizontal Line This option inserts a line from the left margin to the right. You can adjust the length of the line after inserting it. Inserting Special Characters, Web Links and Images These next few options allow you to insert special characters, images or weblinks. When choosing the Special Character option, it will display the characters available for you to insert. When choosing to insert a Web Link the following window will appear allowing you to enter the URL of an existing web site. You must first select the text on your web page to be marked as a web link. Note Page 30 of 40 that you may not see this screen if you have popups blocked on your computer. You will have to enable popups if this is the case. If you wish for this Link to open in a new window then select New Window from the drop down Target list. If you choose to insert an image choose then the following window will appear allowing you to choose from your available images. You can choose to upload a file from your computer by clicking browse, locating the file, then clicking upload. Tip: See Appendix A: Resizing images on your PC before uploading Undo and Redo Choose the Undo option to undo the latest change you have made. Tip: If you later decide you didn't want to undo an action, click Redo Page 31 of 40 Selecting Text This option is used to select all text and graphics so that standard editing can be done for example changing colour or to copy to another page. If you wish to remove the selected text choose the Cut option Print Document You can print the active document by clicking this option. You must have a printer installed on your PC to print. Insert/Override This option toggles between Insert and Overwrite mode Clean Up HTML and Current settings If your web page seems to be behaving strangely, you could try this option. If text has been copied into your web page from a word document, the text on your web page may contain unrecognised characters. This option may be able to identify these characters and remove them. It will prompt for the various clean up options. It is suggested to accept the defaults that the system provides. Page 32 of 40 The following three options, Clear Inline Font Specifications, Remove Formatting and Split Block should be used with Caution as they may change the default settings on your web page. Text Direction – Left to Right To toggle between text moving ‘Left to Right’ or ‘Right to Left’ choose one of these two options. Toggle HTML Source To toggle between displaying the HTML source code or being in WYSIWYG editor click on this. Help To get assistance on the keyboard commands for some of the editing functions click on this option. The following option shows the keyboard shortcuts. Page 33 of 40 Tables Click on the Insert Table option to insert a new table. You will be prompted for the table settings eg column and row numbers. The other options relating to tables will become available once a table has been inserted. If you have problems working with tables please send a request to [email protected] Page 34 of 40 Appendix C: Frequently Asked Questions Why are my pages not aligning correctly? If you have pasted into the WYSIWYG editor directly from Word there is a good chance that you will have to adjust the text in some way. Refer to Appendix B: Using the WYSIWYG Editor and try the ‘Clean Up HTML and Current settings’ option. Paste the text into Notepad to remove formatting from Microsoft Word. Then copy and paste from Notepad to the WYSIWYG editor and format in there. If then you still have problems send a request to [email protected] outlining the problem either with the attached document or with your best attempt at formatting it still in there. We will try and help within the hour. How do I make a link? View the website, page or file that you want to link to. Copy what is in the Address bar. Highlight text or image to hyperlink. Click add link. See Appendix B: Using the WYSIWYG Editor. I cannot do anything; the WYSIWYG Editor fills the whole screen! Click the minimize button. See Appendix B: Using the WYSIWYG Editor. The WYSIWYG is too small, I can’t see what I am doing. Click the Maximize button in the top left hand corner. See Appendix B: Using the WYSIWYG Editor. I want to put a downloadable form on my site, how do I do it? Firstly, we recommend that all downloadable forms for printing should be in PDF format. If the document is currently in MS Word, you can convert it to PDF using Adobe software. Refer to the following website for more information https://createpdf.adobe.com. NOTE Make sure the file is less than 5MB, if it is more you might have to remove some of the images. PDF format is usually smaller files size than Word, you can check by comparing both file sizes. Page 35 of 40 Now that you have the file you wish to put on your site, go to the page you wish to add it to and click Browse, Locate your file, click Upload File. Refer to the How to Maintain Your Web Pages section for more help. See Image Library under the Additional Features section. See Appendix B: Using the WYSIWYG Editor. How do I create an email account? See Email Config under the Additional Features section. How do I configure Outlook Express? See Appendix D: Configuring your Email Client. How do I configure Microsoft Outlook? See Appendix D: Configuring your Email Client. I get lots of spam coming in. What can I do? Try deleting your default email address and setting up a new one. If you still have problems send a request to [email protected] How do I wrap text around an image in the WYSIWYG editor ? There is a list of Styles available for you to try when using the WYSIWYG editor. These are custom designed styles created for your website. It is recommended that you try to use these instead of the font and formatting options as it gives a consistent look and feel to your website. There are two styles that are very useful when you want to wrap text around an image. These are image_wrap_left and image_wrap_right. You must first click on the image you wish the text to be wrapped around. Then click on the style eg image_wrap_left. This will move the image to the left of the text. If you wish to wrap the text around the right of the image use the image_wrap_right style. Click on the style again to disable it. See Appendix B : Using your WYSIWYG Editor for more information Page 36 of 40 Appendix D: Configuring your Email Client As described in Email Config, you can set up Email POP Accounts on your website using your Admin. These need to be linked to an email client such as Outlook Express or Microsoft Outlook so that you can receive emails sent to these accounts. This appendix will describe how this is done . Configuring Outlook Express Open Outlook Express and on the Tools menu, click Accounts Click on Add and then on Mail This will open the Internet Connection Wizard. Enter Your Full Name. Enter the Email Address that you set up in the Administration Centre’s email config section. Page 37 of 40 Enter the server details. These details are listed in the website administration centre email configuration section. Enter the email address that you set up in the administration centre. This must be the complete email address. Enter the Password that you assigned to this account. You may need to refer back to your administration centre to confirm these details. The password is encrypted on the server. If you loose your password, it cannot be recovered. You will need to change the password as described earlier. Click Finish to save these settings and Close to return to Outlook Express. Page 38 of 40 Configuring Microsoft Outlook Open Microsoft Outlook and on the Tools menu, click Accounts Click on Add and then on Mail This will open the Internet Connection Wizard. Enter Your Full Name. Enter the Email Address that you set up in the Administration Centre’s email config section. Page 39 of 40 Enter the server details. These details are listed in the website administration centre email configuration section. Enter the email address that you set up in the administration centre. This must be the complete email address. Enter the Password that you assigned to this account. You may need to refer back to your administration centre to confirm these details. The password is encrypted on the server. If you loose your password, it cannot be recovered. You will need to change the password as described earlier. Click Finish to save these settings and Close to return to Microsoft Outlook. Page 40 of 40