1
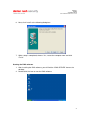
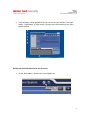
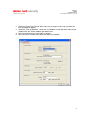
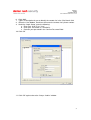
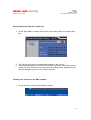
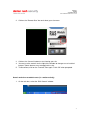
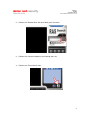
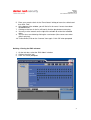
DIGITAL
VIDEO
SURVEILLANCE
REMOTE ADMINISTRATION SYSTEM (RAS)
USER’S MANUAL
This manual provides step by step guide onto setting up your connection with the
remote camera site and also describes basic features of using the RAS software
only.
Installation Procedures
1. Close all running programs before you continue.
2. Insert CD into CD-ROM drive.
3. Open on ‘My Computer’ and double click on the CD-ROM drive (Typically Drive
D).
4. Run the Setup.exe file by double clicking on it.
5. Click ‘Next’ when the following dialog box appears.
1
DIGITAL
VIDEO
SURVEILLANCE
6. Next, click ‘Install’ at the following dialog box.
7. When setup is completed, choose ‘Yes, restart the computer now’ and click
‘Finish’.
Starting the RAS software
1. After installing the RAS software, you will find the ‘IRAS SERVER’ icon on the
desktop.
2. Double click the icon to start the RAS software.
2
DIGITAL
VIDEO
SURVEILLANCE
3. Three windows will be opened which you will find on your taskbar (The ‘RAS
Admin’, ‘RAS Watch’ & ‘RAS Search’) and you are now currently on the ‘RAS
Admin window’.
Setting up the RAS software for the first time
1. On the ‘RAS Admin’, click on the ‘Local Setup’ icon.
3
DIGITAL
VIDEO
SURVEILLANCE
2. Under the ‘Date/Time Format’ box, make any changes on the way you want the
time and date to appear.
3. Under the ‘Dial-up Network’, select the ‘Use Modem’ check box then choose your
modem from the ‘Select modem’ pull down field.
4. Leave everything else on the page as default.
5. Now select the ‘Remote Site’ tab at the top of the window.
4
DIGITAL
VIDEO
SURVEILLANCE
6.
7.
8.
9.
Click ‘Add’.
Type in a description for you to identify the remote site in the ‘Site Name’ field.
Select the ‘Use Modem’ check box then enter the remote site’s phone number.
Under the ‘Login Setup’, enter the following:
a. Enter your ‘User ID’ as ‘User’.
b. Enter your ‘Password’ as ‘12345678’.
c. Re-enter your password in the ‘Confirm Password’ field.
10. Click ‘OK’
11. Click ‘OK’ again to close the ‘Setup – Admin’ window.
5
DIGITAL
VIDEO
SURVEILLANCE
Getting connected with your remote site
1. On the ‘RAS Admin’ window, click the plus sign directly under the ‘Remote Site’
title
2. The site that you have just created should appear in the site tree.
3. Select it by left-clicking it once and then, click the connection icon to dial into the
remote site (This will be the same icon you click to disconnect). Alternatively, you
could also double click on the site name to connect.
Viewing your cameras on the RAS software
1. On the task bar, select the ‘RAS Watch’ window.
6
DIGITAL
VIDEO
SURVEILLANCE
2. Click on the ‘Remote Sites’ bar and select your site name.
3. Click on the ‘Connect’ button to start viewing your site.
4. You may use the controls on the right of the window to change or use installed
features (Some features may not apply to the site).
5. To disconnect, click on the ‘Connect’ icon again. Click ‘OK’ when prompted.
Search and view recorded events (i.e. motion activity)
1. On the task bar, select the ‘RAS Search’ window.
7
DIGITAL
VIDEO
SURVEILLANCE
2. Click on the ‘Remote Sites’ bar and select your site name.
3. Click on the ‘Connect’ button to start viewing your site.
4. Click on the ‘Event Search’ icon
8
DIGITAL
VIDEO
SURVEILLANCE
5. Enter your search criteria in the ‘Event Search’ dialog or leave it as default and
then click ‘Find’.
6. At the bottom of the window, you will find a list of events if events have been
recorded earlier.
7. Clicking on the item in the list will load it; click the play button to start play.
8. You may use the controls on the right of the window to review the recorded
video.
9. You can also save video by clicking the save button (You cannot save when
video is playing).
10. To disconnect, click on the ‘Connect’ icon again. Click ‘OK’ when prompted
Quitting / Closing the RAS software
1. On the task bar, select the ‘RAS Admin’ window.
2. Click on the close icon.
3. Click ‘Yes’ when prompted.
9