1
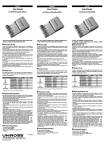
JL269 Portable Gas Detector
JL269 Portable Gas Detector User’s Manual
1. Description
JL269 gas detector for industrial use has a high performance and wide detecting range. It
can be used to detect methane, natural gases, propane, LPG, Hydrogen and other
combustible gases and can help you to find the gas leaking sources easily
2. Features
Sensor doesn’t need to be calibrated
Quick response to combustible gas leakage
Additional Long and flexible gooseneck tube
Adjustable sensitivity
30 Level light /Tricolor show
Low battery alarming indication
The sensor fault self detection
High concentration protect
3. Specifications
Detecting Gas: Natural gas, LPG
Sensitivity: Better than 50ppm
Detection range:
Alarm LED
1.Green LED
2.Yellow LED
3.Red LED
Scale No.
(ppm)
(ppm)
(ppm)
1
500
1000
2000
2
500
1500
3000
3
500
2000
5000
4
1000
3000
5000
5
1000
5000
10000
6
5000
10000
20000
7
5000
20000
30000
8
10000
30000
50000
9
10000
50000
100000
10
10000
100000
200000
Environment: Temperature. -40℃~70℃
Humidity: ≤95% RH non-condensing
Warm-up time: <20S
Response time: <10S
Indication: 30 levels of LED indication:
Green: low concentration
Yellow: middle concentration
1
JL269 Portable Gas Detector
Red: high concentration
Alarming levels: The shorter the buzzer sound interval, the higher the concentration
Battery: 3.6/1600mAh Ni-H chargeable battery
Charge time: 4h to 6h
Using time of the battery: >8h
Weight: 310g
Dimensions: 170mm×62mm×26mm
4. Structure and Functions
4
5
6
3
10
7
11
2
8
13
9
1
12
2
JL269 Portable Gas Detector
1
Gas sensor
7
Turn-on key
2
Flexible gooseneck
8
scale Up”+”
3
Concentration LED
9
scale down “-”
4
Power LED
10
Jack of charger
5
Sensor fault LED
11
6
Full scale LED
12
Battery
13
Buzzer
Jack of earphone (no
earphone included)
5. Operation instruction
5.1 Turn on the detector
” for about 1 second, Power LED lights, and the device begins to
Press and hold “
self-test: the 10 LED will light in turns. Warm-up time is 20 seconds. When warm-up finish, the
green power LED lights and all the alarm LED off, the detector enter detecting status.
5.2 Detecting
Put the sensor into the gas environment and the LED and sound frequency will show the
gas concentration of the environment. With concentration increases, first the green LED
lights and the buzzer frequency increases. When the concentration exceeds the first 10
levels detection range, the alarming LED turns yellow, and then turns red. At the same
time, the sound frequency interval will turn higher. When all LED turn red, it means the
concentration reaches the highest of the detection range. At this point, the “
OL” LED
will light.
5.3 Fault
If there is something wrong with the gas sensor, the detector can’t work. At this point,
the“
FAULT” lights and all concentration LED off. At the same time, the buzzer gives sound
of “Didi----Didi---”.
5.4 Keyboard operation
5.4.1
Silence
When alarming, press both “
” and “
”, the audible alarm is off. When press them
again, the audible alarm is on.
5.4.2. Zero adjustment
If the detector indicates small concentration and you want the present level as zero point,
press both “
” and “
”, then the detector accept the present level as zero.
5.5.3 Scale up
When all the red LED light, it shows the present gas concentration is above the presetting
scale, then press “
” continuously (continuing press operation acceptable) to choose
”, the green alarm LED will light showing
larger scale; when you press and release “
the present scale number ( the quantity of the green LED indicates the corresponding scale,
see table 1 for the details).
3
JL269 Portable Gas Detector
Note: larger scale, less sensitivity. So the larger scale is not suitable to low gas concentration.
5.5.4 Scale down
When the gas concentration around is not very high, you can choose lower scale to detect.
Then you can press “
” continuously (continuing press operation acceptable) to
choose smaller scale.. Note: smaller scale, higher sensitivity.
5.5.5 Turn-off
When the detector is on, press both “
” and “
”, the detector turns off.
6. Battery and charging
This detector adopts 3.6/1600mAh chargeable battery as power. It can work for more than 8
hours continuously.
6.1 Battery voltage indication
When the detector is on, you can test the voltage of the battery. When the voltage is low, the
“
POWER” LED turns red, which means low voltage and it needs charging. In the status
of low voltage, the detector can continue to work for about 30 minutes. When the voltage is
seriously low, the power LED begins to flicker about 2 seconds, and then the detector turns
off. At this point, you’d better not turn on the detector frequently. Otherwise the detector will
be destroyed. Besides, if the detector can’t be turned on or abnormal after turning on,
normally it is due to serious low voltage. Please charge it at time.
6.2 Charge
We kindly suggest you charge the battery when the detector is off, because if on, the battery
will not be charged full. When charging, put the plug of the charger into the AC220V or
AC110V power socket. Then the LED of the charger turns red. The charging begins. Fast
charging time is about 3 to 4 hours (when it’s full, the LED turns green) and then you can use it
normally. We suggest you charge it for 4 to 6 hours.
Note: Please don’t charge the battery at the detecting spot so as to avoid fire or explosion due
to the spark when pulling out the plug. Please don’t charge it when the detector is on so as to
ensure the charging speed. When charging, frequent turning-on and turning-off are not
allowed, otherwise the detector will be destroyed.
7. Troubleshooting Guide
Fault
Turning off immediately after turning
on
No response to the gas
Possible reasons
Solution
Seriously low voltage
Charge it promptly
Warm-up doesn’t end
Wait till warm-up ends
Sensor fault
8. Fittings
Detector 1pc
Charger 1pc
Manual 1pc
4
Replace the sensor