1
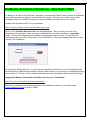
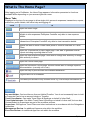
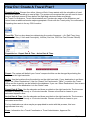
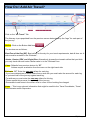
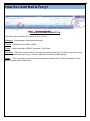
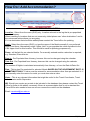
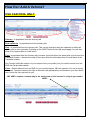
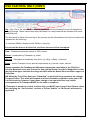
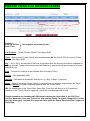
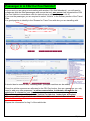
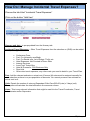
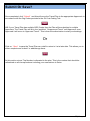
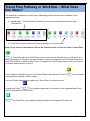
ProMaster Online Travel Planner - Basic User Manual ProMaster is a sophisticated expense management and Travel Planning tool software solution that Charles Sturt University has selected to meet its Travel Card and Travel Planning management needs. 1|Page Table of Contents Who Do I Contact With My Questions?……………………………………………………...….3 How Do I Log Into ProMaster?…………………………………………....................................4 How Do I Activate My ProMaster Account……………………………………………………... 5 What Do All The Icons Mean?...............................................................................................6 What Is The Home Page?.....................................................................................................7 What is a “Travel Plan”?...................................................................................………………8 How Do I Create A Travel Plan?............................................................................................9 How Do I Add Air Travel?................................................................................................... 12 How Do I Add Rail &Ferry?................................................................................................. 13 How Do I Add Accommodation?......................................................................................... 14 How Do I Add A Vehicle?.................................................................................................... 15 How Do I Manage Meal Allowances?...................................................................................20 How Do I Manage Incidental Travel Expenses?..................................................................27 The GL Cost Coding – What Is It?...................................................................................... 28 The Travel Diary – What Is It?............................................................................................ 30 Compliance- What is It?...................................................................................................... 31 Submit or Save?.................................................................................................................. 32 Travel Plan Pathway or Workflow – What does this Mean?............................................... 33 How Do I Search for an Existing Travel Plan?.................................................................... 35 How do I Edit A Travel Plan?.............................................................................................. 37 How Do I Copy A Travel Plan?............................................................................................39 How & Where do I Attach an Invoice?.................................................................................40 How Do I Claim My Meal Allowance?..................................................................................42 2|Page Who Do I Contact With My Questions? For any issues with the Online Travel Planner please, in the first instance, email: [email protected] For further information on the Travel Planner please contact: 34488 Chris Schiller 32273 Paul McLeod Please note: The system is only accessible for CSU Staff who are in the HR Alesco System. For guests and students please use the paper travel authority/ order and have this approved via the appropriate Approver. 3|Page How Do I Log into ProMaster? Your ProMaster Log on and password is synchronised to your CSU Log on – that is, it is the same. Click on the hyperlink [http://www.csu.edu.au/division/finserv/promaster/] and you will be taken directly into ProMaster logon screen. Once you are on this screen click on the link and it will take you directly to ProMaster (you may have to type in your CSU log in and password again – if required) If you are trying to connect on another network {at home, motel, etc} you may need to add “CSUMAIN\” before your log in/username in the User name field E.g. CSUMAIN\xmsmith [see below]. Your password will be the same as you use to log into the CSU Network. 4|Page ProMaster Activation Instructions – New Users ONLY To allow you to claim “Out of Pocket” expenses, or access the Online Travel Planner in ProMaster, you must firstly have an ‘active’ account within the system. Therefore if you have never used ProMaster before you MUST complete the short activation process to allow you access. Please enter the below URL in to your browser; https://secure.inlogik.com/pmx-csu/pm/base/logon.asp Click on the “Activate User Account” as displayed below. (Do not enter your User ID or Password until prompted). Once you have completed this you will be emailed an “activation code”. This must be entered in to ProMaster, as prompted, within 4 hours. You will then be required to enter your CSU “User Name” and a “Password”. (We would suggest that you use your current CSU Password.) As we have a “Single Sign On” you will only be required to do this once ever. The Activation link should ONLY be used for this activation process, after which you must logon to ProMaster through the normal link. The link to this is displayed below and is also available via the Travel Web Page. Ongoing ProMaster link (which should be saved to your “Favourites”; http://www.csu.edu.au/division/finserv/promaster/ Should you encounter any problems please do not hesitate to contact us on either email; [email protected] of phone; 34488 5|Page What Do All The Icons Mean In ProMaster? Identifier to advise a Visa card was used for this transaction. Either Purchase Card or Travel Card. Saved transaction waiting to be submitted. Verify or Reconcile a Transaction. View Transaction/Expense Details in full. View Travel Plan Details Dispute Transaction. Edit Transaction details. Delete (a Visa Card transaction cannot be deleted) Waiting Accountholder (Transactions) – Number of Credit Card transactions that are waiting for the Cardholder to reconcile. Waiting Accountholder (Expenses) – Number of Credit Card transactions that have been “saved” and still need to be “submitted” Waiting Approval – Number of Transactions that have moved onto the Approver for their review and action. Waiting GL Post – Number of Transactions that have been Approved but have not been exported to the Banner General Ledger. Posted – Number of Transactions that have been Approved and have been Posted to Banner and the expense will appear in the appropriate Budget. Disputed – Number of Transactions that are being disputed with the Bank. Dispute Resolved – Number of Disputes that have now been resolved. Draft Travel – Number of Travel Plans that have been created and “saved” not “submitted” or sent back from an Approver for query. Compliance Review – Part of the workflow into Finance (if required) e.g. Approval for Private Vehicle. Review Travel – Allows the Travel Coordinator/ Administrator to be alerted that travel is now Approved and ready to be booked. Unapproved travel – Travel that is awaiting Approval from a Supervisor. Management Approval – Can accommodate an additional Approval for other Supervisors, if required. Executive Review – For the purposes of Approving International Travel at a higher level than normal e.g. Deans etc. Approved Travel – Travel Plan has been Approved. Completed Travel – Travel has been completed and the Plan has been reconciled. Cancelled Travel – Travel Plan has been cancelled prior to any financial transactions being attached. Archived Travel – Travel plan has been fully reconciled and has now been “finalised” Attach all relevant documentation e.g. Tax invoices, Receipts etc. Additional information is required as prompted. Log out 6|Page What Is The Home Page? After logging on to ProMaster, the Home Page appears. Information presented or functions available differ depending on your access rights as a user. Menu Tabs Displayed on the top of every page to allow single-click access to expenses, transactions, reports, authorities, profile details, the online help and logging off. Click To Open the Home Page. Open the Expense Search page. Visible only if the user has Accounts or is eligible to view expenses. Enterprise Controller only able to view expense details. Open the Transaction Search page. Account Holder able to administer transactions. Enterprise Controller only able to view transaction details. Opens the area to either Create travel plans or conduct Searches on Travel Plans Open the Transactions by User report page. User able to generate several reports including exporting data to Excel. Open the User Authorities page. User able to change their authority or assign their authority to others. Open the Profile Detail page. Open the Document Control page. Account Holder able to manage expense documentation. (currently not in use) Open the help to provide even more detailed assistance. Log the user out of ProMaster. Provides quick access to any relevant forms e.g. Lost Receipt Declaration etc. Account Holder: Can be either an Account Holder/Traveller. You do not necessarily have to hold a Corporate Card to be an account holder or Traveller. Travel Coordinator: Can make Travel Plans & Bookings on behalf of other Staff. Travel Administrator: Can Make Travel Plans & Bookings on behalf of other staff, but can also Review/Submit to Supervisors as part of the workflow process. Supervisor: Will Approve Travel Plans and other transactions in accordance with the Delegations Authorities. Management Review: An additional Approver role within the workflow. Executive Review: An additional Approver role within the workflow. 7|Page What is “Create Travel Plan” What is a Travel Plan? A Travel Plan is where all the travel components and estimated expenditure is detailed in preparation for pre approval. This would include same day flights and overnight travel with accommodation, car hire and other travel expenditure. A series of “tabs” are required to be completed relevant to your travel and inclusions e.g. Itinerary, Air Travel, Rail/ Ferry, Accommodation, Vehicle, Allowances, Incidental Travel Expenses, GL Cost Coding, Travel Diary & Compliance. Click on this Link:to commence the creation of the travel plan. 8|Page How Do I Create A Travel Plan? Total Estimate will calculate automatically as you enter the travel details after the itinerary has been created. Reason For Travel: This is a brief summary of the trip, including all key details of the trip, for example; Attending a conference, fieldwork, meetings on Dubbo Campus etc. As much relevant information including destinations should be included for your Approver. Note: it is a new itinerary and will only allocate the Trip Number when it is “saved” or “submitted”. Allowances: In this area it will default to “Allowances”. This is set in accordance with the Travel Policy. Receipts/Tax Invoices must be attached to your Travel Plan when travelling. Allowances are for overnight trips or where the time of travel exceeds 10 hours and are predetermined as per the Travel Policy. They can be paid into the traveller’s bank account 3 days prior to the trip or claimed upon the travelers return. Travel Type: This is for One-Way journeys, Return journeys or Multi-Legs. Please select from the drop down box the relevant choice for your travel. (An example of a Multi-Leg is: Wagga Wagga, Sydney, Bathurst, Dubbo returning to Wagga Wagga). This would be 4 legs. 9|Page How Do I Create A Travel Plan? Departing From: Choose from either Home or Work. Home assists with the calculation of meal allowances when travelling to meet a flight. The system will recognise that you will need to leave home a sufficient amount of time before the flight and calculate meals accordingly. As Travel Co-Ordinators, Travel Administrators and Travelers be aware of the departure and return times as additional meals maybe appropriate. Check with the Travel policy for confirmation. Departing from work is for any CSU Location Travel By: This is a drop down box determining the mode of transport – Air, Rail/ Ferry (long distance rail/ ferry V-Line and Countrylink), Vehicle (Car Hire, CSU Car Pool, Private Vehicle) Depart/Arrive - Depart Date & Time - Arrive Date & Time: Depart: The system will default your “home” campus but this can be changed by selecting the location on the right hand side. Arrive: Use the locations from the selection on the right hand side. If your destination is not there either use “Other Destinations” (Use the “Search” box and search “Other”) or advise the Travel Office and the town/city can be added to the database. If you use “Other Destinations” then ensure that the name of the destination is in the “Notes” area. Depart Date & Time: Use the calendar and times provided on the right hand side. The times are available in hourly, half hourly or 15 minute intervals. Choose a time that is closest to your estimated departure time. Arrival Date & Time: Use the calendar and times provided on the right hand side. The times are available in hourly, half hourly or 15 minute intervals. Choose a time that is closest to your estimated arrival time. For key destinations a value may be pre-populated to assist with this process, this is an approximate time only. Notes: Information for a Travel Coordinator or Travel Administrator, Approver Etc 10 | P a g e How Do I Create A Travel Plan? Delete: Tick Box and “Refresh” to delete an unwanted leg. You will need to complete details for line two as it is automatically generated and may need to be changed TIP: Do not create your own 3 digit code for departure/arrival points. This is directly linked to airport codes. You could be unintentionally using an International Airport Code for a domestic location. 11 | P a g e How Do I Add Air Travel? Click on the “Air Travel” Tab The Itinerary is pre-populated from the previous screen determined by the “legs” for each part of the journey. Airline: Click on the Button Add Item The choices are as follows; Best Fare of the Day (BF): Best airfare on the day for your travel requirements, date & time etc. A value must be entered in the “Estimate”. Jetstar, Qantas, REX, and Virgin Blue: Alternatively choose the domestic airline that you think you may travel with and enter a dollar value in to the “Estimate” box. Class: Defaults from previous choice for “BF” Airlines require a selection from the menu on the right hand side Estimate: “BF” Enter the one way airfare for each leg. If you have determined a return airfare from a web site you must halve the amount for each leg i.e. put each half of the journey against each leg. For airlines you must enter the one way airfare for this leg. Please repeat this process for each Leg of the journey. Remember to add extra in the airfare cost to cover for the booking fee charged. Notes – This is any relevant information that might be useful to the Travel Coordinator, Travel Administrator and/or Supervisor. 12 | P a g e How Do I Add Rail & Ferry? CLICK ON THE ADD ITEM BUTTON This tab is for rail travel e.g. Country Link or V-Line Itinerary - Pre populated from previous screen Carrier – Select from the Menu (RHS) Class – Select from Menu (RHS), Economy, First Class Estimate – Add the one-way value of the rail journey as per the leg. For return journeys a value must be entered for each leg i.e. use the “Add Item” to add an additional leg. Notes – This is any relevant information that might be useful to the Travel Coordinator, Travel Administrator and/or Supervisor 13 | P a g e How Do I Add Accommodation? CLICK ON THE ADD ITEM BUTTON Location - Select from the menu (RHS) only. Location relevant to the leg that is pre-populated from the Itinerary. When travelling to locations that are not commonly visited please use “other destinations” and in the notes area advise where you are going. If it is a destination that should be added please contact the Travel office for updating. Hotel - Select from the menu (RHS), or type the name of the Motel manually if your preferred motel is not there. Alternatively select “Upper Limit” to pre-populate the value equivalent to the CSU Upper Limit for this location. This should be used for planning purposes only. Room - will default for pre selected hotels. For manually entered motels a selection is required, e.g. Standard, Executive etc. Date In - Pre Populated from itinerary, however this can be changed using the calendar Date Out - Pre Populated from itinerary; however this can be changed using the calendar The number of Nights is calculated automatically from itinerary, or from the Date In/Date Out Rate - This is also Pre populated for selected Motels BASED ON THE GOVERNMENT RATE, IS AN ESTIMATE ONLY. A value must be entered for accommodation other than pre selected i.e. if you manually enter the name of a motel you must also enter a value. Notes - This is any relevant information that might be useful to the Travel Coordinator, Travel Administrator and/or Supervisor NB: Should you require any motels to be included in the database then please contact the Travel Office for these to be added, conversely if there is accommodation that is not to standard the Travel Office also needs to know so we can remove the motel from the database. Email: [email protected] 14 | P a g e How Do I Add A Vehicle? CSU CAR POOL ONLY Itinerary - is populated from the itinerary tab Pick up/Return - is populated from the itinerary tab Date - is populated from the itinerary tab. This can be changed using the calendar to reflect an earlier pick up time (primarily if picking up the NIGHT before) also this would apply if a next day drop off is required due to a late return. Time- is populated from the itinerary tab; however it should reflect the actual pick up time from the Transport location. Likewise the drop off time should be the estimated time of arrival back at the Transport location. Car Provider (defaults location of your campus from your profile) but you need to select from the RHS the Car provider details Class - Select relevant car from RHS for your travel purpose. NB: the selection of a car is merely a request. Transport reserve the right to allocate cars appropriately and therefore your first choice may not be the car reserved for you. NB: 4WD’s require a reason why in the notes area on this screen i.e. why do you need a 4WD? 15 | P a g e CSU CAR POOL ONLY (CONT) Qty - Qty = Km’s. An estimate of the kms is populated from the Itinerary but can be changed by tabbing through. These values have been calculated on a way basis with an allowance for some additional kms. The Kms must be halved for each leg of the journey and the information in the top line needs to be repeated for the return leg. i.e. total kms 500km, therefore enter 250km in each leg. Do not total the kms on the first line, and leave the second line incomplete. Rate – Predetermined by the choice of CSU vehicle. Extras - As advised by Transport e.g. trailer Amount - Calculated automatically from Km’s e.g. (Qty) x (Rate) = (Amount) Notes - Advise Transport of any special requirements e.g. tow bar, trailer, 4wd etc Please remember the fundamental difference between the calculation of the CSU Pool Vehicle/ Novated Leases and Private Car Use and the Rental Cars (Avis, Budget Etc) is that the first three types calculate the usage on KM’s while the Rental Cars calculate usage on a Daily Rate. NB: When the Travel Plan has been “Submitted” an email will be generated to the relevant Transport Office. This email will forward all of the information required to make your CSU Car Pool booking. However if your plans change or are cancelled then any further correspondence to Transport MUST be via email or telephone. If Transport is unable to confirm a vehicle then you MUST amend your Travel Plan to reflect this changing the “Car Provider” to either a “Private Vehicle” or Car Rental, whichever is applicable. 16 | P a g e PRIVATE VEHICLE inc NOVATED LEASES Itinerary Pick Up/ Return Date/ Time Pre-populate from Itinerary tab. Car Provider - Select “Private Vehicle” from Menu RHS Class - Select either Private Vehicle klm reimbursement or No Cost to CSU for use of Private Vehicle from Menu RHS Qty - Qty = Km’s. An estimate of the kms is populated from the Itinerary but can be changed by tabbing through. These values have been calculated on a way basis with an allowance for some additional kms. Rate - Private Km’s rate is as per Charles Sturt University Policy. Extras - Not Applicable (N/A) Amount - Calculated automatically from Km’s e.g. (Qty) x (Rate) = (Amount) Notes - Reason for taking Private Vehicle is required and still must be approved by the Travel Manager unless you hold a standing approval with the Travel Office. NB: On submission of the Travel Plan/ Same Day Travel this will drop in to a “Compliance” workflow in the Travel Office for approval, unless the standing approval is held. Please remember the fundamental difference between the calculation of the CSU Pool Vehicle/ Novated Leases and Private Car Use and the Rental Cars (Avis, Budget Etc) is that the first three types calculate the usage on KM’s while the Rental Cars calculate usage on a Daily Rate. 17 | P a g e Passenger In A CSU Car Pool Vehicle? In the event you are going to be travelling with another CSU Staff Member(s), you will need to collaborate with the other passengers and ensure that only one person has requested the CSU Car Pool Vehicle in accordance with the instructions as outlined on pages 14-15. If you are the passenger you are required to select “Vehicle” in the Itinerary section of the Travel Plan. It is good practice to identify in the “Reason for Travel” box with who you are travelling with. It should also be noted in the “Travelling With”. (multiple travellers can be added) Since the vehicle expenses are allocated to the CSU Car booker, then as a passenger you only need to add your other expenses, i.e add accommodation, incidentals, allowances etc whichever is relevant to your travel. There is no requirement to select the Vehicle Provider but instead you will select “Passenger Travelling with Other staff in Vehicle” from the selection on the RHS – ensure there is no costing Repeat this information for Leg 2 of the vehicle tab. 18 | P a g e COMMERCIAL CAR & BUS RENTALS Itinerary Pick Up/ Return Date/ Time Pre-populate from Itinerary tab. Car Provider - Car Rental provider from menu RHS i.e. Avis, Budget, Hertz, Thrifty and for Buses Makehams, Martins and Priests Class - Select relevant vehicle type from the menu on the RHS Qty - Qty = Days. For commercial Car and Bus Hire the Qty is the number of days that the rental is over. (i.e. 24 hour periods) This is determined by the Dates and Times from the itinerary. Rate - Enter the estimated cost of the rental for each day in each leg. E.g. If the total cost you have been quoted is $200.00 you will need to divide this amount by 2 and populate the $100.00 in each of the “amount” boxes for each leg.You may want to estimate more since rental companies have “add ons” eg insurance. Extras - GPS, one way fees etc as advised by the Rental Company Notes - This is any relevant information that might be useful to the Travel Coordinator, Travel Administrator and/or Supervisor 19 | P a g e How Do I Manage Meal Allowances? Meal Allowances have three different types. Type 1:Day Trip under 10 Hours. In accordance with the travel policy there is NO provision for meals. Type 2:Day Trip over 10 Hours. In accordance with the travel policy there has been provision made for an allowance of $60.00. No Receipts required. This can be paid into your bank account prior to travel or claimed upon your return, taking into account any meals provided. Type 3:Overnight Trip. In accordance with the travel policy a meal allowance will be paid either prior to travel or claimed upon the travelers return. It is a calculated amount work from the times in the itinerary. Lets view how to manage a Day Trip over 10 Hours In this example the trip is single day travel, and over 10 hours. The system in the allowances tab will calculate your meal claim. Click on the Add Item Button Your screen should look like this. You will need to click in the Allowance Type box to display the “Single Day Meal Allowance > 10 Hours” link on the RHS 20 | P a g e How Do I Manage Meal Allowances? By selecting the Single Day Meal Allowance > 10 Hours the system will automatically calculate the full allowance of $60.00, however if some meals are supplied, lunch for example you need to click on the “Show Breakdown Box” and click off the Lunch. Then Click Save for the re-calculation to work. Your screen should now display to re-calculated amount 21 | P a g e How Do I Manage Meal Allowances? If your allowance is to be paid prior to travel please click in the box under the heading “Pay Pre-Travel” If you are claiming your allowance after travel please refer to page 42 of this User Guide as to how to claim. 22 | P a g e How Do I Manage Meal Allowances? Cont Lets view how to manage an Overnight Trip. Type 3:Overnight Trip. In accordance with the travel policy a meal allowance will be paid either prior to travel, or claimed upon the travelers return. It is a calculated amount worked from the times in the itinerary. Any adjustments for any meals provided by a third party eg conference organizers may provide a conference dinner must be removed from the show break down box and saved. The system will re-calculate the lesser amount. When you choose the Allowances Tab, the screen will look like this. Click on the Add Item Button Select “Allowance Type”. The allowance type for overnight travel is “Overnight Meal Allowance Only” It will populate with your meal allowance as per the times indicated on the Itinerary you have previously prepared. 23 | P a g e How Do I Manage Meal Allowances? Cont The meals may differ to what has been calculated. i.e. Conference meals and other meals included in your travel plans must be deducted. If you click on this button it will display the meal allowance breakdown At this point it would be appropriate to click off those meals that are being provided. In this instance one lunch and one dinner have been provided. The system will re-calculate what your meal entitlement is once you click the save button 24 | P a g e How Do I Manage Meal Allowances? Cont The system has now re-calculated the meal allowance for the lesser amount. If your allowance is to be paid prior to travel please click in the box under the heading “Pay Pre-Travel” If you are claiming your allowance after travel please refer to page 42 of this User Guide as to how to claim. 25 | P a g e How Do I Manage Meal Allowances? Cont IMPORTANT: By ticking in the Pay Pre-Travel box, the system will automatically pay your meal allowance directly into your EFT bank account three days prior to the travel. HOWEVER if the travel is cancelled between receiving the funds and the departure date, the meal allowance MUST be repaid to the University or if meals were provided and you have made a claim for that meal(s). This repayment may be facilitated via the Travel Office. Please e-mail: [email protected] and advise the following information Name Staff Number Travel Plan Number (TP) Amount An Invoice will be raised and upon receipt of the invoice, you can repay this using the options provided. 26 | P a g e How Do I Manage Incidental Travel Expenses? Choose the tab titled “Incidental Travel Expenses” Click on the button “Add Item” Itinerary and date - is pre-populated from the Itinerary tab. Incidental Travel Expenses – Other Travel Expenses from the selection on (RHS) can be added as required e.g. Conference Fees. Fuel: For University cars Only Fuel: For Rental cars, Avis, Budget ,Thrifty etc Hotel Expenses: Not Covered in Room Rate Internet Services Local Taxi/ Trains/ Bus Hotel & Phones for CSU Business Only Road tolls Other misc travel expenses; any other costs you need to detail in your Travel Plan. Rate: Add the relevant estimate or actual cost (if known) All rates must be entered manually for each selection as there is no pre-population of amounts. You cannot proceed if an estimate or actual cost is nil. Units: Equals the number of rates eg Dependant Child Care $60.00 (rate) x 3 days (unit). The system will calculate the total estimate in the amounts column. Notes: This is any relevant information that might be useful to the Travel Coordinator, Travel Administrator and/or Supervisor. 27 | P a g e The GL Cost Coding - What Is It? Travel Category – The relevant Tabs as used in your Travel Plan. Accounting Codes can be split using the “red brackets” (Widget) Note- can only be split once and only to two Cost Centre’s. Car Hire – Will default to “CSU CAR”. However for Car Rentals e.g. Avis etc, the “Expense Type” must be changed to “CARHIRE” to allow for the Account Code to populate “453” “Private Car” - Search for “PRIVATE CAR” on the RHS under “Expense Types”, account code for “Private Car” is 454. This assists in identifying this expense for the purposes of calculating any tax liability. 28 | P a g e The GL Cost Coding - What Is It? Cont Expense Type – This is directly linked to the Travel Category and will default the account code i.e. Travel Domestic = 450 GL Cost Coding – Actual Account Codes for the expenditure. These populate from your profile but can be changed to any relevant and approved code for your travel. Percentage (%) – If splitting between account codes then the amounts must be split by percentage i.e. 50% & 50% etc. Amount – Defaults from each Travel Category. Notes – relevant to approver regarding the funding if necessary. FBT Component – Advises if FBT (Fringe Benefits Tax) liability exists according to policy and the Australian Taxation Rulings. 29 | P a g e The Travel Diary - What Is It? The Travel Diary is an Australian Taxation Requirement where travel undertaken exceeds 5 nights/ 6 days for domestic Travel and ALL International Travel. The Fringe Benefits Tax Assessment Act 1986 (FBT Act) provides that where an employer pays for or reimburses extended travel for an employee, FBT may be payable on the travel expenditure unless: the employee provides a travel diary to the employer detailing the business activities undertaken on the trip, and the travel diary clearly establishes that any private component of the trip was merely incidental to the business activities. For further information please use this link - http://www.csu.edu.au/division/finserv/travel/fbt.htm Location – Populated by the Itinerary Date - Populated by the Itinerary Purpose at Destination – This requires a brief description of activities at the destination e.g. Conference, Fieldwork, Meetings etc Person/Place – Name of the person meeting or Conference name and Location Business – Check box ticked if day relates to CSU business or remains un-ticked if a personal day. If you exceed the 5 nights/ 6 days rule, the system will not allow you to the next tab until the Travel Diary is completed. This is and Australian Taxation Office requirement. 30 | P a g e Compliance - What Is It? The Travel Compliance Questionnaire must be answered. Travel Policy Declaration must be acknowledged. This area is an acknowledgment by the traveler that it is within CSU guidelines for travelling and guidelines as indicated by the laws of Australia and its Territories. 31 | P a g e Submit Or Save? Once completed, click “Submit” and this will move the Travel Plan to the appropriate Approver/s in accordance with the Org Codes provided in the GL Cost Coding Tab. NB: If your Travel Plan has multiple ORG Codes then the Plan will be submitted to multiple Approvers. The Travel Plan will sit in the “workflow” “Unapproved Travel” until Approved, once Approved it will move to “Approved Travel”. This is then the authorization to start your bookings. Or Click on “Save” to save the Travel Plan as a draft to return to it at a later date. This allows you to either complete and “submit” or add/change items. At this point a unique Trip Number is allocated to the plan. This is the number that should be referenced on all correspondence including your reservations in Serko. 32 | P a g e Travel Plan Pathway or Workflow – What Does this Mean? The workflow or pathway is a quick way of identifying where a travel plan is situated in the approval process. Just a note – From Disputed to Posted is concerning the financial aspects of your Transactions. From Draft Travel to Archived Travel is relating to the Travel plans. Note, at any time you are able to click on the relevant icons to view or locate a Travel Plan A Travel Plan will be in Draft Travel until you click on the Submit button, at this point ,an email is generated to Transport for the booking of a vehicle (if required) and it will then move from Draft Travel Status to either review Travel or Unapproved Travel, depending on how your School or Division administration is set up. In this instance, the Plan will go to the Travel Administrator (Review Travel) correctness and validity of dollar values. for checking for Once the Travel Administrators approve a Travel Plan it will then move to Unapproved Travel for budgetary Approval by the owner of the Organisational Code (Ogn Code) within the Travel Plan. The Travel Plan, once approved will be located in the Approved Travel Icon. . 33 | P a g e Travel Plan Pathway or Workflow – What Does this Mean? (cont) The Completed Travel Icon is where an Approved Travel Plan that has had ALL EXPENSES allocated and finalized moves to after the Complete Travel Plan? DO NOT CLICK IF YOU ARE UNSURE call 34488 for assistance Button has been clicked This Icon is where a Travel Plan that did not proceed will be located. There will be no expenses against these Plans. Travel Plans that are located in the Completed Travel will be archived as an automated process. At any time throughout this process you are able to view where your plans are in the workflow. Plans are always there to view, even in the archived status 34 | P a g e How Do I Search for an Existing Travel Plan? Within the ProMaster system there are numerous ways to achieve the same outcome. This instruction is what we have found to be the easiest. At the top of the screen there is a tab called Travel. Click on this Tab and you will have a screen looking like this – You are able to search using many of the parameters available. Once you have identified what parameters you know click on the Search Button and it will provide you with the data you are looking for. In the example below we have searched just using Approved Travel as the search parameter and this is the result. It has identified two approved travel plans that meet the criteria. 35 | P a g e How Do I Search for an Existing Travel Plan? cont 36 | P a g e How Do I Edit A Travel Plan? A Travel Plan at the stages of Draft Travel, Review travel, Unapproved Travel and Approved Travel can be edited at any stage of the process, with an exception for the Approved Travel Plan. With the example below no monies has been allocated to date hence the Reverse Travel Plan button is present and is present in any of the plans until there is allocations Note – No Reverse Travel Plan Button. 37 | P a g e How Do I Edit A Travel Plan? cont Once you reverse a Travel Plan you need to keep reversing the Plan until the button titled Edit Travel Plan appears . From here you are able to click on this button and it will take you to the Plan for you to edit the necessary details. Please note, that if you are increasing the estimated amount, the approval process recommences through the workflow as before. 38 | P a g e How Do I Copy A Travel Plan? This is a really useful tool if you do the same trip on a regular basis as an Account Holder or if you are a Travel Administrator, you can use this facility to copy plans on behalf of other travelers, taking the same trip, by copying and changing the name of the traveler each time you use the copy facility. This button exists at all stages of the Travel plans, even after they have been archived; this facility is still available. A copied Travel Plan will automatically have a status of Draft Travel as it is expecting you to make amendments, eg dates, amounts etc. After any amendments have been made, you are required to click submit for the process to flow through to the Approved Travel status. 39 | P a g e How and Where Do I Attach an Invoice? As with any sound Financial Practice records must be kept to substantiate the expense and the Universities claim of GST, back from the Government. We now prefer that invoices and any other pertinent information be attached to the Travel Plan, not to the transaction as before. Tax Invoices Other Pertinent information Travel Plan Transactions Expenses Allocated against Travel Plan The easiest way to do the attachments is through the magnifier located against the Travel Plan, click on this icon and the screen should open and look like the screen shot below. 40 | P a g e How and Where Do I Attach an Invoice? cont You will see a button that is called attachments, click on this where you do the attaching of your scanned documents and the next screen is Click on the Browse Button and show the system the pathway where you have stored your documentation on the “S” Drive (once you have done this once it will automatically remember the pathway each time you use the browse button) Double Click on your documents and they will become PDF files. You need to complete the Description and click on Update Changes Plan. and the file will now be a PDF document against the Travel Click on Cancel and this will take you to the previous screen Tip: Cancel in ProMaster is Exit 41 | P a g e How Do I Claim My Meal Allowance After Travel? Step 1 Locate the Trip through the Travel Tab OR from your Home Page On the right hand side, locate the “Double Brackets” for the relevant trip you wish to make your meal allowance claim. Click on the double brackets. Step 2 After clicking on the “Double Brackets” your screen will look similar to this. You have on one side your travel plan and the other is your transactional data. Step 3 Select the Button “Create Quick Claim” Step 4 Complete the relevant information on the “Quick Claim” screen. Date: Defaults to current date, do not change. Description: A brief description of the expense must be entered. Merchant: The name of the merchant the expense relates to for meal allowance the merchant is CSU. Expense Category: Choose the relevant expense category that your expense relates to for meal allowance choose Meal Allowance. Price: Enter the value of your claim Currency: Defaults to AUD. Tax Code: Defaults to NOGST. Net: Defaults from the value in Price. Tax: GST value - Nil Gross: Total value of your claim. 42 | P a g e How Do I Claim My Meal Allowance After Travel? This is an example of a completed claim. Click on SAVE and the claim will appear at the bottom of the Allocations list (under the Visa Transactions if you hold a Visa Card Depending on the number of transactions you have, the claim will sit at the bottom the “Transactions/ Claim to Attach” area on the right hand side. (You may need to scroll down) and locate the Claim which will show as an icon similar to this. Step 5 Match the quick claim to the relevant expense on the left hand side (travel plan) Match the Claim to the estimated expense, Click on the Link Expense to Travel Plan Button, Click on the Allocate Button Step 6 Click “Submit All” Once you have clicked “Submit All” the status of Waiting Accountholder will change to “Private Remittance”. This means that the transaction is waiting for Finance to approve and process into your bank account. 43 | P a g e Page Intentionally Left Blank 44 | P a g e