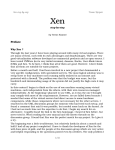
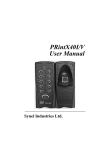
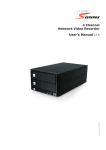
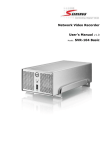
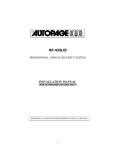
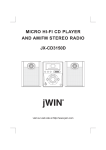
1
HMX2500
Home Entertainment Party System
Water Damage:
The apparatus must not be exposed to dripping or splashing and objects filled with liquids,such as
vases,must not be placed on the apparatus.
Disconnection:
The mains plug is used as the disconnect device,the disconnect device must remain readily operable.
Class 1 Apparatus:
Apparatus with class 1 constru ction must be connected to a mains socket outlet with a protective earth ing
connection.
USER INSTR UCTI ONS FO R DVD PLAYER
Please Do Not :
Put the player in sunshine,on or next to any radiation devices such as heaters ,stoves
or other appliances that produce heat
Put the player in badly ventilated,dusty or high moisture areas or in unsteady or vibrating
place .
Expose the unit to rain or water
Play discs that are scratched or warped as they may damage the unit .
AC 240V~,50Hz(set the voltage selector to suitable position first).
2. Read s pi ct ur e CD to real ize di gi tal pi ct ur e di spl ay.
4. 24b it/96K Hz di gi tal aud io conver ter,hi gh qua lity sound eff ect s, pr of essi ona l Hi-Fi level .
5. Video component signal output,S-video output,Composite video output,Optical, Coaxial
HDMI and YUV output for selection.
7. Various TV screen display selection and preferre d story selection to view.
PROTECTION
,
Laser head is the most important
and critical part of the whole machine.Its performance is
directly linked to the whole equipment s service life and error correction function.When a
common player reads a scratched disc or a non-standard disc,the laser intensity will be 2-4
times or even up to 20 times the normal level,thus greatly reducing its service life.This
appliance is provided with a unique laser head over current protection system,which will
ensure constant laser current and thus greatly extend the service life of the laser head.
Controls
1
8
3
2
4
10
9
1.STANDBY
2.VFD DISPLAY
3.VOLUME/MULTI
4.OPEN/CLOSE
5.PREVIOUS /TUNING6.PLAY/PAUSE
1
9
10
2
6
11
7
12
7.NEXT /TUNING+
8.MICROPHONE1&2 JACK
9.USB PORT
10.COMPARTMENT DOOR
11.INPUT
12.MENU
3
4
11 12 13
1.ADJUST MICROPHONE DELAY
2.ADJUST MICROPHONE TREBLE
3.ADJUST MICROPHONE BASS
4.MICROPHONE 3 VOLUME
5.MICROPHONE 3 INPUT JACK
6.HDMI OUTPUT JACK
7.AUDIO OUTPUT JACK
8.COMPONENT (YUV) VIDEO OUTPUT JACK
9.RIGHT SPEAKER OUTPUT JACK
10.LEFT SPEAKER OUTPUT JACK
5
5
6 7
14
8
15 16 17 18
19
20
11.AUDIO LINE OUTPUT
12. LINE AUDIO INPUT
13.AUX AUDIO INPUT
14.FM ANTENNA JACK
15.DIGITAL SIGNAL COAXIAL OUTPUT
16.VIDEO OUTPUT JACK
17.S-VIDEO OUTPUT JACK
18.DIGITAL SIGNAL OPTICAL OUTPUT
19.AC INPUT(240V~,50Hz)
20.POWER SWITCH
MUTE
STANDBY
MULTI MENU
SOURCE
X-Bass ON/OFF
EJECT
SOURCE
X-Bass
F.WARD
/TUNING+
B.WARD
/TUNING-
ANGLE
EJECT
MULTI MENU ADJUSTMULTI MENU ADJUST+
STEP/STEREO/MONO
SPEAKER LIGHT
REV/TU-
39
NEXT /CHANNEL+
PREV /CHANNELSLOW
SUBTITLE
LANGUAGE/L/R
TIME
USB
39.
conflicts
buttons on
as this will cause a
batteries. Do not
the batteries leak
. Dispose of old batteries
Video cable (yellow)
Instruction Manual
1PC (DVD to TV)
2PCS
,example:
Do not place the amplifier unit on top of the speakers the vibrations may damage the unit and void the warranty.
3. Disc Basic Operation
Once all the connections and settings have been
made, the DVD unit is ready for normal use. Prior
to playback, make sure the following operations
have been carried out.
1. Switch on the TV and select suitable mode.
e.g.:If connected by S-Video, then select
S-Video mode.
2. Switch on this DVD unit.
3. Press the INPUT key on the front panel
or on the remote control and select DISC.
LOADING will be shown on the screen:
POWER
Press NEXT or PREV to jump to next or previous
track/chapter/file.
Press PREV key:
PREV
Press NEXT key:
NEXT
Loading...
Press F.WARD &B.WARD key to get 2X, 4X ,8X,
16X,32X, normal play circular fast forward &
backward function
lf there is no disc, NO DISC will be shown on
the screen:
F.WARD
2X
No disc
Step 2: Press the OPEN/CLOSE key, the tray
comes out automatically.
OPEN/CLOSE
2X
B.WARD
Open
Step 3: Place the disc on the tray, press
OPEN/CLOSE to close the tray, the disc type
will be shown on the VFD screen.
3.1 Play disc
Press STOP key once to enable memory stop.
Press PLAY to execute continueous place back.
Press STOP key twice to stop playback.
STOP
STOP
Insert a disc into the DVD unit and it will start
playing automatically. Press PLAY/PAUSE to
temporary stop playback,press it again to
resume.
PLAY
NOTE: All images in this manual are
illustrations for reference only.
Press PAUSE key:
PAUSE
4. DVD Description of Functions
4.1 Subtitle
Track Go To: --:--
This DVD function enables you to select
multi subtitle languages (Depending on the disc
encoded ).
Press SUBTITLE key to get the desired display.
For example,select language 1- English
from 8 options.
SUBTITLE
TIME
Disc Go To: --:--
01/08 English
Sel e ct Track: -- /13
Off
4.2 Title
Press the TITLE key to get the title
menu.(This operation works only for
multi title encoded discs).
You may pr es s the nu mbe r bu tton s to en ter
the de sired pl ay ing time, cha pt er or trac k nu mbe r.
Fo r ex amp le 55 :50 ,stan ds for 55 mi nu tes an d
50 sec on ds .
4.7 PBC play
In PBC ON mode(press MENU/PBC FOR vcd 2.0),
song selection can only be made in the main menu.
4.3 Menu
Press the MENU key on remote to return
to the main menu.
4.4 Direction keys
4.8 Repeat from A to B
Press A-B key once to set the initial point (A):
A-B
A
While playing discs, the four direction keys
(up,down,left,right) enable you to select your
options in title, menu or setup.
4.5 Number keys
Press the relevant number key for direct
access according to titles.
Press A-B key again to set the end point(B):
AB
A-B
4.6 Time
While playing a DISC, press the TIME key
r e p e a t l y, t h e f o l l o w i n g w i l l b e d i s p l a y e d
depending on which type of disc playing:
TT: /12 CH:00/00
TIME
NOTE: All images in this manual are
illustrations for reference only.
Select direct time by pressing a number
in the subtitle chapter, then press the
relevant key.
4.9 Repeat
4.10 Zoom
In DVD mode, press the REPEAT key. The
following will be displayed:
REPEAT
Chapter
The picture may be enlarged to facilitate your enjoyment of
a particular action .
Press this button repeatly,the zoom scales will be change
respectively.
4.11 Angle
Chapter repeat on
REPEAT
Title
Press the ANGLE key c ontinuously on the remote
control to view various angles of the same image
(This operation works only for discs that are
multi angle encoded).
Angle
2
1/4
Title repeat on
REPEAT
All
Repeat all
4.12 Mute
REPEAT
Press th e MUTE key on th e remote contr ol to mute th e
sound, press it again to resume normal sound.
Repeat off
ln SV CD/VC D/CD mode, pr ess the PB C key to
acc ess PB C off for VC D 2. 0, pr ess the REP EAT
key and the fol lowi ng will be di spl aye d:
REPEAT
Track
Track
REPEAT
All
REPEAT
Repeat off
ALL
NOTE: All images in this manual are
illustrations for reference only.
5.Settings
5.1.3 Screen Saver
Press the SETUP button on the remote control,
the SETUP MENU (main) will be displayed.
Ge neral
Audio
Video
Preference
Ge neral Setup Pa ge
TV Display
PS
Angle Ma rk
On
OS D Lang
Eng
Captions
Off
Screen Sa ver
On
Off
HDCD
Off
Last Me mo ry
The system setup options are illustr ated below:
Ge neral
Audio
Video
Preference
Ge neral Setup Pa ge
TV Display
PS
Angle Ma rk
On
OS D Lang
Eng
Captions
Off
On
Screen Sa ver
On
Off
HDCD
Off
Last Me mo ry
Off
Set OS D La nguage
Go To Ge neral Setup Pa ge
Th e u ser m ay s et t he S creen Sa ver o n o r o ff.
1 . P r e s s t h e L E F T o r R I GH T a r r o w b u t t o n s t o
highlight the icon of the desired page,then
p r e s s t h e D OW N a r r o w b u t t o n t o a c c e s s
that page.
P r e s s t h e D OW N a r r o w b u t t o n t o h i g h l i g h t
the desired option. Press ENT to select
the various options.
2. Press t he LE FT ar row bu tton s t o exi t t he op tion ,
pr ess S ETUP ag ai n t o exi t t he S et up M en u.
5.2 Audio setup
Audio setup includes: Speaker setup, Spdif
setup, CH EQ setup, 3D proc essing.
Ge neral
Audio
Video
Preference
Audio Se tup Pa ge
Speaker Setup
Spdif Se tup
CH EQ Se tup
3D Process
5.1 General setup
5.1.1 TV display
The system setup options are illustr ated below:
Ge neral
Audio
Video
Preference
Ge neral Setup Pa ge
TV Display
PS
4:3/PS
Angle Ma rk
On
4:3/LB
Eng
OS D Lang
16:9
Off
Captions
On
Screen Sa ver
Off
HDCD
Off
Last Me mo ry
5.2.1 Speaker setup
5.2.1.1 Downmix
a) LT/RT
A disc recorded multi-channel soundtra ck,the output
sighal will be incorporated to " left total/light total "
b) STEREO
A disc recorded multi-channel soundtra ck,the output
sighal will be incorporated to " STEREO "
Set TV Di splay Mo de
Highlight the TV DISPLAY mode option and pres s
the arrow buttons to choose the TV display mode
that you prefer . Pres s ENTER to confirm.
5.1.2 Language
The system setup options are illustr ated below:
Ge neral
Audio
Go To Audio Se tup Pa ge
Video
Ge neral
Audio
Video
Preference
Speaker Se tup Pa ge
Downmi x
STR
LT/RT
Stereo
Preference
Ge neral Setup Pa ge
TV Display
PS
Angle Ma rk
On
OS D Lang
Eng
English
Captions
Off
French
Screen Sa ver
On
Ge rma n
Off
HDCD
Spanish
Off
Last Me mo ry
Italian
Portuguese
Set OS D La ng
Th e u ser m ay s et t he l anguage o f screen
displays,subtitles,audio a nd DVD m enus .
Set Downmi x Mo de
NOTE: All images in this manual are
illustrations for reference only.
5.3.1 Spdif output
The system setup options are illustr ated below:
Ge neral
Audio
Video
5.3.3 3D Process setup
The system setup options are illustr ated below:
Preference
Ge neral
Spdif Setup Pa ge
Spdif Ou tput
PCM
Spdif Off
Spdif/Raw
Spdif/Pcm
Setup Sp dif
Audio
Video
Preference
3D Pr ocessing Pa ge
Reverb Mo de
Off
Off
Concert
Living Ro om
Hall
Bathroom
Cave
Arena
Church
Off
Highlight the Spdif option and press the arro w
buttons to choose the Spdif output that you prefer.
There are 3 optional modes: Spdif Off, Spdif/Raw,
and Spdif/Pcm.
a) Spdif Off: No signal is outputted fro m the Coaxial Ouput
jack and the Optical Output jack.
b) Spdif/Raw: Choose this setting if your DVD player is
connected to a disc recorded with Dolgy Digital,DTS
and MPEG audio formats.T he corre sponding digital,
signals will be outputted fro m the Coaxial Output jack
or Optical Output jack. This players digital output jacks
are designed for connection to a Dolby Digital,DTS or
MPEG receiver or decoder.
c) Spdif/Pcm: Choose this setting if your DVD player
is connected to a 2-channel digital stereo amplifier.
When playing a disc recorded with Dolby Digital and
MPEG audio formats,audio signals will be modulated
into a 2-channel PCM signal and will be outputted fro m
the Coaxial Output jack or Optical Output jack.
5.3.2 EQ setup
The system setup options are illustr ated below:
Ge neral
Audio
Video
Preference
CH EQ U Pa ge
Type
None
None
Rock
POP
Live
Dance
Tenco
Classic
Soft
Select EQ Type
Highlight TYPE and pres s the arrow buttons and ENT to
choose EQUALIZER type. There are 8 EQ types:
None, Rock, POP, Live, Dance, Tenco,
Classic, Soft.
Reverb Mode is set to Off,Concert,Living
Room,Hall,Bathroom,Cave,Arena,Church
mode.
NOTE: All images in this manual are
illustrations for reference only.
5.4 Video setup
5.4.2 Resolution
The system setup options are illustr ated below:
The system setup options are illustr ated below:
Ge neral
Audio
Video
Preference
Ge neral
Audio
Video
Preference
Video Se tup Pa ge
Comp onent
Resolution
480 I
576I
Qu ality
720P(50Hz )
HDMI Se tup
720P(60Hz )
Video Se tup Pa ge
Comp onent
S-Video
Resolution
Qu ality
HDMI Se tup
1080I(50Hz )
1080I(60Hz )
1080P(50Hz )
1080P(60Hz )
Resolution
Go To Video Se tup Pa ge
Video Setup includes: Component, Resolution,
Quality, HDMI Setup.
Resolution is set to 480I,576I,720P(50Hz),
720P(60Hz),1080I(50Hz),1080I(60Hz),
1080P(50Hz),1080P(60Hz).
5.4.1 Component
5.4.3 Quality
The system setup options are illustr ated below:
The system setup options are illustr ated below:
Ge neral
Ge neral
Audio
Video
Preference
Video Se tup Pa ge
Comp onent
S-Video
S-Video
Resolution
Interlace YUV
Qu ality
HDMI Se tup
Audio
Video
Preference
Video Qu ality Se tup
Sharpness
Brightness
00
Contrast
Brightness
Comp enent
Component is set to S-Video or Interlace YUV.
Set the sharpn ess,brightness and contras t
depending on your prefere nce.
NOTE: All images in this manual are
illustrations for reference only.
5.4.4 HDMI setup
The system setup options are illustr ated below:
5. 5. 1 Pas swor d set up
Choose HDMI ON or OFF.
Set the pa ss wor d.
Ge neral
Ge neral
Audio
Video
Preference
HDMI Setup Pa ge
HDMI
Audio So urce
On
Off
On
AUTO
Audio
Video
Preference
Password Setup Page
On
Password Mode
On
Off
Password
Go To Password Mode
HDMI
Sel ec t Pas swor d Mod e ON.
Choose Audio Source AUTO or PCM.
Ge neral
Ge neral
Audio
Video
Preference
HDMI Setup Pa ge
HDMI
Audio So urce
On
AUTO
Audio
Video
Preference
Password Setup Page
Password Mode
On
Change
Password
AUTO
PCM
Go To Password Mode
Audio So urce
The de fau lt ol d pa ss wor d is 00 00 .
5. 5. 2 Def au lt
5.5 Preference
Highlight the Preference option.
The sy st em se tup op tion s ar e illus trat ed be low:
If yo u want to res et the sy st em( de fau lt va lue ),
hi gh ligh t the RES ET op tion an d pr es s ENTE R
to co nf irm.
Ge neral
Ge neral
TV Type
Audio
Subtitle
Disc Menu
Parental
Password
Default
Audio
Video
Preference
Preference Page
PAL
Eng
Eng
Eng
Audio
Video
Preference
Preference Page
TV Type
PAL
Audio
Eng
Subtitle
Eng
Disc Menu
Eng
Parental
Password
Default
Reset
Load Factory Setting
Go To Preference Page
Set up the Pr ef er en ce pa ge .
Choose PAL or NTSC for TV type.
Select your prefer language for Audio,Subtitled,
Disc Menu.
※NOTE: All pictures in this manual as
refference only.
6.Operating the DVD unit
6.1.Operating the Mp3 function
To play a Mp3 disc
1.Instructions to insert a Mp3 disc.This machine will start to search for the information on the disc
and show it in the display.
2.Press the number buttons to select the track number desired.
3.Press the DIRECTION key(up,down,left,right) to select desired files,press ENTER or PLAY keys
to play.
2.Press the REPEAT button repeatly to show “repeat one” / “repeat folder” and “repeat off” on the TV screen.
3.In STOPmode,press PROGRAM to change to Filelist or Folder List.
In Filelist mode press RIGHT key to add files to playlist.
Then press PROGRAM into the Playlist menu. In the playlist menu,you can enjoy the playback of
th selected files or press LEFT to delete the added file.
Wh en a
are
Features are
as
1.Insert a disc,the machine searches for disc information and the main menu displays on the
screen. Press a direction key to select a picture. Press the PLAY key to enter play mode. Press
STOP to exit play mode.
2.In PLAY mode,press LEFT&RIGHT to rotate pictures, UP&DOWN to show mirror image.
6.3.Function of USB reader
This DVD unit has a USB jack. Press the INPUT key to select Disc,then you can insert
a USB and pressUSB key to play Mp3 music,MPG4 or JPEG files in USB(operation is similar to
MP3 disc.
Important: The USB port is intended only for data transfer only, other devices cannot be used with
this USB connection. The use of USB extension cords is not recommended.
a disc hold it in the centre and on the edge.
as this
7.Operating the Amplifier
1. Be sure to switch off the power and to connect the outputs to corresponding input jacks.
2. Turn on the power and wait 3-4 seconds untill the speaker functions are connected.
3. Select an audio source by pressing the INPUT key on the front panel or on the remote control
to display AUX,LINE IN,DISC/USB,BT,TUNER.
4. Adjust the VOLUME/MULTI knob on the front panel or the VOL+/- key on the remote control
to adjust the setting of the main volume.
5. Press the MENU key on the front panel or the MULTI MENU key on the remote control to
display TREBLE, MIC MENU then adjust the knob or press MULTI MENU adjust +/- to
increase or decrease music treble,bass,and MIC effect.
6. Press the MUTE key on the remote control to mute, press it again to reset.
Press X-Bass on the remote to turn on/off X-Bass effect.
7. In disc playback,press the SUBTITLE key to copy music or picture to USB.
7.2. Tuner applications
1.Before using the radio functions, you must attach the supplied antenna. Adjust the
antenna to obtain optimum reception.
Press the INPUT key on the front panel(amplifier)or on the remote control,to select
"FM"function.
2. Pr es s the CH +- CH - ke y on the rem ot e co nt rol to find radi o ban ds that yo u hav e pr ev ious ly
sa ve d .
3. Pr es s or hol d the TU+/ TU- ke y on the rem ot e co nt rol to adj us t the radi o frequ enc y manu al ly.
wi ll
and
and it will
. Pr es s the num ber but tons to se t des ired pr ogr am ed num ber . The mac hi ne ca n
mem or ize at mos t 40 FM radi o ban ds .
MIC1,MIC2 or MIC3 is inserted.
the
the
VOLUME.
3.
the
For MIC3,you can use the MIC3 volume knob to adjust its volume.
4. You can use the delay,treble & bass knob on the rear panel to adjust all MIC effect.
the
in oder
Do not
Adjust
7.4.Bluetooth pair and connect
● Turn off any Bluetooth devices previously paired (linked) with this unit.
● Turn on the Bluetooth features on your phone or music player.
● Turn on and set this unit to Bluetooth mode. The flashing blue light around the
VOLUME/MULTI knob indicates it is in pairing mode.
● Set your phone or music player to search for Bluetooth devices.
● Select TEAC HMX2500 from search results on your phone or music player.
● Select OK or YES to pair this unit with your phone or music player.
● If protected, enter 0000 for passkey steady blue light indicates successful connection.
Guide
that
may
your
the
the
that you are operating the TV and the power amplifier correctly.
is a
)
the player and the remote control.
problems,switch the power off,
wait a few seconds and then switch it on again. If no error message is displayed, the player
should work properly.
Specifications
NTSC/PAL-M/PAL-N
Max Power
2500W
FM frequency
87-108MHz
Audio input
2.0CH,LINE IN,AUX,DISC/USB,BT
Power voltage
AC 240V~,50Hz
300W
* Specifications are subject to change.
CAUTION
·The apparatus shall not be exposed to dripping or splashing and that no objects filled with liquids,
such as vases, shall be placed on the apparatus.
·Minimum distances 10 cm around the apparatus for sufficient ventilation.
·The ventilation should not be impeded by covering the ventilation openings with items,such as
newspapers, table-cloths, curtains, etc.
·No naked flame sources, such as lighted candles, should be placed on the apparatus.
·When the mains plug or an appliance coupler is used as the disconnect device,the disconnect device
shall remain readily operable.
To be completely disconnected the power input, the mains plug of apparatus shall be disconnected
from the mains completely.
·The main plug of apparatus should not be obstructed or should be easily accessed during intended
use.
·The use of apparatus in tropical climates.
·Attention should be drawn to the environmental aspects of battery disposal.
·Batteries shall not be exposed to excessive heat such as sunshine, fire or the like.