1
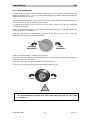
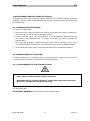
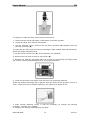
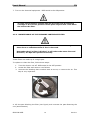
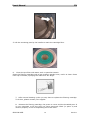
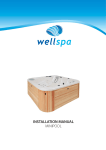
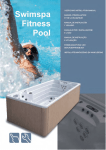
User’s Manual EN CONTENTS 1. General Details........................................................................... 2 2. Safety Warnings.......................................................................... 3 2.1. 2.2. 2.3. 2.4. General. Warnings in maintenance work. Warnings in the use of the Spa. Avoiding risks of hyperthermia. 3. Use of the Spa............................................................................... 3.1. Spa Control Panel 3.2. Function buttons 3.3. Initial start up 3.4. Set the Temperature 3.5. Set the Time and the Filtering Cycle. 3.6. Set the Mode 3.7. Light sequences 3.8. Other options 3.9. Jets operation 7 4. Maintenance Instructions of the Spa.................................................. 4.1. Renewing the Spa Water 4.2. Maintenance of the Filter 4.3. Maintenance of the Acrylic 4.4. Maintenance of the Unit 4.5. Maintenance of the Light 4.6. Maintenance in Periods of non-use or absence 11 5. Maintenance of the water .............................................................….. 18 5.1. Safety in the use Chemical Products. 5.2. Maintenance Schedule of the Spa Water. 5.3. pH Adjustment. 5.4. Disinfection of the Water. 5.5. Use of Special Products. 5.6. Ozone Generator. 6. Recycling and the Environment........................................................... 21 IMPORTANT This instructions manual contains fundamental information on the safety measures to be adopted when installing and starting-up the spa. It is therefore essential that both the Fitter and the User read these instructions before assembly and start-up. SI222-CH USER 1 EN-V1.1 User’s Manual EN 1. GENERAL DETAILS This manual contains all the information needed to fully enjoy your SPA. Please read carefully all the instructions provided as well as the installation manual that you will find with this user manual. If you have any question or doubt on the operation or maintenance of this product, please contact your local dealer. They are professional specialists and their knowledge will help you enjoy this product. Keep this manual in a safe place as you will find it very useful. IMPORTANT The manufacturer reserves the right to modify part of the design or specifications without prior notice and without entering into any obligation. This Spa has been designed and conceived for private use only: any public use shall annul its guarantee. SI222-CH USER 2 EN-V1.1 User’s Manual EN 2. SAFETY WARNINGS 2.1. GENERAL Avoid contact with electrical voltage Carefully follow current regulations regarding accident prevention. Any modification on the equipment requires prior authorisation from the manufacturer. Original spare parts and accessories authorised by the manufacturer guarantee greater safety. The manufacturer of the equipment is exempt from all liability for damages caused by using non-authorised spare parts or accessories. The user shall ensure that qualified adult professionals carry out both the assembly and maintenance works, who have previously carefully read the installation and service instructions. ATTENTION – Correct earthing connection is essential. The earth connection circuit of the building must be in perfect condition to guarantee the safety of the Spa user. If you have doubts on the matter, ensure the earth circuit is reviewed by qualified personnel. The manufacturer shall not be responsible for the damages caused by inadequate maintenance of the earth connection circuit. ATTENTION – It is essential that the owner of the Spa tests the differential switch at least once a month, to check its good working order. The manufacturer shall not be responsible for the damages caused by the assembly of non-authorized accessories, nor for those caused by a improper handling by non-qualified personnel. Please contact your authorised dealer or technical assistance service if you have any doubts or need technical assistance. During operation, some parts of the equipment are at dangerous electrical voltage levels. Work on each element or equipment can only be performed once it has been disconnected from the mains and with the start-up devices disconnected. Safety in the operation of the machine can only be guaranteed if installation and service instructions are followed. The limits indicated on the electrical control panel cannot be exceeded under any circumstances. Contact the Technical Service of the manufacturer or your local dealer in the event of malfunction or a breakdown. In this respect, the current regulations in each country should be followed. There is a risk of flooding with this equipment and therefore, the Spa should be installed in an area prepared to collect or drain leaking water (either from below or overflowing water) as a result of using the Spa or from possible leakage in any of its circuits. (See the Guarantee). The installation of the Spa must at all times meet current regulations applicable in each country, particularly those referring to electrical safety. This unit must be installed in an appropriately prepared area with easy access to all the components of the Spa. The Guarantee does not cover any SI222-CH USER 3 EN-V1.1 User’s Manual EN building work required to position or replace the product. (See the Guarantee). IMPORTANT The manufacturer shall not be held responsible for any damage as a result of incorrect positioning or misuse of the Spa. 2.2. WARNINGS ON MAINTENANCE WORK Before carrying out any electrical or mechanical maintenance work, make sure that the machine is disconnected from the mains, and that the start-up devices are blocked. Do not handle the equipment with wet feet. 2.3. WARNINGS ON THE USE OF THE SPA Take extreme precautions to stop children from entering the Spa unattended. To avoid accidents, ensure that children are supervised at all times. Never leave children alone in the Spa. Take care when entering and leaving the Spa to avoid slipping on wet surfaces. Do not allow anybody to play with sharp or metal objects inside the Spa, which could damage the acrylic surface. Do not allow any user to access the electrical parts of the Spa. Do not start-up the Spa unless it is full of water. Do not use electrical or electronical apparatus inside the Spa. Do not let animals in the Spa. Do not fill the Spa with other liquid other than fresh, duly treated water. Do not fill the Spa with hot water (maximum 35ºC); let the water heat by itself, otherwise it could damage the temperature probes (see “Temperature Adjustment”). Do not use the Spa immediately after intense physical exercise. Do not use the Spa if you are suffering from a contagious disease or 14 days after recovering from a contagious disease. SI222-CH USER 4 EN-V1.1 User’s Manual EN In order to guarantee maximum safety when bathing all our Spas use pumps designed to suction water from anti-vortex, safety drain covers, located on the floor of the Spa. Take special care that these drain covers are not covered by any object or the users (pieces of clothing, hair, legs, etc.). For safety reasons, your head should always be outside the Spa in order to avoid drowning. Do not use the Spa if the drain covers are broken, damaged or unassembled, as apart from damaging the Spa, it could also lead to a risk of drowning The headrests of your Spa are made of synthetic foam, which can be damaged in high concentrations or bromine or chlorine, or low levels of pH. Make sure that when adding chemical products, the headrests are neither totally nor partially immersed in the water. If necessary, remove them until the chemical products have taken effect. Damages resulting from improper use shall not be considered under the guarantee of the product. The Spa includes a cover designed to protect the acrylic surface from sunrays when it is not being used. This cover will also help to keep the water warm and for sun protection that could damage the acrylic material of the Spa. The cover will require additional means of protection in the event of heavy rain or snow. The cover is not designed to bear heavy weights, not even children or animals. Also, water in bad condition could damage the cover. Therefore, keep the chemical levels in accordance with the instructions provided in this manual. Do not clean the cover with detergent or abrasive products as they will cause damage. Improper use of the cover is not included in the guarantee. WARNING The water should be disinfected thoroughly before using the Spa, especially if it has not been used for a certain period of time, whether or not it has been left with or without water inside. During periods of non-use, traces of stagnant water may remain, which may cause the growth of micro organisms potentially dangerous for health. Therefore, disinfect the Spa as indicated in this manual, ensuring that the pH and disinfectant parameters are suitable. SI222-CH USER 5 EN-V1.1 User’s Manual EN 2.4. AVOIDING RISKS OF HYPERTHERMIA Prolonged, direct contact with hot water could cause HYPERTHERMIA. This occurs when the internal body temperature reaches levels above the normal temperature of 36.5ºC. It is advised not to bathe for longer than 15 minutes Symptoms of hyperthermia are a sudden drop in blood pressure resulting in a sensation of dizziness with the possibility of fainting. The Spa water should never be above 40ºC. Water temperatures between 37ºC and 40ºC are only considered safe for adults without any health problems. Lower temperatures are recommended for the majority of people and children. THE USE OF ALCOHOL, DRUGS OR MEDICINES COULD INCREASE THE RISK OF HYPERTHERMIA. IT IS NOT ADVISABLE FOR PREGNANT WOMEN, PATIENTS WITH HIGH BLOOD PRESSURE, A HEART CONDITION, DIABETES OR UNDER MEDICATION TO USE THE SPA. SHOULD SEEK DOCTOR’S ADVICE. SEEK DOCTOR’S ADVICE. IMPORTANT Your Spa is designed for private use and discontinued operation. It is recommended not to exceed two 15-minute massage sessions per day. SI222-CH USER 6 EN-V1.1 User’s Manual EN 3. USE OF THE SPA 3.1. SPA CONTROL PANEL 3.2. FUNCTION BUTTONS Figure Description Figure Description Power Mode Power on/ stand-by Switching key Jets1 Time Pump 1 Time Jets2 Warm Pump 2 Temperature/ time / mode set key Blower Cool Air blower Temperature/time/mode set key Light Operating instructions (1) Power: this button is used to switch between stand-by and power on modes. (2) Jet1: press the “jet” button to activate the low speed of the pump and again for the high speed of the pump (optional depending on the spa model), press the “jet” button again to turn off the pump. (3) Jet2: Press the “jet” button to turn the pump 2 on or off (Optional depending on the spa model). (4) Blower: press the “blower” button to turn the blower on or off (Optional depending on the spa model). (5) Light: press the “light” button to turn the light on or off and switch between different modes. (6) Warm :Temperature/ time/mode set key (7) Cool : Temperature/ time/mode set key (8) Mode : allows to switch between STANDARD, ECONOMY and SLEEP modes (9) Time : time (10) Time + Warm: Press together time and temperature, it will indicate reversely. Press again, and it will return back. (11) Warm + Cool: Press them together to lock the panel, indicating PL. Press them again to unlock. (12) Time + Blower: Press them together to return to original set. SI222-CH USER 7 EN-V1.1 User’s Manual EN 3.3. INITIAL START UP 3.3.1. Stand-By / Power On Power on Stand-by (1) Stand-by the spa goes into stand-by mode when the spa is properly supplied with power. (2) In the stand-by mode, the current temperature and time will appear on the screen. (3) Power on: press power button to turn on the power, once the panel is turned on, all the functions are available. 3.4. SETTING THE TEMPERATURE (10 – 40 ºC) (1) Press the “Warm” button. Each time the button is pressed, the set Temperature display will increase by one degree. (2) Press the “Cool” button. Each time the button is pressed, the set Temperature display will decrease by one degree. 3.5. SET THE TIME AND THE FILTERING CYCLE (1) To set the time, press the “Time” button, then the “Mode” button. (2) Select the hour by pressing “Warm” or “Cool” button, each press will change the time by one hour. Press “Mode” button to enter the minutes, press “Warm” or “Cool” button to change the minutes. Press “Mode” button to exit the time setting procedure. (3) To set the filter cycle, press “Time” button and, ”Mode”, ”Mode”, ”Mode”. Within 3 seconds, press “Warm” button or “Cool” button to adjust any time. Start time hour and minutes for the start time of filter cycle 1. Press the “Mode” button to set the end time of filter cycle1, adjust the time as above. Press the “Mode” button to set the start time of filter cycle 2, adjust the Time as above. Press the “Mode” button to set the end time of filter cycle 2, adjust the time as above. Time set Filter cycle 1 set Filter cycle 2 set 3.6. SET THE MODE (1) Press “Mode” button to enter mode programming. (2) Press “Warm” button or “Cool” button to select the mode, then press “Mode” button to confirm the selection. STANDARD mode: maintains the desired temperature. ECONOMY mode: the spa only heats the water during the filter cycles. SLEEP mode: The heater will be turned off all the time. SI222-CH USER 8 EN-V1.1 User’s Manual EN Once the spa has been properly connected, the system will automatically select the standard mode to maintain the desired temperature. 3.7. LIGHT SEQUENCES 3.1 The LED LIGHT has different modes, press the button "Light" to turn on the light, once again to turn off the light, press the button again to turn the light and change into another mode. 3.8. OTHER FUNCTIONS Filter cycle programming Under the standby mode, the filter cycle programming will automatically run twice each day. Hose and pipe clearing cycle One minute after the filtration cycle has started; the system will automatically turn on the blower and the massage pump for 2 minutes to purge the hydraulic circuits. Clean up cycle (Optional depending on the configuration) At the end of any massage, after 30 minutes, a clean up cycle will begin: the filtration and ozone generator will run for one hour. If all the buttons are left on, the system will revert to standby mode after one hour. Massage automatically turns off If left on, the Jest1 \ Jets2 and Blower will automatically turn off after 15 / 30 minutes. Memory function The system will revert to the last setting after each power on. Diagnosis functions See the installation manual for more detailed instructions. Default settings Temperature: 38ºC Mode: Standard Filter cycles: Filter 1 (08:00 10:00) Filter 2 (20:00 22:00) RISK OF ELECTRIC DISCHARGE The user must not repair any parts. Do not attempt to repair this control. Call your dealer or technical service. SI222-CH USER 9 EN-V1.1 User’s Manual EN 3.9. JETS OPERATION The water jets provide a hydrotherapy pressure jet. It is a closed circuit, where the water is absorbed by 1, 2 or 3 pumps (depending on the SPA model) through the drain and driven to the jets. The hydromassage effect is provided by the jet, when the circuit water mixes with the outside air, in the so-called Venturi effect. To adjust the amount of air driven into the jets, simply turn the air input tab (venturis) as follows: Turn clockwise to reduce the amount of air mixed in the jets. This will reduce the intensity of the jet massage. Turn anti-clockwise to increase the amount of air mixed in the jets. increase the intensity of the jet massage. GREATER INTENSITY This will LESS INTENSITY Each air inlet activates a certain group of jets. Some jets can also adjust the flow intensity on opening and closing the water flow. To do this, proceed as follows: Turn the outer ring a quarter clockwise to close the jet. Turn the outer ring a quarter anti-clockwise to open the jet. OPEN CLOSE ATTENTION! Do not attempt to forcibly turn the outer ring of the jet, as you could damage it. SI222-CH USER 10 EN-V1.1 User’s Manual EN 4. MAINTENANCE INSTRUCTIONS OF THE SPA The Spas are built with maximum quality and with the hardest wearing materials available. Proper care and maintenance will ensure a long life-span of the Spa and its components. 4.1. RENEWING THE SPA WATER. To change the Spa water: Disconnect the electrical equipment, placing the differential switch (installed in the main input of the home) in the OFF position. Locate the drain valve (see Spa drainage of the Installation Manual) and turn the valve to the OPEN position. The Spa will empty by gravity through the general drain. Once the Spa is empty, inspect the acrylic and clean if necessary (see point 4.3. Maintenance of the acrylic). Turn the drain valve to the CLOSED position. Fill the Spa with clean water (see Filling the Spa of the Installation Manual). 4.2. MAINTENANCE OF THE FILTER. All Spas include either a cartridge filter or a pressure filter. Check the type of filter in your Spa and follow the maintenance instructions below. 4.2.1. MAINTENANCE OF CARTRIDGE FILTERS. It is advisable to periodically check the condition of the cartridge filter. Clean them or replace them if dirt is observed. Remember that if a filter is blocked, it will reduce the water flow and therefore, the Spa will operate incorrectly. These filters have two very differentiated parts: PRE-FILTER: It is based on a grid, where the larger particles floating on the water are deposited (). FILTERING CARTRIDGE: Retains the smaller particles (). SI222-CH USER 11 EN-V1.1 User’s Manual EN To change or clean the filter, follow these instructions: 1. Disconnect the electrical supply. Differential in the OFF position. 2. Locate the filter and remove it as shown: 3. Lift the skimmer cover. Remove the pre-filter upwards () together with the filtering cartridge (). To reach the pre-filter and the filtering cartridge in Spa models with side skimmers, follow the steps indicated below: 1. Carefully slide off the trim () of the skimmer unit upwards. 2. Remove the tray that is used as a pre-filter () 3. Remove the filtering cartridges () one by one by unscrewing and lifting them out of their housing and placing them in a horizontal position. 4. Clean the pre-filter with water until there are no remaining particles. Clean the filtering cartridge with a garden hose jet spray at low pressure until it is clean. Clean from top to bottom spraying the water at an angle of 45º. 5. After several washing cycles, it may be necessary to change the filtering cartridge. Contact your supplier. 6. Replace the filtering cartridge and pre-filter. SI222-CH USER 12 EN-V1.1 User’s Manual EN 7. Turn on the electrical equipment. Differential in the ON position. The Spa should always operate with the pre-filter and the filtering cartridge in the correct position. Never place objects that could block the inlet to the filter. 4.2.2. MAINTENANCE OF THE PRESSURE CARTRIDGE FILTER. It is advisable to periodically check the condition of the cartridge filter. Clean them or substitute them if dirt is observed. Remember that if a filter is blocked, it will reduce the water flow and therefore, the Spa will operate incorrectly. These filters are made up of a single part. To replace or clean the filter, follow these steps: 1. Turn the electric unit off. Differential in the OFF position. 2. Locate the filter and remove it as follows: 3. Unscrew the bleeding drain marked with an arrow, to remove the air. This step is very important. 4. Lift the part blocking the filter (see figure) and unscrew the part fastening the unit (anticlockwise). SI222-CH USER 13 EN-V1.1 User’s Manual EN 5. Lift the remaining part by the handle to reach the cartridge filter. 6. Clean the pre-filter with water until no particles remain. Clean the filtering cartridge with a low-pressure garden hose, until it is clean. Clean from top to bottom, spraying the water at a 45º angle. 7. After several cleaning cycles you may have to replace the filtering cartridge. To do this, please contact your supplier. 8. Reinsert the filtering cartridge, the press-on cover and the threaded part. It is very important to lift the part you have previously lifted (in point 4) and insert it properly in the corresponding slot of the filter. SI222-CH USER 14 EN-V1.1 User’s Manual EN 9. Close the valve you opened in point 1. Always remember to check that this valve is closed properly, otherwise your spa could be seriously damaged. 10. Turn the electric unit on. Differential in the ON position. Never place objects that could block the inlet to the filter Remember to follow all the steps and to close the valve as indicated in order not to damage the Spa or hurt yourself. 4.3. MAINTENANCE OF THE ACRYLIC To clean the acrylic surface, use a non-abrasive cleaner and warm water. Once the Spa is clean, rinse with water to remove the detergent. Clean the non-submerged part of the spa with good quality Spa polish once a week. Remember: never leave the Spa uncovered and exposed to sunlight, as this could cause damage not covered by the guarantee. 4.4. MAINTENANCE OF THE UNIT (Only Spas with natural wood unit) The unit is treated with special oil that protects the wood from water absorption. It is recommended to repeat this treatment periodically, at least once a year. Extra treatment given to the unit when it is new will prolong its life-span. SI222-CH USER 15 EN-V1.1 User’s Manual EN In time, the wood will darken, and because it is live matter, it is normal for small cracks to appear. This is a normal reaction to environmental conditions that do not damage the wood. It should simply be polished and treated with oil. Good quality “Teak oil” should be used or any other wood protection oil. 4.5. MAINTENANCE OF THE LIGHT Replacing the lamp is the only required maintenance on the spotlight. To replace the lamp, follow these steps: WARNING! - RISK OF ELECTRIC SHOCK Make sure the power of the Spa is turned off. The new lamp must have the same features as the lamp supplied. Never install lamps without the front lens. To ensure perfect watertightness, clean the mounting base of the flat gasket of the glass or replace it if you observe any dents or permanent damage. Depending on spotlight model, the lamp is replaced in the following way: Draining the Spa (depending on the model of spotlight) Empty the Spa (See section Spa Drainage). Fit the aforementioned plastic spanner in the front side of the spotlight and turn it in order to release its bayonet fastening. Change the lamp (press fastening). Reassemble the spotlight making sure to fasten the bayonet of the front part with the spanner and pressing sufficiently to prevent water from entering the spotlight. Assemble the trim of the spotlight in the colour you wish. Without draining the Spa (depending on the model of spotlight) Dismantle the wooden side panel where the spotlight is installed using a medium-sized stecker screwdriver. SI222-CH USER 16 EN-V1.1 User’s Manual EN To replace the lamp, turn the lamp-holder bushing anticlockwise and lift it from its position. Once the faulty lamp has been replaced, place the lamp-holder back in position and reassemble the wooden side panel of the Spa. If you have any doubt about the explanation of this operation, contact your authorised dealer or authorised technical service. 4.6. MAINTENANCE IN PERIODS OF NON-USE OR ABSENCE SHORT PERIODS (3-5 DAYS) Adjust the pH and treat the water (see Water Maintenance section). Cover the spa. Before using the Spa again, readjust the pH and treat the water again. PROLONGED PERIODS (5-14 DAYS) Set the temperature at its lowest level. Adjust the pH and treat the water (see Water Maintenance section) Cover the Spa. Before using the Spa again, reset the temperature as required , readjust the pH and treat the water again. PREPARATION FOR WINTER If it is not planned to use the Spa through the winter season or for prolonged periods of time, the following operations should be done: Disconnect the electrical equipment, placing the differential switch tab in the OFF position. Locate the drain valve (see Drainage of the Spa) and turn the red lever of the valve to the OPEN position. The Spa will empty by gravity through the general drain. Leave the drain valve open. Remove the filter cartridge/s from the filter (See Maintenance of the filter) and keep in a dry place. Clean and dry the Spa. Cover the Spa. Do not leave water in the Spa without electrical connection outdoors at temperatures below 4ºC, as the pipes can freeze and damage the Spa. SI222-CH USER 17 EN-V1.1 User’s Manual EN 5. MAINTENANCE OF THE WATER The user must pay particular attention to the maintenance of water. Maintenance will depend on the mineral content of the water used, how often the Spa is used and how many people use the Spa. There are three essential points for the maintenance of the water: FILTERING OF WATER CHEMICAL ANALYSIS AND pH CONTROL DISINFECTION OF WATER 5.1. SAFETY IN THE USE OF CHEMICAL PRODUCTS Before using a chemical product, read the instructions on the product label carefully. IMPORTANT It is advisable that always the same person handles the chemical products. Keep these products away from children. Add the exact amounts to the water, as specified. Keep containers tightly closed in dry, well-ventilated places. Do not inhale chemical products, and take care not to let them come into contact with the eyes, nose or mouth. Wash hands after use. Follow the emergency instructions on the product label in the event of an accident or ingestion. Do not smoke while handling these products – they may be flammable. Do not store these products inside the Spa unit. Do not mix products. Add first one and then the other to the water, to avoid possible reactions. Do not add chemical products to the water if there is someone in the Spa. 5.2. MAINTENANCE SCHEDULE OF THE SPA WATER All chemical products: Bromine in tablet form, Algaecides, Anti-calcareous and pH reducer, must be added to a floating dispenser (not supplied), with the massage pump on for at least ten minutes. SI222-CH USER 18 EN-V1.1 User’s Manual EN 5.3. pH ADJUSTMENT A pH index of between 7.2 and 7.6 is recommended. The pH level measures the acidity and alkalinity: below 7, are acid. Values above 7 are alkali and It is very important to maintain the correct pH level both for the disinfectant to work properly and to prevent corrosion or deposits on the Spa. Any damage caused by an inadequate pH level is not covered by your Spa guarantee. The effects of a very low pH level are: - The disinfectant will quickly dissipate. - The equipment of the Spa become rusty. - The water can start causing skin irritations to bathers. The effects of a very high pH level are: - The disinfectant is less effective. - Scale may appear on the acrylic and equipment. - The water may become cloudy. - The filter cartridge can become blocked. Check the pH of the Spa water daily using the pH test set. (not supplied) If the pH is above the indexes, use pH MINOR SPA. Wait for two hours and re-do the pH test. If the pH is below indexes, use pH MAJOR SPA. Wait for two hours and re-do the pH test. Once the pH index has been adjusted to the values indicated above, proceed to the next point. 5.4. DISINFECTION OF THE WATER Disinfection of the water is of utmost importance in order to destroy algae, bacteria and organisms that could develop in the water. However, excessive disinfection could cause skin and eye irritation. BROMIDE TABLETS are a suitable disinfectant for the Spa water. placed in the pre-filter and gradually dissolves. This product is Check the residual bromide level daily using the Br analyser set. The recommended level of residual bromide is between 2.2 and 3.3 ppm. SI222-CH USER 19 EN-V1.1 User’s Manual EN 5.5. USE OF SPECIAL PRODUCTS Apart from products to maintain the pH and disinfectant level, there are other products formulated especially for use in Spas that will help you to maintain the water and installation in perfect condition. SPA-ANTI-CALCAREOUS: This prevents the precipitation of calcium salts (scale), particularly in hard water. This product should be added weekly and whenever the water is renewed. SPA-ALGAECIDE: This algaecide prevents algae from growing in the Spa water. This product is added weekly and whenever the water is renewed. SPA-ANTIFOAM: Foam is often formed owing to the agitation of the water and grease present in the water. Whenever there is a significant amount of foam, remove it with Spa-Antifoam. SPA-DEGREASER: To remove rings of dirt and grease that form on the walls of the Spa. To use this product, it is recommended to empty the Spa and apply a degreaser with a sponge on the parts to be cleaned. Rinse immediately with plenty of water. 5.6 OZONE GENERATOR (only in spas with this option). Ozone, O3, is an oxidizing chemical compound, which is very effective for disinfecting water. The main advantage of ozone is that it leaves no chemical trace and is odourless. The capacity of ozone as a disinfectant is due to its potential as an oxidizing agent, which eliminates any organic matter that may be present in the water. In order to produce ozone, electricity is passed through an ozonator to produce ozone ions from oxygen in the atmosphere. This is an automatic process and the resulting product is injected through the jets of the Spa. The process does not require the user to use any other mechanism. The water is collected in the drains and skimmer, by the absorption action of the massage pump. It is then sent through the heat exchanger and as it leaves, the ozone is injected. The water is distributed by the filtering back-flow. Part of this flow is also distributed through the drain outlet in order to avoid stagnant water from collecting. Ozone treatment does not exclude the use of other chemical products such as Bromide or Chlorine. Ozone is considered a complementary process to them, therefore reducing the use of Bromide or Chlorine. SI222-CH USER 20 EN-V1.1 User’s Manual EN QUICK GUIDE TO THE APPLICATION OF CHEMICAL PRODUCTS Reason for Use Amounts per m3 of water Frequency of use pH MINOR SPA Add if the pH level is above acceptable levels (7.2-7.6 ppm). Add following recommendations of the chemical product manufacturer. Analyse the pH daily with the pH Test. pH MAJOR SPA Add if the pH level is below acceptable levels (7.2-7.6 ppm). Add following recommendations of the chemical product manufacturer. Analyse the pH daily with the pH Test. BROMIDE TABLETS Add if the Br level is above acceptable values (3-5 ppm). Add following recommendations of the chemical product manufacturer. Analyse the Br daily with the Br Test. ANTICALCAREOUS To prevent precipitation of calcium salts (scale). Add following recommendations of the chemical product manufacturer. Once a week and whenever the water is renewed. Prevents algae from growing in the water. Add following recommendations of the chemical products manufacturer. Once a week and whenever the water is renewed. To eliminate rings of dirt on the walls of the Spa. Rub with a sponge Whenever dirt is and immediately observed on the rinse with abundant walls of the Spa. water. Foam in the water. Add following recommendations of the chemical product manufacturer. SPA ALGAECIDE DEGREASER ANTIFOAM Whenever foam appears in the water. 6. RECYCLING AND THE ENVIRONMENT The Spa includes electric and/or electronic material, which at the end of its life-span, should be suitably treated as special waste. Contact your local authorities to find out the collection and waste disposal procedure for electric and electronic material. SI222-CH USER 21 EN-V1.1