1
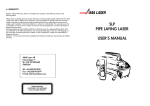
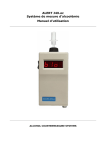
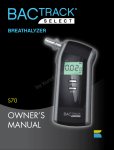
AC1 PIPE LAYING LASER
USER’S MANUAL
CONTENTS:
1. What’s what
2. Operation
3. Calibration
4. Battery power
5. Technical data
6. Warranty
WARNING!
Do not stare directly into the laser beam.
Follow the advise issued by your national
occupational safety agency.
1. WHAT´S WHAT
FIGURE 1. CONTROL PANEL
1. On/Off Button
2. Battery indicator
3. Side alignment buttons
4. Side alignment position indicator
5. Close range remote control detector
6. Cross axis angle indicator
7. Grade setting buttons
8. Warning indicator for laser radiation
9. Display backlight button
10. Grade setting figures
11. Percent/Promille indicator
10.
11.
9.
1.
8.
2.
7.
6.
5.
4.
3.
1.
3.
4.
2.
5.
FIGURE 2. REMOTE CONTROL
1. Function indicator
2. Backlight button
3. Side alignment buttons
4. Stand-by button
5. Grade setting buttons
2. OPERATION
Turning the laser on
Place the AC1 in working position. Turn the laser on with the on/off button (1) on the laser key pad.
Code lock
If the code lock function is enabled (by your dealer), you will be prompted to dial in your user code when the
instrument is turned on. Dial it in by selecting the digit with the side arrow buttons, and setting the digit with the
+/- buttons. If you lose your user code, you have ten tries, then the laser is permanently locked and must be
returned to your AMA dealer for unlocking.
Grade setting
Set the desired grade with the grade setting buttons (7) on the laser key pad. Press once, and the grade changes
by 0,002% (0,02‰). By pressing the key a longer while, the grade accelerates. If you press + or - once, the
lowest figure (10) starts blinking on the display. As long as it blinks, you can select the next figure using the side
alignment buttons (3), and change its value with the + and - buttons (7). After a few seconds of inactivity, the
blinking stops.
Side alignment
Press the side alignment buttons (3) on the laser key pad to move the beam sideways. By holding the button down,
the beam accelerates. One press will move the beam 2 mm sideways on 100 m. Press both side alignment buttons
simultaneously, and the laser automatically centres the side alignment.
Backlight
By pressing the backlight button (9) on the laser key pad, the light behind the display is lit for better visibility. It
stays on for a few seconds. The backlight is also lit when any other button is pressed.
Self levelling
When the laser has not completed levelling, the laser beam has not reached its correct height. This is indicated by
a blinking laser beam and laser symbol on the display.
If the working position of the laser is tilted “nose up” or “nose down” more than app. 10 degrees, it will not be
able to self level. Correct this by repositioning the laser.
Cross axis tilt
The cross axis indicator (6) on the display shows if the laser is tilted more than 3 degrees in the cross axis (“roll”)
by blinking and showing with the level vial “bubble” in which direction it is tilted. Readjust the position of the laser
to correct this.
The remote control
The remote control enables you to work the laser from a distance. The AC 1 has two main detectors pointing in
the direction of the laser beam with high amplification for long working range, and a single detector (5) pointing
upwards from the laser keypad for limited working range.
Remote backlight
Press the backlight button (2) for remote backlight. This enables better visibility when the laser is in a manhole.
Stand-by
Press the stand by button (4) on the remote to bring the laser to stand by. In stand by mode, the laser draws
approx. 50% of the normal operating current and saves battery life. It also enables you to avoid irritation when
the laser beam is not needed. Press Stand-by again to bring the laser back to life.
Remote side alignment
You can also use the remote control for side alignment. The arrows (3) are set to work in the right direction if you
stand where the beam hits, and point the remote control towards the laser.
Flashing
By pressing the remote control backlight button (2) for 5 seconds, the beam starts flashing for better visibility. The
flashing is interrupted if the laser is outside of its cross axis levelling range.
Grade setting from the remote control
To avoid mistakes, do not use this feature before you understand how it works and have practised.
To enable remote grade set, hold down the + or - button (5) on the remote for 5 seconds. The laser beam now
starts flashing quickly and starts moving in the desired direction at an accelerating pace. After a few seconds of
inactivity, the quick blinking stops, and you can no longer change the grade from the remote.
The AC 1 now works with a temporary grade, but still remembers the old grade that you set on the laser keypad.
Both grades will alternatively show on the display. As an additional warning, the laser beam will flash once every
10 seconds.
To go back to the stored grade, press Stand by (2) twice to put the laser to sleep and back to life. The laser has
now forgotten the temporary grade setting from the remote control.
To store this temporary grade as the new working grade, hold down the backlight button on the laser keypad for
10 seconds. The temporary grade has now become the stored grade. The display shows “dry” briefly to confirm.
3. CALIBRATION
Calibration checks should be done regularly to ensure good results. Checks can be done in the field using a
measuring distance of approx. 50 meters.
Mark two points at the distance. From behind one of the points, aim a level beam from the AC 1 over the two
points and measure the distance between each point and the beam. Move the laser behind the second point and
repeat the procedure, aiming the beam now in the opposite direction. If the beam is indeed level, the difference
between the first and second measurements should be the same. If this is not the case, the AC 1 is in need of
calibration by your AMA dealer.
4. BATTERY POWER
The AC 1 is powered by an in-built battery pack. The battery life during operation is more than 80 hours under
normal conditions with a fresh battery pack. With a worn battery pack and in cold temperatures, the laser can still
operate some 20 hours. Frequent use of the Stand-by function prolongs the working life.
The battery indicator (2) on the display gives an indication of remaining battery life, simulating remaining
charge. When the battery is low and close to power down, the laser beam will flash three times every 10 seconds,
and the display will show blinking battery indicator.
If the AC 1 shuts down due to low battery, the display will show “bA Lo”. In this case, shut the laser off and
charge.Charge the battery for 7 hours for full charge. The first 4 hours will charge fast. The laser can be operated
when charging. In emergency situations, as little as 15 minutes of charging will give several hours of battery life.
A full charge over the weekend should give you more than a week’s operation. If possible, stick to this charging
scheme. If you charge more often, it will shorten the life of the battery.
The external power cable can be connected to a 12 V battery for long, uninterrupted operation. Please note that
this does not charge the AC 1.
5. TECHNICAL DATA
Laser source ...............................Laser diode
Wavelength................................635 nm
Laser safety class........................Class 3R, max output 3,5 mW
Beam diameter at 100 m.............14 mm
Range ........................................200 m
Power source .............................Built-in NiCd, 5.7 Ah
Battery life, full charge ...............80 h normal, 20 h worst conditions
External power cable..................Built-in polarity protection, use 12V battery
Operating temperature ...............- 20ºC to + 50ºC
Sealing ......................................Waterproof, sealed, purged with nitrogen
Length........................................295 mm
Diameter ....................................140 mm
Weight .......................................4.5 Kg
Levelling range in beam direction + / - 10%
Cross axis tilt range ....................+ / - 3º
Grade range ..............................- 10% to + 40%
Grade increment ........................0.002% per step
Side alignment range..................20 m at 100 m
Accuracy at grade 0% ................+ /- 5 mm at 100 m
Automatic tilt compensation ........Compensated to full grade accuracy within cross axis tilt range
Vertical beam travel....................Alignment error < 50 mm at 100 m over 10% grade travel within
cross axis tilt range
Remote control ...........................Waterproof, metal housing
Remote control functionality ........Side alignment, display backlight, stand by on/off, grade set
Remote control range..................100 m normal conditions, 40 m in bad conditions
Remote control power source ......Built-in battery, 2x3.6V Lithium R6, life 1 year normal usage
Stand by function .......................From remote control, power usage 50% of operating
6. WARRANTY
Products sold by AMA Laser Systems AB are warranted by the company in the following manner to the following
extent:
Subject to the succeeding provision hereof, AMA Laser Systems warrants products sold by AMA twenty-four (24)
months after date for delivery from AMA Laser Systems AB. The manufacturer’s liability under this warranty is
limited to repairing or replacing any product returned to the factory or authorised service centre and judged, upon
inspection to have been defective in material or workmanship. This warranty covers the cost of labour as well as
parts, but does not cover the cost of transportation to and from the factory or authorised service centre.
The forgoing states the entire liability of AMA Laser Systems AB to the owner of a registered AMA product. AMA
Laser Systems AB shall not be held responsible for any consequential damages of any kind. The forgoing is in
lieu of all other warranties expressed or implied. In case of malfunction, contact your AMA Dealer for shipping
instructions.
Important: Your warranty card must be completed and mailed to manufacturer upon purchase to validate
warranty.
AMA Laser Systems AB
Garpenbergsgatan 6
SE-163 53 SPÅNGA
SWEDEN
T : + 46 (0)8 981098
Tel
Fax: + 46 (0)8 981099
E-mail: [email protected]
LASER RADIATION
AVOID DIRECT EYE EXPOSURE
CLASS 3R LASER PRODUCT