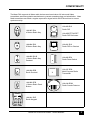
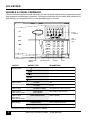
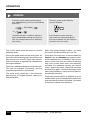
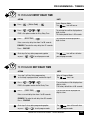
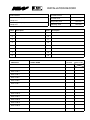
1
R16
uSer’s MANUAL
Ness R16 Radio Control Panel
oPERATION & programming manual
REV 1
Head Office:
Ness Security Products Pty Ltd
ABN 28 069 984 372
4 / 167 Prospect Hwy
Seven Hills NSW 2147 Australia
Ph +61 2 8825 9222
Admin Fax +61 2 9838 8508
[email protected]
www.ness.com.au
SYDNEY
Ph 02 8825 9222 Fax 02 9674 2520
[email protected]
MELBOURNE
Ph 03 9875 6400 Fax 03 9875 6422
[email protected]
BRISBANE
Ph 07 3399 4910 Fax 07 3217 9711
[email protected]
“Australia’s largest designer
and manufacturer of
high quality security products”
PERTH
Ph 08 9328 2511 Fax 08 9227 7073
[email protected]
Adelaide
Ph 08 8152 0000 Fax 08 8152 0100
[email protected]
R16 User’s Manual
Rev 1. March 2008
Document Part Number: 890-319
For products:
100-690 R16 Control Panel
Approvals
EMC COMPLIANCE
EN 50130-4:1996 Part 4: Electromagnetic compatability. Electrostatic Discharge, Radiated RF Immunity, Electrical Fast Transient/burst.
Surge Immunity, Conducted RF Immunity, Voltage Dips and Interruptions, Mains Supply Variations.
AS/NZ CISPR 22:2002- Class B, Electromagnetic Radiation, Terminal Disturbance Voltage.
EN61000-6-3:2001, Harmonic Current Emissions, Voltage fluctuations and Flicker.
TELECOM
TBR21, EU. PTC200, NEW ZEALAND TELECOM. AS ACIF S002, AUSTRALIA
SAFETY
EN60950:2000 inc Country Deviations, Safety of Information Technology Equipment
AS/NZ3260-1993 incl. AMDTS 1,2,3 &4. TS001-1997 ACA Australian Communications Authority
Copyright Notice
All rights reserved. No part of this publication may be reproduced, transmitted or stored in a retrieval system in any form or by any
means, electronic, mechanical, photocopying, recording, or otherwise, without the prior written permission of Ness.
Ness reserves the right to make changes to features and specifications at any time without prior notification in the interest of
ongoing product development and improvement.
© 2008 Ness Security Products Pty Ltd ABN 28 069 984 372
CONTENTS
Introduction .....................................................................................4
Compatibility....................................................................................5
R16 Keypad..................................................................................6, 7
Operation.........................................................................................8
Operation summary.........................................................................9
Arming............................................................................................10
Monitor Mode.................................................................................11
Disarming.......................................................................................12
Panic Alarm....................................................................................13
Duress Alarm..................................................................................14
Fire Alarm.......................................................................................15
Medical Alarm................................................................................15
Radio Doorbell...............................................................................16
Excluding Zones............................................................................17
View Memory...........................................................................18, 19
Monitoring Operation.....................................................................20
Remote Operation by Telephone . ................................................21
PROGRAMMING............................................................................22
Programming Options Table..........................................................23
Radio Doorbell...............................................................................24
Doorbell volume.............................................................................24
Doorbell tune.................................................................................25
Radio Key programming..........................................................26, 27
Keypad Code programming..........................................................28
Entry Delay programming..............................................................29
Exit Delay programming................................................................29
Specifications.................................................................................30
Installation Record.........................................................................31
Introduction
The Ness R16 is a unique fully self-contained
radio control panel.
The built-in piezo siren provides high volume
audible warning. The R16 also has Siren,
Piezo and Strobe outputs for additional
hardwired noisemakers.
The panel has a built-in keypad for programming
and user operation, a built-in piezo siren, builtin LCD display, built-in radio receiver, built-in
battery backup and built-in dialler.
The R16 has a number of sophisticated power
saving features designed to provide at least
48 hours service running on the backup
battery alone. (This includes one full alarm
condition with sirens, strobe and dialler).
The R16 supports up to 16 Ness Radio PIRs and
up to 14 Ness Radio Keys. All Ness supervised
and encrypted radio devices are supported.
There is even a Doorbell feature with selectable
tunes when used with the Ness Radio Doorbell
transmitter. (If the radio doorbell is available in
the local frequency).
The built-in dialler uses Contact ID format for
central station monitoring as well as audible
monitoring to any telephone. The user can
also dial into the system for remote arming
and disarming over the telephone line.
In addition to radio devices, the R16 has 1
hardwired zone and 1 hardwired tamper input
for connection of a wired detection device and
external siren cover tamper switch.
RADIO DOOR
SWITCHES
RADIO KEYS
RADIO
DETECTION
RADIO
DOORBELL
ARM
1
2
MONITOR
4
5
3
6
EXCLUDE
7
8
9
MEMORY
P
0
E
ZONE INPUT
HARDWIRE
EXTERNAL
PLUGPACK
(Supplied)
PHONE LEAD
(Supplied)
SIREN OUTPUT
STROBE OUTPUT
TAMPER INPUT
INTERNAL
PIEZO OUTPUT
Ness R16 Control panel - USER Manual
Compatibility
The Ness R16 supports all Ness radio devices as shown below. All late model Ness
transmitters send encrypted transmissions to prevent eavesdropping and substitution. Ness
fixed transmitters can send a regular supervision signal which the R16 monitors to ensure
system security.
100-067 RK4
4 Button Radio Key
100-663 R15
Radio PIR
100-663PET R15PET
100-663
Radio PIR Pet Aware
Radio
PIR
100-664 RK3
3 Button Radio Key
100-691 R12
Radio PIR inc Bracket
100-683 RK1B
1 Button Radio Key
Pendant
100-662 RR1
Radio Reed Switch
100-056 RDB
Radio Doorbell
100-527 RR2
Multi-Purpose Radio
Transmitter
100-283 RPB
1 Button Radio Panic
Button
106-040 RSM
Radio Smoke Detector
RKP
R A D I O K E Y PA D
100-001 RKP
Radio Keypad
100-001
Radio Keypad
Ness R16 Control panel - USER Manual
R16 Keypad
Audible & Visual feedback
The R16 onboard keypad provides the facility for user level and installer level programming and all
user operation and emergency functions. The keys are soft-touch silicon rubber and are backlit for
high visibility. Any keypress will turn on the backlighting for 4 minutes.
BACKLIT
LCD DISPLAY
ONBOARD SIREN
/ BEEPER
OUTPUT
ARM
1
2
3
MONITOR
4
5
6
EXCLUDE
7
8
9
MEMORY
P
0
E
FUNCTION BUTTONS
OUTPUT TYPE
PROGRAM
ENTER
DESCRIPTION
SHORT BEEP
Keypad Acknowledge key press
3 BEEPS (RAPID)
Keypad Valid entry, end of Exit Time
LONG BEEP
Keypad Invalid entry
8 BEEPS (RAPID)
Low battery / AC Fail / Medical Alarm
CONTINUOUS BEEPS
Alarm, Entry Delay, etc
Onboard Siren
External Siren output
1 CHIRP*
Arm
3 CHIRPS*
Disarm
Onboard Siren
DOORBELL TONES
The Doorbell has been pressed.
Onboard Siren
External Siren output
SIREN BURST,
(Low Volume)
Zone Auto Exclude warning
Keypad beeper
Onboard Siren
Piezo output
External Siren output
SIREN CONTINUOUS
Alarm condition
Strobe output
STROBE BURST
Panel Armed or Disarmed
STROBE CONTINUOUS
Alarm condition
* Arm/disarm chirps must be enabled by your installer.
FIRE
MEDICAL
PANIC
Ness R16 Control panel - USER Manual
R16 Keypad
Keypad Display in operating mode
* The flashing RADIO fault icon could be indicating that the radio key/device has either low battery or
supervision failure or other radio related problems. The numeric display 1–15 will show which device is
sending the signal.
See page 18: How to view memory.
See page 19: The table Keypad Display in Memory Review Mode provides further detail.
Ness R16 Control panel - USER Manual
Operation
Operating Modes
Alarms, Definition
The Ness R16 will operate in one of the following
modes:
Alarms may be caused by:
Armed. The system is “On” and ready to
detect intrusion.
Disarmed. The system is “Off”. This is
the normal mode when the premises are
occupied. Day Zones and 24 Hour Zones such
as external siren tamper, if used, are active.
Day Mode. The system is Disarmed and a zone
or zones have been setup to create an alarm
when activated. Often used as a doorway alert
in a shop.
Monitor Mode. Allows the system to be
“partially” Armed. For example, in a house, to
allow all perimeter zones, doors and windows,
to be Monitored (armed) at night.
24Hr Zones. Zones that have been setup to be
active in any mode. Usually used for Tamper
switches and Panic buttons.
Doorbell. The doorbell can be triggered
using the optional Ness Doorbell transmitter
The doorbell function has adjustable volume
and selectable chime settings. Operates in any
panel mode.
• A zone has been triggered while Armed
• A Tamper has been triggered
• A PANIC button has been triggered
All of these may cause your sirens and strobe
to operate. Various visual indications relevant
to the alarm will be retained in the memory. If
this occurs, Disarming your control panel will
reset the alarm. The cause of the alarm can be
identified by entering the Alarm Memory Mode
as described on page 18.
Resetting Alarms
To stop the siren/s or to reset the strobe light if
it is still flashing* (if installed), reset the panel
using the keypad by entering a valid keypad
code followed by the E button, or press the OFF
button on a valid Radio Key.
To check the cause of the alarm, you can view
the event memory as shown on page 18.
* In the event of an alarm, the strobe light will
continue to flash until the panel is reset by the
keypad or radio key, otherwise it will time out
after 11 hours. (If mains power is disconnected,
the panel will reset the strobe light output after
1 hour to conserve the backup battery).
Ness R16 Control panel - USER Manual
Operation Summary
OPERATION
ARM
1
2
MONITOR
4
5
6
EXCLUDE
7
8
9
MEMORY
P
0
E
DISARM
To Disarm and/or reset
alarms.
RADIO KEY
x1
Shortcut method, (If enabled by your installer).
[User Code]
Press the ON button once.
x1
Press the OFF button once.
[User Code]
MONITOR MODE
The panel must be in
a Disarmed state first.
KEYPAD
[User Code]
ARM
The panel must be in
a Disarmed state first.
3
x2
Shortcut method, (If enabled by your installer).
Press ON button twice
within 4 seconds.
Radio Key Panic will
function only if enabled
by your installer.
PANIC
Both keys together
Hold
Keypad Panic must be enabled by your installer.
KEYPAD DURESS
Keypad Duress should only
used by arrangement with
your monitoring station.
Radio Key Duress will
function only if enabled
by your installer.
[User Code]
To Disarm and report a Duress Alarm, add the
digit 9 before your User Code when Disarming.
This will function only if enabled by your installer.
Hold
EXCLUDING ZONES
Zones can be Excluded
when the panel is disarmed.
...then press [Zone No.]
[Zone No.]
...
Enter the zone numbers to be Excluded.
To exit Exclude mode
VIEW MEMORY
View Memory can be used
...then press
when the panel is disarmed.
repeatedly to display
the last 20 events.
To exit Memory mode
DOORBELL
x1
RDB Radio Door Bell.
(Depending on availability
in the regional frequency).
Note:
Monitor Mode arming will be ignored if no monitor zones are programmed.
Ness R16 Control panel - USER Manual
Operation
ARMING
To Arm the system using the onboard keypad,
press ARM followed by a valid user code, followed
by the E key.
[User Code]
To Arm the system using a Radio Key
press the ON button.
x1
...or
The Arming Shortcut is enabled by default, this
allows arming without having to enter your user
code. (The Arming Shortcut can be disabled by
your installer).
If Siren Chirps have been enabled by
your installer, the strobe light output will
flash and the onboard siren will 'chirp' once
to indicate successful arming.
The control panel must be armed to enable
detection zones.
Note: If the panel is already in alarm, you must
first silence the alarm before you can arm.
Arming the panel starts the exit delay timer. All
zones are inactive during this time and become
fully armed once the exit delay time expires.
(End of exit delay is signalled by 3 beeps from
the keypad beeper).
At the end of the exit time, all zones should be
Sealed. If any are Unsealed, the onboard siren
and the external siren, (if installed), will sound a
lower volume tone for 2 seconds as a warning
that those zones have been automatically
excluded. For maximum security, you should
return, disarm the panel, check the premises
and then Arm again. Continual warnings could
mean that a detector is faulty and may have to
be manually excluded.
The factory default exit delay time is 60 seconds.
This can be changed if necessary, see the
programming section in this manual.
The panel must initially be in the disarmed
state and not in Program, Monitor, Memory or
Exclude modes.
10
If the auto-exclude option is disabled by your
installer and a zone is unsealed at the end of exit
time, the siren will sound for 5 minutes, (5 minutes
is the factory default siren duration).
Ness R16 Control panel - USER Manual
Operation
MONITOR MODE
Ensure the system is disarmed before attempting
to arm in Monitor Mode.
[User Code]
To arm in Monitor Mode using a Radio Key,
press the ON button twice within 4 seconds.
x2
...or
The Monitor Mode Shortcut is enabled by default,
this allows arming of Monitor Mode without having
to enter your user code.
(Monitor Mode Shortcut can be disabled by
your installer).
Monitor mode allows you to Arm selected zones
while others are ignored. Typically, perimeter
zones (doors and windows) can be monitored
while you are at home.
If Siren Chirps have been enabled by
your installer, the strobe light output will
flash and the onboard siren will 'chirp' once
to indicate successful arming in Monitor
Mode.
Entry and Exit delay timers operate as normal
in Monitor Mode.
Your installer must program which zones will be
active in Monitor mode.
If an alarm occurs while in Monitor mode,
entering [User Code]
will silence the alarm.
This will also Disarm the panel, so remember to
enter monitor again if needed.
The panel must initially be in the disarmed
state and not in Program, Monitor, Memory or
Exclude modes.
Using the optional Radio Keys you can enter
Monitor Mode by pressing the ON button twice
within 4 seconds.
Ness R16 Control panel - USER Manual
11
Operation
DISARMING
To Disarm the system using the onboard keypad,
enter a valid user code, followed by the E key.
x1
[User Code]
Sirens and strobe output, (if running), will be reset
on disarming.
When you enter the protected premises through
a delay zone, the keypad will sound continuous
beeps as a reminder to disarm. The panel must
be disarmed before the entry delay time expires,
otherwise the alarm will sound.
If using a Radio Key, you can disarm from
outside the premises without having to enter
any protected zones.
12
To Disarm the system using a Radio Key
press the OFF button.
If Siren Chirps have been enabled by
your installer, the strobe light output will
flash and the onboard siren will 'chirp' three
times to indicate successful disarming.
The factory default entry delay time is 20
seconds. This can be changed if necessary, see
the programming section in this manual.
If you make a mistake in entering your code,
press the E button and try again. Five incorrect
code attempts will cause an alarm.
Ness R16 Control panel - USER Manual
Operation - Emergency functions
PANIC ALARM
To generate a Keypad PANIC alarm using the keypad,
press both * (star) keys together for 2 seconds.
To generate a PANIC alarm using a Radio
Key, press the and hold the Radio Key PANIC
button for at least 4 seconds.
Hold
Both keys together
The Keypad Panic function is enabled by default,
and can be disabled by your installer.
The keypad panic function sounds the onboard
siren and the external siren outputs. The sirens
will reset when the Siren Reset Time has expired,
(factory default is 5 minutes).
A Panic report will be sent by dialler if your
system is monitored by a Central Station. (If
Panic reports have been enabled by your
installer).
The Radio Key Panic function will only
function if enabled by your installer.
Panic cannot be used while the panel is in
Program, Memory or Exclude mode.
Note: Your installer may have installed a separate
panic button. To activate the panic alarm simply
press that button.
Ness R16 Control panel - USER Manual
13
Operation - Emergency functions
DURESS ALARM
To generate a DURESS alarm using the keypad,
add the digit '9' in front of your code when disarming.
9
[User Code]
The Keypad Duress function is disabled by default,
and must be enabled by your installer.
IMPORTANT NOTE: Your installer must
program the R16 to enable Radio Key Panic
to act as the DURESS alarm. This means
Radio Key Panic will no longer be available.
If enabled by your installer, to generate a
DURESS alarm using a Radio Key, press
and hold the Radio Key PANIC button for
at least 4 seconds.
Hold
The DURESS alarm can be used to send a silent
alarm to the Central Station that you are being
forced to disarm the panel against your will. That
is; you are disarming under “duress.”
To Disarm and send a DURESS alarm, prefix your
User Code with the digit 9 when Disarming.
* DURESS Alarm is normally not
enabled. To enable the DURESS
function, consult your installer
* DURESS alarms can only be used
if your system is monitored by a
Central Station.
* The DURESS alarm does not
sound any siren outputs and can
only be reported by dialler to
your central station.
14
Ness R16 Control panel - USER Manual
Operation - Emergency functions
FIRE ALARM
To generate a FIRE alarm using the keypad, press
and hold the FIRE key, (left hand star key), for
at least 2 seconds.
The FIRE Alarm cannot be generated
by a Radio Key.
Hold
The Keypad Fire alarm function is disabled by default,
and must be enabled by your installer.
The FIRE alarm sounds the siren outputs using the Fire siren sound and the dialler reports a fire
alarm.
MEDICAL ALARM
To generate a MEDICAL alarm using the keypad,
press and hold the MEDICAL key, (right hand star key),
for at least 2 seconds.
Hold
The Keypad Medical alarm function is disabled
by default, and must be enabled by your installer.
IMPORTANT NOTE: Your installer must
program the R16 to enable Radio Key Panic
to act as the MEDICAL alarm. This means
Radio Key Panic will no longer be available.
If enabled by your installer, to generate a
MEDICAL alarm using a Radio Key, press
and hold the Radio Key PANIC button for
at least 4 seconds.
Hold
The primary purpose of this alarm is to report a MEDICAL alarm to your central station. The keypad
beeper sounds 8 rapid beeps to indicate that the Medical alarm has been triggered.
Ness R16 Control panel - USER Manual
15
Operation - Doorbell
DOORBELL
If a Ness Radio Doorbell has been installed,
simply press the button once.
Press
Radio Doorbell
transmitter.
The doorbell tune is heard through the R16
onboard siren. The doorbell volume and the
tune can be set by the user.
IMPORTANT NOTE: The R16 can be programmed
to allow Radio Key Panic to act as the DOORBELL.
This means Radio Key Panic will no longer
be available.
If enabled by your installer, to sound the
Doorbell, press and hold the Radio Key
PANIC button for at least 4 seconds.
Hold
See pages 24 & 25 for doorbell volume and doorbell tune programming.
If a Ness Radio Doorbell has been installed, simply press the button once.
The R16 can also be programmed to operate the doorbell from the Panic button of Ness radio
keys. Note that in this case, the R16 cannot receive Panic alarms from radio keys.
16
Ness R16 Control panel - USER Manual
Operation - Excluding Zones
EXCLUDING ZONES
EXCLUDING ZONES
To EXCLUDE zones, the R16 must be in the disarmed mode.
[User Code]
Press...
or...
The
EXCLUDE icon will turn on.
Enter the zone number of the zone/s to be excluded, (1-16).
[Zone No.]
[Zone No.]
...etc
The zone light of each Excluded zone will turn on.
Press...
The
to exit Exclude mode.
EXCLUDE icon will flash continuously until the panel is next disarmed.
If a detector becomes faulty and cannot be
sealed when arming the panel, that zone can be
Excluded so that it does not cause alarms.
Zone Exclude is not permanent. Excluded
zones are automatically Included next time the
system is disarmed.
When zones have been Excluded, the EXCLUDE
icon flashes continuously while the panel is
Disarmed and also when Armed.
Zones can be manually included by the
same method as Excluding. Simply use the
Zones can only be excluded while the panel is
disarmed.
[ZONE NUMBER]
sequence to turn OFF
the zone icons to be Included.
Ness R16 Control panel - USER Manual
17
Operation - View memory
VIEWING MEMORY
Press...
[User Code]
or...
The
MEMORY icon will turn on.
Press...
The most recent event will be displayed.
Press...
The next most recent event will be displayed.
Press...
Press...
...and so on (up to the last 20 events).
to exit Memory mode.
The R16 control panel stores a comprehensive
event memory including Arming, Disarming, Low
Battery, Mains Fail and Alarms.
The memory is constantly upgraded and the last
20 events are always available for viewing.
This memory display can only be selected while
the panel is in the Disarmed state.
18
To Clear the Memory ICON
The MEMORY icon on the LCD display flashes
continuously when an alarm has occurred as a
reminder to view the alarm memory.
The MEMORY icon stops flashing after the
memory is viewed as shown above.
The MEMORY icon is automatically cleared
next time the panel is Armed and on entry to
program mode.
Ness R16 Control panel - USER Manual
Operation - View memory
Keypad Display in Memory Review Mode
Event
Display Icons
Arm
ARMED
Disarm
blank
Auto Exclude Zone
EXCLUDE + 1...16
Mains Fail
MAINS
Panel Panic/Medical/Fire
EXCLUDE
Battery Fail
BATTERY
Line Fault
LINE
Dialler Call Fail
LINE
Zone Alarm
1...16
Tamper Panel/Siren
TAMPER
Tamper(4th failed attempts)
TAMPER + PROGRAM
Radio Jamming
RADIO
Radio Substitution
RADIO
Radio Key Low Battery
RADIO + BATTERY + 2...15
Radio Key Panic/Medical
RADIO + EXCLUDE
Detector Tamper
RADIO + TAMPER + 1...16
Detector Low Battery
RADIO + BATTERY + 1...16
Detector Supervision Fail
RADIO + 1...16
Pendant Supervision Fail
RADIO + MONITOR + 1...15
Memory Review Examples
Panel was Disarmed.
Panel was Armed.
Zone 3 alarm.
Low Battery from radio device 1.
Ness R16 Control panel - USER Manual
19
Monitoring
CENTRAL STATION MONITORING
Central Station
Monitoring
The R16 control panel has an on-board digital
dialler which can send detailed alarm messages
to a Central Monitoring Station.
MONITORED
PREMISES
MONITORING
STATION
TELEPHONE LINE
The digital messages can include information
about the zone or zones which caused the alarm,
tamper alarms, low battery or mains failure
reports, and it can also (by user number) identify
the users who Arm and Disarm the system.
For further information about alarm monitoring,
contact your dealer.
AUDIBLE MONITORING
MONITORED
PREMISES
TELEPHONE LINE
ANY TELEPHONE
Note:
The R16 can be monitored by Central
Station or by Voice Dialling to a private
phone, but not by both simultaneously.
Any telephone numbers programmed
in options P70E & P71E must be erased
to allow the Voice Dialling telephone
numbers to work. (Ask your installer).
20
Ness Voice Dialling
The dialler sends alarm reports to a private
telephone, (mobile telephone or fixed telephone),
using Voice Dialling Telephone numbers 1 and
2, (P00E, P01E).
Enabling Voice Dialling
Voice Dialling Format is enabled simply by
programming the Voice Dialling phone number
options P00E and P01E. (See side note. Central
Station Monitoring must be disabled to enable
Voice Dialling).
Operation
The word 'ALARM' is repeated for 30 seconds
until the alarm is acknowledged (see below). If
the alarm is not acknowledged the telephone
number will be redialled.
Ackowledging The Alarm
The person receiving the call can acknowledge
the alarm by pressing the # key on their
telephone. Press the # key for 2 seconds during
pauses in the audible message. (On mobile
phones, press the # key in short bursts. Many
mobile phones enter sub menus if the # key is
pressed continuously).
Ness R16 Control panel - USER Manual
Remote Operation
Audible Feedback
Remote Telephone Arm/Disarm
3 BEEPS:
Valid command/user code.
The R16 can be armed and disarmed remotely using a standard fixed
or mobile telephone.
To maintain panel security, remote operations can only be activated
after entering a valid user code.
1 LONG BEEP:
Invalid command or user
code, try again.
To operate the R16 by telephone, you need a DTMF capable
telephone, a valid User Code and you must know the Telephone
number of the line to which the R16 is connected.
Notes
If the R16 does not receive
remote commands for
periods longer than 60
seconds it will assume that
the call is finished and it
will hang up.
Remote Operation is disabled by default and must be enabled by
your installer before it can be used.
Sequence of Operation.
1. Phone the R16 telephone number and listen for the required
number of double rings and then hang up.
2. Call the number again within 60 seconds.
Summary of
telephone commands
3. The R16 will answer the second call immediately, sound a
beep for 2 seconds then, after a pause, it will sound a lower
frequency tone. The R16 is now ready to receive telephone
commands.
Prepare to receive
commands.
4. Press the
button on the telephone. This tells the R16 that
telephone commands will follow.
[User Code]
Verifies The user.
Arm.
Disarm.
hang up.
5. Now enter a valid User Code followed by the
button.
The R16 will respond with 3 beeps if it recognises the code or
1 long beep to signal the code was invalid and to try again.
6. Enter the command to arm or disarm the panel.
See: Summary Of Telephone Commands.
7. Press
to finish. This tells the R16 to hang up. Also hang
up your telephone.
Ness R16 Control panel - USER Manual
21
Programming
Various system options can be programmed
by the user. These options can only be
accessed from Program Mode.
User Codes or Radio Keys can be added
or deleted. Up to 15 keypad user codes or
14 Radio Keys or a mixture of both can be
programmed.
Entry and Exit timers can be changed if
necessary, (between 1 and 99 seconds).
To ENTER Program Mode
[Master Code]
To EXIT Program Mode
The Doorbell Tune and Volume can be
programmed.
For all other programming changes, ask
your installer.
The panel will automatically exit Program
Mode if no buttons are pressed for
4 minutes.
22
The factory default
Master Code is: 123
Ness R16 Control panel - USER Manual
Programming
Programming Options Table
OPTION NUMBERS
RADIO CODES
P10E
DESCRIPTION
DEFAULT
P5E
DOORBELL VOLUME
Level 3
P6E
DOORBELL TUNE
Tune 3
P26E
ENTRY DELAY TIME
20 seconds
P28E
EXIT DELAY TIME
60 seconds
KEYPAD CODES
P11E
USER SLOT 1 MASTER KEYPAD CODE
2E
P12E
USER SLOT 2
3E
P13E
USER SLOT 3
4E
P14E
USER SLOT 4
5E
P15E
USER SLOT 5
6E
P16E
USER SLOT 6
7E
P17E
USER SLOT 7
8E
P18E
USER SLOT 8
9E
P19E
USER SLOT 9
10E
P20E
USER SLOT 10
11E
P21E
USER SLOT 11
12E
P22E
USER SLOT 12
13E
P23E
USER SLOT 13
14E
P24E
USER SLOT 14
15E
P25E
USER SLOT 15
123
User Slots 2 to 15 can store either a Keypad Code or a Radio Key, not both. If
a user Slot is programmed as a Radio Key using option P10E, then that slot is
not available as a Keypad Code and vice versa.
Ness R16 Control panel - USER Manual
23
Programming - Doorbell
TO PROGRAM A RADIO DOORBELL
ACTION
NOTE
Program the Ness Radio Doorbell to an available
User Slot.
See page 26.
"To Program Radio Keys"
Program Extra Option 5E for that User Slot.
See page 27.
"Extra Options For Radio Codes"
EXAMPLE: To program a Radio Doorbell
to User Slot 15.
In Program Mode:
1. Press... P10E 15E
2. Press and hold the Radio Doorbell button for 8 seconds.
3. Press... P25E 5E
TO PROGRAM DOORBELL VOLUME
ACTION
NOTE
[Master Code]
Press...
Enters Program Mode.
The
icon will turn on.
P5E is the programming option number
for Doorbell Volume.
Press...
The current doorbell tune will be played at the
current volume level. The display will show a
number between 1 & 4 to show the current
volume level. (1=lowest, 4=highest).
Factory default is 3.
Press... (1 - 4)
Each time you select a level the current
doorbell tune will play once at that volume.
Go to step 2 of any other programming option
or press...
24
to exit program mode.
E.g, Press 1E, 2E, 3E or 4E to select
Lowest, Low, Medium or High volume.
The
icon
.
will turn off when you
exit program mode.
Ness R16 Control panel - USER Manual
Programming - Doorbell
See page 16 for Doorbell Operation.
Ness R16 Control panel - USER Manual
25
Programming - Radio Keys
The R16 will accept up to 14 Ness Radio Keys to be used for remote control wireless Arming/Disarming
and Panic functions.
Radio Keys are programmed to one of the 15 User Slots with the easy to use radio ‘Learn’ mode.
A User Slot can hold either a keypad code or a radio key code, not both. User Code 1, (the master
Code), is always a keypad code.
TO PROGRAM RADIO KEYS
ACTION
Press...
NOTE
[Master Code]
Enters Program Mode.
The
icon will turn on.
P10E is the option number for
programming Radio Keys.
Press...
Numbers 2 to 15 on the display will show which
User Slots already contain Radio Keys, (if any).
Press... (2 - 15)
The chosen User Slot number will be flashing.
User Slots with Radio keys already programmed
will be on steady.
Choose a User Slot to program a
Radio Key. Enter a user slot number
from 2 to 15 followed by the E button.
Press and hold the PANIC button for at least
8 seconds on the Radio Key to be programmed.
This transmits the 'Learn' message to
the R16 panel.
If the Radio Key was successfully programmed, you
will hear beep, beep + 3 beeps.
A long beep means the Radio Key is
already programmed to another User Slot.
See Extra Options For Radio Codes on the next page
to program the behaviour of the Radio Key's Panic
button. Or skip to step 6 to leave the factory default.
(Panic button triggers Panic Alarm).
Go to step 2 of any other programming option
or press...
to exit program mode.
The
icon
.
will turn off when
you exit program mode.
TO DELETE RADIO KEYS
To delete a Radio Key, press P10E, select the
User Slot to delete (2E-15E), then press P10E again.
The panel must be in Program Mode.
EXAMPLE: To delete the Radio key programmed on
User Slot 2.
Press... P10E 2E P10E
26
Ness R16 Control panel - USER Manual
Programming - Radio Keys
How to send the Learn Message - Portable Transmitters
This table shows the method for sending the programming ‘Learn’ message for compatible Ness
transmitters.
RKP
R A D I O K E Y PA D
RK4 Radio Key
Press and hold
Panic for 8
seconds.
RDB Radio
DoorBell
Press and hold
for 8 seconds.
RK1B Radio
Panic
Press 3 times.
RKP Radio
Keypad
Insert the battery or
consult the Radio
Keypad manual.
100-001
Radio Keypad
Extra Options For Radio Codes
Each User Slot has five Extra Options which control the behaviour of Radio Keys and the Radio
Doorbell transmitter.
The Extra Options are:
1E, Panic: The Panic Button will trigger the Panic alarm. (default).
2E, Duress: The Panic Button will trigger the Duress alarm.
3E, Medical: The Panic Button will trigger the Medical alarm.
4E, Ignore Panic: Disables Panic Button on radio keys.
5E, Doorbell: The Panic Button will sound the R16 doorbell feature.*
Each User Slot is defaulted for Extra Option 1E, trigger Panic.
The Extra option for a user code slot can be programmed after a radio key has been programmed
to that slot.
Programming sequence For Extra Options
1. Press: P [User Slot option number 12-25] E
• If a Radio Key is programmed to the User Slot, the RADIO icon will be on. Icons 1–5 show which Extra
Option is currently selected.
2. Press: [1–5] E
• This selects a new Extra Option.
EXAMPLE
When programming a Radio Doorbell*, the User Slot must be set for ‘Doorbell’ or the Panic alarm
will be triggered when the doorbell is pressed.
In this example, a Radio Doorbell has been programmed to User Slot 15. To program the Extra
Option for User Slot 15, in program mode, press: P25E 5E
Ness R16 Control panel - USER Manual
27
Programming - Keypad Codes
1
2
3
4
5
6
7
8
9
P
0
E
TO PROGRAM KEYPAD CODES
ACTION
NOTE
Press...
[Master Code]
Press...
[11-25]
Enters Program Mode.
The
The existing code will be displayed one
digit at a time.
Enter the option number for the Keypad Code
you are programming.
Press...
(NEW CODE)
icon will turn on.
You will hear one beep on the first entry
of the new code and three beeps when
the code is verified.
(NEW CODE)
Enter the new code twice for verification.
EXAMPLE: To program Keypad Code 2 to be 1234:
The new code will be displayed one
digit at a time.
Press... P12E 1234E 1234E
Go to step 2 of any other programming option
to exit program mode.
or press...
The
icon
.
will turn off when
you exit program mode.
TO DELETE KEYPAD CODES
To delete a Keypad Code, enter the MEMORY button
in place of the code.
The panel must be in Program Mode.
EXAMPLE: To delete the Keypad Code 2:
Press... P12E MEMORY E
Notes on Programming Keypad Codes
• Keypad Codes can be 3 to 6 digits in length.
• Codes beginning with 0 (zero) can be programmed
but they will not operate the panel - this is an
alternative method for disabling user codes. The
MEMORY E function is the recommended method of
deleting user codes.
• All codes must be unique to each other. Codes
are rejected if already used. Some codes that are
similar to existing codes may also be rejected.
28
• User Code 1 (Master Code) can be changed but it
can not be deleted. The MEMORY + E sequence
simply reverts User Code 1 back to factory default
of 123.
• Open/Close reports, (if enabled by your installer),
are identified by user number if the control panel is
central station monitored.
Shortcut arming, (ARM + E, (if enabled), is
identified to the central station as User 25.
Ness R16 Control panel - USER Manual
Programming - Timers
TO PROGRAM ENTRY DELAY TIME
ACTION
NOTE
[Master Code]
Press...
Press...
P26E is the option number for Entry Delay Time.
Press...
(NEW TIME)
Enter a new entry delay time from 1 to 99 seconds.
Enters Program Mode.
The
icon will turn on.
The existing time will be displayed one
digit at a time.
The factory default time is 20 seconds.
The new time will be displayed one
digit at a time.
EXAMPLE: To make the entry delay time 25 seconds:
Press... P26E 25E
Go to step 2 of any other programming option
to exit program mode.
or press...
The
icon
.
will turn off when
you exit program mode.
TO PROGRAM EXIT DELAY TIME
ACTION
NOTE
See step 1 of Entry Delay programming,
or if already in program mode, continue to step 2.
Press...
P28E is the option number for Exit Delay Time.
Press...
(NEW TIME)
Enter a new exit delay time from 1 to 99 seconds.
When in Program Mode.
The
icon is on.
The existing time will be displayed one
digit at a time.
The factory default time is 60 seconds.
The new time will be displayed one
digit at a time.
EXAMPLE: To make the exit delay time 50 seconds:
Press... P28E 50E
Go to step 2 of any other programming option
or press...
to exit program mode.
The
icon
.
will turn off when
you exit program mode.
Ness R16 Control panel - USER Manual
29
Specifications
Radio zones
16
Hardwired zones
1 (operates in series with zone 16)
Hardwired tamper zones
1
Radio compatibility
Ness supervised & encrypted radio devices
Dialler format
Contact ID Format
Audible Voice Format
On board Keypad
Backlit, programming & user functions
LCD display
High contrast icon display
Plug pack
220-240V AC 50-60Hz, output 17V AC @300mA
Quiescent current draw
10 mA (in power save mode if mains is off)
Built-in backup battery
12 volt 0.8 Amp/hour, sealed lead acid
Dynamic Battery Test
Every Hour and on arming/disarming
Fuses
Siren Output, 2A Auto-reset
Strobe, 1.5A Auto-reset
Piez Output, 500mA Auto-reset
Built-in Piezo, 500mA Auto-reset
Siren output
1 x 8 Ohm horn speaker max.
On board piezo siren
110 dB
PIEZ (Reset) output
12V DC 300mA max.
Strobe output
12V DC, 1 strobe light max.
Dimensions
210(w) x 145(h) x 40(d) mm
30
Ness R16 Control panel - USER Manual
Installation Record
Date Installed:
Doorbell Volume
Installation Company:
Doorbell Tune
Telephone:
Monitoring Company:
Telephone:
Zone
Description
Zone
1
9
2
10
3
11
4
12
5
13
6
14
7
15
8
16
User Slot
User Code 1 (Master Code)
User Code 2
User Code 3
User Code 4
User Code 5
User Code 6
User Code 7
User Code 8
User Code 9
User Code 10
User Code 11
User Code 12
User Code 13
User Code 14
User Code 15
User's Name
Entry Delay Time
Seconds
Exit Delay Time
Seconds
Description
user Type
Keypad
Radio CODE
YES
Ness Limited Warranty:
Ness Security Products Pty Ltd warrants its products to be free from manufacturing defects in materials or workmanship for the warranty period as detailed in Ness’ Terms and Conditions of Sale and all other obligations detailed in those Terms and Conditions.
Whilst Ness Security Products, the manufacturer, is accredited to ISO9001 and all possible care and diligence has been applied
during manufacture to ensure the reliable operation of this unit, there are various external factors that MAY impede or restrict the
operation of this unit in accordance with the product's specification.
These factors include, but are not limited to,
1. Failure to communicate to the monitoring company due to a telephone service provider’s line fault or due to the incorrect configuration of the telephone/Product to the Telephone Network. It is the responsibility of a qualified Installer to ensure correct configuration
to the telephone network.
2. Erratic or reduced radio range as detailed in the manufacturer’s specifications. Ness’ radio based products are sophisticated low
power devices however the presence of in-band radio signals, high power transmissions or interference caused by electrical appliances e.g. computers, televisions etc. MAY reduce the range performance. Whilst such occurrences are unusual, they are possible
none the less. If a problem such as this is encountered and the performance is unsatisfactory, the installer of the product should
be contacted immediately.
3. Unauthorised tampering, physical damage, electrical interruptions such as mains failure, electrical spikes or lightning.
Ness Security Products is not an insurer of either property or safety of the user and limits its liability for any loss or damage including
incidental or consequential damages to Ness' original selling price. There are no warranties, expressed or implied, which extend
beyond the description on the face hereof. Ness Security Products recommend that the system is tested weekly to confirm reliable
operation.