1
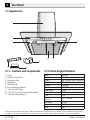
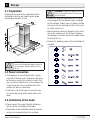
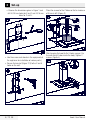
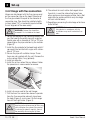
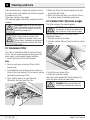
CWB 9601 X
Hood
User Manual
Please read this user manual first!
Dear Customer,
Thank you for prefering a Beko product. We hope that you get the best results from your product which
has been manufactured with high quality and state-of-the-art technology. Therefore, please read this
entire user manual and all other accompanying documents carefully before using the product and keep it
as a reference for future use. If you handover the product to someone else, give the user manual as well.
Follow all warnings and information in the user manual.
Remember that this user manual is also applicable for several other models. Differences between models
will be identified in the manual.
Explanation of symbols
Throughout this user manual the following symbols are used:
C
A
B
Important information or useful hints
about usage.
Warning for hazardous situations with
regard to life and property.
Warning for electric shock.
Packaging materials of the product are
manufactured from recyclable materials
in accordance with our National
Environment Regulations.
Do not dispose of the packaging materials together with the domestic or other wastes. Take them to the
packaging material collection points designated by the local authorities.
This product was manufactured using the latest technology in environmentally friendly conditions.
TABLE OF CONTENTS
1Important safety and environmental
instructions
4
1.1 General Safety . . . . . . . . . . . . . . . . . . . . . . 4
1.1.1 Electrical safety . . . . . . . . . . . . . . . . . . . . 4
1.1.2 Product safety . . . . . . . . . . . . . . . . . . . . . 4
1.2 Intended purpose . . . . . . . . . . . . . . . . . . . . 5
1.3 Child safety . . . . . . . . . . . . . . . . . . . . . . . . 5
1.4 Compliance with the AEEE Directive and
Disposal of Waste Products . . . . . . . . . . . . 5
1.5 Package details . . . . . . . . . . . . . . . . . . . . . . 5
2Your Hood
6
2.1 Appearance. . . . . . . . . . . . . . . . . . . . . . . . . 6
2.1.1. Controls and components . . . . . . . . . . . . 6
2.2 Technical Specifications . . . . . . . . . . . . . . . . 6
3Set-up
7-10
3.1 Preparation . . . . . . . . . . . . . . . . . . . . . . . . . 7
3.2 Power connection . . . . . . . . . . . . . . . . . . . . 7
3.3 Installation of the Hood . . . . . . . . . . . . . . . . 7
3.4 Flue Set-up . . . . . . . . . . . . . . . . . . . . . . . . . 9
3.4.1 Usage without flue connection . . . . . . . . . 9
3.4.2 Usage with flue connection . . . . . . . . . . . 10
4Operation of the Appliance
11
4.1 Control panel. . . . . . . . . . . . . . . . . . . . . . . 11
5Cleaning and Care
12-13
5.1 Aluminum filter . . . . . . . . . . . . . . . . . . . . . 12
5.2 Carbon filter (Flueless usage) . . . . . . . . . . . 12
5.3 Replacement of the lamp . . . . . . . . . . . . . . 13
Hood / User Manual
3 / 13 EN
1 Important safety and environmental instructions
This section contains safety instructions that will
help you prevent injuries or material damages. Any
warranty shall be void if you do not observe these
instructions.
1.1.2 Product safety
1.1 General Safety
•• Do not make connections to the flues connected
with stoves, exhaust shafts or flues with rising
flames. Observe the rules set by authorities on
the discharge of exhaust air.
•• Always have the installation and repair work
performed by Authorized Dealers. Manufacturing
firm shall not be held responsible for damages
that may be caused by unauthorized persons.
•• This appliance is not intended for use by children and persons with reduced physical, sensory
or mental capabilities, or lack of experience and
knowledge. Children should be supervised to ensure that they do not tamper with the appliance.
•• You may use pipes with a diameter of 120 mm
or 150 mm on the flue connection of your hood.
•• The height between the lower surface of the
hood and upper surface of the stove/oven should
not be less than 65 cm.
•• Do not operate the hood without aluminum filters
and do not remove the filters while it is operated.
1.1.1 Electrical safety
•• Do not touch the lamps of the hood after operating the hood for a long time. Hot lamps may
burn your hand.
•• Always unplug the appliance from the mains
supply during installation, maintenance, cleaning
and repair operations.
•• Do not cause high flames under the unit. Otherwise, the oil in the oil trap filter may ignite and
cause a fire.
•• If the power cord is faulty, it should be replaced
by a qualified person certified by the manufacturer, after-sales service or similar (preferably
electrician) or a person described by the importer.
•• Operate your appliance after putting a pot, pan
etc. on the hobs. Otherwise, rising heat may deform some components of your unit.
•• Operating voltage is 220 to 240 volts.
•• Do not keep easily flammable materials under
your hood.
•• Do not operate a faulty unit unless it is repaired
by the authorized service! Risk of electric shock!
•• Do not put power cord near cooktops. This may
cause a fire as the cord may be melted.
•• Do not plug in the hood before it is installed.
•• To achieve the best performance, the length
of the external conductor should not exceed 4
meters, it should not have more than two 90°
angles and its diameter should be at least ø120
mm.
•• Disconnect the appliance before any intervention
to the internal parts of the appliance.
4 / 13 EN
•• Turn off the hobs before taking a pot, pan etc.
from the hobs.
•• Oil may catch fire while making dishes such as
fries etc. For this reason, be careful about the
covers and curtains.
•• Do not leave the cooktops unattended while
making dishes such as fries etc.; hot oil can
cause fires.
•• There is a risk of fire if your hood is not cleaned
in the specified periods.
•• Be very careful and use gloves when you are
cleaning your hood.
Hood / User Manual
1 Important safety and environmental instructions
•• We advise you to operate the unit a few minutes •• Service life of the product you have purchased
before starting to cook in order to increase the
is 10 years. This is the period required for
suction power. Thus, you shall have a continuous
availability of spare parts for functioning of the
and stable suction power when the vapors occur.
product.
•• Operate your appliance for 15 minutes more
after the end of cooking or frying in order to
remove unpleasant smell from the air in the
kitchen.
•• Ensure that fresh air enters the kitchen, especially when the hood is operated together with
the gas hobs.
•• Ensure that the flue connection of the unit is
not connected to flues used to discharge smoke
caused by non-electric devices. (E.g. Radiator
flues).
•• If there is non-electric appliance in the same
room with the hood, the negative pressure inside
the room should be maximum 0.4 mbar to prevent the suction of the waste gas from the other
appliance by the hood into the room again.
•• There shall be adequate ventilation of the room
when the range hood is used at the same time
as appliances burning gas or other fuels. (Not
applicable to appliances that only discharge the
air back into the room).
•• Do not flambé under the range hood.
Caution:
•• Accessible parts may become hot when used
with a cooking appliance.
1.2 Intended purpose
•• This appliance is intended for domestic use. It
is not suitable for commerical use, and should
not be used for any purposes other than the
intended purpose.
•• Manufacturer assumes no responsibility for any
damage caused by misuse or improper transport.
Hood / User Manual
1.3 Child safety
•• Package materials are risky for children. Keep
the package materials out of reach of the children.
•• Electrical appliances are risky for children. Keep
the children away from the unit when it is operated. Do not let them play with the product.
1.4 Compliance with the AEEE
Directive and Disposal of Waste
Products
This product does not include harmful
and prohibited materials specified in
the “Regulation for Supervision of the
Waste Electric and Electronic
Appliances” issued by the Ministry of
Environment and Urban Planning. It complies with
AEEE Directive. This product has been produced
from recyclable and reusable high quality components and materials. Therefore, do not dispose of
this product with the domestic wastes or other
wastes at the end of its service life. Take it to a
collection center for recycling of electric and electronic appliances. You can ask for these collection
centers from your local administration. Help protecting the environment and natural resources by
recycling the used products.
1.5 Package details
Package of the product is made of
recyclable materials as per our
National Legislation. Do not dispose of
the package wastes with domestic
wastes or other wastes; bring it to the
package collection centers specified by local authorities.
5 / 13 EN
2 Your Hood
2.1 Appearance
6
5
4
1
3
2
9
7
8
2.1.1. Controls and components
2.2 Technical Specifications
1-Lamp
2-Aluminum filter lock
3-Aluminum filter
4-Hood body
5-Control panel
6-Flue connection element
7-2 pcs of wall fittings
8-1 pc of 120 mm flue connection adaptor
9-1 air deflector (optional)
Width
Depth
Height
Supply voltage
Control
Suction power
Motor power
Lamp power
Fuse
Air outlet pipe
diameter
Net weight
Gross weight
Color
900 mm
500 mm
Min. 675 mm - Max. 1005 mm
220 - 240 V, 50 Hz
3 positions
800 m3/h
230 W
2X20 W
10 A
120 - 150 mm
10.5 kg
13.3 kg
Inox
Markings on the product or the values stated in other documents supplied with the product are values obtained under laboratory
conditions as per relevant standards. These values may vary according to the usage of the product and ambient conditions.
6 / 13 EN
Hood / User Manual
3 Set-up
3.1 Preparation
Information required for the preparation of the
installation place for your hood is given below.
(Dimensions are given in mm)
A
WARNING: Remove the protective film (if
any) on the hood and flue surface after
the installation.
•• Perform the transport operations with the original package of the unit observing the markings
on the package. Protect your unit against factors
that may harm the package and the unit (humidity, water, impact etc.).
•• Hood should be placed as aligned by the central
axis of the cooking unit. The distance between
the cooking unit and oil filters of the hood should
be at least 65 cm.
•• Perform the following steps for the installation of
the hood.
A
WARNING: The height between the lower
surface of the hood and upper surface of
the stove/oven should not be less than
65 cm.
3.2 Power connection
•• This appliance is manufactured with a supply
cord with 3 threads, and it should be connected
to the mains supply with an electric switch that
has a minimum clearance of 3 mm between the
3-pole terminals. Have a qualified electrician
perform the electric connection.
•• Install your unit so that you can reach the electric connection (plug, outlet) easily after installation.
3.3 Installation of the Hood
•• Please consult the nearest Arçelik Authorized
Service for the installation of the hood.
•• Preparation of the installation place and electric
wiring is the responsibility of the customer.
Hood / User Manual
7 / 13 EN
3 Set-up
•• Observe the dimensions given in Figure 1 and
drill 4 Ø 8 mm holes for X and Y and 4 Ø 6 mm
holes for Z and H.
•• Use the screws and dowels in the equipment of
the appliance for installation of various parts.)
Place the screws to the Z holes so that a clearance
of 8 mm is left. (Figure 3)
After hanging the hood to the Y holes, secure it to
the wall using X holes inside the body. Tighten Y
screws. (Figure 4)
•• Secure the bracket (Figure 2-3) to the Z and H
holes on the wall.
8 / 13 EN
Hood / User Manual
3 Set-up
3.4 Flue Set-up
1.Install 2 clamping screw seats to the left and
right holes of the wall hanger.
2.Place the flue connection element freely on the
body.
3.Pull the inner flue connection element upwards
from the flue connection element placed over
the body (Figure 4), and screw the brackets to Z
and axes from left and right sides. (Figure 5)
3.4.1 Usage without flue connection
Air is filtered by the carbon filter and returned to
the room. Carbon filter is used when there is no
flue available in the house or when it is not possible to install the flue pipe.
1.Remove the aluminum filters.
2.To install the carbon filter, center the carbon filter
on the plastic part on both sides of the fan body,
and secure it on the tabs.
3.Reinstall the aluminum filters.
Hood / User Manual
9 / 13 EN
3 Set-up
3.4.2 Usage with flue connection
Vapors are discharged with the flue pipe secured
on the connection ring on the hood. Diameter of
the flue pipe should be equal to the diameter of
connection ring. Pipe should be installed slightly
inclined (about 10°) in horizontal layouts to allow
the air to go out of the room easily.
A
WARNING: Carbon filter should be
removed if it is installed on the hood.
1.For the installation of flue connected model, connect the hood to the outlet pipe with a rigid or
flexible pipe with a diameter of 150 or 120 mm
depending on the pipe selection by the installer.
(Figure 3)
2.Install the flue adaptor to the hood body outlet if
you would like to install with a pipe with a diameter of 120 mm.
3.Secure the pipe with suitable clamps. These
items are not supplied with the unit. Remove the
active carbon filters, if any (optional).
4.Install air deflector.
5.Install the active carbon filter as follows. Follow
the procedure in reverse order to remove.
8.The exhaust air must not be discharged into a
flue which is used for exhausting fumes from
other appliances burning gas or other fuels. (Not
applicable for appliances which only discharge
air back into the room).
9.Regulations concerning the discharge of air have
to be fulfilled.
A
WARNING: Failure to install the screws or
fixing device in accordance with the
instructions may result in electrical hazards..
6.Install clip screw seat to the wall hanger.
7.Pull the inner flue connection element upwards
from the flue connection element placed over
the body (Figure 4), and screw it to the hanger
from left and right sides. (Figure 5)
A
10 / 13 EN
WARNING: In case of failure to perform
cleaning and maintenance of oil filters regularly and when the carbon filter reaches
its service life (about 4 months), there is
the possibility of causing fire by them.
Hood / User Manual
4 Operation of the Appliance
4.1 Control panel
4.2 Operating the Hood
•• Hood is equipped with a motor with various
speed settings. For a better performance, we
advise you to use low speeds in normal conditions, and high speeds when smell and vapors
are intensified.
A- Turning the lamp on/off
B- Speed 1
C- Speed 2
D- Speed 3
E- Warning light
1.Press any of the speed setting buttons (B, C, D)
to operate the hood in the required speed.
2.You can illuminate the cooking area by pressing
button A.
3.Press the speed setting button you pressed before again to turn off the hood.
Red warning light on the front panel is illuminated
continuously when the motor is activated.
Hood / User Manual
11 / 13 EN
5 Cleaning and Care
Prior to maintenance, unplug the appliance or turn
the main switch off or loosen the fuse that supplies
the hood or turn it off.
Clean your stainless steel hood
with cleaning agents specifically produced for this
material.
A
A
WARNING: Never use rubbing mate-
rials (wire wool) or abrasive materials (brushes, the harder side of the
scouring sponge etc.).
WARNING: Sterilizers, products made
of carbon steel or similar material containing chloride may cause
black stains, corrosion or permanent
marks when they contact with stainless steel.
3.Wash the filters with liquid detergent and then
rinse them with water.
4.When the filters are dried, re-install the filter in
the reverse order of the above procedure.
5.2 Carbon filter (Flueless usage)
This filter removes the cooking odours.
WARNING: Carbon filter should never
be washed. It should be replaced every 4 months under normal usage.
You can procure carbon filter from Arçelik
Authorized Dealers.
1.Remove the aluminum filters.
2.Take the carbon filter out from its seat by pulling
it out.
A
5.1 Aluminum filter
This filter is intended to retain the oil particles in
the air. You are recommended to clean your filter
every month under normal usage conditions.
1.Push the aluminum filter lock forward.
Note
•• You can wash your aluminum filters in dishwasher also.
•• A discoloration may be observed on aluminum
filters as they are washed. This is normal, you do
not need to replace your filter.
2.Then, slightly lower it and pull forward.
Otherwise, you may bend the filter.
12 / 13 EN
3.Install the new carbon filter.
4.Install the aluminum filters.
Use a soft cloth soaked with liquid detergent to
clean the outer surface of your hood.
A
WARNING: Never use abrasive or
scratching materials for cleaning.
Hood / User Manual
5 Cleaning and Care
A
WARNING: You may cause a fire if
you do not follow the instructions on
the cleaning and replacement of the
filters of your hood.
5.3 Replacement of the lamp
2 pieces of 20 W halogen lamps are used in your
hood. Prior to replacement of lamp, unplug the
appliance or turn the main switch off or loosen
the fuse that supplies the hood or turn it off. To
remove the holder of the halogen lamp, take the
lamp holder out by rotating it counterclockwise.
Be careful not to drop the lamp holder during this
operation. After replacing the lamp, install the lamp
holder by rotating it clockwise following the reverse
order of the removal procedure. We advise you to
install the new lamp with a piece of cloth or gloves.
Contacting halogen lamps with bare hands will
reduce their service life.
Note:
•• You may procure lamps from Authorized Dealers.
If you need to transport the unit:
•• Keep original package. Transport the unit with its
original package, and follow the transport markings on the original package.
If you do not have the original package:
•• Do not put heavy objects on the hood.
•• Protect the outer surface from impacts.
•• Pack the unit so that it would not be damaged
during transport.
Hood / User Manual
13 / 13 EN
Beko Manufacturers Guarantee
Congratulations on purchasing a quality Beko product. Beko automatically
provide you with a 2 year Manufacturers Guarantee, covering parts and
labour for servicing within the geographical limits of Australia and New
Zealand.
General Terms and Conditions
For Australian Consumers
goods come with guarantees that cannot be excluded under the Australian
Consumer Law. You are entitled to a replacement or refund for a major
failure and for compensation for any other reasonably foreseeable loss or
damage. You are also entitled to have the goods repaired or replaced if the
goods fail to be of acceptable quality and the failure does not amount to a
major failure.
For New Zealand Consumers
Nothing in this guarantee purports to modify or exclude the conditions,
guarantees and undertakings, and other legal rights, under the New Zealand
Consumer Guarantees Act and other laws, except in those circumstances
contemplated by section 43(2) of the New Zealand Consumer Guarantees
Act.
Beko Guarantee
The Beko Manufacturers’ Guarantee provides additional protection for your
claims which will allow for a quick and simple process for all parties, subject
to our terms and conditions below.
To enable us to assist you in the most expedient way please contact us by
phoning the Toll free number (relative to your country of residence) as listed
below. Please ensure you refer to your user manual and in particular the
section headed “Recommended Solutions for the problems” before phoning.
The commencement date of this guarantee starts on the day of purchase
and proof of purchase must be supplied to the Beko Service Centre prior to
commencement of any guarantee work.
1
Terms and Conditions
Beko Australia and New Zealand Pty Ltd guarantees to the original purchaser
to repair, or at its option replace, without charge to the owner for any part
which is not of ‘acceptable quality’ within two years of date of purchase.
“No Lemon Guarantee” *
if the product fails more than 2 times during
the Guarantee period due to the same type failure caused by the same part,
we will automatically replace the product with an equivalent product free of
charge.
Food Spoilage*
If your product is a fridge or freezer, we will reimburse you for food which
due to a valid fault as per our guarantee is spoilt; reimburse you as per the
Up to 200 Litre
$100.00
>200 Litre - 400 Litre
$200.00
>400 Litre - 600 Litre
$300.00
>600 litre
$350.00
* Subject to a valid claim under the terms and conditions of this Guarantee
To be eligible for this Guarantee the product must be purchased from an
Authorised Reseller in Australia or New Zealand.
What is not covered under this Guarantee
1. Any service calls in which the problem is found not to be caused or
related to any defect in the Product. In this instance, the cost of the
service call will be charged to you. Examples (but not limited too) of
no product fault listed below:
a. Correcting the installation, e.g. levelling of product, adjustment of drain crossed or kinked hoses, leakage of hoses if
ers), noises due to water hammer and/or power supplies.
b. Replacing fuses or correcting house power wiring or house
plumbing issues.
c. Failure due to incorrect set up or requiring instructions normally covered in user manual.
d. Blocked pumps, removal of foreign objects/substances from
the washing machine, e.g. socks, bra wires, dirt etc.
e. Normal noise or vibration
f.
Infestation of pests, insects or vermin
2
2. This Guarantee does not cover damage caused by:
a. Misuse or abuse of the Beko Product
b. Accidental damage of any kind
c. Rust and Corrosion where the product is located within a corrosive environment
d. Discolouration of burners or trivets on gas cooktops or chrome
surrounds
e. Incorrect operation or not following the operation instructions
as stated in the user manual.
f.
Improper installation
g. Failure to clean or improper cleaning
h. Use of incorrect non – compliant electrical or gas connections
i.
External sources including but not limited to electrical inter-
j.
Any loss caused by civil commotion
k. Any loss caused from extreme events of nature including but
l.
Use of non genuine/authorised parts
m. Any repair or other work carried out on the Beko product
other than by an Authorised Beko Service Personnel.
3. This Guarantee does not cover costs associated with replacing and
3
This Guarantee has been designed for Products used in normal domestic
environment. Our products are not designed for commercial use. Any commercial use may affect this Product’s Guarantee.
Service under this Manufacturer’s Guarantee is provided by the Beko Australia and New Zealand Authorised Repairer.
The Guarantee is provided by Beko Australia and New Zealand Pty Ltd (ABN:
49 152 055 162) of 55 Blanck Street, Ormeau, QLD Australia 4208, P O Box
354 Ormeau QLD Australia 4208.
In Australia if you need assistance....
Toll Free 1300 282 356
Email:
[email protected]
In New Zealand if you need assistance....
Toll Free 0800 69 2356
Email:
[email protected]
4
285.9101.78/R-AA-27092011