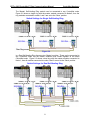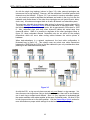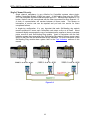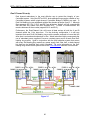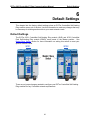
1
EOTec 2000 ControlNet Ring
Communications Manual
Self-Healing Ring Modules for
ControlNet Physical Media Layer
November 2008
First Edition
Weed Instrument Company, Inc.
707 Jeffrey Way, P.O. Box 300
Round Rock, TX 78680-0300
USA
Tel:
512-434-2850
Fax:
512-434-2851
E-mail: [email protected]
Web:
www.weedinstrument.com
Weed Instrument Co., Inc. reserves the right to make any modifications to
this document or the information contained herein at any time without notice.
Limited Warranty
Weed Instrument Co., Inc. (“Seller”) warrants that the Products will operate substantially in conformance
with Seller’s published specifications, when subjected to normal, proper and intended usage by properly
trained personnel, for a period of two (2) years from the date of shipment to Buyer (the “Warranty
Period”). Seller agrees during the Warranty Period, provided it is promptly notified in writing upon the
discovery of any defect and further provided that all cost of returning the defective Products to Seller are
pre-paid by Buyer, to repair or replace, at Seller’s option, defective Products so as to cause the same to
operate in substantial conformance with said specifications. Replacement parts may be new or
refurbished, at the election of Seller. All replaced parts shall become the property of Seller. Shipment to
Buyer of repaired or replacement Products shall be made in accordance with the provisions of Section 5
of the Sellers Terms & Conditions of Sale. Lamps, fuses, bulbs and other expendable items are expressly
excluded from the warranty. Seller’s sole liability with respect to equipment, materials, parts or software
furnished to Seller by third party suppliers shall be limited to the assignment by Seller to Buyer or any
such third party supplier’s warranty; to the extent the same is assignable. In no event shall Seller have
any obligation to make repairs, replacements or corrections required, in whole or in part, as the result of
(i) normal wear and tear, (ii) accident, disaster or event of force majeure, (iii) misuse, fault or negligence
of or by Buyer, (iv) use of the Products in a manner of which they were not designed, (v) causes external
to the Products such as, but not limited to, power failure or electrical power surges, (vi) improper storage
of the Products or (vii) use of the Products in combination with equipment or software not supplied by
Seller. If Seller determines that Products for which Buyer has requested warranty services are not
covered by the warranty hereunder, Buyer shall pay or reimburse Seller for all costs of investigating and
responding to such request at Seller’s then prevailing time and materials rates. If Seller provides repair
services or replacement parts that are not covered by the warranty, Buyer shall pay Seller therefore at
Seller’s then prevailing time and materials rates. ANY INSTALLATION, MAINTENANCE, REPAIR,
SERVICE, RELOCATION OR ALTERATION TO OR OF, OR OTHER TAMPERING WITH, THE
PRODUCTS PERFORMED BY ANY PERSON OR ENTITY OTHER THAN SELLER WITHOUT
SELLER’S PRIOR WRITTEN APPROVAL, OR ANY USE OF REPLACEMENT PARTS NOT SUPPLIED
OR APPROVED BY SELLER, SHALL IMMEDIATELY VOID AND CANCEL ALL WARRANTIES WITH
RESPECT TO THE AFFECTED PRODUCTS.
EXCEPT AS EXPRESSLY PROVIDED IN THIS WARRANTY, SELLER DISCLAIMS ALL WARRANTIES,
WHETHER EXPRESS OR IMPLIED, ORAL OR WRITTEN, WITH RESPECT TO THE PRODUCTS,
INCLUDING WITHOUT LIMITATION ALL IMPLIED WARRANTIES OF MERCHANTABILITY OR
FITNESS FOR ANY PARTICULAR PURPOSE. SELLER DOES NOT WARRANT THAT THE
PRODUCTS ARE ERROR-FREE OR WILL ACCOMPLISH ANY PARTICULAR RESULT.
Copyright
Copyright © 2008 Weed Instrument Company, Inc.
All rights reserved.
Reproduction without permission is prohibited.
ii
Standards and Warnings
The EOTec 2000 ControlNet Ring Modules from Weed Instrument have been designed to meet
the following standards.
EMC immunity – IEC61326-1:1998 Equipment for Measurement, Control and
Laboratory Use
FM Approved for:
Class I, Division 2, Groups A, B, C& D, T4
(0°C To +60°C)
When used in Hazardous Locations:
Class I, Division 2, Groups A, B, C & D, T4.
Substitution of components may impair suitability for Class I, Division 2.
Power, input and output (I/O) wiring must be in accordance with Class I,
Division 2 wiring methods and in accordance with the authority having
jurisdiction. Do not connect/disconnect equipment unless area is known to be
non-hazardous and power is switched off. Certified components for use in a
suitable enclosure. The maximum ambient temperature is 60°C.
Installations shall comply with the relevant requirements of the National
Electrical Code® (ANSI/NFPA 70), the Canadian Electrical Code® (CEC,
CAN/CSA-C22.1) and any local electrical codes, where applicable.
The Fiber Optic portion of the ControlNet Specification is somewhat limited
in scope and Weed Instrument Fiber Optic Products have a more varied set of
specifications based on field requirements and proven applications. The fiber
portion of this series is not designed to be compatible with the fiber portion of
the ControlNet Specification and, therefore, interconnection by fiber to any
other manufacturer’s products is neither expressed nor implied.
Lightning Danger: Do not work on equipment during periods of lightning
activity.
iii
EOTec 2000 ControlNet™ Ring Communications Manual
Table of Contents
Table of Contents
Chapter 1
Introduction ......................................................................... 1
Introducing the EOTec 2000 Self-Healing Ring Modules ................................ 1
EOTec 2C31 ControlNet Self-Healing Ring (SHR).......................................... 2
EOTec 2C32 ControlNet Dual Self-Healing Ring (DSHR)............................... 2
Feature Overview ............................................................................................ 3
Options and Accessories................................................................................. 3
Chapter 2
EOTec ControlNet Hardware.............................................. 4
Key Self-Healing Ring Features ...................................................................... 4
Self-Healing Ring Module Overview................................................................ 5
Self-Healing Ring Module Features................................................................. 5
Master/Slave Switch Settings.......................................................................... 7
Switch Settings for Single Self-Healing Ring .................................................. 8
Switch Settings for Dual Self-Healing Ring ..................................................... 8
Wiring Guidelines for Self-Healing Ring Modules ........................................... 9
Fiber Optic Cable Lengths............................................................................. 10
Optical Transceiver Specifications ................................................................ 10
Estimated Cable Lengths .............................................................................. 10
Maximizing System Cables ........................................................................... 10
ControlNet Self-Healing Ring Fault Indicators............................................... 11
Local and Remote Alarms ............................................................................. 12
4-20mA Fault Prediction................................................................................ 13
Chapter 3
Network Configuration ..................................................... 14
Network Setup and Operation ....................................................................... 14
Supported Network Configurations................................................................ 15
Single Channel/Ring Communication ........................................................... 15
Dual Channel/Ring Communication .............................................................. 17
Single Channel Security ................................................................................ 19
Dual Channel Security................................................................................... 20
Network Configuration Tips ........................................................................... 21
EOTec 2000 ControlNet™ Ring Communications Manual
Chapter 4
Table of Contents
Planning and Installation.................................................. 22
Planning a Network ....................................................................................... 22
Understanding EOTec/ControlNet Terminology ........................................... 22
Understanding Coax Limitations ................................................................... 24
Understanding When to Use Repeaters ....................................................... 24
Understanding the Benefits of Fiber.............................................................. 25
Understanding Fiber Limitations ................................................................... 25
Understanding Optical Transceivers ............................................................. 25
Optical Transceiver Specifications ................................................................ 26
Understanding Fiber Attenuation .................................................................. 26
Understanding Propagation Delay ................................................................ 28
Example 1: Maximum Delay (Single Channel)................................. 29
Getting to the Point-to-Point ............................................................. 31
Example 2: Maximum Delay (Dual Channel) ................................... 32
Verifying Network Parameters....................................................................... 34
Installing a Network ....................................................................................... 35
Coax Application Tips.................................................................................... 35
Fiber Application Tips .................................................................................... 36
Redundant Network Tips............................................................................... 36
Chapter 5
Troubleshooting................................................................ 37
Diagnosing Network Failures......................................................................... 37
Interrupting Fault Indicators........................................................................... 38
Power Supply Indicators................................................................................ 38
Electrical Interface Indicator .......................................................................... 38
Optical Interface Indicators............................................................................ 39
Link Active Indicator (2C32 Only).................................................................. 39
Remote LED / Relay Indicators ..................................................................... 40
Chapter 6
Default Settings................................................................. 41
Default Settings ............................................................................................. 41
EOTec 2000 ControlNet™ Ring Communications Manual
Table of Contents
Appendix A Technical Specifications .................................................. 42
General Specifications................................................................................... 42
Dimensions.................................................................................................... 43
Appendix B Self-Healing Ring Product Series .................................... 44
Optical Transceiver Specifications ................................................................ 44
Available Dual Channel Cables ..................................................................... 44
Available Optical Converters ......................................................................... 44
Accessories – Patch Cord Conversion Cables.............................................. 45
Appendix C Service Information........................................................... 46
Technical Support and Service...................................................................... 46
EOTec 2000 ControlNet™ Ring Communications Manual
Introduction
1
Introduction
This manual describes the uses for the EOTec 2C31 and *ControlNet™ Self-Healing
Ring (SHR) and 2C32 Dual Self-Healing Ring (DSHR) communication modules specially
designed for connecting ControlNet devices on the Physical Media Layer in industrial
field applications.
ControlNet is swiftly being adopted by the industrial automation and control industry.
Industrial applications often demand rugged, robust equipment that can provide high
reliability in settings far removed from a comfortable, climate-controlled office
environment.
Devices attached to a network normally cannot tell what is happening elsewhere on the
system. As a result, the responsibility for monitoring and reacting to faults in the network
must fall on the ControlNet communication equipment that connects these devices. SelfHealing Ring modules are well suited to react to these faults by rerouting essential data
to insure no unscheduled downtime. In this environment, real-time alarms are a vital
feature to inform system administrators and operators when a problem occurs and
prevent loss of any system data.
Introducing the EOTec 2000 Self-Healing Ring Modules
The EOTec 2000 Self-Healing Ring Modules are designed using patent pending
technology to give reliable operation in harsh industrial environments. As shown in
figure 1-1 (single ring) and 1-2 (dual ring), Weed Instrument provides various solutions
for creating redundant communications topologies. Create the ControlNet
communication ring that meets your needs; for single channel redundancy, or for dualredundant channel configurations. You can also combine ring topologies with existing
point-to-point, daisy-chain, and star topologies into one network. Both Weed SelfHealing Ring modules support multi-mode fiber for short to medium range distances and
single mode fiber for greater distances between your ControlNet devices.
Fiber optic technology provides many advantages for industrial control applications.
These include EMI/RFI immunity, the ability to run fiber optic cable through hazardous
areas, and the ability to connect long distance communication links.
Both EOTec 2C31 & 2C32 Modules come with LED indicators for local determination of
communication failures and relay contacts to support a remote alarm system. In
addition, each has redundant power supply inputs to provide a constant power source.
Also, both fiber optic ports have diagnostics which provide a 4 to 20mA real-time output
for measuring the received optical power level (light intensity) of all glass fiber cables.
The global alarm is unique because it is passed between all modules. A set of relay
contacts is provided on every module and will close in an alarm condition. As a result,
only one module needs to be connected to a remote alarm to alert when a fault has
occurred anywhere within your network.
* ControlNet is a registered trademark of ControlNet International, Ltd.
1
EOTec 2000 ControlNet™ Ring Communications Manual
Introduction
EOTec 2C31 ControlNet Self-Healing Ring (SHR)
Figure 1-1
In ring topologies, an additional fiber path is added (shown in figure 1-1) to insure that
communication is maintained when a fiber break occurs. In a dual channel system (see
figure 1-2), there is one fiber ring to support Channel-A and an entirely separate fiber
ring to support Channel-B. The DSHR also provides a third or tertiary path to increase
redundancy for network systems that cannot afford any unscheduled down time.
EOTec 2C32 ControlNet Dual Self-Healing Ring (DSHR)
Figure 1-2
2
EOTec 2000 ControlNet™ Ring Communications Manual
Introduction
Feature Overview
EOTec 2000 ControlNet Self-Healing Ring modules can support both Multi-Mode and
Single-Mode optical modules and includes diagnostic features that are not even offered
as options on most other optical modules.
Appendix B, EOTec 2000 ControlNet Self-Healing Ring Product Series, includes ordering
information on Self-Healing Ring models and Optional Accessories.
Your EOTec ControlNet SHR modules require no jumper configuration. All ControlNet
communication modules come ready to meet any ControlNet™ network configuration.
Each module comes with a Master/Slave switch located on the front of each module.
This switch must be set so that one Master module resides in each ring. See
Master/Slave Switch for the proper switch settings for your ControlNet ring.
Options and Accessories
Contact your Weed sales representative to order any of these options or accessories.
•
•
•
Fiber optic patch cables (converts LC connection to your fiber cable termination)
Optical Conversion – convert between multi-mode and single mode at fiber ports
Dual-channel Link cables of various lengths
See Appendix B – Self-Healing Ring Product Series for more information on options and
accessories.
3
EOTec 2000 ControlNet™ Ring Communications Manual
ControlNet Hardware
2
EOTec ControlNet Hardware
This chapter describes how both the EOTec 2C31 ControlNet™ Self-Healing Module
and the 2C32 ControlNet™ Dual Self-Healing Module are designed to give reliable
operation in harsh industrial environments. Both these modules have direct electrical
connections over coax cable to your ControlNet devices. The 2C31 is used to create a
single ring to support redundancy for a single channel system. The 2C32 is used to
create a dual ring to support dual-redundancy on both Channel A and B.
Key Self-Healing Ring Features
2C31
¾ Single and Dual Self-Healing Rings
for High Reliability
o Highest number of nodes supported
o Fully compliant with ControlNet™ specification
¾ Small Form-factor Pluggable (SFP),
High Performance Laser Optics
o 1310nm lever-latch SFP laser transceiver
o Real-time indication of fiber optic health
o Single/Multi-mode conversion available
¾ Global Ring Failure Alarm with Comprehensive
Diagnostics
o Indicator and relay monitor
o Four additional alarm relay outputs
o Minimizes downtime
2C32
¾ Compact Enclosure
o Reduced installation space required
o Standard 35 mm DIN-rail mounting
¾ Industrial Design
o CE Marked
o Class I, Division 2, Groups A, B, C & D, T4
¾ Accessories Available
o Duplex patch cords (LC to ST, LC to SC, etc.)
o Link cables
o Spare SFP Transceivers
4
EOTec 2000 ControlNet™ Ring Communications Manual
ControlNet Hardware
Self-Healing Ring Module Overview
The quickest way to begin understanding the functional uses of the Weed Self-Healing
Ring (2C31 – Single Ring & 2C32 – Dual Ring) Modules is to split the module in half as
shown in figure 2-1. All data communication features are located on the bottom and all
power and diagnostic features are located on the top with a Master/Slave switch located
front and center.
Figure 2-1
Additional understanding can be learned by further dissecting the module into its
functional parts. For more detailed information refer to table 2-1a, b, & c below.
Self-Healing Ring Module Features
Features
Description
Power 1, 2___
Remote Alarms Æ
Power Inputs: There are two 15-30Vdc inputs on the front of
each module to meet redundant power needs.
Power 1, 2 InputsÆ
Power Alarms: Each module comes equipped with local and
remote alarms to assist in diagnosing power faults. When
power is > 15Vdc and < 30Vdc a power fault will occur.
•
Power 1 Alarm Æ
Power 2 Alarm Æ
Both power inputs have an LED alarm on the front of
each module to indicate power status.
•
Both power inputs have remote alarms which can be
accessed at the top of each module. Dry contact relays are
closed on alarm.
For additional wiring information consult Wiring Guidelines.
For alarm information consult Troubleshooting.
Table 2-1a
5
EOTec 2000 ControlNet™ Ring Communications Manual
ControlNet Hardware
Self-Healing Ring Module Features
Features
Dual Channel___
Link Active LED Æ
Dual Channel___
Link Port Æ
Dual Channel Link_
Remote AlarmÆ
Master/Slave__
Switch Æ
Link Alarm Æ
Global Alarm Æ
Description
Dual Channel Link Port (2C32 Only): The 2C32 supports dual
channel ControlNet Operations.
Meaning that for each
ControlNet node two ring modules are required (1 for A; 1 for
B).
These two ring modules are linked together and
communicate over a dual-channel link cable (see figure 1-2).
Dual Channel Link Active LED: Provides status information
on dual-channel communications.
For alarm information consult Troubleshooting.
Å Global Remote Alarm
Master/Slave Switch: One module (only 1) must be set to
master for each ring in the network configuration. Thus for
dual rings there will be two Masters (1 for ring-A; 1 for ringB).
Link Alarm: The dual-channel link port has two alarms. An
LED for local status and a dry contact relay to provide status to
a remote location.
Global Alarm: The global alarm is passed between all selfhealing ring modules so only one module needs to be connected
to a remote location to indicate a fault in the ring(s).
For additional wiring information consult Wiring Guidelines.
For alarm information consult Troubleshooting.
Fiber 1___
Active LEDs Æ
Fiber 2___
Active LEDs Æ
Fiber 1 & 2 Transceivers: Both Fiber 1 and Fiber 2 are
supported by Small Form-factor Pluggable (SFP) transceivers.
A ring is formed by connecting fiber 1 cable in one direction
while connecting fiber 2 in the other direction around the ring
(Single ring see figure 1-1; Dual ring see figure 1-2 ).
Fiber 1 Port Æ
Fiber 1 & 2 Activity: Both fiber ports have local transmit (TX)
and receive (RX) activity light to provide fiber activity status
information.
Fiber 2 Port Æ
For alarm information consult Troubleshooting.
Fiber 1, 2 Remote__
Alarms Æ
Fiber 1, 2 4-20mA_
Outputs Æ
Fiber 1 Alarm Æ
Fiber 2 Alarm Æ
Fiber 1 & 2 Alarms: Both Fiber 1 and Fiber 2 each have alarm
support. Each have an LED for local status and a dry contact
relay to provide status to a remote location.
Fiber 1 & 2 4-20mA Outputs: Fiber 1 and Fiber 2 are each
supported by a 4 to 20mA output. This signal is based on the
light intensity received by each port. A 4mA reading indicates
no light received. The reading increases as the received light
intensifies.
For additional wiring information consult Wiring Guidelines.
For alarm information consult Troubleshooting.
Table 2-1b
6
EOTec 2000 ControlNet™ Ring Communications Manual
ControlNet Hardware
Self-Healing Ring Module Features
Features
ControlNet___
Active LED Æ
Description
ControlNet Port: The Self-Healing Ring module can be
attached to any ControlNet network. This will connect directly
to the coax trunk line via a ControlNet tap (Single ring see
figure 1-1; Dual ring see figure 1-2 ).
ControlNet Activity: Each Self-Healing Ring module has an
LED to provide status on the ControlNet port.
ControlNet Input Æ
For alarm information consult Troubleshooting.
Table 2-1c
Master/Slave Switch Settings
As shown in figure 2-1 both the 2C31 and 2C32 have a Master/Slave switch that must
be set appropriately for ring operation to function correctly. When a module is set as the
master or ring manager, it controls the routing of data messages around any broken or
unusable glass fiber cables.
When configuring a ControlNet Network using EOTec Self-Healing Ring modules, it is
important that only one module in the ring is set as the ‘Master’. All other modules in
the ring must be set in the ‘Slave’ position. In a properly configured ring, the network
may function properly even if these switches are not set correctly. However, the master
is important to all break/heal management functions so when these switches are not set
correctly your network may unexpectedly fail when a simple fault occurs.
2C31
2C32
Figure 2-1
For proper switch settings see figure 2-2 for single ring and figure 2-3 for dual rings.
7
EOTec 2000 ControlNet™ Ring Communications Manual
ControlNet Hardware
The ‘Master’ Self-Healing Ring module can be connected to any ControlNet node.
Figure 2-2 shows a single ring with the master module connected to Node-2; thus the
ring modules connected to nodes 1 and 3 are set to the ‘Slave’ position.
Switch Settings for Single Self-Healing Ring
Figure 2-2
In a Dual Self-Healing Ring, there are two ‘Master’ modules. These can be connected to
any ControlNet node, but the master modules must reside together at the same
ControlNet node. Figure 2-3 shows a dual ring with the master modules connected to
Node-1; thus all modules connected to nodes 2 and 3 are set to the ‘Slave’ position.
Switch Settings for Dual Self-Healing Ring
Figure 2-3
8
EOTec 2000 ControlNet™ Ring Communications Manual
ControlNet Hardware
Wiring Guidelines for Self-Healing Ring Modules
Both the EOTec 2C31 & 2C32 modules can be connected per Table 2-4.
Top View
All relays are closed on alarm
* Function supported by 2C32 Only
Table 2-4
Removable
Terminal Block Plugs
To assist in making wire connections to the
modules, the terminal block plugs are easily
removed.
Place the tip of a screwdriver under the front
of the plug and lift.
9
EOTec 2000 ControlNet™ Ring Communications Manual
ControlNet Hardware
Fiber Optic Cable Lengths
The quality of the fiber cable determines the maximum distance you can achieve.
Consult your local distributor for attenuation specifications prior to purchasing your fiber
media components. The Small Form-factor Pluggable (SFP) Transceivers used in the
EOTec 2000 ControlNet Ring modules are designed for use with either multi-mode or
single-mode optic fiber. The wavelength used for both is 1310nm. Table 2-5 below,
provides estimated maximum distances for selecting the proper transceivers for the fiber
optic cable lengths needed in your network. All maximum distances are based on
transceiver wavelengths and typical attenuation per fiber diameters.
Optical Transceiver Specifications
Model
Fiber Type
2C31-LC-MM/MM
Multi-mode
2C31-LC-SM/SM
Single mode
2C32-LC-MM/MM
Multi-mode
2C32-LC-SM/SM
Single mode
Max Optical Dynamic Range,
Fiber Size
11 dB into 62.5/125μm fiber
7.5 dB into 50/125μm fiber
19 dB into 9/125μm fiber
11 dB into 62.5/125μm fiber
7.5 dB into 50.5/125μm fiber
19 dB into 9/125μm fiber
Typical Max
Distance (mi/km)
2.5mi/4km
1.9mi/3km
12.4mi/20km
2.5mi/4km
1.9mi/3km
12.4mi/20km
Table 2-5
For more information on calculating maximum fiber distance refer to section
Understanding Fiber Attenuation in Chapter 4.
Estimated Cable Lengths
The maximum length of a fiber cable section for any Weed fiber optic module is
dependent on the quality of the fiber, number of splices, and the number of connectors
between the transmit and receive diodes. The total attenuation for a cable section must
be less than the stated optical power budget of the optical module selected. Estimated
fiber optic cable distance is based on typical cable attenuation and assumes optimum
cable quality. See sections ‘Understanding Fiber Limitations’ and ‘Understanding fiber
Attenuation’ in Chapter 4 for more detailed information on this subject.
Maximizing System Cables
Whenever possible avoid splicing your cable. Connectors can cause considerable
attenuation and limit the maximum length of your system. Be certain to measure the
attenuation of each different cable sections after the cable is installed.
10
EOTec 2000 ControlNet™ Ring Communications Manual
ControlNet Hardware
ControlNet Self-Healing Ring Fault Indicators
This section describes the 4-level fault protection system of the Self-Healing Ring on both
the 2C31 (SHR) and 2C32 (DSHR) modules. Each level provides additional ring fault
information for troubleshooting network faults as shown in figure 2-4.
The fault indication system begins with data communication indicators (LEDs) on the front
of each module which provide status for the flow of data packets through the network.
The next stage provides fault indicators (LEDs) which are also located on the front of
each module. These will identify what type of fault has occurred and corresponds with
the third stage or remote alarms (relays) that provide contacts which can be used for a
remote alarm system. Finally, any of these faults will result in the fourth stage; a Global
Alarm (relay).
The Global Alarm is unique in that it is communicated between all Self-Healing Ring
modules. When a global alarm is set, all modules in the ring(s) respond at the same time.
This provides the user with one signal that can be taken to a control point and alert
maintenance staff that a failure has occurred in the network. This also allows the fault to
be immediately corrected thus preventing any unscheduled downtime.
Figure 2-4
See the next section for a complete list of local and remote alarms indicators. For
troubleshooting tips please refer to section 5 for assistance in diagnosing network
failures.
11
EOTec 2000 ControlNet™ Ring Communications Manual
Local and Remote Alarms
* Indicates 2C32 (Dual Self-Healing Ring) feature only.
12
ControlNet Hardware
EOTec 2000 ControlNet™ Ring Communications Manual
ControlNet Hardware
4-20mA Fault Prediction
Ever increasing up-time requirements in networking applications have led to looking at
physical media layer components to aid in improving system availability. This factor has
led the industry to employing SFP Optical Transceivers with DMI Diagnostics. The
Diagnostic Monitoring Interface (DMI) defined in document SFF-8472 adds parametric
monitoring to SFP (Small Form-factor Pluggable).
The primary purpose of SFF-8472 is to aid in predicting transceiver lifetime, isolating
system failures and verifying component compliance. Predictive failure capabilities help a
user identify potential link problems before system performance is impacted. One of the
key elements of SFF-8472 is a real-time sensor for received optical power which is
decoded as a 16 bit unsigned integer, with EEPROM contents ranging from 0mW to
6.55mW. The decoded number is in units of 0.1 µW per bit with an accuracy defined as ±
3dB.
This specification was developed to be used with all SFP devices and has an upper limit
that is far beyond transceivers used in the ControlNet environment. The transceivers
used in the EOTec Self-Healing Ring modules each have a minimum output power of
10µW for Multi-mode and 31µW for Single mode. This 16-bit digital reading provided by
the receiver is small in comparison to the specified 6.55mW upper limit so this signal must
be amplified before it is converted into an analog output. The amplification is
appropriately stepped for each transceiver type so that it fits into the 4-20mA range.
As explained above the received power measurement has an accuracy of ± 3dB. This is
equivalent to ± 50% of the received optical power. Since this is not a particularly accurate
measurement, each transceiver will provide a slightly different reading across the same
length of fiber.
However, SFP lasers are operated in constant power mode so they rarely exhibit any
variation in transmit power. This means that although they are not providing an accurate
reading they do provide a consistent reading. Any attenuation in the fiber will decrease
this reading so the longer the fiber the lower the reading will be. This reading can also be
affected by any splices or connectors added between the transmit and receive diodes so
once the system is set up and operational any further attenuation or decrease in this
reading can be considered deterioration in the fiber segment.
An investigation can then occur to determine root-cause of a changed reading before the
segment becomes inoperable. Thus loose connections or a deteriorating transmitter or
receiver can be detected. Even insulation nicks or erratic bends which may occur in a
normal maintenance call can change the refraction of light along the fiber. This type of
event can affect the reading and be discovered and corrected before a fault occurs.
For more information on connecting the 4-20mA output refer to the Module Wiring
Guidelines in chapter 2.
13
EOTec 2000 ControlNet™ Ring Communications Manual
Network Configurations
3
Network Configurations
This chapter describes network ring topologies you can configure using EOTec 2000
ControlNet Self-Healing Ring (SHR) and Dual Self-Healing Ring (DSHR) modules.
Further, this chapter will also address ring topologies which incorporate EOTec 2000
ControlNet Stacks using the EOTec 2C20 and provides details on how to build such
networks.
Network Setup and Operation
As each network is different, Weed offers easily configured modules to meet your unique
ControlNet needs. Using their patent pending technology Weed has developed the
EOTec 2000 ControlNet Self-Healing Ring (SHR) and Dual Self-Healing Ring (DSHR)
modules are easily selected to meet these communication needs.
To begin selection, first start at the heart of the network, the ControlNet trunk line. This
is a bi-directional coax cable that connects directly to your ControlNet device. Both the
2C31 (SHR) and 2C32 (DSHR) modules have a bi-directional BNC port to connect
directly to this ControlNet coax trunk line.
A power source must be selected to operate your Self-Healing Ring modules. Both the
2C31 and 2C32 modules have dual 15-30Vdc inputs. For mission critical applications, a
redundant power supply input is available. It is highly recommended that each module
has two power sources to insure no interruption of service. If power is disconnected or a
power source outside this specified range is selected an alarm will occur. Refer to Local
and Remote Alarms for more information.
Next, it is time to determine optical communication type. Both the SHR and DSHR
modules support multi-mode and single mode optical fiber. To learn more about
selecting the correct Self-Healing ring module for your application, refer to the Planning
a Network section of this manual and in particular Understanding Fiber Attenuation.
Another consideration is how to use the diagnostic features of the Self-Healing Ring
modules. A simple solution may be to use the dry relay contacts to set alarms with
panel or tower lights and then taking the global alarm to a control room to set an initial
alarm to alert maintenance personal of a network issue that must be addressed.
However, this only works well in applications where all ControlNet nodes are in close
proximity to one another as within one facility. In cases where the nodes are several
kilometers or miles away from each other then lights are not a good solution. These
same dry relay contacts can then be taken to a DC Input module that can reside in the
same chassis with your ControlNet Bridge (CNB) to be used as alarms by an application
of your choice. Also see ControlNet Self-Healing Ring Fault Indicators for more
information on Weed Self-Healing Ring alarms.
14
EOTec 2000 ControlNet™ Ring Communications Manual
Network Configurations
Supported Network Configurations
When connecting ControlNet nodes together there are several topologies which are
supported by EOTec 2000 products. This manual’s main purpose is to explain how to
configure self-healing ring and dual self-healing ring topologies. However, it will also
illustrate how Point-to-Point, Cascade/Daisy-Chain, and Star configurations can be
interconnected with ring topologies to form a network.
Any of these network
configurations can be used and is limited only by the ControlNet maximum delay time.
Single Channel/Ring Communication
ControlNet systems using single channel ControlNet Bridges (CNBs) can be easily
designed or converted to a Self-Healing Ring using the EOTec 2C31 Self-Healing Ring
modules. Each 2C31 module has two fiber ports. Each fiber port has a transmitter and
a receiver so each fiber port will be connected with two optical fibers. These two fibers
are considered a fiber segment. As you can see in figure 3-1, the 2C31 supporting
Node-2 is connected to Node-5 by one fiber segment in the clockwise direction and to
Node-7 by a fiber segment in the counter-clockwise direction. The ring is then
completed by connecting a fiber segment between Node-5 and Node-7.
Figure 3-1
The ring is now physically attached, but break management must still be activated by
setting the Master/Slave switch on the front of each 2C31. Only one 2C31 can be set as
the ‘Master’ or ring manager; all other 2C31s must be set to the slave position. Also,
see the Master/Slave Switch section for more information on proper switch settings for a
self-healing ring.
15
EOTec 2000 ControlNet™ Ring Communications Manual
Network Configurations
Other network topologies can interconnect into a Self-Healing Ring as well. Figure 3-2
uses the same 3 node single ring as the previous example; however, Node-2 is shown
with a Point-to-Point connection, Node-5 in a Daisy-Chain, and Node-7 as a Star
configuration. All these configurations can work within the same ControlNet network.
Figure 3-2
When connecting three separate facilities that are miles apart, the configuration shown
in figure 3-2 may work well, but only the fiber ring has all the diagnostic features of the
2C31. All coax connections are susceptible to faults. Only the ring configuration shown
in figure 3-3 provides a redundant path and all the diagnostic features.
Figure 3-3
16
EOTec 2000 ControlNet™ Ring Communications Manual
Network Configurations
Dual Channel/Ring Communication
ControlNet systems using redundant channel ControlNet Bridges (CNBRs) can also be
designed or converted to a dual-redundant Self-Healing Ring using the EOTec 2C32
Dual Self-Healing Ring modules. Each 2C32 module also has two fiber ports with a
transmitter and a receiver. Again, each fiber port will be connected with two optical
fibers or fiber segment.
As you can see in figure 3-4, two 2C32s are supporting Node-2. One is connected via
coax to channel-A while the other is connected to channel-B. A dual ring is merely a
second ring that mirrors the first ring. All hardware is the same and all coax and fiber
segments are the same type and length. Similar to the single ring example, Node-2 is
connected to Node-5 by two fiber segments (1 for channel-A & 1 for channel-B) in the
clockwise direction. Node-2 is connected to Node-7 by a two fiber segments in the
counter-clockwise direction. Then to finish the ring Node-5 and Node-7 is connected
together by two fiber segments.
Also shown in figure 3-4, if Node-2/Fiber-2 Port connects to Node-5/Fiber-1 Port in ringA then Node-2/Fiber-2 Port must also connect to Node-5/Fiber-1 Port in ring-B. Do Not
connect Node-2/Fiber-2 Port to Node-5 in the ring-A (clockwise) and Node-2/Fiber-2 Port
to Node-7 in the ring-B (counter-clockwise). The break management algorithm assumes
that the user has followed the Rockwell requirement of identical connections in both A
and B channels.
Figure 3-4
17
EOTec 2000 ControlNet™ Ring Communications Manual
Network Configurations
As with the single ring topology (shown in figure 3-2), other network topologies can
interconnect into a ring topology. However, with the redundant ControlNet systems both
channels must be identical. In figure 3-2 if you wanted to create a redundant system,
not only would you need to duplicate the hardware and media in the ring, but also the
hardware and media shown in the other three topologies as well (point-to-point; daisychain; star). All nodes must support both an A and a B channel in a redundant system.
The maximum allowable skew between data arriving for channel-A versus channel-B is
1.6µs (see Example 2: Maximum Delay for more information on maximum skew). Using
the standard delay for fiber of 5.1ns per meter, this is approximately 300 meters or 1000
ft. Also, redundant rings work best when channel-A cables are routed away from
channel-B cables. While it is possible to duplicate all the other topologies shown in
figure 3-2, these redundant channel ControlNet rules do not allow for the multiple
mismatches which will occur when routing cables between the various pieces of
hardware.
When dual-redundancy is a network requirement, the best cable configuration is
illustrated here in figure 3-5. This solution uses very short coax cable connections
between the CBNR and the 2C32s so the fiber cables are your only consideration when
planning for two redundant network paths.
Figure 3-5
As with the 2C31, a ring can only have one and only one ‘Master’ or ring manager. Yet,
since there are two rings when using a dual-channel system, there will be two masters;
one in each ring or support each channel. Also, it is very important to understand that
the master modules must reside together at the same ControlNet node. All other 2C32s
in both rings must be set to the slave position. Visit the Master/Slave Switch section for
more information on proper switch settings for a dual-redundant self-healing ring.
18
EOTec 2000 ControlNet™ Ring Communications Manual
Network Configurations
Single Channel Security
Single channel redundancy is very effective for ControlNet systems where singlechannel ControlNet Bridges (CNBs) are used. A Self-Healing ring using the EOTec
2C31 can withstand one fiber break as shown figure 3-6. Although fiber segment 2-3 is
broken, Node-3 can still communicate with the other two nodes over fiber segment 1-3.
A chain of communication still remains between all three nodes. This causes no
interruption of service and can be repaired and put back into service for future
unexpected failures.
In single-ring configuration, it is very important that each Self-Healing ring module
remains powered to insure each ControlNet node stays on-line at all times. Weed
Instrument highly recommends the use of redundant power supplies to insure a constant
power source at each Self-Healing Ring module. Used in conjunction with the fault
indication system that comes with every Self-Healing Ring module either a power supply
fault or a fiber fault can be identified and quickly remedied. For more information on the
Self-Healing Ring module alarm system refer to the Fault Indicators sections of this
manual.
Figure 3-6
19
EOTec 2000 ControlNet™ Ring Communications Manual
Network Configurations
Dual Channel Security
Dual channel redundancy is the most effective way to protect the integrity of your
ControlNet system. Using the EOTec 2C32, dual-redundant rings can be created on any
ControlNet systems where single-channel ControlNet Bridges (CNBRs) are used. A
Dual Self-Healing ring can withstand multiple fiber breaks as shown figure 3-7. Although
fiber segments A2-3, A1-3, B1-2, and B2-3 are all broken, Node-3 can still communicate
with the other two nodes over fiber segment B1-3. A chain of communication still
remains between all three nodes (segment A1-2 and B1-3).
Furthermore, the Dual-Channel Link will insure all data arrives at both the A and B
channels within the 1.6µs skew time. For the dual-ring configuration, it is still very
important that each Dual Self-Healing ring module remains powered to insure that this
skew time is met and each node stays on-line. Weed Instrument highly recommends the
use of redundant power supplies to insure a constant power source at each Dual SelfHealing ring module. Used in conjunction with the fault indication system that comes
with every Self-Healing Ring module any power supply fault, fiber fault, or dual-channel
link fault can be identified and quickly remedied. For more information on the SelfHealing Ring module alarm system refer to the Fault Indicators sections of this manual.
Figure 3-7
20
EOTec 2000 ControlNet™ Ring Communications Manual
Network Configurations
Network Configuration Tips
The following applications tips are provided to help plan and install ControlNet networks.
•
Plan the network wiring to minimize the number of connections and the
length of the network cables. Simple and short is always better. When
planning your network using EOTec 2C31 Self-Healing and EOTec 2C32
Dual Self-Healing Ring modules, refer to the Planning a Network section
of this manual.
•
While ControlNet supports up to 99 nodes, ControlNet has a limitation of
48 nodes per coax segment. Coax can communicate up to 1000 meters,
but for each tap added 16.3 meters must be subtracted from this overall
segment length. See Understanding Coax Limitations for more details.
•
Another limitation is the propagation delay for the entire network (121µs)
which amounts to approximately 20 kilometers of optical fiber for the
entire network. Understanding this protocol limitation will help you to
design your network wisely. See Understanding Propagation Delay for
more details.
•
To ensure no unscheduled downtime always use two separate power
sources for each 2C31 or 2C32 module in your ControlNet system.
•
A dual-redundant configuration increases network reliability by providing
two alternative paths for message flow in the event of a network segment
or power failure. When a communication segment break occurs,
messages are automatically captured from an alternative communication
path as shown in figure 3-7.
•
Using the provided diagnostic features is the only way to ensure
maximum reliability of your ControlNet physical media layer.
•
Power supply relays provide monitoring from a remote location to easily
warn users immediately of any power failures.
•
The remote Link Alarm (2C32 only) provides assurance that no faulty
communication connection goes unnoticed. There is no such thing as an
unimportant fault in a dual-redundant system.
•
Using the Fiber 1 & 2 Remote Alarms allows users to replace or repair
faulty fiber before unscheduled down-time occurs.
•
Employing the 4-20mA optical diagnostic ports to monitor optical power
levels (light intensity) provides users with a real-time early warning of any
deteriorating optic fiber and/or connections.
21
EOTec 2000 ControlNet™ Ring Communications Manual
Planning and Installation
4
Planning and Installation
This section discusses the limitations of ControlNet and explains how to plan and install
your network, and provide advice and application tips to avoid common pitfalls.
Planning a Network
The ControlNet Shelf-Healing Ring system gives you the flexibility to design a
communication ring network for your particular application. To take full advantage of this
flexibility, you should spend sufficient time planning how to install your network before
assembling any of the hardware.
Create a project plan and checklists to help you determine the components needed for
your application.
•
•
•
•
•
•
•
Determine how many nodes (taps) will be in each coax segment
Determine the length of the coax segments and the need for electrical repeaters
Determine the length of the fiber segments
Decide the type of fiber cable and connections to use
Determine how many fiber connectors you will need
Calculate the maximum allowable segment length
For dual ring, determine a separate fiber path for channel-B ring
Understanding EOTec/ControlNet Terminology
It is important when planning and installing a ControlNet network to understand the
proper terminology used. Below in tables 4-1a, 4-1b is a list of commonly used terms.
Term
Description
BNC Connector
Type of connectors used for coax electrical connections. Used on all
EOTec 2C31 and 2C32 modules.
Trunk-cable sections connecting nodes via taps with a terminator at
each end.
A communication port required with the EOTec 2C32 and dual selfhealing ring communications. Connects the ring module on channel-A
to the ring module on channel-B. Allows data to pass between
channel A and B.
Communication cable used to connect two 2C32s together at the
Dual-Channel Link Port. Looks similar to Cat5 Ethernet cable, but is
not.
Optic fiber cable used to connect two different connector types, e.g.,
LC to SC connectors. Also see Patch Cord (Patch Panel Cable).
A length of fiber optic cable connecting two optical modules or two
coax segments.
Coax Segment
Dual-Channel Link
Port
Dual-Channel Link
Cable
Fiber Conversion
Cable
Fiber Segment
Table 4-1a
22
EOTec 2000 ControlNet™ Ring Communications Manual
Planning and Installation
Term
Description
LC Connector
Miniature type of connectors commonly used for terminating fiber optic
cables.
A link is another word for cable connection.
See Dual-Channel Link Cable.
See Dual-Channel Link Port
A network is the collection of nodes connected together by segments
(coax or fiber).
Any physical device connecting to the ControlNet media system which
requires a network address in order to function on the network. A
network may contain up to a maximum of 99 nodes. This node
address must be in the range of 1 - 99 and be unique to that network.
A communication module used to convert from multi-mode to single
mode fiber.
Cable used to attach a device to a patch panel.
A second power supply used to insure EOTec ring modules always
remain powered.
Link
Link Cable
Link Port
Network
Node
Optical Converter
Patch Cord
Redundant
Power Supply
Ring Module
SC Connector
Segment
Self-Healing Ring
Module
ST* Connector
Tap
Terminator (coax)
Trunk Cable
See Self-Healing Ring Module.
Type of connectors commonly used for terminating fiber optic cables.
A segment consists of either coax or fiber cable and connects two or
more devices.
A communication module used to connect devices in a ring
configuration. Provides additional communication paths around bad
fiber and/or hardware.
Type of connectors commonly used for terminating fiber optic cables.
*ST is a registered trademark of AT&T
The coax connection between any device and the ControlNet media
system. Contains an electrical circuit and must be used to connect all
ControlNet devices to the coax trunk line.
A 75Ω terminator must be installed on the 2 taps at each end of every
coax segment.
The trunk cable is the bus, or central part of the ControlNet Coax
media system. The trunk cable can be composed of multiple sections
of cable. The standard cable used to construct trunk-cable sections is
quad shield RG-6 type Coax.
Table 4-1b
23
EOTec 2000 ControlNet™ Ring Communications Manual
Planning and Installation
Understanding Coax Limitations
For any ControlNet network it is important to understand the limitations of the coax
connections. While the best designed rings will contain very little coax, rings can be
formed as a central hub of a network with other topologies connecting into this ring.
Refer to the Supported Network Configurations section of Chapter 3 for more information
on connecting other topologies (point-to-point; star, daisy-chain) into a star network.
The total allowable length of a segment containing standard RG-6 quad shield cable
depends upon the number of taps in your segment. There is no minimum trunk-cable
section length requirement. The maximum allowable total length of a segment is 1,000
meters with two taps connected. Each additional tap decreases the maximum length of
the segment by 16.3m. The maximum number of taps allowed on a segment is 48 with a
maximum segment length of 250m as shown in figure 4-1.
Example: If your segment requires 16 taps,
the length for each segment is:
1000m – [16.3m x (16 – 2)]
1000m – (16.3m x 14)
1000m – 228.2m = 771.8m
Figure 4-1
Understanding When to Use Repeaters
You need to install repeaters when your network configuration requires more than 48
taps or a longer trunk cable is needed than the ControlNet specification allows (see
Understand Coax Limitations). ControlNet repeaters are only useful in network
topologies that connect into an EOTec self-healing ring and can not be included inside
the ring itself.
ControlNet allows for a maximum of 99 addressable nodes. Repeaters do not require an
address so they do not count against the total of 99. As many as 48 tap connections are
allowed on a maximum segment length of 250m (all coax cable must total to less than
250m). An electrical repeater can be used locally (distances up to 1000m) or for longer
distances an optical repeater can be installed.
For more information on using electrical and optical repeaters see the accompanying
EOTec 2000 ControlNet User Manual.
24
EOTec 2000 ControlNet™ Ring Communications Manual
Planning and Installation
Understanding the Benefits of Fiber
Fiber has benefits over electrical coax cable. Table 4-2 lists many of these benefits
Feature
Benefit
No Ground Potential
Fiber carries no electrical current so it is completely isolated
from any potential electrical sources that cause disruptions on
copper media and provides immunity to lightning strikes.
No EMI
Fiber is made of glass so it is immune to EMI (ElectroMagnetic
Interference).
Use Fiber in noisy environments such as
heavy machinery and multiple cable systems where copper
could suffer communication disruptions. Fiber is also a great
choice for high-voltage environments.
No Sparks
Fiber conducts light not electrical pulses so it is a safe choice
for carrying data communication through hazardous areas.
Less Signal Loss
Fiber media carries data using light pulses not electrical
current. Thus fiber can carry data much greater distances.
Greater distance between repeaters means that fewer
repeaters are needed between long distance nodes.
Less Size and Weight
Fiber cables are much smaller and lighter than coax cables.
Table 4-2
Understanding Fiber Limitations
While fiber has many benefits over coax there are limitations too. Every network that
uses fiber must maintain a minimum signal level for each fiber segment in order to
achieve effective signal strength. Attenuation of a fiber segment is effected by the
quality of the termination at each connector, splices, bulkheads and the fiber cable itself.
At any time, the total amount of attenuation shall not exceed the optical power budget of
the optical repeater module used. See Understanding Fiber Attenuation for more
information on optical power budget.
Understanding Optical Transceivers
When choosing a self-healing ring module to use in your configuration, a commonly
asked question is “What particular cable type is used with a particular module?” You
must select a module (and the corresponding cable type) based on economics and the
distance you want the data to travel. There are two types of fiber cable: single and multimode. These two cable types differ in that single mode cable allows light to travel in a
single path. Multi-mode cable allows light to travel in multiple paths. Single-mode cable
is generally used in longer-distance applications (see table 4-3).
The maximum length of a fiber cable section for the optical transceivers used in each
ring module is dependent on the quality of the fiber, number of splices, and the number
of connectors. When estimating maximum cable length, take into account attenuation
that occurs along the entire fiber path. Attenuation refers to the decay in the strength of
the light signal along the cable path. Consult your local distributor for attenuation
specifications prior to purchasing your fiber media components.
25
EOTec 2000 ControlNet™ Ring Communications Manual
Planning and Installation
Table 4-3 below provides transceiver specifications to help in selecting the proper Weed
self-healing ring module for your application:
Optical Transceiver Specifications
Model
Fiber Type
2C31-LC-MM/MM
Multi-mode
2C31-LC-SM/SM
Single mode
2C32-LC-MM/MM
Multi-mode
2C32-LC-SM/SM
Single mode
Max Optical Dynamic Range,
Fiber Size
11 dB into 62.5/125μm fiber
7.5 dB into 50/125μm fiber
19 dB into 9/125μm fiber
11 dB into 62.5/125μm fiber
7.5 dB into 50.5/125μm fiber
19 dB into 9/125μm fiber
Typical Max
Distance (mi/km)
2.5mi/4km
1.9mi/3km
12.4mi/20km
2.5mi/4km
1.9mi/3km
12.4mi/20km
Table 4-3
Understanding Fiber Attenuation
Before selecting the proper transceiver to use in your application, you must first calculate
the power budget for the fiber cable lengths in your plan. But, remember if you install
longer distance fiber cables, install bulkhead connectors or fusion splices, expose the
cable to multiple sharp bends, or employ different quality cable or connector types, you
must recalculate your attenuation levels. Use the example below to help you understand
how to determine fiber attenuation levels of your fiber cables.
From table 4-3 above, you can see the maximum optical dynamic range or power budget
for a 2C32-LC-MM/MM Module is 11dB using 62.5/125µm fiber. This means that the
maximum amount of attenuation of light between this module and the one connected at
the other end of the fiber can not exceed 11dB. This power budget is valid throughout
the operating temperature range (0º to +60º C). If you modify the cables with splices or
connectors then you must recalculate the attenuation levels.
Use the steps in table 4-4 to determine the correct fiber attenuation for selecting the
correct EOTec self-healing ring modules for your application.
Step Description
Explanation
1
Determine total power budget
Given the application, the size of the network, and
fiber type, how much total loss (dB) is expected and
allowed?
2
Determine insertion loss – Add
up the loss from connectors,
splices, bulkhead, etc.
Account for all added attenuation from insertion loss
on the fiber segments. Do not include the two
connectors on the ends of each fiber cable.
3
Determine cable loss – Add up
the loss from all cable lengths.
Select fiber cable and identify typical power loss.
Loss = loss of light over 1 kilometer (dB/km)
4
Compare and select
Total loss of light cannot be greater than the power
budget or optical dynamic range of the selected
optical module (transceiver).
Table 4-4
26
EOTec 2000 ControlNet™ Ring Communications Manual
Planning and Installation
If the total power loss (sum of Steps 2 & 3) is less than the power budget of the selected
optical module (Step 1), then you are within the power budget. If however, the power
loss (sum of Steps 2 & 3) is greater than the power budget, then you will need to
reconfigure the topology, shorten cable lengths, or select a ring module with a different
transceiver.
Example: This example is for a multi-mode fiber connection going through 2 panel
connectors, 1 bulkhead and one spliced fiber cable to a mating fiber
connection 5 kilometers away.
•
•
•
•
Optical module power budget from Table 4-3
o 2C32-LC-MM/MM = 11dB @1300nm – Multi-Mode (MM)
o 2C32-LC-SM/SM = 19dB @1300nm – Single Mode (SM)
Fiber cable (62.5/125µm) having an attenuation of 1.5dB/km @ 1300nm
Fiber cable (9/125µm) having an attenuation of 0.5dB/km @ 1300nm
For insertion loss, subtract a minimum attenuation of 1dB for each added
connector, splice, patch panel, bulkhead, etc. (not to include the terminating
connectors on each end of fiber).
Insertion Loss (dB)
The attenuation lost from connectors, splices, patch panel, bulkhead, etc.
Insertion Loss = (2 panels + 1 bulkhead + 1 splice) x (minimum connector attenuation)
= 4 x 1dB
= 4dB
Cable Loss (dB)
The attenuation lost from the cable length required to connect the link.
Cable Loss for MM =
=
Cable Loss for SM =
=
5 kilometers x 1.5dB (typical attenuation for 62.5/125µm @ 1300nm)
7.5dB
5 kilometers x 0.5dB (typical attenuation for 9/125µm @ 1300nm)
2.5dB
Total Attenuation (dB)
The total attenuation lost from both inserted devices and cable length.
Total attenuation = (cable loss) + (insertion loss)
Total Loss MM = 7.5dB + 4dB (62.5/125µm @ 1300nm)
= 11.5dB @ 1300nm (required power budget)
Total Loss SM = 2.5dB + 4dB (9/125µm @ 1300nm)
= 6.5dB @ 1300nm (required power budget)
The total attenuation accumulated over this 5 kilometer segment is 11.5dB so as shown
in table 4-3 the 2C32-LC-MM/MM model using 62.5/125µm fiber is under budget (11dB)
for this application and should not be used. However, this application is well within the
budget of the 2C32-LC-SM/SM model using 9/125µm fiber (19dB) so it is a good choice
to use in this application. Also, if single mode fiber is preferred then the 2C32-LCSM/SM module is the obvious choice to make.
27
EOTec 2000 ControlNet™ Ring Communications Manual
Planning and Installation
Understanding Propagation Delay
The ControlNet Maximum Propagation Delay specification refers to the worst case signal
delay between any two nodes on a network. You will need to figure out the worst case
scenario based on media distances and the number of EOTec modules which the data
signals will pass through. You should be aware that this does not mean all media and
EOTec modules in your network; only the media and modules that link the two furthest
nodes of your system.
Network delays include the delays through coax and fiber media and the EOTec SelfHealing Ring modules you are planning to use. Use Example 1 and Example 2 to help
you understand which media and Weed modules to use when calculating maximum
propagation delay.
In order for a network to operate, the sum of the network’s delays must be equal to or
less than the ControlNet specified maximum propagation delay of 121μs. The
total network allowable delay each way is 121μs. The propagation delays through taps
are minimal and can be ignored.
Listed in table 4-5 are delay values for EOTec ControlNet devices and media:
Media Item
Propagation Delay Time
2C31
1µs/module
2C32
1µs/module
RG-6 Coax Cable
4.17µs/km or 1.27µs/1000 ft
Multi-mode Fiber
5.01µs/km or 1.53µs/1000 ft
Single Mode Fiber
5.01µs/km or 1.53µs/1000 ft
Table 4-5
28
EOTec 2000 ControlNet™ Ring Communications Manual
Planning and Installation
Example 1: Maximum Delay (Single Channel)
The following example (figure 4-2) shows a single-channel Self-Healing Ring network
designed with both coax and optical fiber segments. Each delay in the network is
marked D1 through D10. It is important to note that maximum delay time is based on
the maximum number of ring modules and maximum length of the media used between
the two nodes that are furthest apart from each other in the network system.
Single Self-healing Ring
Figure 4-2
With ring networks the physical media forms a physical ring of optic fiber. Data packets
are transmitted in both directions around the ring. As shown in figure 4-2, when Node-1
communicates with Node-2 it transmits the packet from the ring module marked D2 in
both the clockwise and counter-clockwise directions. In this way, one of the 3 fiber
segments shown (D3; D7; D10) can be broken, but communication will still continue.
However, one of the two paths shown in figure 4-2 will be longer and two of the four
nodes will be the furthest distance apart from each other. Worst case delay is calculated
using only this longest delay path. This is to insure that the Network Update Time (NUT)
has been calculated on the longest possible network distance no matter where the fiber
breaks.
In a ring, since any two nodes will have two paths of communication between them; both
must be calculated to understand which is the longest. Since Node-2 and Node-3 share
a coax segment only the node furthest from the ring (Node-2) needs to be calculated
with the two other nodes (Node-1; Node-4). Node-3 is always closer (see figure 4-2).
As shown in tables 4-6 and 4-7, the counter-clockwise path is over twice as long as the
clockwise path between nodes 1 and 2. Both paths between nodes 1 and 3 are much
shorter than counter-clockwise path of nodes 1 and 2 (see tables 4-8 and 4-9).
However, as you see in table 4-10 the clockwise path between nodes 2 and 4 is the
short in the ring and therefore the counter-clockwise is the longest path so the figures in
table 4-11 are to be used to calculate the worst case propagation delay.
While nodes 1 through 4 are shown using a *ControlLogix™ 1756 chassis, they are interchangeable
with any ControlNet controller using BNC connectors.
* ControlLogix is a registered trademark of Rockwell Automation
29
EOTec 2000 ControlNet™ Ring Communications Manual
Node-1 to Node-2 Clockwise
Delay
Description
Planning and Installation
Node-1 to Node-2 Counter-Clockwise
Total (µs)
Delay
Description
Total (µs)
D1
6m (coax) x 4.17ns =
0.0250
D1
6m (coax) x 4.17ns =
0.0250
D2
1 x 1µs =
1.0000
D2
1 x 1µs =
1.0000
D3
3556m (fiber) x 5.01ns =
17.8156
D10
7018m (fiber) x 5.01ns =
D4
1 x 1µs =
1.0000
D8
1 x 1µs =
D5
6m (coax) x 4.17ns =
0.0250
D7
2534m (fiber) x 5.01ns =
D6
835m (coax) x 4.17ns =
3.4820
D4
1 x 1µs =
1.0000
023.3476
D5
6m (coax) x 4.17ns =
0.0250
D6
835m (coax) x 4.17ns =
3.4820
Total Propagation Delay__
Table 4-6
35.1602
1.0000
Total Propagation Delay
12.6953
054.3875
Table 4-7
Node-1 to Node-4 Clockwise
Delay
Description
Node-1 to Node-4 Counter-Clockwise
Total (µs)
Delay
Description
D1
6m (coax) x 4.17ns =
0.0250
D2
1 x 1µs =
D3
3556m (fiber) x 5.01ns =
D4
1 x 1µs =
D7
2534m (fiber) x 5.01ns =
D8
1 x 1µs =
1.0000
Total Propagation Delay
D9
6m (coax) x 4.17ns =
0.0250
Table 4-9
Total Propagation Delay__
Total (µs)
D1
6m (coax) x 4.17ns =
0.0250
1.0000
D2
1 x 1µs =
1.0000
17.8156
D10
7018m (fiber) x 5.01ns =
1.0000
D8
1 x 1µs =
1.0000
12.6953
D9
6m (coax) x 4.17ns =
0.0250
35.1602
37.2102
33.5609
Table 4-8
Node-2 to Node-4 Clockwise
Delay
Description
Node-2 to Node-4 Counter-Clockwise
Total (µs)
Delay
Description
Total (µs)
D6
835m (coax) x 4.17ns =
3.4820
D6
835m (coax) x 4.17ns =
3.4820
D5
6m (coax) x 4.17ns =
0.0250
D5
6m (coax) x 4.17ns =
0.0250
D4
1 x 1µs =
1.0000
D4
1 x 1µs =
1.0000
D7
2534m (fiber) x 5.01ns =
12.6953
D3
3556m (fiber) x 5.01ns =
D8
1 x 1µs =
1.0000
D2
1 x 1µs =
D9
6m (coax) x 4.17ns =
0.0250
D10
7018m (fiber) x 5.01ns =
18.2273
D8
1 x 1µs =
1.0000
D9
6m (coax) x 4.17ns =
0.0250
Total Propagation Delay__
Table 4-10
1.0000
Total Propagation Delay
Table 4-11
30
17.8156
35.1602
59.5078
EOTec 2000 ControlNet™ Ring Communications Manual
Planning and Installation
The worst-case propagation delay of 56.4608µs shown in tables 4-11 is acceptable
because it is well within the maximum allowable network delay time of 121µs. These are
also the devices and media that you will use to verify your network parameters. Refer to
the Verifying Network Parameters section later in this chapter to learn more about proper
network verification techniques.
Getting to the Point-to-Point
The exercise in example-1 shows us how to calculate the worst-case propagation delay
for any two nodes (point-to-point). However, this could take quite some time in large
network systems so looking for easy ways to identify the longest link becomes handy
and straight to the point.
Did you notice in example-1 that the two paths between Node-2 and Node-3 (tables 4-10
& 4-11) are both the longest and the shortest lengths? This is true for any two points
plotted along a circle (or ring).
Rule 1: When you identify the shortest fiber segment, follow the reverse direction to the
same adjacent node and you have identified the longest communication path.
This is where the worst-case delay will be. If the shortest fiber segment
breaks, these two nodes must still be able to communicate taking the longest
path.
Rule 2: When your ring has no coax spurs as opposed to the coax segment where
Node-2 and Node-3 connect (shown in figure 4-2), then there is virtually no
coax cable to consider in the calculation. Simply remove the shortest fiber
segment from the calculation. Add up the delays of the remaining segments
and all the ring module delays and this is the path for your longest delay time.
Rule 3: If there are several long spurs coming off the ring, you may have more
calculations to perform to find the longest path. The device at the end of the
longest coax spur will be one of the two furthest nodes, but rules 1 and 2 may
not apply in configurations where coax segments are long and fiber segments
are very short.
Rule 4: Any device not directly connected to the ring, such as Node-2 in figure 4-2, will
not have a redundant path. If the coax cable marked D6 should break, Node-2
becomes isolated from the rest of the network. Another ring module should be
added so that all four nodes connect to the fiber ring and insure a secondary
path for all devices.
31
EOTec 2000 ControlNet™ Ring Communications Manual
Planning and Installation
Example 2: Maximum Delay (Dual Channel)
This example begins where the previous example left off with the same single
communication channel used in Example 1. However, now we will use a redundant
communication path (channel B) to insure greater reliability for this ControlNet system.
The cables for channel B must be routed in a different pathway from Channel A to insure
this greater redundant reliability. When the same cable trays or conduits are used then
there is a greater chance that both paths can be removed during the same unfortunate
accident.
For dual-channel systems, ControlNet transmits two identical packets at the same time.
To insure redundancy ControlNet also expects the two identical packets to be delivered
at approximately the same time. Since longer fiber equals a longer delay time, all fiber
segments for A and B channels must be approximately the same length. As it’s difficult
to route two separate paths of equal length, ControlNet allows for a skew in the
propagation delay or delivery time of packets between channels A and B. ControlNet
specifies this to be no greater than 1.6µs (channel-A to channel-B).
Dual Redundant Self-healing Ring
Figure 4-3
A skew of only 1.6µs does not seem like much, but when divided by the standard delay
time of 5.01ns/meter for typical optical fiber, this allows for roughly 319.36 meters or
1047.77 feet. A good rule of thumb to remember would be 300 meters of 1000 feet.
This is in excess of the length of 3 football fields.
32
EOTec 2000 ControlNet™ Ring Communications Manual
Planning and Installation
The total network delay time for channel-A can easily be calculated by adding up all the
delays found in example-1. Now a total for channel-B must be calculated. As you can
see in figures 4-12 and 4-13, the delay in channel-B is longer than channel-A.
If you remember what was learned from example-1, when determining the total network
delay time for a ring, it is not necessary to include all of the fiber segments. The
maximum delay in a ring network will occur when the shortest fiber segment is broken.
By looking again at tables 4-14 and 4-13 you will see that the fiber segment marked D7
is the shortest. Now by subtracting this out you will see that channel-B still has the
greatest maximum delay time so this is the maximum delay within the redundant network
illustrated in figure 4-3. As discussed before, this is far below the maximum network
update time of 121µs determined by the ControlNet specification.
By now comparing the two maximum delay times from tables 4-12 and 4-13, we can
determine the skew between channel-A and channel-B.
Channel-A Propagation Delay
Delay
Description
D1-a
Channel-B Propagation Delay
Total (µs)
Delay
Description
6m (coax) x 4.17ns =
0.0250
D1-b
6m (coax) x 4.17ns =
0.0250
D2-a
1 x 1µs =
1.0000
D2-b
1 x 1µs =
1.0000
D3-a
3556m (fiber) x 5.01ns =
17.8156
D3-b
3601m (fiber) x 5.01ns =
D4-a
1 x 1µs =
1.0000
D4-b
1 x 1µs =
1.0000
D5-a
6m (coax) x 4.17ns =
0.0250
D5-b
6m (coax) x 4.17ns =
0.0250
D6-a
835m (coax) x 4.17ns =
3.4820
D6-b
905m (coax) x 4.17ns =
3.7739
D7-a
2534m (fiber) x 5.01ns =
12.6953
D7-b
2496m (fiber) x 5.01ns =
12.5050
D8-a
1 x 1µs =
1.0000
D8-b
1 x 1µs =
1.0000
D9-a
6m (coax) x 4.17ns =
0.0250
D9-b
6m (coax) x 4.17ns =
0.0250
D10-a
7018m (fiber) x 5.01ns =
35.1602
D10-b
7194m (fiber) x 5.01ns =
Total Channel A Propagation Delay__ 72.2281
Total (µs)
18.0410
36.0419
Total Channel B Propagation Delay_
73.4368
Total Channel A Propagation Delay
72.2281
Total Channel B Propagation Delay
73.4368
Minus shortest fiber segment (D7)
12.6953
Minus shortest fiber segment (D7)
12.5050
Channel-A Maximum Delay Time
59.5328
Channel-B Maximum Delay Time
60.9318
Table 4-12
Table 4-13
A to B channel skew = 60.9318µs (ChB) – 59.5328 µs (ChA) = 1.399µs
This example shows a valid redundant network as the calculated skew between channel
A and B is 1.399µs; still below the maximum network skew of 1.6µs.
Now for those of you that have been paying very close attention, you may be saying to
yourself, “Wait just a minute! Shouldn’t the maximum delay time in table 4-12 be the
same as what was found in table 4-11?” Yes, it should, if you also subtract the delay
from the coax segment marked D1 (59.5328 – 0.0250 = 59.5078). However, when
remembering rule #2, short coax segments can normally be ignored when calculating
the maximum delay time of your network. Also, as you will soon find out when verifying
your network parameters the lowest length coax accepted by RSNetworx™ is 100m.
33
EOTec 2000 ControlNet™ Ring Communications Manual
Planning and Installation
Verifying Network Parameters
You can use *RSNetworx™ for ControlNet to determine whether or not your system
meets the network parameter requirements. Based on your system planned
requirements (NUT, SMAX, UMAX, types and length of cable, number and types of
repeaters and worst case network delay); RSNetworx will validate the network
configuration parameters. Once the parameters are validated, the software will tell you if
your configured network is acceptable. If your network is not valid, you must adjust your
planned requirements.
It is important to understand the application needs of the equipment within your network
before adjusting network parameters as these adjustments can keep devices from
communicating within an appropriate time frame. SMAX (maximum scheduled address)
and UMAX (maximum unscheduled address) will be used by RSNetworx to determine
the maximum addressable nodes that can communicate on the network. The NUT
(Network Update Time) determines the interval time for each node to communicate.
Upon entering RSNetworx, from the toolbar menu, select Networks and then Properties.
Enter your network parameters based on the application needs of your ControlNet
system. Next select Media Configuration, the information entered here will be used to
determine the maximum network propagation delay in your network. Enter the total
amount of coax (RG-6 Coax Cable), and fiber (Glass Fiber Cable) used to connect the
furthest two nodes in your system. These lengths will be expressed in meters and round
up to the nearest 100m. See Understanding Propagation Delay for further information
on which media segments to include.
Next, you must enter the types of devices used to communicate on the ControlNet
Physical Media Layer. You will notice that no Weed Instrument modules will be listed so
the next best option will be to use equipment listed that has similar delay times. You can
select the appropriate Rockwell devices from table 4-14 below that equals the Weed
Instrument device delay time in table 4-15. This means that for every EOTec SelfHealing Ring module (2C31 or 2C32) enter one 1786-RPA and one 1786-RPFRL.
When reviewing figure 4-2 and 4-3 note that number of devices to use is 3 (of each).
Enter the number of devices used to connect the furthest two nodes in your system. For
a ring this would include all ring modules as each node requires at least one ring
module. For dual rings both rings have the same number of ring modules so whichever
path is used the module delay time is the same. Count only one set of modules as if it
were a single ring.
Rockwell Automation
Weed Instrument
Device
Delay Time
Device
Delay Time
1786-RPA
901ns
2C31
1µs
1786-RPFRL
100ns
2C32
1µs
Table 4-14
Table 4-15
*RSNetworx™ is a registered trademark of Rockwell Automation.
34
EOTec 2000 ControlNet™ Ring Communications Manual
Planning and Installation
Installing a Network
Weed Instrument sells the necessary equipment to install a communication connection
on the physical media layer, but we do not offer installation services. Many customers
retain qualified professionals to plan, install, and maintain their ControlNet systems. If
your company does not retain such a staff we recommend you contract an installation
specialist. The specialist you choose should install your cable and terminate it following
the supplier’s installation instructions.
However, a specialist is not necessary to connect your EOTec 2000 ControlNet SelfHealing Ring modules. Anyone with installation experience that has read and
understands this manual can easily connect this equipment using the pre-installed
cables.
Whether you are installing or maintaining a ControlNet system keep the following
application tips in mind.
Coax Application Tips
The following applications tips are provided to help understand coax electrical networks.
•
Taps contain passive electronics and must be used for the network to
function properly. Other methods of connecting to a Coax trunk cable will
result in reflected energy that will disrupt communications.
•
A 75Ω terminator must be installed on the tap at each end of a segment.
•
You should always calculate the three-dimensional routing path distance
when determining cable lengths. Consider vertical dimensions as well as
horizontal dimensions.
•
When you install repeaters in series, use your ControlNet Network
management Software (RSNetWorx) to verify that the system is an
allowable configuration.
•
Do not let any metallic surfaces on the BNC connectors, plugs, or optional
accessories touch grounded metallic surfaces. This contact could cause
noise on the network
•
A disconnected drop cable can cause noise on the network. Because of
this, it is recommend having only one unconnected drop cable per
segment for maintenance purposes. Be sure to keep the dust cap on any
unconnected drop cable.
35
EOTec 2000 ControlNet™ Ring Communications Manual
Planning and Installation
Fiber Application Tips
The following applications tips are provided to help understand fiber optic networks:
•
•
•
Avoid lengthening your cable by joining sections with connectors.
Connectors can cause considerable attenuation and limit the maximum
length of your system. Be sure to measure the attenuation of all cable
sections (from both ends) after the cable is installed.
It is recommended that all fiber segments be specified, installed, verified,
and certified by a fiber optic specialist.
Use high-quality connectors and fiber cable to stretch your power budget.
Higher-quality connectors and cable can withstand a broader range of
temperatures and distances.
Redundant Network Tips
With redundant media, each node sends signals on two separate paths (channel-A and
channel-B). The receiving node compares the quality of the two signals and accepts the
better signal to permit use of the best signal. This also provides a backup
communication should one path fail.
Observe these guidelines when planning a redundant media system:
•
•
•
•
•
•
Route the cables for the two channels (channel-A and channel-B)
differently to reduce the chance of both channels being damaged at the
same time.
Each ControlNet node in a redundant network must be able to support
redundant Coax connections (ControlNet Bridge-Redundant - CNBR) and
be connected by two coax cables at all times. Any nodes connected to
only one side of a redundant-cable link will result in media errors on the
unconnected trunk cable.
Install the cable systems so that all cables at any physical device location
can be easily identified and labeled with the appropriate icon or letter.
Each redundant ControlNet device is labeled so you can connect it to the
corresponding cable.
Both channels (channel-A and trunk channel-B) of a redundant network
must have identical configurations. Each segment must contain the same
number of taps, nodes and ring modules. Connect all nodes, ring
modules and any required coax media communication devices needed in
the same relative sequence on both channel-A and channel-B.
Install cable on each side of a redundant system so that each cable is
about the same length. The total difference in length between the two
channels (skew time) of a redundant network goes up as the number of
nodes/modules increases.
The total delay time between the two redundant channels can not be
skewed by more than 1.6µs.
36
EOTec 2000 ControlNet™ Ring Communications Manual
Troubleshooting
5
Troubleshooting
Weed provides several solutions to help you diagnose trouble that may occur on the
ControlNet Physical Media Layer. Understanding the information in this section will help
to find the root cause of the problem and resolve it quickly.
Diagnosing Network Failures
Each EOTec 2000 ControlNet Self-Healing Ring module has LED indicators to help you
diagnose a communication failure when trouble occurs. Figure 5-1 below illustrates all
product features. For a more detailed review of product features, please visit Section 2
– Ring Module Overview for more information. There are also relay contacts that allow
these fault indicators to be accessed at a remote location. Understanding these
indicators will help you identify a network problem and resolve it quickly.
Figure 5-1
37
EOTec 2000 ControlNet™ Ring Communications Manual
Troubleshooting
Interrupting Fault Indicators
The following troubleshooting suggestions have been provided to assist you should you have
trouble with your EOTec 2000 ControlNet Modules.
Power Supply Indicators
Function
Power
(IN 1 & IN 2)
Indication
IN 1
IN 2
Solid
Green
Solid
Green
Action
Power is good (>15 or < 30Vdc).
Solid
Green
Solid
Red
Power not >15 or < 30Vdc at IN 2 input connector.
1. Check DC input at cage clamp connector.
2. Check fuse. Replace if blown.
3. If both input power and the fuses are good, replace
module.
Solid
Red
Solid
Green
Power not >15 or < 30Vdc at IN 1 input connector.
1. Check DC input at cage clamp connector.
2. Check fuse. Replace if blown.
3. If both input power and the fuses are good, replace
module.
Off
Power not supplied to both input connectors.
1. Check DC input at cage clamp connector.
2. Check fuses. Replace if blown.
3. If both input power and the fuses are good, replace
module.
Off
Electrical Interface Indicator
Function
ControlNet
Coax
Indication
Action
Solid Green
ControlNet Signal is good.
Flash Green
ControlNet Initialization. Happens only during network setup.
Flash Red/ Green
Solid Red
Off
Data error on ControlNet signal at coax trunk. The LED flashes
red 1 sec. for every bad packet. With enough errors, the light
will appear to be continuously red.
1. Check all BNC connectors on this coax segment.
2. Insure all 75Ω terminators are connected correctly.
3. Replace module and all devices on coax one at a time
until bad device is found.
Jabber Condition.
A ControlNet device is constantly transmitting onto coax.
No input communication from coax on BNC.
1. Check BNC connector and check the other end of the
coax to insure it is connected to another device.
2. Insure ring(s) only has one ‘Master’ module.
3. Replace module and all devices on coax one at a time
until bad device is found.
38
EOTec 2000 ControlNet™ Ring Communications Manual
Troubleshooting
Optical Interface Indicators
Function
Receive
(RX)
Indication
Action
Fiber 1 / Fiber 2
Solid Green
Flash Red/Green
Solid Red
Solid Green
Transmit
(TX)
Off
Module is receiving good data.
Module is receiving data with errors. The LED flashes red 1
sec. for every bad packet. With enough errors, the light will
appear to be continuously red.
1. Possible loose connector TX or RX on either end of fiber.
2. Possible bad transceiver TX or RX on either end of fiber.
3. Possible bad module TX or RX on either end of fiber.
No light received from transmitter.
1. Possible disconnected connector TX or RX on either end
of fiber.
2. Possible broken Fiber.
3. Possible bad transceiver TX or RX on either end of fiber.
4. Possible bad module TX or RX on either end of fiber.
Module is transmitting data. Default when transceiver is in.
No data is being transmitted.
1. Insure the transceiver is plugged in correctly.
2. Possible bad transceiver.
3. Possible bad module.
Link Active Indicator (2C32 Only)
Function
Link Active
Indication
Solid Green
Flash Red/Green
Solid Red
Action
Module is receiving good data and status signals.
Module is receiving data with errors. The LED flashes red 1
sec. for every bad packet. With enough errors, the light will
appear to be continuously red.
1. Possible loose connector on either end of cable.
2. Possible bad cable
3. Possible bad module on either end of fiber.
No data or status signals received.
1. Possible disconnected connector on either end of cable.
2. Possible broken cable.
3. Possible bad module on either end of cable.
39
EOTec 2000 ControlNet™ Ring Communications Manual
Troubleshooting
Remote LED / Relay Indicators
Function
LED
Action
Power
IN 1 / IN 2
Relays
Solid Green
Relay open. Module is receiving good power (>15 or < 30Vdc).
Solid Red
Relay closed. Module is receiving bad power (<15 or > 30Vdc).
See Power Supply Indicators for detailed troubleshooting
information.
Solid Green
Fiber 1 / Fiber 2
Relays
Link Relay
(2C32 Only)
Global Relay
Solid Red
Solid Green
Solid Red
Solid Green
Solid Red
Relay open. Module is receiving good data.
Relay closed. Module is receiving data with errors or no light is
received from transmitter. See Optical Interface Indicators for
detailed troubleshooting information.
Relay open. Module is receiving good data and status.
Relay closed. Module is receiving bad data and status. See
Link Active Indicator for detailed troubleshooting information.
Relay open. No faults within the ring(s).
A fault has occurred in the ring(s)
1. Red Global with no other red LEDs = Good module
2. Red Global with red power LED = Power alarm. See
Power Supply Indicators for detailed troubleshooting
information.
3. Red Global with red fiber LED = Fiber alarm. See the
Optical Interface Indicators for detailed troubleshooting
information.
4. Red Global with red Link LED = Link alarm. See Link
Active Indicator for detailed troubleshooting information.
40
EOTec 2000 ControlNet™ Ring Communications Manual
Default Settings
6
Default Settings
This chapter lists the factory default settings when an EOTec ControlNet Self-Healing
Ring module comes out of the box. Use this information to make any changes that may
be necessary for tailoring each module to your exact network needs.
Default Settings
The EOTec 2C31 ControlNet Self-Healing Ring module (SHR) and 2C32 ControlNet
Dual Self-Healing Ring module (DSHR) come preset in the Master position. See
Master/Slave Switch section for more information on setting this switch to meet your
specific network needs.
2C31
2C32
There are no jumper changes needed to configure your EOTec ControlNet Self-Healing
Ring modules for any ControlNet network requirements.
41
EOTec 2000 ControlNet™ Ring Communications Manual
Technical Specifications
A
Technical Specifications
General Specifications
Maximum nodes
Maximum taps per segment
Maximum coax cable length
Trunk connection
Coax cable connection
Data rate
Propagation delay
Coax propagation delay
Fiber propagation delay
Mounting
Input Voltage
Inrush current, maximum
Alarm Output Contacts
Rating Maximum
Diagnostic Output
Loop Resistance
Transient Spike Protection
Mean time between failures (MTBF)
Operating temperature range
Storage temperature range
Humidity (non-condensing)
99 nodes supported
48 (using coax cable length of 250m maximum)
1000m (when connected to only 2 taps)
Anywhere on the trunk via ControlNet Tap with 1m
drop cable required
BNC
5M baud
1µs maximum per link pair
4.17µs/km
1.27µs/1000ft
5.01µs/km
1.53µs/1000ft
35mm DIN Rail
15-30Vdc; Nominal 24Vdc @ 333mA Quiescent (8W)
1A @ 24Vdc
DPDT (Form-C) relay
220Vdc, 250Vac
1A Switching Current
1A Carrying Current
4 to 20mA loop signal
1000Ω @ 24Vdc; Adjust ±50Ω / Volt Change
1500 W 25° C (10 X 1000µs)
471,361 Operating Hours MIL-HDBK-217F (25°C)
0 to +60 °C
-40 to +85 °C
5 to 95% RH
EMC immunity – EN 61326-1:1998
LVD:73/23/EEC
RoHS Directive 2002/95/EC; WEEE Directive 20021 961 EC
Hazardous locations
FM Approved: Class I, Division 2, Groups A, B, C, & D, T4
CSA C22.2 No 142 and C22.2 No 213
Optical Wavelength
Communication Data Range
Optical Port Connection
1310nm
Up to 155 Mbps
Duplex LC connector - other connectors options
available, see datasheet for accessories
See Optical Transceiver Specification below.
UL 94V-0
See Dimensions section in this manual.
Optical Dynamic Range
Packaging (polyamide)
Dimensions
42
EOTec 2000 ControlNet™ Ring Communications Manual
Dimensions
Triple Wide Modules
Module Type
Model Numbers
SHR, DSHR
2C31, 2C32
43
Technical Specifications
EOTec 2000 ControlNet™ Ring Communications Manual
Product Series
B
Self-Healing Ring Product Series
The following table will help in selecting the appropriate EOTec 2000 ControlNet™ Self-Healing
Ring module for your specific needs. Choose either 2C31 (single ring) or 2C32 (dual ring)
modules for the type of ring that meets your system configuration needs. Then select the
appropriate module number that matches fiber type and size that is suitable for your application.
Optical Transceiver Specifications
Model
Number
Ring
Type
Fiber
Type
2C31-LC-MM/MM
Single
Multi-mode
2C31-LC-SM/SM
Single
Single mode
2C32-LC-MM/MM
Dual
Multi-mode
2C32-LC-SM/SM
Dual
Single mode
Max Optical Dynamic Range,
Fiber Size
Typical Max
Distance (mi/km)
11 dB into 62.5/125μm fiber
7.5 dB into 50/125μm fiber
19 dB into 9/125μm fiber
11 dB into 62.5/125μm fiber
7.5 dB into 50.5/125μm fiber
19 dB into 9/125μm fiber
2.5mi/4km
1.9mi/3km
12.4mi/20km
2.5mi/4km
1.9mi/3km
12.4mi/20km
When selecting Dual Self-Healing Ring (DSHR) modules, an additional cable must be purchased
to connect these modules at each ControlNet™ node linking ring A to ring B (see network
configurations for more information). Select from the following cable options:
Available Dual Channel Cables
Part Number
Length
2LNK-1M
2LNK-3M
1 Meter
3 Meters
Each EOTec 2000 ControlNet™ Self-Healing Ring module has two transceivers, so if an optical
converter is what meets your needs, Weed can easily provide the following solutions.
Available Optical Converters
Model
Number
2C31-LC-SM/MM
2C32-LC-SM/MM
Ring
Type
Single
Dual
Fiber
Type
Max Optical Dynamic Range,
Fiber Size
Typical Max
Distance (mi/km)
Single mode
19 dB into 9/125μm fiber
12.4mi/20km
Multi-mode
11 dB into 62.5/125μm fiber
7.5 dB into 50/125μm fiber
2.5mi/4km
1.9mi/3km
Single mode
19 dB into 9/125μm fiber
12.4mi/20km
Multi-mode
11 dB into 62.5/125μm fiber
7.5 dB into 50/125μm fiber
2.5mi/4km
1.9mi/3km
44
EOTec 2000 ControlNet™ Ring Communications Manual
Product Series
Additionally, patch cords can be purchased from Weed to convert from your standard optical fiber
termination to the LC connectors on the Self-Healing Ring modules. Choose from the following
available options.
Accessories – Patch Cord Conversion Cables
Part Number
Description
Length
Fiber Type/Size
Conversion
62-LC-ST-2M
62-LC-LC-2M
62-LC-SC-2M
50-LC-SC-2M
50-LC-LC-2M
50-LC-SC-2M
9-LC-SC-2M
9-LC-LC-2M
9-LC-SC-2M
Duplex Fiber Patch Cord
Duplex Fiber Patch Cord
Duplex Fiber Patch Cord
Duplex Fiber Patch Cord
Duplex Fiber Patch Cord
Duplex Fiber Patch Cord
Duplex Fiber Patch Cord
Duplex Fiber Patch Cord
Duplex Fiber Patch Cord
2 Meters
2 Meters
2 Meters
2 Meters
2 Meters
2 Meters
2 Meters
2 Meters
2 Meters
MM / 62.5/125µm
MM / 62.5/125µm
MM / 62.5/125µm
MM / 50/125µm
MM / 50/125µm
MM / 50/125µm
SM / 9/125µm
SM / 9/125µm
SM / 9/125µm
LC to ST
LC to LC
LC to SC
LC to ST
LC to LC
LC to SC
LC to ST
LC to LC
LC to SC
If the cable conversion you require is not listed, please contact our factory for availability.
45
EOTec 2000 ControlNet™ Ring Communications Manual
Service Information
C
Service Information
Technical Support and Service
For technical support, please go to our website at:
www.weedinstrument.com/contact_us/technical.html
Installation and Operation
Our professionals guide you through the installation and operation of your new product so that it
is efficiently operational in the minimum amount of time. Weed Instrument also helps you install
options and upgrades to ensure that your product is successfully enhanced with more
performance and new capabilities.
Troubleshooting
Should you have a question regarding the operation of your instrument or its perceived
malfunction, the technical support experts will help you determine the issue and offer you the
best possible solution. Before contacting us, please go to our website at
www.weedinstrument.com/contact_us/tech_support/troubleshooting.html and determine if
any of the troubleshooting tips solve your problem.
Service and Repair
If you need service or repair, please go to our website at:
www.weedinstrument.com/contact_us/tech_support/service.html
1. Click the link for the RETURN MATERIAL AUTHORIZATION FORM. This must be filled
out completely in order to obtain a Return Material Authorization Number (RMA#) from
Weed Instrument.
2. The RMA# must be marked on the outside of the box prior to shipping the unit to us for
repair or calibration.
3. You are responsible for fully decontaminating your unit prior to shipment. If we receive a
contaminated product we reserve the right to have it removed and destroyed by a HAZ
MAT team at the owner’s expense.
4. Once the form is complete, please send to Weed Instrument by clicking on the Submit
button. You will be given an RMA number within 24 hours. If you need the RMA#
immediately, please call after sending it and a Service Administrator will give you the
number verbally.
46
47
Part Number: RM0900194
Revision:
11/08